You’re in for a treat! Bacon isn’t just for breakfast anymore—it’s the star of the show in these 18 mouthwatering appetizer recipes. Whether you’re hosting a game day party, looking for the perfect holiday snack, or just craving something irresistibly savory, we’ve got you covered. Get ready to impress your guests and satisfy those bacon cravings with these creative and delicious ideas. Let’s dive in!
Bacon-Wrapped Jalapeno Poppers
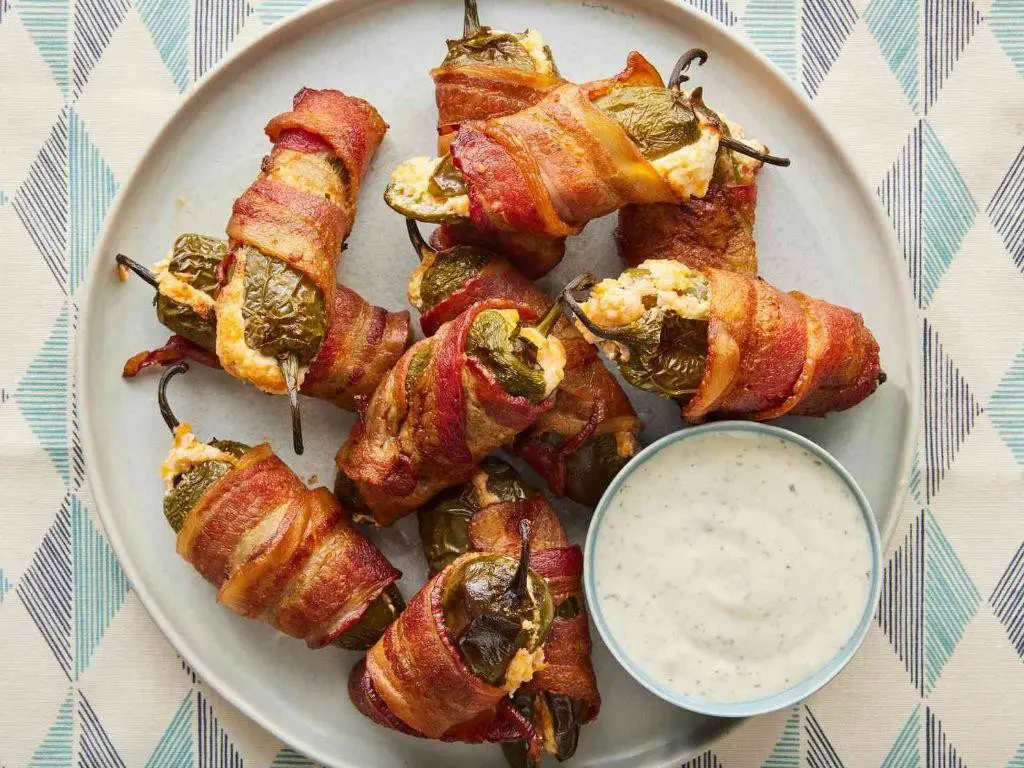
Whisper the name ‘Bacon-Wrapped Jalapeno Poppers’ at any gathering, and watch as eyes light up with anticipation. This dish, a harmonious blend of spicy, creamy, and smoky flavors, wrapped in a crisp bacon embrace, is the epitome of crowd-pleasing appetizers.
Ingredients
- 12 fresh jalapenos (look for uniform size for even cooking)
- 8 oz cream cheese, softened (for easier mixing)
- 1 cup shredded cheddar cheese (sharp for more flavor)
- 1/2 tsp garlic powder (adjust to taste)
- 12 slices bacon (thin-cut works best for wrapping)
- 1 tbsp olive oil (or any neutral oil, for greasing)
Instructions
- Preheat your oven to 375°F (190°C) and lightly grease a baking sheet with olive oil to prevent sticking.
- Slice each jalapeno in half lengthwise; use a spoon to carefully remove the seeds and membranes for less heat.
- In a medium bowl, combine the softened cream cheese, shredded cheddar, and garlic powder until well blended.
- Fill each jalapeno half with the cheese mixture, ensuring it’s packed but not overflowing.
- Wrap each stuffed jalapeno with a slice of bacon, securing the ends underneath to prevent unraveling during baking.
- Arrange the poppers on the prepared baking sheet, spacing them about an inch apart for even cooking.
- Bake for 20-25 minutes, or until the bacon is crispy and the cheese is bubbly and slightly golden.
- Let the poppers cool for 5 minutes before serving to allow the cheese to set slightly.
These Bacon-Wrapped Jalapeno Poppers emerge from the oven with a perfect contrast of textures: the crisp bacon exterior gives way to a creamy, spicy interior. Serve them atop a rustic wooden board for a visually appealing presentation that invites guests to dive in.
Maple Bacon Crackers
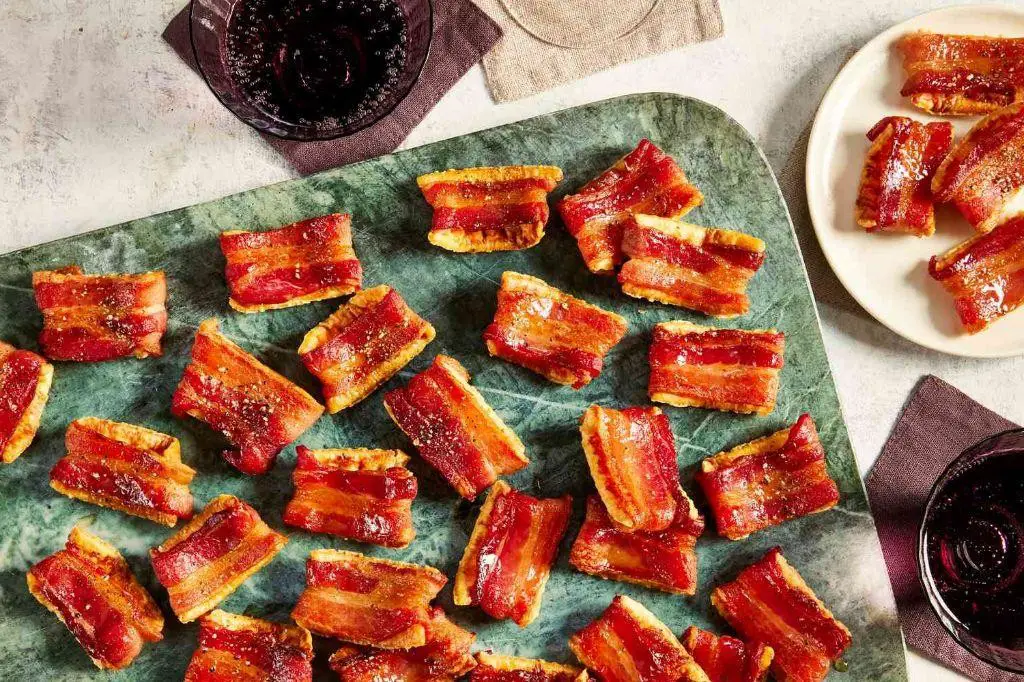
Savory meets sweet in this irresistible snack that combines the smoky depth of bacon with the rich, caramel-like sweetness of maple syrup. These Maple Bacon Crackers are the perfect blend of flavors and textures, making them an ideal choice for gatherings or a sophisticated treat to enjoy with your afternoon tea.
Ingredients
- 1 sleeve of saltine crackers (about 40 crackers)
- 1/2 cup unsalted butter, melted (for a richer flavor, use European-style butter)
- 1/2 cup pure maple syrup (grade A for a lighter flavor, grade B for deeper)
- 1/2 cup brown sugar, packed (light or dark, depending on preference)
- 8 slices of thick-cut bacon, cooked until crisp and crumbled (reserve 1 tbsp of bacon fat)
- 1/4 tsp cayenne pepper (optional, for a subtle heat)
Instructions
- Preheat your oven to 350°F (175°C) and line a baking sheet with parchment paper for easy cleanup.
- Arrange the saltine crackers in a single layer on the prepared baking sheet, ensuring they are close but not overlapping.
- In a medium bowl, whisk together the melted butter, maple syrup, brown sugar, reserved bacon fat, and cayenne pepper until well combined.
- Evenly drizzle the maple mixture over the crackers, using a spoon to spread it gently if necessary to cover each cracker.
- Sprinkle the crumbled bacon evenly over the top of the crackers, pressing lightly to adhere.
- Bake in the preheated oven for 10-12 minutes, or until the topping is bubbly and the edges of the crackers begin to turn golden brown.
- Remove from the oven and let cool on the baking sheet for 5 minutes before transferring to a wire rack to cool completely.
Maple Bacon Crackers emerge from the oven with a delightful contrast of crispy and chewy textures, their flavor profile a harmonious balance of sweet, salty, and smoky. Serve them as a standalone snack or crumble over a bowl of vanilla ice cream for an unexpected dessert twist.
Bacon and Cheese Stuffed Mushrooms

Kickstart your culinary adventure with these Bacon and Cheese Stuffed Mushrooms, a dish that marries the earthy depth of mushrooms with the rich, smoky flavors of bacon and melted cheese. Perfect for entertaining or a cozy night in, these bite-sized delights are sure to impress with their elegant presentation and irresistible taste.
Ingredients
- 24 large white mushrooms (about 1.5 inches in diameter, stems removed and reserved)
- 6 slices bacon (finely chopped, for a crispier texture)
- 1/2 cup cream cheese (softened, for easier mixing)
- 1/4 cup grated Parmesan cheese (freshly grated for best flavor)
- 1/4 tsp garlic powder (adjust to taste)
- 1/4 tsp black pepper (freshly ground preferred)
- 1 tbsp olive oil (or any neutral oil, for brushing)
- 1 tbsp fresh parsley (chopped, for garnish)
Instructions
- Preheat your oven to 375°F (190°C) and line a baking sheet with parchment paper for easy cleanup.
- Brush each mushroom cap lightly with olive oil and place them cap-side down on the prepared baking sheet.
- Finely chop the reserved mushroom stems and set aside.
- In a skillet over medium heat, cook the chopped bacon until crispy, about 5-7 minutes. Remove with a slotted spoon and drain on paper towels.
- In the same skillet, sauté the chopped mushroom stems until soft, about 3-4 minutes, then remove from heat.
- In a mixing bowl, combine the cooked bacon, sautéed mushroom stems, cream cheese, Parmesan cheese, garlic powder, and black pepper. Mix until well blended.
- Spoon the filling into each mushroom cap, mounding it slightly.
- Bake in the preheated oven for 15-20 minutes, or until the mushrooms are tender and the filling is golden brown.
- Garnish with chopped fresh parsley before serving.
Finished with a golden hue, these stuffed mushrooms offer a delightful contrast between the tender mushroom caps and the creamy, savory filling. Serve them warm as a sophisticated appetizer or alongside a crisp salad for a light yet satisfying meal.
Bacon-Wrapped Dates with Goat Cheese
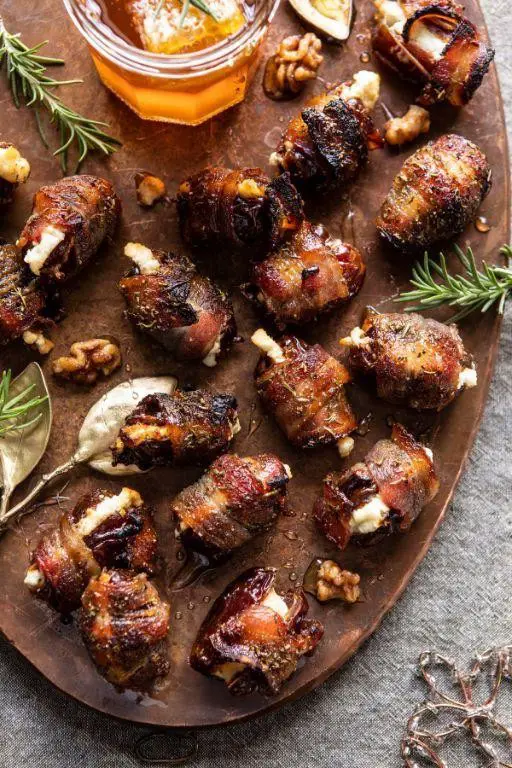
Unveiling a dish that marries the smoky richness of bacon with the sweet, chewy delight of dates, all brought together by the creamy tang of goat cheese, this recipe is a testament to the beauty of simple ingredients creating extraordinary flavors.
Ingredients
- 12 Medjool dates, pitted (look for plump, soft dates for the best texture)
- 4 oz goat cheese, at room temperature (for easier filling)
- 6 slices bacon, cut in half crosswise (thin-cut bacon works best for quick crisping)
- 1 tbsp honey, for drizzling (optional, for added sweetness)
- Toothpicks, for securing
Instructions
- Preheat your oven to 375°F (190°C) and line a baking sheet with parchment paper for easy cleanup.
- Using a small knife, carefully make a slit in each date and remove the pit, ensuring not to cut all the way through.
- Fill each date with approximately 1 teaspoon of goat cheese, gently pressing the edges to close slightly.
- Wrap each stuffed date with a half-slice of bacon, securing the ends with a toothpick. Tip: Ensure the bacon is snug but not too tight to allow for even cooking.
- Arrange the wrapped dates on the prepared baking sheet, spacing them about an inch apart.
- Bake in the preheated oven for 15-20 minutes, or until the bacon is crispy and golden brown. Tip: For extra crispiness, broil for the last 1-2 minutes, watching closely to prevent burning.
- Remove from the oven and let cool for 5 minutes. If desired, drizzle lightly with honey before serving. Tip: The honey adds a lovely gloss and complements the savory flavors beautifully.
Combining the crisp, salty bacon with the soft, sweet dates and creamy goat cheese creates a delightful contrast in every bite. Serve these elegant morsels on a platter garnished with fresh thyme for a touch of color and aroma, making them as visually appealing as they are delicious.
Bacon and Onion Tartlets

Masterfully combining the rich, smoky flavors of bacon with the sweet, caramelized depth of onions, these tartlets are a testament to the beauty of simple ingredients transformed into something extraordinary. Perfect for any gathering, they strike a delightful balance between elegance and comfort.
Ingredients
- 1 cup all-purpose flour (for a lighter crust, substitute with pastry flour)
- 1/2 cup unsalted butter, chilled and diced (ensures a flaky texture)
- 3 tbsp ice water (just enough to bring the dough together)
- 6 slices bacon, chopped (thick-cut preferred for more texture)
- 1 large onion, thinly sliced (yellow or white for sweetness)
- 1/2 cup heavy cream (for a richer filling)
- 2 eggs (room temperature for even mixing)
- 1/4 tsp salt (adjust to taste)
- 1/4 tsp black pepper (freshly ground for best flavor)
Instructions
- Preheat your oven to 375°F (190°C) to ensure it’s ready for baking.
- In a large bowl, combine the flour and diced butter. Use your fingertips to rub the butter into the flour until the mixture resembles coarse crumbs.
- Gradually add ice water, one tablespoon at a time, mixing until the dough just comes together. Tip: Avoid overworking the dough to keep it tender.
- Roll out the dough on a lightly floured surface to about 1/8-inch thickness. Cut into circles to fit your tartlet pans.
- Press the dough circles into the pans, trimming any excess. Chill in the refrigerator for 15 minutes to prevent shrinking during baking.
- While the dough chills, cook the chopped bacon in a skillet over medium heat until crispy. Remove with a slotted spoon and set aside.
- In the same skillet, add the thinly sliced onions. Cook over low heat, stirring occasionally, until caramelized, about 20 minutes. Tip: A pinch of sugar can speed up caramelization.
- In a bowl, whisk together the heavy cream, eggs, salt, and pepper. Stir in the cooked bacon and caramelized onions.
- Divide the filling evenly among the chilled tartlet shells. Bake for 20-25 minutes, or until the filling is set and the crust is golden brown.
- Let the tartlets cool in the pans for 5 minutes before transferring to a wire rack. Tip: They’re easier to remove when slightly cooled.
Just out of the oven, these tartlets boast a buttery, flaky crust that gives way to a creamy, savory filling with bursts of smoky bacon and sweet onion. Serve them warm as a sophisticated appetizer or pair with a crisp salad for a light lunch.
Bacon-Wrapped Water Chestnuts

Yielded by the harmonious blend of crunch and savor, these Bacon-Wrapped Water Chestnuts are a testament to the beauty of simple ingredients transformed into an exquisite appetizer. Perfect for gatherings, they strike a delightful balance between the smoky richness of bacon and the crisp, refreshing bite of water chestnuts.
Ingredients
- 1 can (8 oz) whole water chestnuts, drained (pat dry for better bacon adhesion)
- 1/2 lb bacon, cut into halves (thin slices work best for even cooking)
- 1/4 cup soy sauce (low sodium preferred to control saltiness)
- 2 tbsp brown sugar (packed for a deeper flavor)
- 1 tbsp ketchup (adds a hint of sweetness and tang)
- 1/2 tsp garlic powder (for a subtle aromatic depth)
- Toothpicks, soaked in water for 30 minutes (prevents burning in the oven)
Instructions
- Preheat your oven to 375°F (190°C) and line a baking sheet with aluminum foil for easy cleanup.
- In a small bowl, whisk together the soy sauce, brown sugar, ketchup, and garlic powder until the sugar is fully dissolved to create the marinade.
- Add the water chestnuts to the marinade, ensuring they are fully coated. Let them marinate for at least 10 minutes to absorb the flavors.
- Wrap each marinated water chestnut with a half slice of bacon, securing it with a soaked toothpick. Place them seam side down on the prepared baking sheet.
- Bake in the preheated oven for 25-30 minutes, or until the bacon is crispy and golden brown, flipping halfway through for even cooking.
- For an extra glaze, brush the chestnuts with the remaining marinade halfway through baking, ensuring a glossy, flavorful finish.
- Once done, let them cool for a few minutes before serving to allow the flavors to meld and the bacon to crisp up further.
With their irresistible combination of textures and flavors, these Bacon-Wrapped Water Chestnuts are sure to be the star of any appetizer spread. Serve them atop a bed of greens for a visually appealing presentation or alongside a dipping sauce of your choice to elevate the experience.
Bacon Deviled Eggs

Venture into the realm of classic appetizers with a twist that promises to delight your palate. Bacon deviled eggs combine the creamy, tangy essence of traditional deviled eggs with the smoky, crispy allure of bacon, creating a harmonious blend of flavors and textures that’s irresistible.
Ingredients
- 6 large eggs (preferably organic for richer flavor)
- 3 tablespoons mayonnaise (or Greek yogurt for a lighter version)
- 1 teaspoon Dijon mustard (adjust to taste)
- 1/4 teaspoon smoked paprika (plus extra for garnish)
- 2 slices bacon, cooked until crispy and crumbled (reserve some for topping)
- Salt and freshly ground black pepper (to taste)
- 1 tablespoon fresh chives, finely chopped (for garnish)
Instructions
- Place the eggs in a single layer in a saucepan and cover with water by 1 inch. Bring to a boil over high heat, then cover and remove from heat. Let stand for 12 minutes for perfectly hard-boiled eggs.
- Transfer the eggs to a bowl of ice water to cool for at least 5 minutes. This stops the cooking process and makes peeling easier.
- Once cooled, peel the eggs and slice them in half lengthwise. Gently remove the yolks and place them in a medium bowl.
- Mash the yolks with a fork until smooth. Add the mayonnaise, Dijon mustard, smoked paprika, and half of the crumbled bacon. Season with salt and pepper, then mix until well combined.
- Spoon or pipe the yolk mixture back into the egg white halves. For a professional touch, use a piping bag with a star tip.
- Sprinkle the remaining bacon and chives over the filled eggs, followed by a light dusting of smoked paprika for color and flavor.
How these bacon deviled eggs present a perfect balance of creamy and crunchy, with the smokiness of the bacon elevating the traditional recipe. Serve them on a slate board for a rustic yet elegant presentation, or alongside a crisp green salad for a light, satisfying meal.
Bacon and Blue Cheese Stuffed Celery
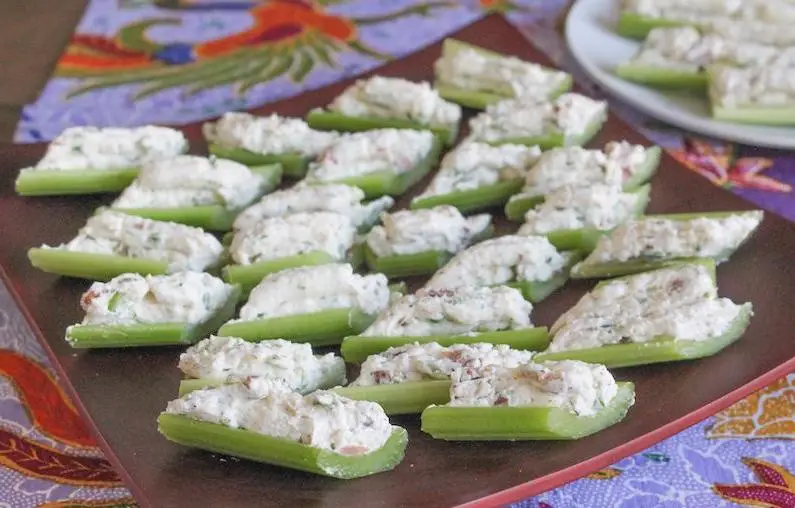
Zesty and sophisticated, this Bacon and Blue Cheese Stuffed Celery transforms a humble vegetable into a luxurious appetizer that’s as visually appealing as it is delicious. Perfect for entertaining or a refined snack, the combination of crispy bacon and tangy blue cheese offers a delightful contrast of flavors and textures.
Ingredients
- 8 oz blue cheese, crumbled (for a milder flavor, use Gorgonzola)
- 4 slices bacon, cooked until crispy and crumbled (reserve 1 tbsp of bacon grease)
- 1/4 cup sour cream (full-fat recommended for creaminess)
- 1 tbsp fresh chives, finely chopped (plus extra for garnish)
- 1/2 tsp freshly ground black pepper (adjust to taste)
- 12 celery stalks, trimmed and cut into 3-inch pieces (ensure they’re crisp and fresh)
Instructions
- In a medium mixing bowl, combine the crumbled blue cheese, crispy bacon, sour cream, chives, and black pepper. Mix gently until all ingredients are well incorporated.
- Using a small spoon or a piping bag, fill each celery piece with the blue cheese mixture, ensuring it’s generously stuffed but not overflowing.
- Drizzle the reserved bacon grease lightly over the stuffed celery for an added layer of flavor.
- Garnish each piece with a sprinkle of additional chives for a pop of color and freshness.
- Arrange the stuffed celery on a serving platter and chill in the refrigerator for at least 30 minutes before serving to allow the flavors to meld.
Kaleidoscopic in presentation, these stuffed celery pieces offer a crunchy bite followed by the creamy, umami-rich filling. Serve them on a slate board for an elegant touch or alongside a crisp white wine to elevate your appetizer game.
Bacon-Wrapped Asparagus
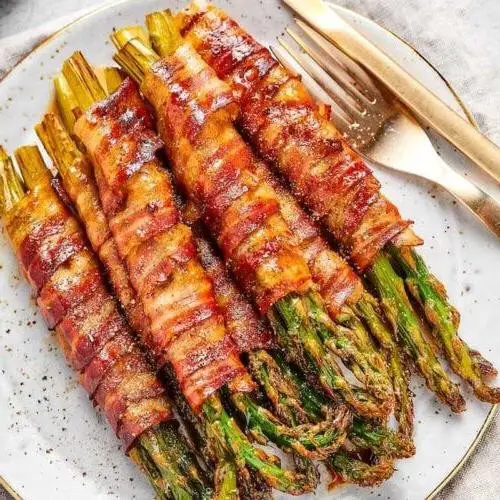
Delightfully simple yet undeniably sophisticated, bacon-wrapped asparagus combines the crisp, verdant freshness of asparagus with the rich, smoky savoriness of bacon, creating a dish that’s as visually appealing as it is delicious.
Ingredients
- 1 lb fresh asparagus, trimmed (look for spears of uniform thickness for even cooking)
- 8 slices bacon (thin-cut works best for quick crisping)
- 1 tbsp olive oil (or any neutral oil, for brushing)
- 1/2 tsp black pepper (freshly ground preferred)
- 1/4 tsp salt (adjust to taste)
Instructions
- Preheat your oven to 400°F (200°C) and line a baking sheet with parchment paper for easy cleanup.
- Divide the asparagus into 8 equal bundles. Tip: Aim for about 5-6 spears per bundle for the perfect bite.
- Wrap each asparagus bundle with a slice of bacon, starting at the bottom and spiraling upwards to cover most of the spears.
- Place the wrapped bundles on the prepared baking sheet, seam side down, to prevent unraveling.
- Lightly brush each bundle with olive oil, then season with salt and black pepper. Tip: The oil helps the bacon crisp up beautifully.
- Bake in the preheated oven for 20-25 minutes, or until the bacon is crispy and the asparagus is tender when pierced with a fork. Tip: Rotate the baking sheet halfway through for even cooking.
- Let the bundles rest for 2 minutes before serving to allow the flavors to meld.
The bacon-wrapped asparagus emerges from the oven with a perfect contrast of textures—crispy bacon giving way to tender, slightly crunchy asparagus. Serve these elegant bundles as a standout side dish or as a chic appetizer at your next gathering, perhaps with a drizzle of balsamic glaze for an extra touch of sophistication.
Bacon and Cheddar Cheese Ball
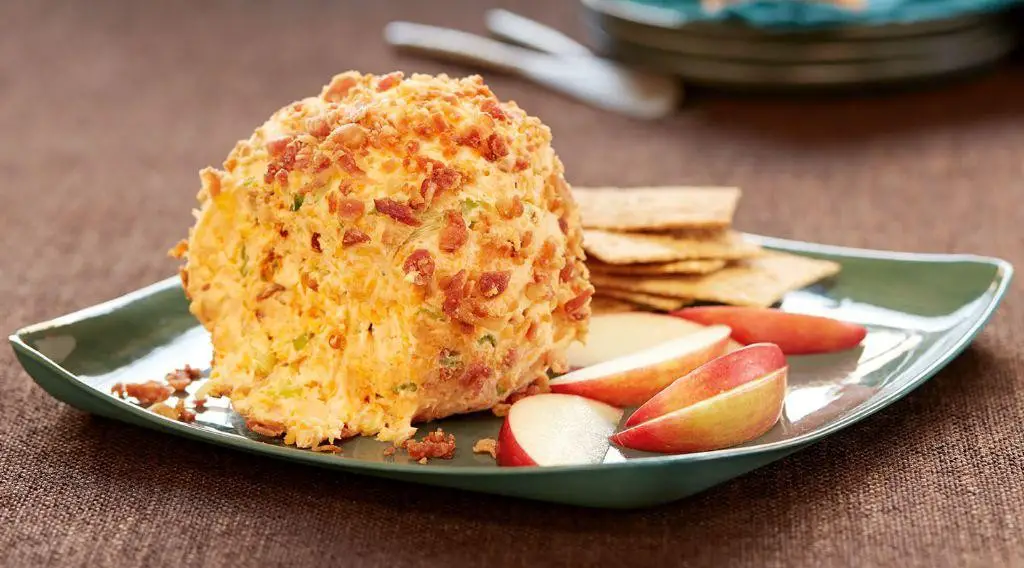
Zesty and indulgent, this Bacon and Cheddar Cheese Ball is a show-stopping appetizer that combines smoky bacon, sharp cheddar, and a hint of spice for a crowd-pleasing treat. Perfect for gatherings, its rich flavors and creamy texture make it a memorable addition to any table.
Ingredients
- 8 oz cream cheese, softened (for easier mixing)
- 1 1/2 cups sharp cheddar cheese, shredded (preferably aged for depth of flavor)
- 6 slices bacon, cooked crispy and crumbled (reserve 2 tbsp for garnish)
- 2 green onions, finely chopped (plus extra for garnish)
- 1/2 tsp garlic powder (adjust to taste)
- 1/2 tsp smoked paprika (for a subtle smokiness)
- 1/4 tsp cayenne pepper (optional, for heat)
- 1/2 cup pecans, finely chopped (for coating, walnuts can be substituted)
Instructions
- In a large mixing bowl, combine the softened cream cheese, shredded cheddar cheese, crumbled bacon (reserving 2 tbsp for garnish), chopped green onions, garlic powder, smoked paprika, and cayenne pepper. Mix until all ingredients are evenly incorporated.
- Transfer the mixture onto a sheet of plastic wrap. Using the wrap, shape the mixture into a ball, twisting the top to secure. Chill in the refrigerator for at least 1 hour, or until firm.
- Place the chopped pecans on a plate. Unwrap the cheese ball and roll it in the pecans, pressing gently to adhere. Sprinkle the reserved bacon and additional green onions on top for garnish.
- Return the cheese ball to the refrigerator for another 30 minutes to set before serving. This step ensures the cheese ball holds its shape.
Ample in flavor, this Bacon and Cheddar Cheese Ball boasts a creamy interior with a crunchy nut coating, offering a delightful contrast in textures. Serve with crisp crackers or sliced baguette for an elegant presentation that’s sure to impress.
Bacon-Wrapped Shrimp
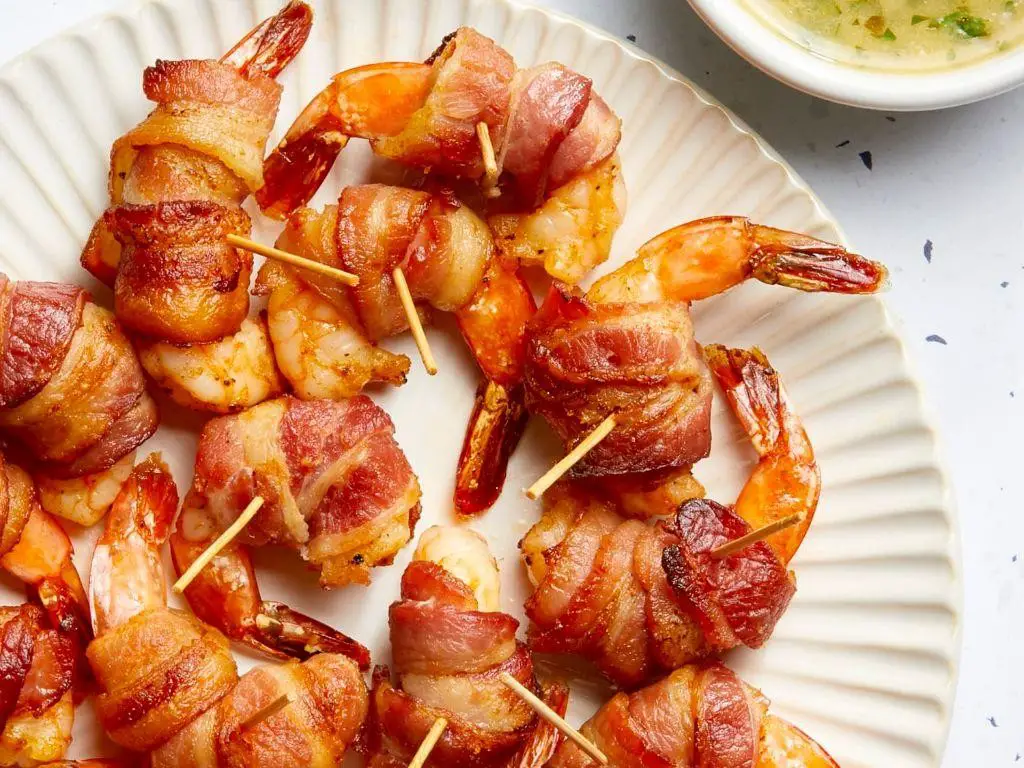
Yielded by the sea and the smoke, this Bacon-Wrapped Shrimp recipe marries the succulence of the ocean with the rich, smoky embrace of bacon, creating a dish that’s as luxurious as it is irresistible.
Ingredients
- 1 lb large shrimp, peeled and deveined (tail-on for presentation)
- 8 slices bacon, cut in half (use thin slices for quicker cooking)
- 2 tbsp olive oil (or any neutral oil for brushing)
- 1 tbsp smoked paprika (adjust to taste for smokiness)
- 1/2 tsp garlic powder (for a subtle depth)
- Salt and freshly ground black pepper (to season)
- Wooden toothpicks (soaked in water for 30 minutes to prevent burning)
Instructions
- Preheat your oven to 400°F (200°C) and line a baking sheet with parchment paper for easy cleanup.
- In a small bowl, mix smoked paprika, garlic powder, salt, and pepper. Lightly brush each shrimp with olive oil, then sprinkle the seasoning mix over them, ensuring even coverage.
- Wrap each shrimp with a half-slice of bacon, securing it with a toothpick. Place them seam-side down on the prepared baking sheet, spacing evenly.
- Bake for 10-12 minutes, then flip each shrimp and bake for another 8-10 minutes, or until the bacon is crispy and the shrimp are pink and opaque.
- For extra crispiness, broil for the last 2 minutes, watching closely to prevent burning.
- Let rest for 2 minutes before serving to allow the juices to redistribute.
Now, the Bacon-Wrapped Shrimp emerges with a perfect contrast of textures—crispy bacon giving way to tender, juicy shrimp. Serve these morsels on a platter with a drizzle of honey or a squeeze of lemon for a bright finish, turning them into the star of any gathering.
Bacon and Spinach Stuffed Phyllo Cups

Zesty and sophisticated, these Bacon and Spinach Stuffed Phyllo Cups are a delightful blend of crispy, flaky pastry enveloping a rich, savory filling. Perfect for an elegant appetizer or a chic brunch addition, they promise to impress with every bite.
Ingredients
- 1 package phyllo cups (15 count), thawed if frozen
- 4 slices bacon, cooked until crisp and crumbled (reserve 1 tbsp grease)
- 1 cup fresh spinach, finely chopped (packed)
- 1/2 cup cream cheese, softened
- 1/4 cup grated Parmesan cheese
- 1/4 tsp garlic powder
- 1/4 tsp onion powder
- 1/8 tsp black pepper
- 1 tbsp reserved bacon grease (or olive oil as substitute)
Instructions
- Preheat oven to 350°F (175°C). Arrange phyllo cups on a baking sheet; set aside.
- In a medium bowl, combine crumbled bacon, chopped spinach, cream cheese, Parmesan cheese, garlic powder, onion powder, and black pepper. Mix until well blended.
- Using a small spoon, evenly distribute the filling among the phyllo cups, filling each just to the top.
- Lightly brush the tops of the filled phyllo cups with reserved bacon grease for added flavor and a golden finish.
- Bake in the preheated oven for 10-12 minutes, or until the edges of the phyllo cups are golden brown and the filling is heated through.
- Remove from oven and let cool for 2 minutes before serving to allow the filling to set slightly.
Kaleidoscopic in flavor, these stuffed phyllo cups offer a delightful contrast between the crisp, buttery shell and the creamy, umami-rich filling. Serve them atop a bed of mixed greens for a visually stunning presentation that’s as delicious as it is beautiful.
Bacon-Wrapped Mozzarella Sticks

These Bacon-Wrapped Mozzarella Sticks are a decadent twist on a classic appetizer, combining the smoky richness of bacon with the creamy, melty goodness of mozzarella. Perfect for entertaining or indulging in a gourmet snack, this recipe promises to elevate your culinary repertoire with minimal effort.
Ingredients
- 12 mozzarella string cheese sticks (freeze for 30 minutes for easier handling)
- 12 slices thin-cut bacon (use high-quality bacon for better flavor and crispiness)
- 1 cup all-purpose flour (for dredging)
- 2 large eggs (beaten, for egg wash)
- 1 cup Italian-style breadcrumbs (or panko for extra crunch)
- 1 tsp garlic powder (adjust to taste)
- 1 tsp smoked paprika (for a subtle smoky flavor)
- Vegetable oil (for frying, enough to fill a pot 2 inches deep)
Instructions
- Preheat your deep fryer or a heavy pot filled with 2 inches of vegetable oil to 375°F. Use a candy thermometer to ensure accuracy.
- While the oil heats, wrap each frozen mozzarella stick tightly with a slice of bacon, ensuring the ends overlap slightly to seal.
- Dredge each bacon-wrapped mozzarella stick in flour, shaking off any excess. This helps the egg wash adhere better.
- Dip the floured sticks into the beaten eggs, then roll them in the breadcrumb mixture until fully coated. For extra crispiness, double coat by repeating the egg and breadcrumb steps.
- Carefully place the coated sticks into the hot oil, frying in batches to avoid overcrowding. Fry for 2-3 minutes or until golden brown and the bacon is crispy.
- Use a slotted spoon to remove the sticks from the oil, draining them on a wire rack over paper towels to keep them crispy.
- Serve immediately with marinara sauce or a spicy aioli for dipping. The contrast of the crispy bacon exterior with the gooey mozzarella inside is irresistible.
For a visually stunning presentation, skewer each stick with a decorative toothpick and arrange them on a slate board with dipping sauces in small ramekins. The smoky, savory flavors paired with the creamy cheese create a harmonious bite that’s sure to impress.
Bacon and Apple Bites
Bacon and Apple Bites offer a delightful harmony of smoky and sweet, perfect for those seeking a sophisticated yet easy-to-prepare appetizer. Begin by preheating your oven to 375°F, ensuring a crisp finish for the bacon.
Ingredients
- 6 slices of thick-cut bacon (look for applewood-smoked for extra flavor)
- 1 large apple, cored and thinly sliced (Honeycrisp or Fuji recommended for sweetness and crunch)
- 1 tbsp maple syrup (pure, for a richer taste)
- 1/2 tsp ground cinnamon (adjust to spice preference)
- 1/4 cup brown sugar (packed, for a caramelized coating)
Instructions
- Preheat oven to 375°F and line a baking sheet with parchment paper to prevent sticking.
- Lay the bacon slices flat on the prepared baking sheet, ensuring they do not overlap for even cooking.
- In a small bowl, mix the brown sugar and cinnamon, then sprinkle evenly over the bacon slices.
- Drizzle the maple syrup over the bacon, using a brush to spread it evenly if necessary.
- Place a thin apple slice on one end of each bacon slice, then roll the bacon around the apple, securing with a toothpick if needed.
- Bake for 20-25 minutes, or until the bacon is crispy and the sugar has caramelized.
- Remove from the oven and let cool for 5 minutes before serving to allow the flavors to meld.
At first bite, the crispiness of the bacon contrasts beautifully with the tender apple, while the caramelized sugar adds a luxurious sweetness. Serve these bites on a platter garnished with fresh thyme for an elegant touch at your next gathering.
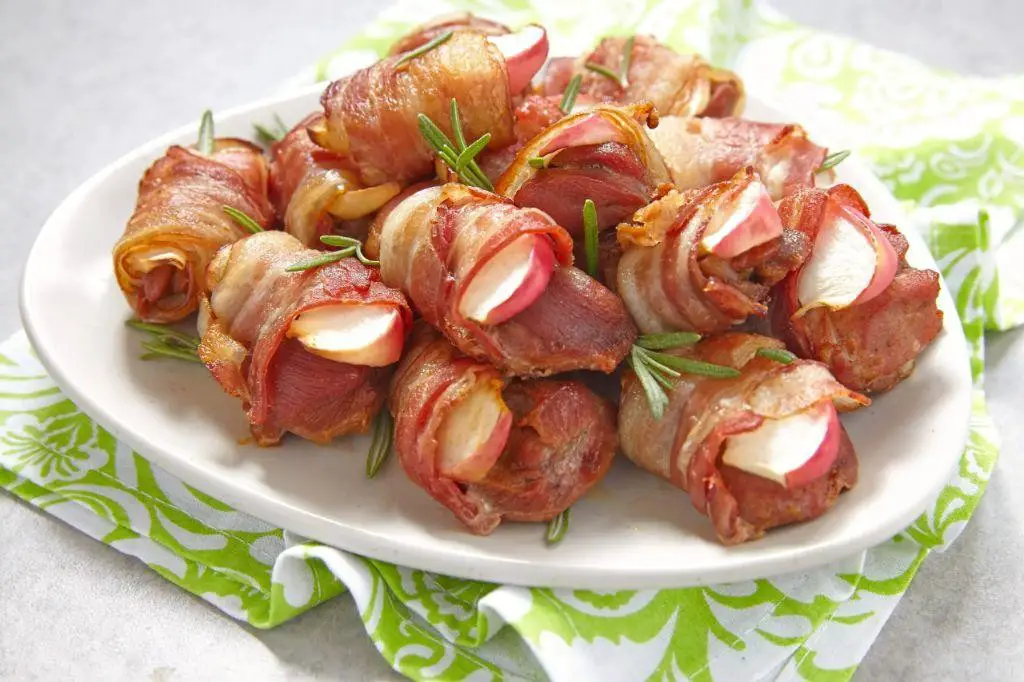
Bacon-Wrapped Pineapple

Lusciously combining the smoky richness of bacon with the sweet, tangy burst of pineapple, this dish is a delightful juxtaposition of flavors that promises to elevate any gathering. Perfect for those who appreciate a harmonious blend of savory and sweet, it’s a simple yet sophisticated appetizer that’s sure to impress.
Ingredients
- 8 slices of thick-cut bacon (look for high-quality, applewood-smoked bacon for the best flavor)
- 1 fresh pineapple, peeled and cut into 1-inch chunks (about 16 pieces)
- 2 tbsp brown sugar (for a caramelized finish)
- 1/2 tsp cayenne pepper (adjust to taste for a hint of heat)
- Wooden toothpicks, soaked in water for 30 minutes (to prevent burning)
Instructions
- Preheat your oven to 375°F (190°C) and line a baking sheet with parchment paper for easy cleanup.
- In a small bowl, mix the brown sugar and cayenne pepper to create a sweet and spicy rub.
- Wrap each pineapple chunk with a slice of bacon, securing it with a soaked toothpick. Ensure the bacon is snug but not too tight to allow for even cooking.
- Place the bacon-wrapped pineapple pieces on the prepared baking sheet, spacing them about an inch apart.
- Sprinkle the brown sugar and cayenne mixture evenly over each piece, using your fingers to gently press the seasoning onto the bacon.
- Bake in the preheated oven for 20-25 minutes, or until the bacon is crispy and the pineapple is caramelized. For extra crispiness, broil for the last 2-3 minutes, watching closely to prevent burning.
- Let cool for a few minutes before serving to allow the flavors to meld and to avoid burning your guests’ mouths.
Golden and glistening, these bacon-wrapped pineapple bites offer a perfect crunch followed by a juicy, sweet interior. Serve them on a platter with a drizzle of honey for added sweetness or alongside a spicy aioli for a contrasting kick.
Bacon and Avocado Crostini
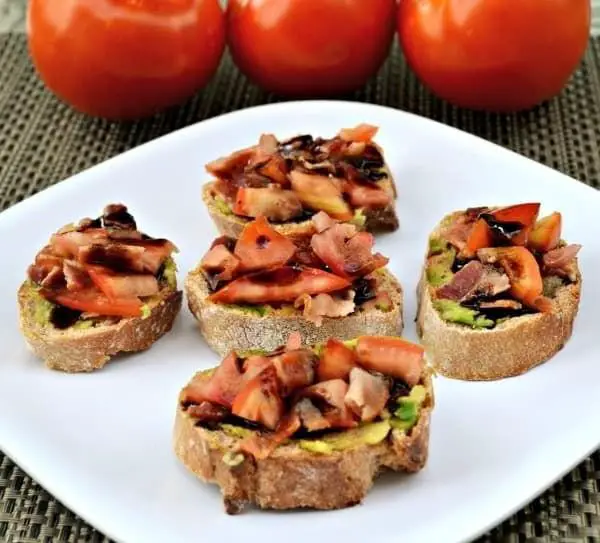
Whisking together the rustic charm of crispy bread with the creamy decadence of avocado and the smoky allure of bacon, this Bacon and Avocado Crostini is a symphony of textures and flavors that promises to elevate any gathering.
Ingredients
- 1 baguette, sliced into 1/2-inch thick pieces (for a crispier texture, opt for day-old bread)
- 2 ripe avocados, mashed (choose avocados that yield slightly to pressure for perfect ripeness)
- 6 slices of bacon, cooked until crispy and crumbled (thick-cut bacon offers a meatier bite)
- 2 tablespoons olive oil (extra virgin for a fruity note)
- 1 tablespoon lemon juice (freshly squeezed to prevent browning of the avocado)
- Salt and pepper to taste (start with a pinch and adjust as needed)
- 1/4 cup crumbled feta cheese (for a tangy contrast, or substitute with goat cheese)
- 1 tablespoon chopped chives (for a mild oniony garnish)
Instructions
- Preheat your oven to 375°F (190°C) to ensure it’s ready for toasting the bread.
- Arrange the baguette slices on a baking sheet in a single layer, brushing each slice lightly with olive oil on both sides for even browning.
- Toast the bread in the preheated oven for 5-7 minutes, or until golden and crisp around the edges, flipping halfway through for uniform texture.
- While the bread toasts, combine the mashed avocados with lemon juice, salt, and pepper in a bowl, mixing gently to incorporate the flavors without overworking the avocado.
- Once the bread is toasted, let it cool for a minute before spreading a generous layer of the avocado mixture on each slice.
- Sprinkle the crumbled bacon and feta cheese over the avocado, ensuring each crostini gets a balanced amount of both.
- Garnish with chopped chives for a fresh, colorful finish.
Combining the crunch of perfectly toasted bread with the creamy avocado and the salty crispness of bacon, these crostini are a delightful contrast of textures. Serve them as an elegant appetizer at your next dinner party or enjoy them as a sophisticated snack with a glass of crisp white wine.
Bacon-Wrapped Chicken Bites

Glistening under the golden hue of the oven’s glow, these Bacon-Wrapped Chicken Bites are a symphony of flavors and textures, perfectly poised to elevate any gathering from mundane to memorable. Each bite-sized morsel marries the succulence of chicken with the crisp, smoky embrace of bacon, creating a dish that’s as visually appealing as it is delicious.
Ingredients
- 1 lb chicken breast, cut into 1-inch cubes (ensure uniform size for even cooking)
- 8 slices bacon, cut into thirds (thick-cut bacon recommended for better wrapping)
- 1/4 cup brown sugar (for a hint of sweetness that caramelizes beautifully)
- 1 tsp smoked paprika (adds depth and a smoky flavor)
- 1/2 tsp garlic powder (adjust to taste)
- 1/4 tsp black pepper (freshly ground preferred)
- Wooden toothpicks, soaked in water for 30 minutes (to prevent burning)
Instructions
- Preheat your oven to 375°F (190°C) and line a baking sheet with parchment paper for easy cleanup.
- In a small bowl, mix together the brown sugar, smoked paprika, garlic powder, and black pepper to create a dry rub.
- Pat the chicken cubes dry with paper towels to ensure the rub adheres well, then evenly coat each piece with the spice mixture.
- Wrap each seasoned chicken cube with a piece of bacon, securing it with a soaked toothpick. Tip: Stretch the bacon slightly as you wrap for a snug fit that won’t unravel during cooking.
- Arrange the wrapped chicken bites on the prepared baking sheet, ensuring they’re not touching to allow for even cooking and crispiness.
- Bake for 25-30 minutes, or until the bacon is crispy and the chicken reaches an internal temperature of 165°F (74°C). Tip: For extra crispiness, broil for the last 2-3 minutes, watching closely to prevent burning.
- Let the bites rest for 5 minutes before serving to allow the juices to redistribute. Tip: Serve with a side of honey mustard or ranch dressing for dipping.
Nowhere does simplicity meet sophistication quite like in these Bacon-Wrapped Chicken Bites, where the caramelized bacon exterior gives way to tender, flavorful chicken within. Perfect for skewering on decorative picks for a festive appetizer or serving atop a bed of greens for a heartier dish, these bites promise to be the star of any table.
Bacon and Corn Dip
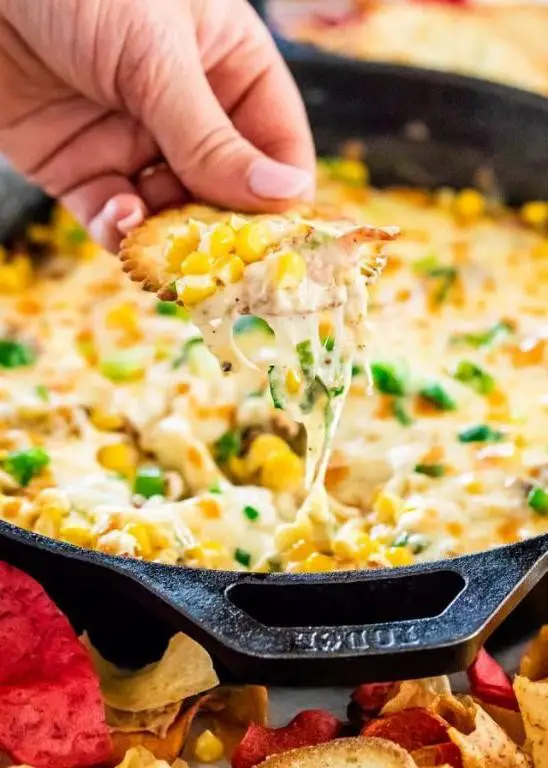
Unveiling a dish that effortlessly marries the smoky richness of bacon with the sweet crunch of corn, this Bacon and Corn Dip is a testament to the beauty of simple ingredients coming together in perfect harmony. Ideal for gatherings or a cozy night in, its layers of flavor promise to delight the palate.
Ingredients
- 8 oz bacon, chopped (for a crispier texture, opt for thick-cut)
- 1 cup corn kernels, fresh or frozen (thawed if frozen)
- 8 oz cream cheese, softened (for smoother blending)
- 1/2 cup sour cream (adds a tangy depth)
- 1/4 cup mayonnaise (for creaminess)
- 1 tsp garlic powder (adjust to taste)
- 1/2 tsp smoked paprika (enhances the smoky flavor)
- 1 cup shredded cheddar cheese (for a gooey texture)
- 2 green onions, thinly sliced (for a fresh contrast)
Instructions
- Preheat your oven to 375°F (190°C) to ensure it’s ready for baking.
- In a large skillet over medium heat, cook the chopped bacon until crispy, about 8-10 minutes. Transfer to a paper towel-lined plate to drain, reserving 1 tbsp of bacon fat in the skillet.
- In the same skillet with the reserved bacon fat, add the corn kernels. Cook over medium heat for 3-4 minutes until slightly charred, stirring occasionally for even cooking.
- In a large mixing bowl, combine the softened cream cheese, sour cream, and mayonnaise. Mix until smooth and well incorporated.
- Fold in the cooked bacon, charred corn, garlic powder, smoked paprika, and half of the shredded cheddar cheese until evenly distributed.
- Transfer the mixture to a baking dish, spreading it evenly. Sprinkle the remaining cheddar cheese on top.
- Bake in the preheated oven for 20-25 minutes, or until the cheese is bubbly and lightly golden.
- Garnish with sliced green onions before serving.
A symphony of textures and flavors, this dip boasts a creamy base punctuated by the crunch of corn and bacon, all under a blanket of melted cheese. Serve it warm with tortilla chips or as a decadent topping for baked potatoes to elevate any meal.
Conclusion
You’ve just discovered a treasure trove of 18 mouthwatering bacon appetizer recipes that are sure to impress at any gathering. From classic twists to creative new favorites, there’s something for every taste. We’d love to hear which recipes you try and adore—drop us a comment below! Don’t forget to share the bacon love by pinning this article on Pinterest for your fellow home cooks to enjoy.