Packed with flavor and designed to nourish, our collection of 18 Delicious Bariatric Recipes is your go-to guide for meals that are as satisfying as they are nutritious. Whether you’re post-surgery or simply seeking healthier options, these dishes promise to delight your taste buds without compromising on your dietary goals. Dive in and discover how easy and enjoyable eating well can be!
Bariatric-Friendly Chicken Parmesan

Ready to shake up your meal prep with a dish that’s as kind to your waistline as it is to your taste buds? This Bariatric-Friendly Chicken Parmesan swaps the heavy breading for a protein-packed punch, keeping all the cheesy, saucy goodness you crave.
Ingredients
- 2 boneless, skinless chicken breasts
- A splash of olive oil
- A couple of cloves of garlic, minced
- 1 cup of marinara sauce (look for low-sugar options)
- 1/2 cup of shredded part-skim mozzarella
- A sprinkle of grated Parmesan
- 1 tsp of Italian seasoning
- Salt and pepper, just a pinch
Instructions
- Preheat your oven to 375°F—this ensures even cooking without drying out the chicken.
- Heat a splash of olive oil in a skillet over medium heat. Add the minced garlic and sauté until fragrant, about 30 seconds.
- Season the chicken breasts with salt, pepper, and Italian seasoning, then add them to the skillet. Cook for about 5 minutes on each side until golden but not fully cooked through.
- Pour the marinara sauce over the chicken in the skillet, then sprinkle the mozzarella and Parmesan on top.
- Transfer the skillet to the oven and bake for 10 minutes, or until the cheese is bubbly and the chicken reaches an internal temperature of 165°F.
- Let it rest for a couple of minutes before serving—this keeps the juices locked in.
Light, yet satisfying, this dish delivers a crispy edge with a melt-in-your-mouth center. Try serving it over a bed of zucchini noodles for an extra veggie boost!
Low-Carb Bariatric Meatloaf
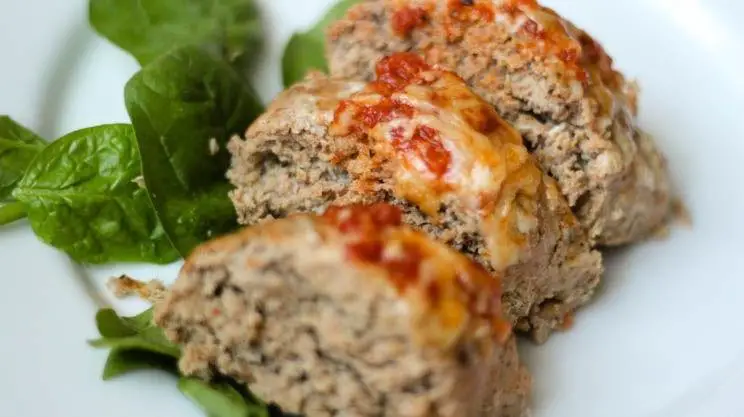
Alright, let’s dive into this mouthwatering Low-Carb Bariatric Meatloaf that’s about to become your new weeknight hero.
Ingredients
- 1.5 lbs of ground beef (the leaner, the better)
- A couple of eggs, beaten
- 1/2 cup of almond flour (for that perfect bind)
- A splash of sugar-free ketchup (trust me, it’s a game-changer)
- 1 tbsp of Worcestershire sauce (for that umami kick)
- 1 tsp of garlic powder (because, flavor)
- 1 tsp of onion powder (its best friend)
- A pinch of salt and pepper (season like you mean it)
Instructions
- Preheat your oven to 375°F. Grab a loaf pan and give it a quick spray with non-stick.
- In a large bowl, mix the ground beef, beaten eggs, almond flour, Worcestershire sauce, garlic powder, onion powder, salt, and pepper. Use your hands—it’s the best tool you’ve got.
- Press the mixture into the loaf pan. Smooth the top with a spatula for that Instagram-worthy finish.
- Brush the top with sugar-free ketchup. This isn’t just for looks; it adds a tangy sweetness.
- Bake for 45 minutes. You’ll know it’s done when the edges are slightly crispy and the center is firm.
- Let it rest for 10 minutes. This step is crucial for the juices to redistribute—skip it at your own peril.
Final thoughts: This meatloaf is juicy, flavorful, and holds together like a dream. Slice it thick for a hearty dinner or thin for meal-prep sandwiches. Either way, it’s a winner.
Bariatric Protein Pancakes

Never settle for bland breakfasts again—these bariatric protein pancakes pack a punch of flavor without the guilt. Flip your morning routine with a stack that’s as nutritious as it is delicious.
Ingredients
- 1 cup of oat flour (just blend some oats!)
- 2 scoops of your favorite vanilla protein powder
- 1 tsp of baking powder (for that fluff)
- A pinch of salt (to balance the sweet)
- 1 egg (the binder)
- A splash of almond milk (until the batter’s just right)
- A couple of drops of vanilla extract (because why not?)
- 1 tbsp of coconut oil (for cooking)
Instructions
- Grab a bowl—whisk together the oat flour, protein powder, baking powder, and salt.
- Crack in the egg, pour in the almond milk and vanilla extract, then stir until smooth. Tip: Let the batter sit for 5 minutes to thicken.
- Heat a non-stick pan over medium heat (about 350°F) and melt a bit of coconut oil.
- Pour ¼ cup of batter for each pancake. Tip: Wait for bubbles to form on top before flipping—about 2 minutes.
- Flip and cook for another 1-2 minutes until golden. Tip: Keep them warm in the oven at 200°F if you’re making a batch.
Crave-worthy and satisfying, these pancakes are fluffy with a slight chew—perfect with a drizzle of sugar-free syrup or a dollop of Greek yogurt. Stack them high or roll them up with some peanut butter for a protein-packed snack on the go.
Bariatric Turkey and Quinoa Stuffed Peppers
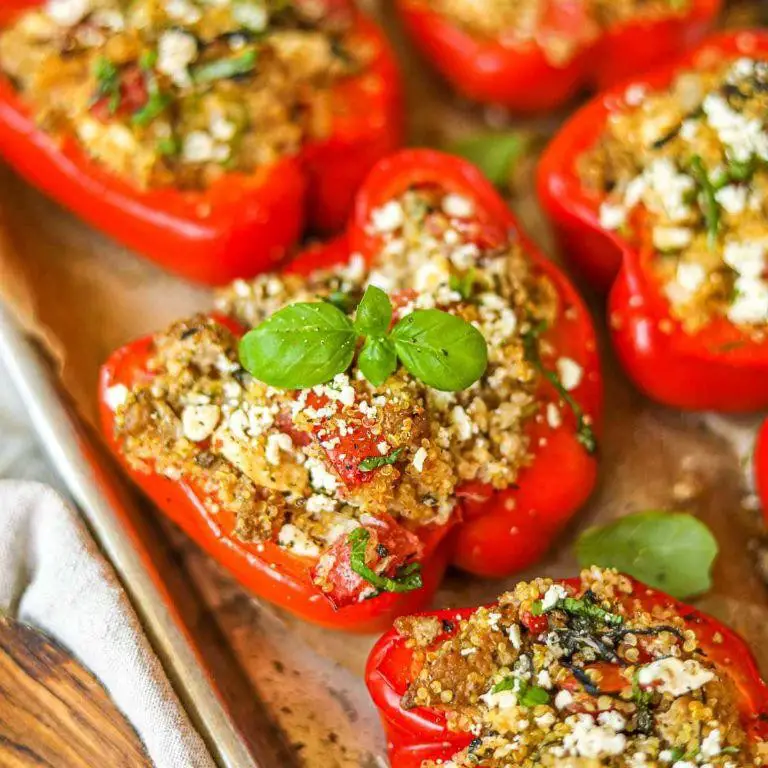
Ditch the boring dinner routine with these bariatric-friendly stuffed peppers—packed with protein, fiber, and all the flavor without the guilt.
Ingredients
- 4 large bell peppers, any color
- 1 lb lean ground turkey
- 1 cup cooked quinoa
- 1 small onion, diced
- 2 cloves garlic, minced
- 1 can (14.5 oz) diced tomatoes, drained
- 1 tsp cumin
- 1 tsp chili powder
- A splash of olive oil
- A couple of handfuls of shredded low-fat cheese
- Salt and pepper, just a pinch
Instructions
- Preheat your oven to 375°F and grab a baking dish.
- Slice the tops off the bell peppers, remove the seeds, and give them a quick rinse.
- Heat a splash of olive oil in a pan over medium heat, then toss in the onion and garlic. Sauté until they’re just soft, about 3 minutes.
- Add the ground turkey to the pan, breaking it up as it cooks. Tip: Don’t overcrowd the pan—cook in batches if needed for even browning.
- Once the turkey’s no longer pink, stir in the quinoa, diced tomatoes, cumin, chili powder, and a pinch of salt and pepper. Let it simmer for 5 minutes to blend the flavors.
- Spoon the turkey-quinoa mix into the bell peppers, packing it down lightly. Top each with a sprinkle of cheese.
- Bake for 25-30 minutes, until the peppers are tender and the cheese is bubbly. Tip: Cover with foil halfway through if the cheese is browning too fast.
- Let them cool for a few minutes before serving. Tip: They’re easier to handle and the flavors settle beautifully.
Whip these up for a meal that’s as satisfying to eat as it is easy on the stomach. The peppers stay crisp-tender, cradling the savory, spiced filling—perfect with a dollop of Greek yogurt or a side of avocado slices.
Bariatric-Friendly Zucchini Lasagna

Hungry for lasagna but keeping it light? This bariatric-friendly zucchini lasagna swaps noodles for zucchini slices, packing all the cheesy, saucy goodness without the guilt.
Ingredients
- 3 medium zucchinis, sliced into 1/4-inch strips
- A couple of cups of your favorite marinara sauce
- 1 cup part-skim ricotta cheese
- 1 cup shredded mozzarella cheese
- A splash of olive oil
- 1/2 tsp garlic powder
- 1/2 tsp Italian seasoning
- A pinch of salt and pepper
Instructions
- Preheat your oven to 375°F and grab a baking dish.
- Lightly brush the zucchini slices with olive oil and sprinkle with salt. Tip: Pat them dry first to avoid soggy lasagna.
- Layer the bottom of the dish with zucchini slices, slightly overlapping.
- Spread a thin layer of marinara over the zucchini.
- Dollop half the ricotta over the sauce, then sprinkle with half the mozzarella. Tip: Mix a little garlic powder and Italian seasoning into the ricotta for extra flavor.
- Repeat the layers once more, finishing with a layer of zucchini and a sprinkle of mozzarella on top.
- Cover with foil and bake for 25 minutes, then uncover and bake for another 10 minutes until bubbly and golden. Tip: Let it sit for 5 minutes before slicing to set perfectly.
Perfectly layered with melty cheese and tender zucchini, this lasagna feels indulgent yet light. Serve it with a crisp salad for a complete meal that doesn’t weigh you down.
Bariatric Cauliflower Mash
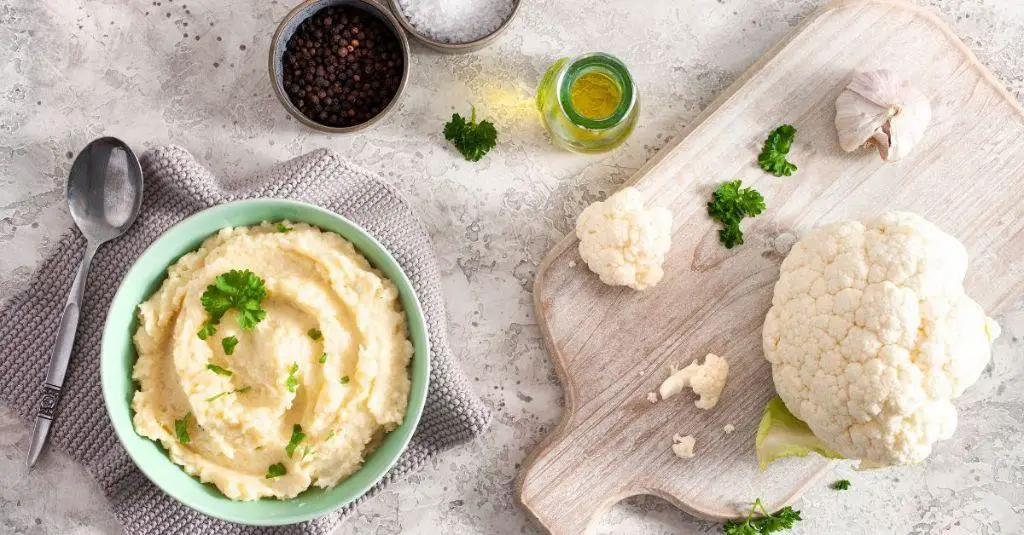
Overwhelm your taste buds with this bariatric-friendly twist on classic mash—cauliflower steps in for potatoes, slashing carbs without skimping on creamy satisfaction.
Ingredients
- 1 large head of cauliflower, chopped into florets
- A couple of tablespoons of unsalted butter
- A splash of heavy cream
- Salt, just a pinch
- Pepper, a quick grind
- A sprinkle of garlic powder
Instructions
- Steam those cauliflower florets until they’re fork-tender, about 10 minutes. Tip: Don’t let them get waterlogged—keep the steam tight and quick.
- Drain the cauliflower well, then pat dry with a towel to avoid a watery mash. Tip: Extra moisture is the enemy of creaminess here.
- Toss the florets into a food processor with the butter, cream, salt, pepper, and garlic powder.
- Blitz until smooth, scraping down the sides as needed. Tip: If it’s too thick, a tiny bit more cream can save the day.
- Give it a final taste and adjust the seasoning if you must, then serve immediately.
Expect a velvety texture that hugs your spoon, with a buttery, slightly garlicky flavor that’ll make you forget it’s not potatoes. Try topping with crispy bacon bits or chives for a fancy touch.
Bariatric Egg White Omelette with Spinach

Unlock the power of protein with this bariatric-friendly egg white omelette that’s as nutritious as it is delicious. Packed with spinach, it’s a low-calorie, high-energy start to your day.
Ingredients
- 3 large egg whites
- A handful of fresh spinach, roughly chopped
- A splash of olive oil
- A pinch of salt
- A couple of cracks of black pepper
Instructions
- Heat a non-stick skillet over medium heat and add a splash of olive oil.
- Once the oil is shimmering, toss in the spinach and sauté for about 1 minute until just wilted. Tip: Don’t overcook the spinach to keep its vibrant color and nutrients.
- In a bowl, whisk the egg whites with a pinch of salt until slightly frothy.
- Pour the egg whites over the spinach in the skillet, tilting the pan to spread them evenly.
- Cook for 2-3 minutes without stirring, until the edges start to set. Tip: Cover the skillet for the last minute to ensure the top cooks through without flipping.
- Season with a couple of cracks of black pepper, then fold the omelette in half with a spatula.
- Slide onto a plate and serve immediately. Tip: For an extra kick, add a sprinkle of red pepper flakes before folding.
Not only is this omelette fluffy and light, but the spinach adds a fresh, earthy flavor that’s downright addictive. Try topping it with a dollop of salsa for a spicy twist or pair it with avocado slices for creamy contrast.
Bariatric Slow Cooker Chicken Tacos
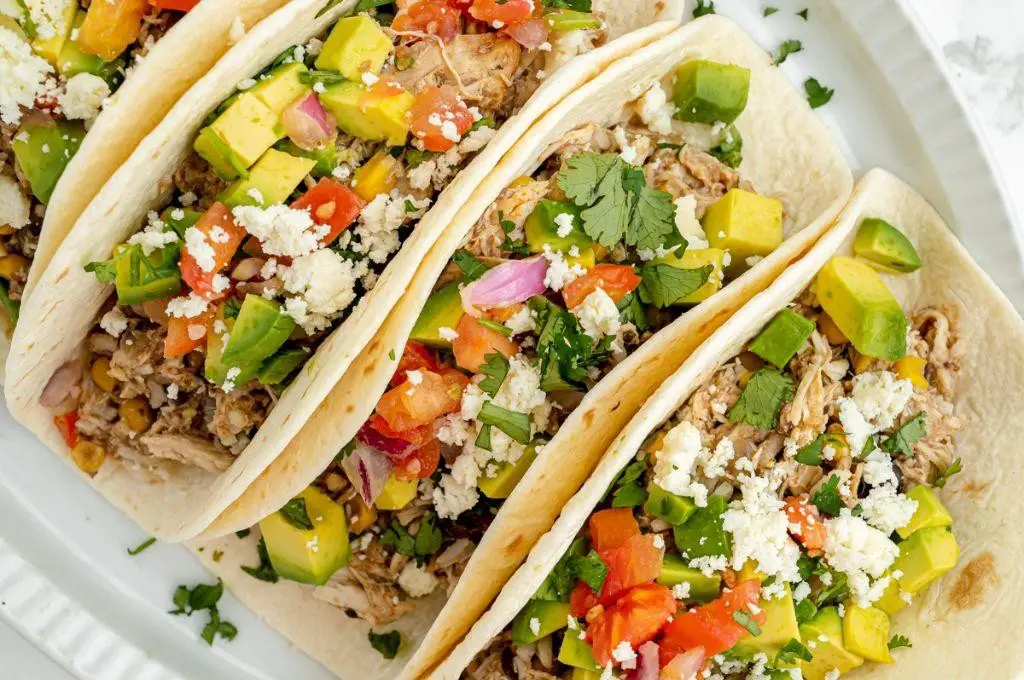
Make your meal prep a breeze with these bariatric-friendly slow cooker chicken tacos—juicy, flavorful, and ridiculously easy to throw together.
Ingredients
- 2 lbs of boneless, skinless chicken breasts
- A splash of olive oil
- A couple of cloves of garlic, minced
- 1 packet of taco seasoning
- 1 cup of chicken broth
- A handful of fresh cilantro, chopped
- Juice of 1 lime
- 8 small low-carb tortillas
- A dollop of Greek yogurt (instead of sour cream)
- A sprinkle of shredded lettuce
- A few slices of avocado
Instructions
- Grab your slow cooker and lightly coat the bottom with olive oil to prevent sticking.
- Lay the chicken breasts flat in the slow cooker—no need to chop, they’ll shred easily later.
- Sprinkle the minced garlic and taco seasoning over the chicken, then pour in the chicken broth.
- Set your slow cooker to low for 6 hours or high for 3 hours. Tip: If you’re short on time, high setting works just as well!
- Once done, use two forks to shred the chicken directly in the slow cooker. Tip: The chicken should be so tender it practically shreds itself.
- Stir in the chopped cilantro and lime juice for that fresh zing. Tip: Fresh lime juice beats bottled any day for brightness.
- Warm the tortillas in a dry skillet over medium heat for about 30 seconds each side—just until they’re pliable.
- Load up each tortilla with the chicken, then top with Greek yogurt, shredded lettuce, and avocado slices.
Flavor-packed and fork-tender, this chicken is a dream wrapped in a tortilla. Serve it with extra lime wedges for squeezing, or go wild with a side of spicy cauliflower rice.
Bariatric Pumpkin Protein Muffins
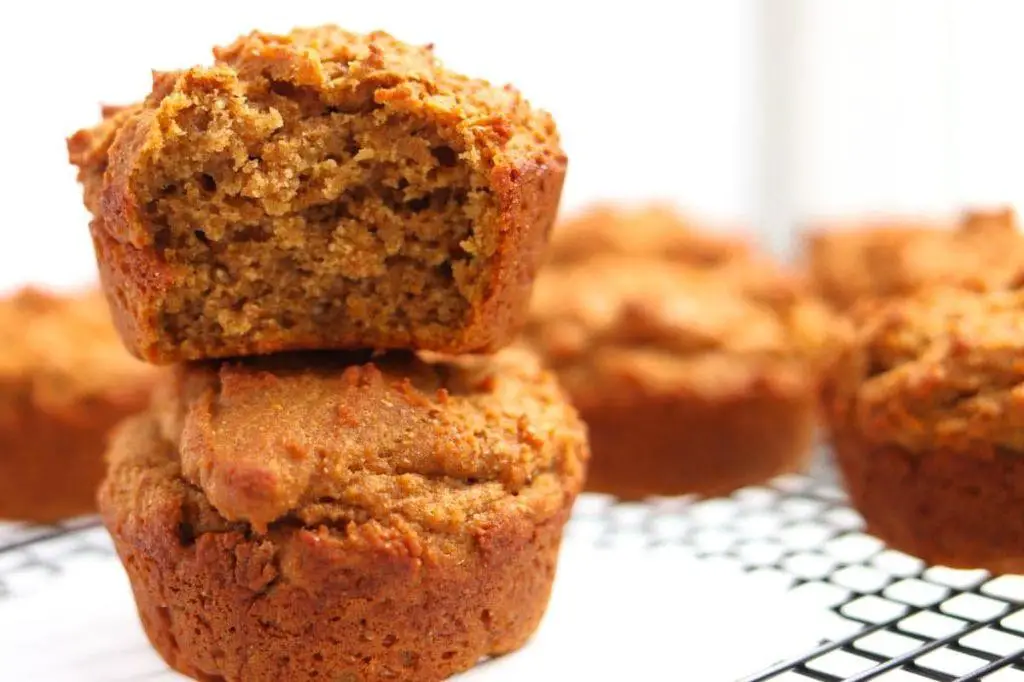
Snag a protein-packed breakfast that tastes like dessert with these bariatric-friendly muffins. Perfect for meal prep, they’re fluffy, moist, and secretly good for you.
Ingredients
- 1 cup of canned pumpkin puree (not pie filling)
- 2 scoops of vanilla protein powder
- 1/2 cup of almond flour
- 1/4 cup of coconut flour
- a couple of eggs
- a splash of vanilla extract
- 1 tsp of pumpkin pie spice
- 1/2 tsp of baking soda
- a pinch of salt
- 1/4 cup of sugar-free maple syrup
Instructions
- Preheat your oven to 350°F and line a muffin tin with silicone liners for easy removal.
- In a large bowl, whisk together the pumpkin puree, eggs, and vanilla extract until smooth.
- Tip: For extra fluffiness, let the eggs sit out for 10 minutes before using.
- Add the protein powder, almond flour, coconut flour, pumpkin pie spice, baking soda, and salt to the wet ingredients. Mix until just combined.
- Tip: Don’t overmix to keep the muffins tender.
- Pour in the sugar-free maple syrup and stir gently to incorporate.
- Divide the batter evenly among the muffin cups, filling each about 3/4 full.
- Bake for 20-25 minutes, or until a toothpick comes out clean.
- Tip: Rotate the tin halfway through for even baking.
- Let the muffins cool in the tin for 5 minutes, then transfer to a wire rack.
Get ready for muffins that are moist inside with a slight crust on top. Serve warm with a dollop of Greek yogurt for an extra protein kick.
Bariatric Shrimp and Cauliflower Grits

Get ready to shake up your meal prep with this low-carb, high-protein twist on a Southern classic that’s as easy to make as it is delicious.
Ingredients
- 1 lb shrimp, peeled and deveined
- 1 head cauliflower, riced
- 2 cups chicken broth
- 1/2 cup sharp cheddar, shredded
- 2 tbsp butter
- 1 clove garlic, minced
- A splash of heavy cream
- A couple of green onions, sliced
- Salt and pepper, just enough to season
Instructions
- Heat a large skillet over medium heat and melt the butter.
- Add the minced garlic and sauté for about 30 seconds until fragrant.
- Toss in the shrimp, season with salt and pepper, and cook until pink, about 2 minutes per side. Tip: Don’t overcrowd the shrimp to get a nice sear.
- Remove the shrimp and set aside.
- In the same skillet, add the riced cauliflower and chicken broth. Bring to a simmer.
- Cook for about 5 minutes, stirring occasionally, until the cauliflower is tender and the broth is mostly absorbed. Tip: The texture should resemble grits.
- Stir in the cheddar and a splash of heavy cream until the cheese melts and the mixture is creamy.
- Return the shrimp to the skillet, mixing gently to combine.
- Garnish with sliced green onions before serving. Tip: For an extra kick, add a dash of hot sauce.
The creamy cauliflower grits perfectly complement the succulent shrimp, creating a dish that’s both comforting and light. Serve it in a bowl for a cozy dinner or plate it up fancy for your next brunch.
Bariatric-Friendly Beef and Broccoli Stir Fry
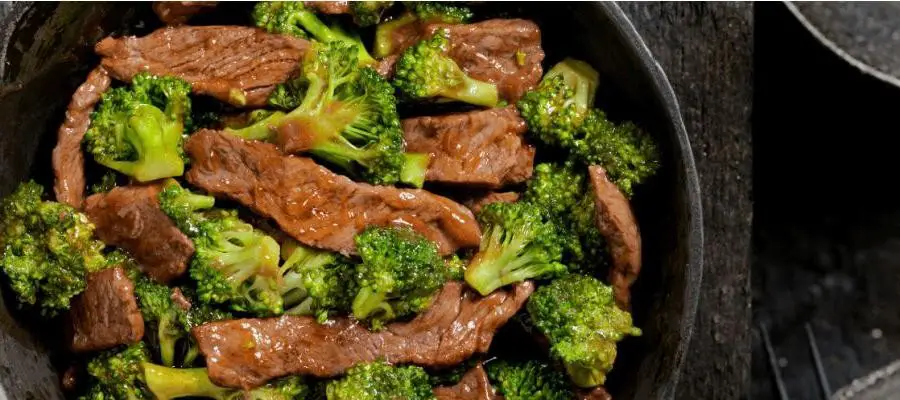
Victory is yours with this bariatric-friendly beef and broccoli stir fry—quick, nutritious, and packed with flavor without the guilt. Perfect for post-op or anyone craving a lighter take on the classic.
Ingredients
- 1 lb lean beef strips (think flank or sirloin)
- 2 cups broccoli florets (fresh or frozen, no judgment)
- A splash of low-sodium soy sauce
- A couple of garlic cloves, minced
- 1 tbsp olive oil
- A pinch of red pepper flakes (optional, for a kick)
- 1/2 cup beef broth (keep it low-sodium)
- 1 tsp ginger, grated (fresh is best, but powder works in a pinch)
Instructions
- Heat olive oil in a large skillet over medium-high heat until it shimmers—about 2 minutes.
- Add beef strips to the skillet. Sear for 3 minutes per side until browned but still pink inside. Tip: Don’t overcrowd the pan to get that perfect sear.
- Toss in minced garlic and grated ginger. Stir for 30 seconds until fragrant—your kitchen should smell amazing.
- Pour in the beef broth and a splash of soy sauce. Scrape up any browned bits for extra flavor.
- Add broccoli florets and a pinch of red pepper flakes if you’re feeling spicy. Cover and simmer for 5 minutes until broccoli is tender-crisp. Tip: Keep the lid on to steam the broccoli perfectly.
- Uncover and stir everything together. Let it cook for another 2 minutes to thicken the sauce slightly. Tip: If the sauce is too thin, a teaspoon of cornstarch mixed with water can thicken it up.
Enjoy this stir fry over a bed of cauliflower rice for a low-carb delight or as is for a protein-packed meal. The beef stays juicy, the broccoli crisp, and the sauce? Just the right amount of savory with a hint of spice.
Bariatric Cottage Cheese and Fruit Bowl

Get ready to shake up your snack game with this bariatric-friendly bowl that’s as easy as it is delicious. Grab your spoon—it’s time to dive into creamy cottage cheese and fresh fruit bliss.
Ingredients
- 1 cup of low-fat cottage cheese
- A handful of mixed berries (strawberries, blueberries, raspberries)
- A drizzle of honey
- A sprinkle of chia seeds
- A couple of mint leaves for garnish
Instructions
- Scoop the cottage cheese into a bowl, aiming for a creamy base.
- Wash your berries under cold water, then pat them dry with a paper towel to avoid a soggy bowl.
- Slice the strawberries into bite-sized pieces for easy eating.
- Arrange the berries on top of the cottage cheese, mixing colors for a vibrant look.
- Drizzle honey over the fruit for a touch of sweetness—about a teaspoon should do it.
- Sprinkle chia seeds evenly across the top for a crunchy texture and omega-3 boost.
- Garnish with mint leaves for a fresh finish and pop of color.
Just like that, you’ve got a bowl that’s creamy, crunchy, and bursting with freshness. Perfect for a quick breakfast or a refreshing snack, this bowl is as versatile as it is tasty. Try swapping the berries for seasonal fruit to keep it exciting all year round.
Bariatric Spaghetti Squash with Marinara
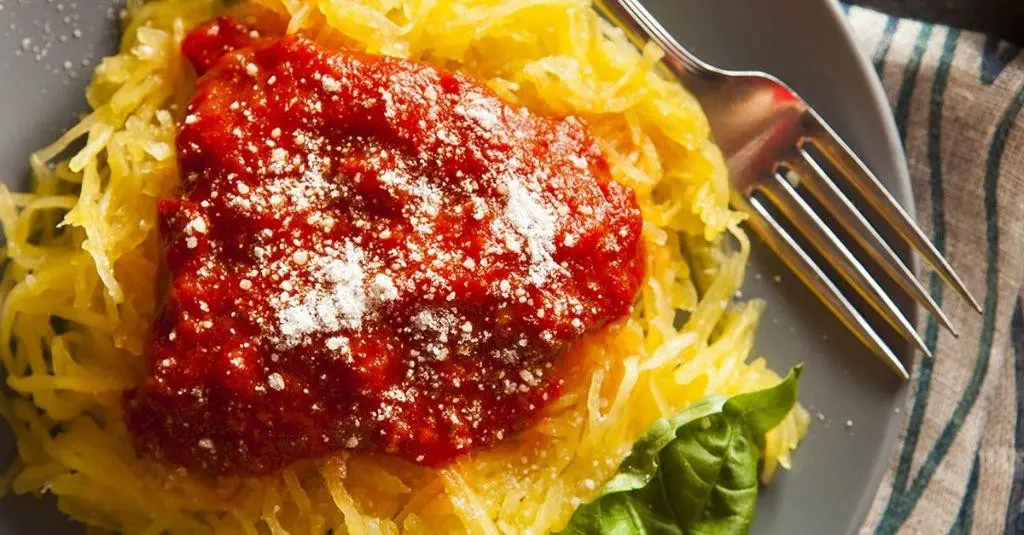
Get ready to twist up your pasta night with this low-carb, high-flavor alternative that’s as easy as it is delicious.
Ingredients
- 1 medium spaghetti squash (about 3 lbs)
- A couple of cups of your favorite marinara sauce
- A splash of olive oil
- A pinch of salt and pepper
- A handful of fresh basil leaves, torn
- A sprinkle of grated Parmesan cheese (optional)
Instructions
- Preheat your oven to 400°F. Line a baking sheet with parchment paper for easy cleanup.
- Cut the spaghetti squash in half lengthwise. Scoop out the seeds with a spoon—save them for roasting if you’re into that!
- Drizzle the cut sides with olive oil and season with salt and pepper. Place them cut-side down on the baking sheet.
- Roast for 40 minutes or until the flesh is tender and easily shreds into spaghetti-like strands with a fork.
- While the squash roasts, heat the marinara sauce in a small pot over medium heat until it’s warm and bubbly, about 5 minutes.
- Once the squash is done, use a fork to scrape the flesh into strands. Divide between plates.
- Top each portion with warm marinara sauce, torn basil leaves, and a sprinkle of Parmesan if you’re feeling fancy.
Keep it simple or jazz it up—this dish is all about the squash’s naturally sweet, nutty flavor playing off the tangy marinara. Try serving it with a side of garlicky sautéed greens for a full meal that’s as satisfying as it is wholesome.
Bariatric Greek Yogurt Chicken Salad
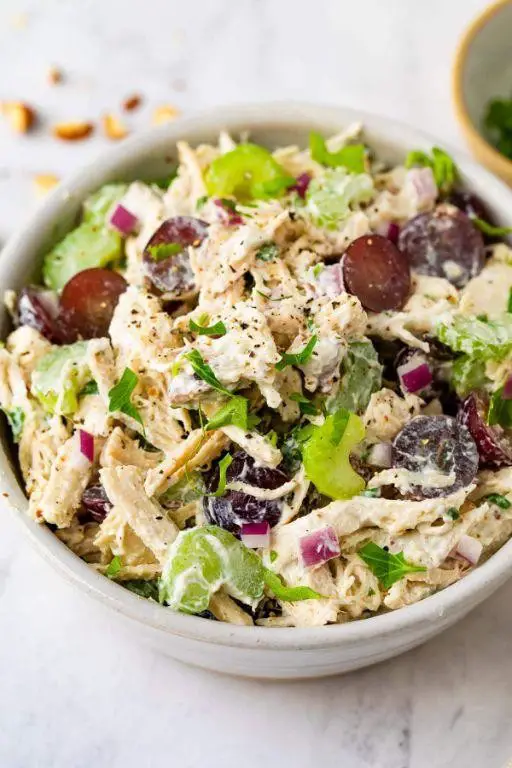
Here’s a game-changer for your meal prep—**Bariatric Greek Yogurt Chicken Salad** that’s high in protein, low in guilt, and packed with flavor. **H**ungry yet? Let’s dive in.
Ingredients
- 2 cups of cooked chicken, shredded (think leftovers or rotisserie)
- 1/2 cup of Greek yogurt (go for full-fat to keep it creamy)
- 1 tbsp of lemon juice (freshly squeezed, please)
- 1/4 cup of celery, finely chopped (for that crunch)
- 1/4 cup of red onion, diced (a little goes a long way)
- 1 tsp of garlic powder (because flavor)
- A pinch of salt and pepper (season like you mean it)
- A handful of almonds, chopped (optional, for extra crunch)
Instructions
- **Grab a large mixing bowl**—this is where the magic happens.
- **Toss in the shredded chicken**, breaking up any clumps with your fingers.
- **Add the Greek yogurt and lemon juice**, stirring until the chicken is evenly coated. *Tip: If it’s too thick, a splash of water can loosen it up.*
- **Throw in the celery, red onion, and garlic powder**, mixing well to distribute the flavors. *Tip: Let it sit for 10 minutes to let the flavors marry.*
- **Season with salt and pepper**, tasting as you go. *Tip: Always under-season at first—you can add more later.*
- **Fold in the chopped almonds** if using, for that extra texture.
- **Chill in the fridge for at least 30 minutes** before serving to let everything come together.
**Y**ou’ll love the creamy texture with bursts of crunch from the celery and almonds. Serve it on a bed of greens, in a low-carb wrap, or straight out of the bowl—no judgment here.
Bariatric Chocolate Protein Pudding
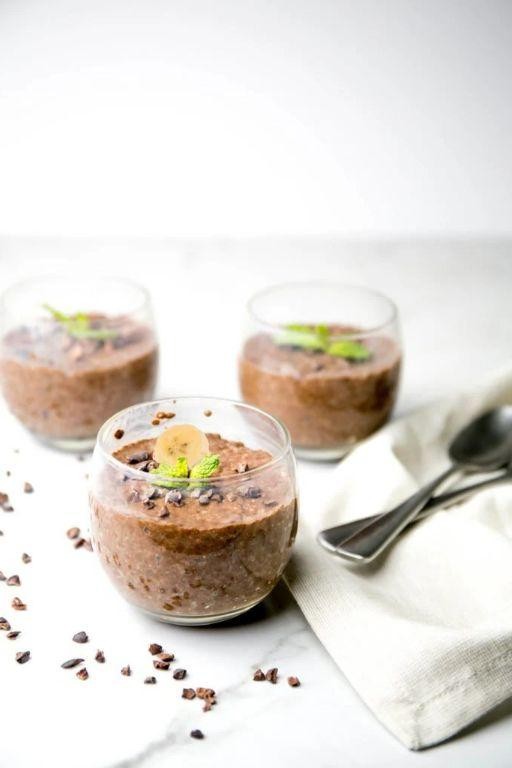
Elevate your snack game with this bariatric-friendly chocolate protein pudding that’s as easy to make as it is delicious. Perfect for post-op cravings or a protein-packed dessert, it’s a game-changer.
Ingredients
- 1 cup of unsweetened almond milk
- 2 scoops of chocolate protein powder
- 1 tbsp of chia seeds
- A splash of vanilla extract
- A couple of ice cubes
Instructions
- Grab a blender and toss in the unsweetened almond milk, chocolate protein powder, chia seeds, and vanilla extract.
- Drop in a couple of ice cubes to thicken the mix—trust us, it makes a difference.
- Blend on high for 30 seconds, or until everything is smooth and no chunks are left. Tip: Scrape down the sides if needed to get every bit mixed in.
- Pour the mixture into a bowl and let it sit in the fridge for at least 2 hours. Tip: The chia seeds need time to work their magic and thicken the pudding.
- Give it a good stir before serving to break up any clumps. Tip: If it’s too thick, a splash of almond milk will loosen it up.
This pudding comes out silky smooth with a rich chocolate flavor that satisfies without the guilt. Try topping it with fresh berries or a dollop of whipped cream for an extra treat.
Bariatric Avocado and Egg Breakfast

Overwhelmed by breakfast choices? **Whip up** this bariatric-friendly avocado and egg breakfast—it’s creamy, protein-packed, and ready in minutes.
Ingredients
- 1 ripe avocado
- 2 large eggs
- A splash of olive oil
- A pinch of salt
- A couple of cracks of black pepper
- A sprinkle of chili flakes (optional)
Instructions
- **Preheat** your skillet over medium heat and add a splash of olive oil.
- **Crack** the eggs into the skillet, keeping them separate. Cook for 2-3 minutes until the whites are set but the yolks are still runny. Tip: Cover the skillet for the last minute to steam the tops gently.
- **Slice** the avocado in half, remove the pit, and scoop the flesh into a bowl. Mash lightly with a fork, leaving some chunks for texture.
- **Season** the mashed avocado with a pinch of salt and a couple of cracks of black pepper. Mix well.
- **Plate** the mashed avocado and top with the fried eggs. Sprinkle with chili flakes if you like a little heat. Tip: For extra flavor, drizzle with a bit more olive oil before serving.
- **Serve** immediately and enjoy the contrast between the creamy avocado and the rich, runny yolks. Tip: Pair with a slice of whole-grain toast for added crunch.
Kickstart your morning with this dish—the avocado brings a buttery smoothness, while the eggs add a satisfying richness. Try topping with microgreens for a fresh twist.
Bariatric Turkey Burger Lettuce Wraps
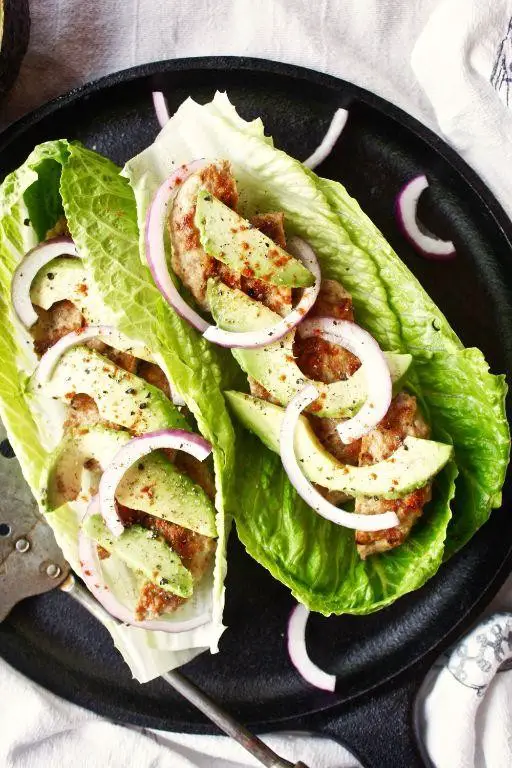
Alright, let’s dive into these bariatric turkey burger lettuce wraps—**lean, mean, and packed with flavor**.
Ingredients
- 1 lb ground turkey (go for the 93% lean stuff)
- 1 egg (the binder that holds it all together)
- 1/4 cup almond flour (for a low-carb crunch)
- 1 tbsp Worcestershire sauce (that umami kick)
- 1 tsp garlic powder (because, duh)
- 1/2 tsp salt (just enough to season)
- A couple of dashes of black pepper (for a little heat)
- 1 tbsp olive oil (to keep things from sticking)
- 4 large lettuce leaves (butter or romaine, your call)
- A splash of water (to keep the turkey moist)
Instructions
- **Mix it up**: In a bowl, combine ground turkey, egg, almond flour, Worcestershire sauce, garlic powder, salt, and black pepper. Use your hands—it’s messy but effective.
- **Shape ’em**: Divide the mixture into 4 equal parts and form into patties. Pro tip: Make a slight indentation in the center to prevent bulging.
- **Heat the pan**: Over medium heat, add olive oil. Wait until it shimmers—that’s when you know it’s ready.
- **Cook to perfection**: Add patties. Cook for 5-6 minutes per side, or until internal temp hits 165°F. No guessing—use a meat thermometer.
- **Rest and wrap**: Let patties sit for 2 minutes (keeps them juicy). Then, tuck each into a lettuce leaf. Bonus tip: Add a slice of avocado for extra creaminess.
These wraps are **juicy, flavorful, and surprisingly satisfying**. Serve them with a side of pickles or a tangy yogurt dip for an extra punch.
Bariatric Cinnamon Apple Protein Oatmeal
Ready to fuel your morning with a powerhouse breakfast? This bariatric-friendly oatmeal packs protein, warmth, and a hint of sweetness to kickstart your day.
Ingredients
- 1/2 cup rolled oats
- 1 cup unsweetened almond milk
- 1 scoop vanilla protein powder
- 1/2 a medium apple, diced
- 1 tsp cinnamon
- A splash of vanilla extract
- A pinch of salt
Instructions
- Grab a small pot and toss in the oats and almond milk. Heat over medium until it starts to bubble, about 3 minutes.
- Stir in the protein powder until it’s fully dissolved—no clumps allowed! Tip: If it’s too thick, add a splash more almond milk.
- Add the diced apple, cinnamon, vanilla extract, and that pinch of salt. Keep stirring for another 2 minutes until the apples soften slightly.
- Kill the heat and let it sit for a minute. This lets the oats soak up all that goodness and thicken up perfectly.
- Serve it hot with an extra sprinkle of cinnamon on top for that Instagram-worthy finish. Tip: For extra crunch, top with a few almond slices.
Dreamy creamy with chunks of soft apple and a cozy cinnamon hug. Try it with a dollop of Greek yogurt for a protein-packed twist.
Conclusion
Savory, satisfying, and specially designed for your bariatric journey, these 18 recipes are a treasure trove of nutrition and flavor. We invite you to whip up these dishes, share your favorites in the comments, and spread the love by pinning this roundup on Pinterest. Happy cooking!