Feeling stuck in a dinner rut or just looking to spice up your meal prep with some wholesome goodness? You’re in the right place! Our roundup of 20 Healthy, Clean, and Delicious Recipes is packed with nutritious dishes that promise to delight your taste buds without compromising on health. From quick weeknight dinners to hearty comfort foods, there’s something here for every home cook in North America. Let’s dive in!
Avocado and Quinoa Salad

Creating a refreshing and nutritious Avocado and Quinoa Salad is simpler than you might think, and it’s perfect for those warm summer days when you crave something light yet satisfying.
Ingredients
- 1 cup quinoa, rinsed (I find rinsing removes any bitterness)
- 2 cups water (for that perfect fluffy texture)
- 1 ripe avocado, diced (the creamier, the better)
- 1/4 cup extra virgin olive oil (my go-to for its fruity notes)
- 2 tbsp lemon juice (freshly squeezed makes all the difference)
- 1/2 tsp salt (to enhance all the flavors)
- 1/4 cup chopped cilantro (adds a fresh, herby kick)
- 1/2 cup cherry tomatoes, halved (for a juicy burst in every bite)
Instructions
- In a medium saucepan, combine the rinsed quinoa and water. Bring to a boil over high heat.
- Once boiling, reduce the heat to low, cover, and simmer for 15 minutes, or until the water is fully absorbed. Tip: Let it sit covered for 5 minutes off the heat for extra fluffiness.
- While the quinoa cooks, whisk together the olive oil, lemon juice, and salt in a large bowl. Tip: Adjust the lemon juice to your liking for more tang.
- Fluff the quinoa with a fork and add it to the bowl with the dressing. Toss gently to combine.
- Add the diced avocado, chopped cilantro, and halved cherry tomatoes to the quinoa mixture. Gently fold everything together to avoid mashing the avocado. Tip: Adding the avocado last keeps it from turning brown too quickly.
Light and vibrant, this salad offers a delightful contrast between the creamy avocado and the fluffy quinoa. Serve it chilled for a refreshing lunch, or as a side dish at your next barbecue to impress your guests.
Grilled Lemon Herb Chicken
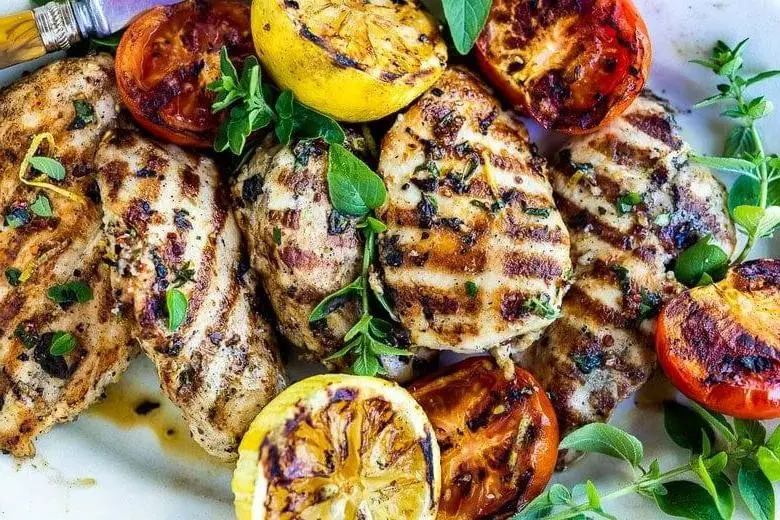
Begin by gathering your ingredients and prepping your grill for a delicious Grilled Lemon Herb Chicken that’s perfect for any summer evening. This methodical approach ensures even cooking and maximum flavor infusion.
Ingredients
- 4 boneless, skinless chicken breasts (I find that organic chicken tends to be more tender)
- 1/4 cup extra virgin olive oil (my go-to for its fruity notes)
- 2 tbsp fresh lemon juice (about 1 large lemon, freshly squeezed tastes best)
- 2 cloves garlic, minced (for that punch of flavor)
- 1 tbsp chopped fresh rosemary (dried works in a pinch, but fresh is fragrant)
- 1 tbsp chopped fresh thyme (again, fresh is preferable for brightness)
- 1 tsp salt (I use sea salt for its clean taste)
- 1/2 tsp black pepper (freshly ground gives the best flavor)
Instructions
- In a medium bowl, whisk together the olive oil, lemon juice, minced garlic, rosemary, thyme, salt, and pepper to create the marinade.
- Place the chicken breasts in a large resealable plastic bag and pour the marinade over them. Seal the bag, removing as much air as possible, and massage the marinade into the chicken. Marinate in the refrigerator for at least 1 hour, or up to 4 hours for deeper flavor.
- Preheat your grill to medium-high heat, about 375°F to 400°F. This ensures a good sear without burning.
- Remove the chicken from the marinade, letting excess drip off. Discard the remaining marinade.
- Grill the chicken for 6-7 minutes on the first side, then flip and grill for another 5-6 minutes, or until the internal temperature reaches 165°F. Tip: Resist the urge to move the chicken around too much to get those perfect grill marks.
- Let the chicken rest for 5 minutes before slicing. This allows the juices to redistribute, ensuring moist meat.
Chicken emerges juicy with a vibrant lemon-herb crust that’s slightly charred from the grill. Serve it over a bed of quinoa or slice it for a refreshing summer salad.
Sweet Potato and Black Bean Tacos
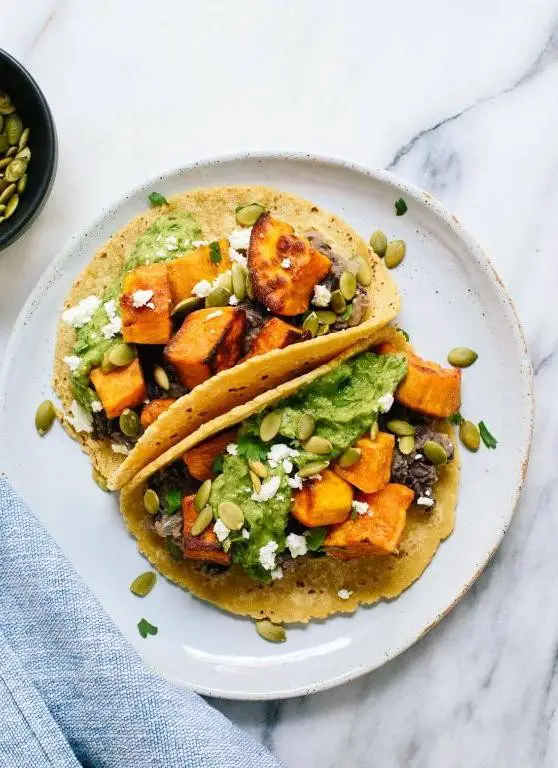
Venturing into the world of vegetarian tacos, these Sweet Potato and Black Bean Tacos are a delightful blend of sweet and savory, wrapped in a warm tortilla. Perfect for a quick weeknight dinner or a festive taco night, this recipe is as nutritious as it is delicious.
Ingredients
- 2 medium sweet potatoes, peeled and diced into 1/2-inch cubes (I find the smaller cubes cook more evenly)
- 1 tbsp extra virgin olive oil (my go-to for its flavor and health benefits)
- 1 tsp ground cumin (toasted cumin seeds ground at home elevate the flavor)
- 1/2 tsp smoked paprika (for that hint of smokiness)
- 1 can (15 oz) black beans, rinsed and drained (I prefer low-sodium for better control over seasoning)
- 8 small corn tortillas (warmed slightly for flexibility)
- 1/2 cup crumbled feta cheese (for a tangy contrast)
- Fresh cilantro leaves, for garnish (a must for that fresh finish)
Instructions
- Preheat your oven to 400°F (200°C) to ensure it’s ready for roasting the sweet potatoes.
- Toss the diced sweet potatoes with olive oil, cumin, and smoked paprika on a baking sheet until evenly coated. Spread them in a single layer for uniform roasting.
- Roast in the preheated oven for 25 minutes, flipping halfway through, until the sweet potatoes are tender and slightly caramelized.
- While the sweet potatoes roast, warm the black beans in a small saucepan over medium heat for 5 minutes, stirring occasionally. This step ensures the beans are heated through without drying out.
- Warm the corn tortillas in a dry skillet over medium heat for about 30 seconds per side, or until pliable. Keeping them warm in a towel will prevent them from drying out.
- Assemble the tacos by dividing the roasted sweet potatoes and warm black beans among the tortillas. Top with crumbled feta cheese and fresh cilantro leaves.
Just like that, you’ve got a meal that’s bursting with flavors and textures—creamy sweet potatoes, hearty black beans, and the fresh crunch of cilantro. Serve these tacos with a side of lime wedges for an extra zing that ties all the flavors together beautifully.
Zucchini Noodles with Pesto
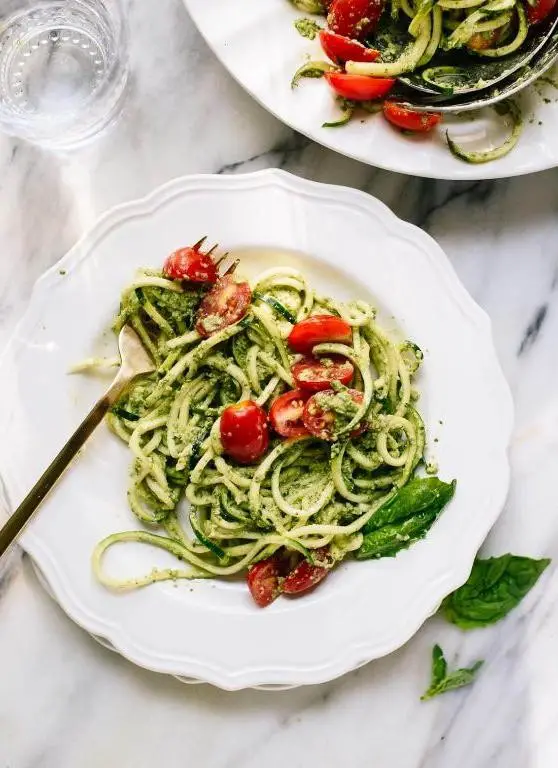
Ready to dive into a light, refreshing dish that’s perfect for summer? Zucchini noodles with pesto is a vibrant, healthy option that’s as easy to make as it is delicious. Let’s get started with the basics and build up to a dish that’s sure to impress.
Ingredients
- 2 medium zucchinis – Look for firm, bright green zucchinis for the best noodles.
- 1 cup fresh basil leaves – The fresher, the better for that vibrant pesto flavor.
- 1/4 cup extra virgin olive oil – My go-to for its fruity depth.
- 1/4 cup grated Parmesan cheese – Adds a salty, umami kick.
- 1/4 cup pine nuts – Toast them lightly for extra crunch and flavor.
- 1 garlic clove – Because what’s pesto without a little garlic?
- Salt to taste – Just a pinch to bring all the flavors together.
Instructions
- Using a spiralizer, turn the zucchinis into noodles. If you don’t have a spiralizer, a julienne peeler works too.
- In a food processor, combine the basil, olive oil, Parmesan, pine nuts, and garlic. Pulse until smooth. Tip: Scrape down the sides as needed for an even blend.
- Heat a large skillet over medium heat. Add the zucchini noodles and sauté for 2-3 minutes, just until they’re slightly softened but still crisp. Tip: Don’t overcook, or they’ll become mushy.
- Remove from heat and toss the zucchini noodles with the pesto until evenly coated. Tip: Add a splash of pasta water if the pesto is too thick.
- Serve immediately, garnished with extra Parmesan and pine nuts if desired.
This dish offers a delightful crunch with the creamy richness of pesto, making it a perfect light meal or side. Try serving it with grilled chicken or shrimp for an extra protein boost.
Baked Salmon with Asparagus
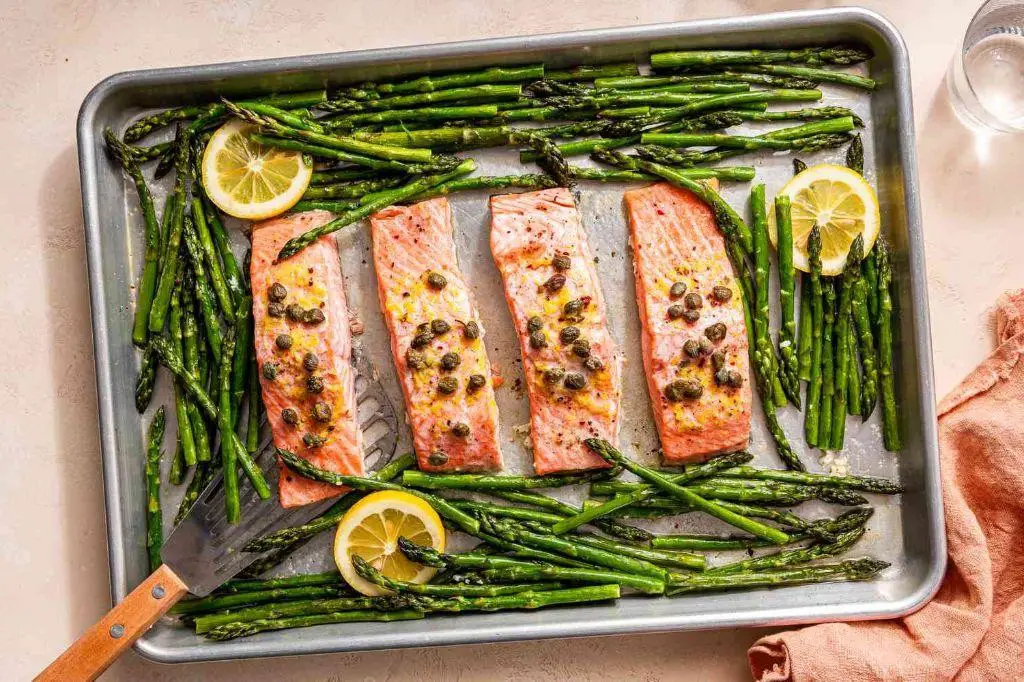
Here’s a simple yet elegant dish that’s perfect for a healthy weeknight dinner or a special occasion. Baked salmon with asparagus combines the rich, buttery flavor of salmon with the fresh, crisp taste of asparagus, all cooked to perfection in one pan.
Ingredients
- 1 lb salmon fillet (I love using wild-caught for its superior flavor and texture)
- 1 bunch asparagus, trimmed (about 1 lb, look for bright green stalks with tight tips)
- 2 tbsp extra virgin olive oil (my go-to for its fruity notes)
- 1 tsp salt (I prefer sea salt for its clean taste)
- 1/2 tsp black pepper (freshly ground makes all the difference)
- 1 lemon, thinly sliced (for that bright, citrusy kick)
- 2 cloves garlic, minced (because garlic makes everything better)
Instructions
- Preheat your oven to 400°F (200°C) to ensure it’s perfectly hot for baking.
- Line a baking sheet with parchment paper for easy cleanup, a little trick I always use.
- Place the salmon fillet in the center of the baking sheet and arrange the asparagus around it.
- Drizzle the olive oil over the salmon and asparagus, then sprinkle with salt and pepper.
- Scatter the minced garlic over the salmon and top with lemon slices for added flavor.
- Bake for 12-15 minutes, until the salmon flakes easily with a fork and the asparagus is tender-crisp. Tip: Don’t overcook the salmon to keep it moist.
- Let it rest for 2 minutes before serving to allow the flavors to meld beautifully.
Unbelievably moist and flavorful, this baked salmon with asparagus is a dish that’s as pleasing to the palate as it is to the eye. Serve it over a bed of quinoa or with a side of roasted potatoes for a complete meal that’s sure to impress.
Stuffed Bell Peppers with Turkey and Brown Rice

For a hearty and healthy meal that’s as colorful as it is delicious, stuffed bell peppers with turkey and brown rice is a fantastic choice. This dish combines lean protein, whole grains, and vibrant veggies in a way that’s both satisfying and simple to make.
Ingredients
- 4 large bell peppers (any color, but I love the contrast of red and green)
- 1 lb ground turkey (I find 93% lean works best for flavor and moisture)
- 1 cup cooked brown rice (leftover rice is perfect here)
- 1 small onion, diced (yellow or white for sweetness)
- 2 cloves garlic, minced (fresh is always my preference)
- 1 cup marinara sauce (homemade or your favorite store-bought brand)
- 1 tsp dried oregano (rubbed between your fingers to release the oils)
- 1/2 tsp salt (I use sea salt for its clean taste)
- 1/4 tsp black pepper (freshly ground makes a difference)
- 1 tbsp extra virgin olive oil (my go-to for sautéing)
- 1/2 cup shredded mozzarella cheese (for that perfect melt)
Instructions
- Preheat your oven to 375°F (190°C) to ensure it’s ready for baking.
- Cut the tops off the bell peppers and remove the seeds and membranes. A small paring knife works wonders here.
- Heat the olive oil in a large skillet over medium heat. Add the onion and garlic, sautéing until translucent, about 3-4 minutes.
- Add the ground turkey to the skillet, breaking it apart with a spoon. Cook until no longer pink, about 5-6 minutes.
- Stir in the cooked brown rice, marinara sauce, oregano, salt, and pepper. Mix well and let it simmer for 2 minutes to blend the flavors.
- Carefully spoon the turkey and rice mixture into the prepared bell peppers, packing it lightly. Top each with shredded mozzarella.
- Place the stuffed peppers in a baking dish and cover with foil. Bake for 25 minutes, then remove the foil and bake for another 10 minutes until the cheese is bubbly and slightly golden.
- Let the peppers rest for 5 minutes before serving. This allows the flavors to meld and makes them easier to handle.
After baking, the peppers are tender yet hold their shape, with a filling that’s moist and flavorful. Serve them with a side of crusty bread to soak up any extra sauce, or a simple green salad for a complete meal.
Chia Seed Pudding with Fresh Berries
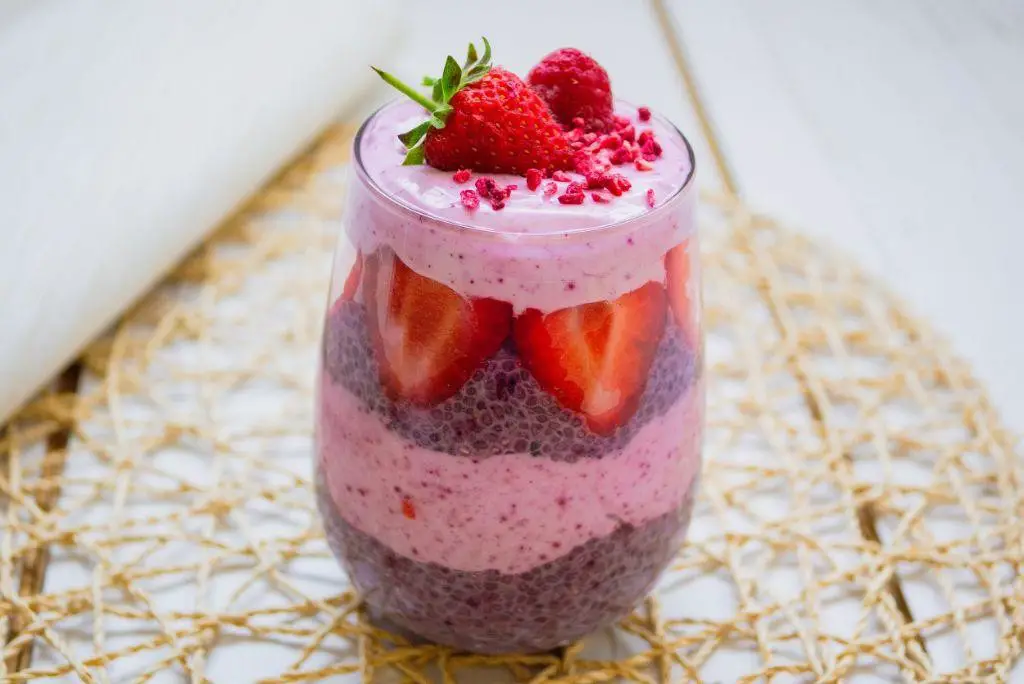
Understanding the basics of chia seed pudding can transform your breakfast routine into something both nutritious and effortlessly delicious. This recipe, Chia Seed Pudding with Fresh Berries, is a perfect example of how simple ingredients can come together to create a meal that’s as satisfying to make as it is to eat.
Ingredients
- 1/4 cup chia seeds (I find that organic chia seeds have the best texture)
- 1 cup almond milk (unsweetened is my preference for a cleaner taste)
- 1 tbsp maple syrup (pure maple syrup adds a lovely depth of flavor)
- 1/2 tsp vanilla extract (a splash of vanilla makes all the difference)
- 1 cup mixed fresh berries (strawberries, blueberries, and raspberries are my go-to)
Instructions
- In a medium bowl, combine the chia seeds and almond milk, stirring well to ensure the chia seeds are fully submerged.
- Add the maple syrup and vanilla extract to the bowl, stirring again to incorporate all the ingredients evenly.
- Cover the bowl with plastic wrap and refrigerate for at least 4 hours, or overnight, until the mixture has thickened to a pudding-like consistency. Tip: Stir the mixture once or twice during the first hour to prevent clumping.
- Once the chia pudding has set, give it a good stir to fluff it up slightly.
- Divide the pudding into two serving bowls and top each with 1/2 cup of mixed fresh berries. Tip: For an extra touch of sweetness, drizzle a little more maple syrup over the berries before serving.
- Serve immediately, or store covered in the refrigerator for up to 2 days. Tip: The pudding thickens more over time, so if you prefer a softer texture, add a splash of almond milk before serving.
The chia seed pudding will have a creamy, gelatinous texture that pairs beautifully with the fresh, juicy berries. For a creative twist, layer the pudding and berries in a glass for a parfait-style presentation that’s as visually appealing as it is delicious.
Spinach and Mushroom Frittata

Creating a delicious Spinach and Mushroom Frittata is simpler than you might think, and it’s a fantastic way to start your day with a nutritious meal. Let’s walk through the process together, ensuring you end up with a fluffy, flavorful frittata every time.
Ingredients
- 8 large eggs (I prefer room temp eggs here for a fluffier texture)
- 1 cup fresh spinach, roughly chopped (packed tightly for maximum flavor)
- 1 cup mushrooms, sliced (cremini mushrooms add a nice depth)
- 1/2 cup shredded cheddar cheese (sharp cheddar is my go-to for a bit of tang)
- 2 tbsp extra virgin olive oil (for that rich, fruity undertone)
- 1/4 tsp salt (just enough to enhance the natural flavors)
- 1/4 tsp black pepper (freshly ground for the best aroma)
Instructions
- Preheat your oven to 375°F (190°C) to ensure it’s ready for baking the frittata.
- Heat 2 tbsp of extra virgin olive oil in a 10-inch oven-safe skillet over medium heat until shimmering.
- Add 1 cup of sliced mushrooms to the skillet, sautéing until they’re golden brown and have released their moisture, about 5 minutes.
- Stir in 1 cup of roughly chopped fresh spinach, cooking just until wilted, about 1 minute. Tip: Don’t overcook the spinach to keep its vibrant color.
- In a large bowl, whisk together 8 large eggs, 1/4 tsp salt, and 1/4 tsp black pepper until well combined. Tip: Whisking the eggs thoroughly incorporates air, leading to a lighter frittata.
- Pour the egg mixture over the sautéed vegetables in the skillet, gently stirring to distribute the ingredients evenly.
- Sprinkle 1/2 cup of shredded cheddar cheese evenly over the top. Tip: Adding cheese on top creates a beautifully golden crust.
- Transfer the skillet to the preheated oven and bake for 15-20 minutes, or until the eggs are set and the top is lightly golden.
- Remove from the oven and let it sit for 5 minutes before slicing. This allows the frittata to set further and makes slicing cleaner.
Beautifully golden and packed with flavors, this frittata boasts a tender interior with a slightly crisp edge. Serve it warm with a side of fresh fruit or a light salad for a complete meal that’s sure to impress.
Lentil Soup with Kale
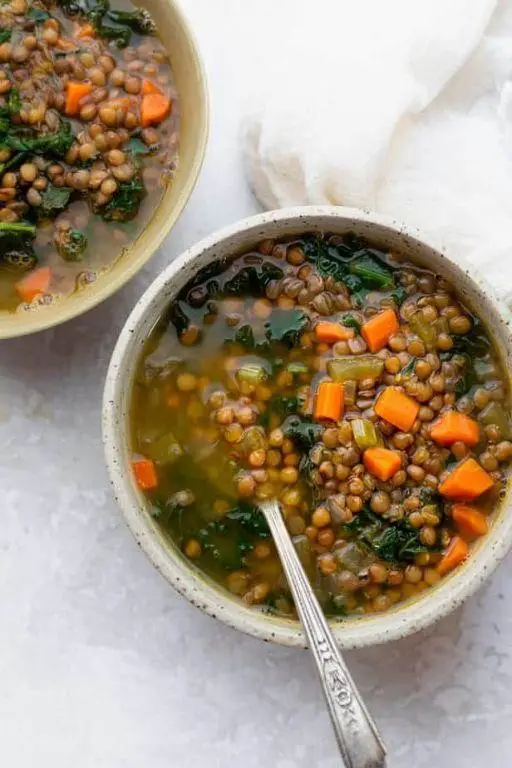
Unveiling the simplicity and heartiness of lentil soup with kale, this recipe is a perfect blend of nutrition and comfort, ideal for any season. Let’s walk through each step to create this wholesome dish together.
Ingredients
- 1 cup dried green lentils (rinsed and picked over for any debris)
- 2 tbsp extra virgin olive oil (my go-to for its fruity notes)
- 1 medium onion, diced (yellow onions work best for their sweetness)
- 2 carrots, peeled and diced (for a pop of color and sweetness)
- 2 cloves garlic, minced (freshly minced releases the best flavor)
- 6 cups vegetable broth (homemade or store-bought, but low sodium preferred)
- 1 bunch kale, stems removed and leaves chopped (I love the texture of curly kale here)
- 1 tsp ground cumin (for that warm, earthy note)
- Salt and pepper (to season, but we’ll specify amounts)
Instructions
- Heat the olive oil in a large pot over medium heat until shimmering, about 1 minute.
- Add the diced onion and carrots, sautéing until the onion is translucent, about 5 minutes. Tip: Stir occasionally to prevent burning.
- Stir in the minced garlic and cumin, cooking for another minute until fragrant. Tip: Garlic burns quickly, so keep the heat moderate.
- Add the rinsed lentils and vegetable broth, bringing the mixture to a boil.
- Reduce heat to low, cover, and simmer for 25 minutes, or until the lentils are tender. Tip: Skim off any foam that forms on top for a clearer soup.
- Stir in the chopped kale, cooking uncovered for an additional 5 minutes until the kale is wilted but still vibrant.
- Season with 1/2 tsp salt and 1/4 tsp pepper, adjusting as needed after tasting.
Every spoonful of this lentil soup with kale offers a comforting texture, with the lentils providing a soft bite and the kale adding a slight crispness. Serve it with a drizzle of olive oil and a slice of crusty bread for a complete meal.
Cauliflower Rice Stir Fry
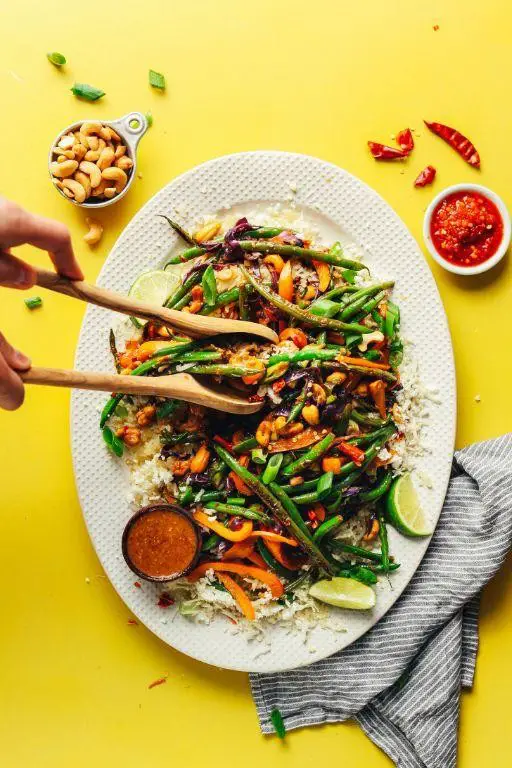
Ready to transform your weeknight dinners with a healthier twist? Cauliflower Rice Stir Fry is your ticket to a quick, nutritious meal that doesn’t skimp on flavor. Let’s break it down step by step, ensuring even the newest cooks can follow along with confidence.
Ingredients
- 1 large head of cauliflower (about 4 cups when riced; I find the fresher, the better for texture)
- 2 tbsp extra virgin olive oil (my go-to for its fruity notes)
- 1 cup diced carrots (for a sweet crunch)
- 1 cup frozen peas (no need to thaw, they cook quickly)
- 2 cloves garlic, minced (freshly minced packs the best punch)
- 2 tbsp soy sauce (low sodium works great if you’re watching salt intake)
- 1 tsp sesame oil (a little goes a long way for that authentic flavor)
- 2 eggs (I prefer room temp eggs here for even cooking)
Instructions
- Start by ricing the cauliflower: chop the florets into chunks and pulse in a food processor until it resembles rice. Don’t overprocess to avoid mushiness.
- Heat 1 tbsp olive oil in a large skillet over medium-high heat (about 350°F). Add the carrots and peas, stirring occasionally for 3 minutes until slightly softened.
- Push the veggies to one side of the skillet. Add the remaining olive oil and minced garlic to the empty space, sautéing for 30 seconds until fragrant.
- Mix the garlic with the veggies, then add the cauliflower rice. Stir well to combine, cooking for 5 minutes until the cauliflower is tender but still has bite.
- Create a well in the center of the skillet. Crack the eggs into it, scrambling gently until just set, about 2 minutes. Then, fold into the cauliflower mixture.
- Drizzle with soy sauce and sesame oil, stirring to evenly distribute. Cook for another minute to meld the flavors.
Vibrant and satisfying, this stir fry offers a delightful contrast of textures—from the tender cauliflower to the crisp veggies and fluffy eggs. Serve it in a bowl with a sprinkle of green onions or a dash of chili flakes for an extra kick.
Greek Yogurt with Honey and Nuts

Zesty and refreshing, this Greek Yogurt with Honey and Nuts is a simple yet elegant dish that’s perfect for any time of the day. Let’s dive into making this creamy, crunchy, and sweet delight that’s as nutritious as it is delicious.
Ingredients
- 1 cup Greek yogurt (I love the thick and creamy texture of full-fat Greek yogurt for this recipe)
- 2 tbsp honey (local honey is my preference for its rich flavor and health benefits)
- 1/4 cup mixed nuts (almonds and walnuts are my go-to for their crunch and nutritional value)
Instructions
- Measure out 1 cup of Greek yogurt and place it in a serving bowl. Tip: Let the yogurt sit at room temperature for about 10 minutes to slightly soften, enhancing its creaminess.
- Drizzle 2 tablespoons of honey over the yogurt. Tip: Warm the honey slightly if it’s too thick, making it easier to drizzle.
- Chop 1/4 cup of mixed nuts into small pieces for even distribution. Tip: Lightly toasting the nuts beforehand can add an extra layer of flavor.
- Sprinkle the chopped nuts evenly over the yogurt and honey.
- Serve immediately or chill in the refrigerator for up to 30 minutes for a cooler treat.
Creamy, sweet, and nutty, this dish offers a delightful contrast of textures and flavors. For a creative twist, layer the ingredients in a glass for a parfait-style presentation or add a sprinkle of cinnamon for warmth.
Turkey and Avocado Wrap
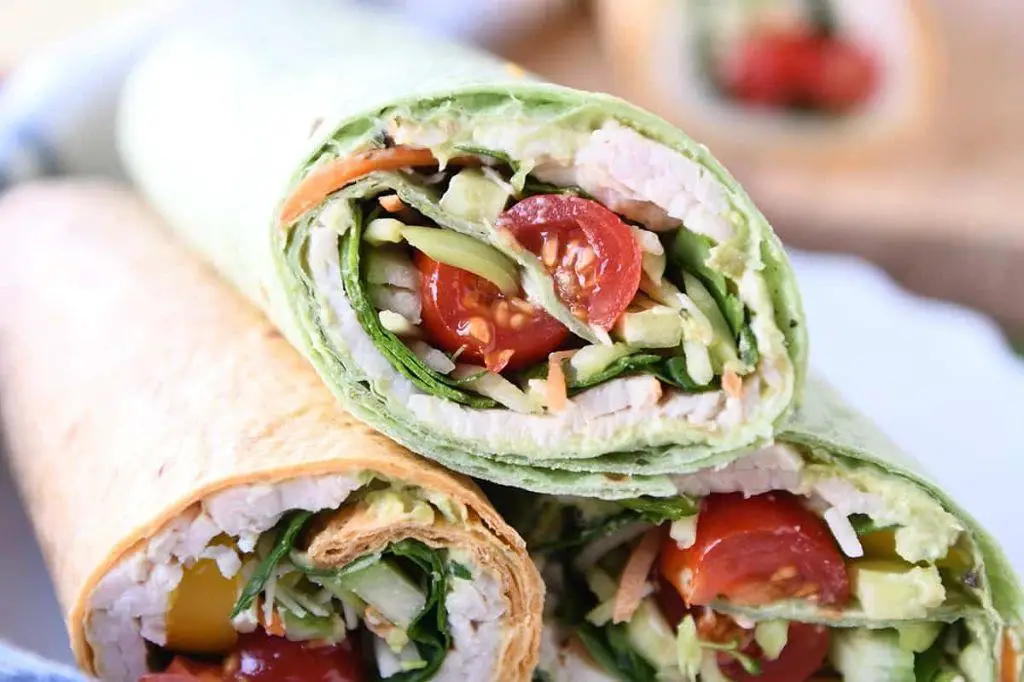
Delightfully simple yet satisfying, the Turkey and Avocado Wrap is a perfect blend of creamy and crunchy, making it an ideal meal for any time of the day. Let’s walk through the steps to create this delicious wrap, ensuring every bite is as enjoyable as the last.
Ingredients
- 1 large whole wheat tortilla (I find the whole wheat adds a nice, nutty flavor)
- 1/2 cup sliced turkey breast (opt for smoked turkey for an extra flavor kick)
- 1/2 ripe avocado, sliced (the riper, the creamier!)
- 1/4 cup shredded lettuce (I like using romaine for its crunch)
- 2 tbsp mayonnaise (a light mayo works just as well here)
- 1 tbsp mustard (Dijon mustard adds a lovely tang)
- 1/4 cup shredded cheddar cheese (sharp cheddar is my preference for its bold flavor)
Instructions
- Lay the whole wheat tortilla flat on a clean, dry surface.
- Spread the mayonnaise evenly over the tortilla, leaving a small border around the edges to prevent spillage.
- Dot the mustard over the mayonnaise, ensuring a balanced distribution for that perfect tang in every bite.
- Arrange the sliced turkey breast in a single layer over the sauces, covering most of the tortilla.
- Place the avocado slices on top of the turkey, spacing them out to ensure every wrap has creamy goodness.
- Sprinkle the shredded lettuce over the avocado, adding a refreshing crunch.
- Finish by evenly distributing the shredded cheddar cheese over the lettuce, which will melt slightly from the warmth of the other ingredients.
- Carefully roll the tortilla tightly from one end to the other, tucking in the ingredients as you go to keep everything snug inside.
- Slice the wrap in half diagonally for easier handling and a more appealing presentation.
The wrap offers a delightful contrast between the creamy avocado and the crisp lettuce, with the smoked turkey and sharp cheddar adding depth of flavor. Serve it with a side of sweet potato fries or a simple salad for a complete meal that’s both nutritious and satisfying.
Roasted Beet and Goat Cheese Salad
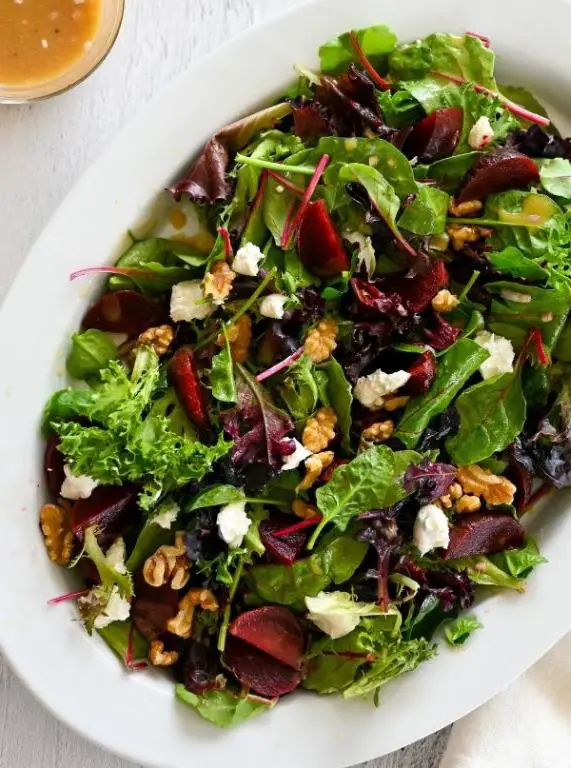
Now, let’s dive into creating a vibrant and flavorful Roasted Beet and Goat Cheese Salad that’s as pleasing to the eye as it is to the palate. This dish combines the earthy sweetness of beets with the creamy tang of goat cheese, creating a perfect balance of flavors and textures.
Ingredients
- 3 medium beets, peeled and cut into wedges – I find that golden beets add a lovely color contrast.
- 2 tbsp extra virgin olive oil – my go-to for its fruity notes.
- 1/2 tsp salt – to enhance the natural flavors.
- 1/4 tsp black pepper – freshly ground for the best aroma.
- 4 cups mixed greens – a blend of arugula and spinach works wonderfully.
- 1/2 cup crumbled goat cheese – room temperature for easier crumbling.
- 1/4 cup walnuts, toasted – adds a nice crunch.
- 2 tbsp balsamic vinegar – for a touch of acidity.
Instructions
- Preheat your oven to 400°F (200°C) to ensure it’s ready for roasting.
- Toss the beet wedges with olive oil, salt, and pepper until evenly coated. Tip: Use your hands for this to ensure every piece is well covered.
- Spread the beets in a single layer on a baking sheet. Roast for 25-30 minutes, turning halfway, until tender and slightly caramelized. Tip: The edges should start to crisp for maximum flavor.
- While the beets roast, arrange the mixed greens on a serving platter. Tip: A wide, shallow bowl showcases the salad’s colors beautifully.
- Once the beets are done, let them cool slightly before arranging them over the greens.
- Sprinkle the crumbled goat cheese and toasted walnuts over the top.
- Drizzle with balsamic vinegar just before serving to keep the greens crisp.
Vibrant and full of contrasting textures, this salad is a feast for the senses. Serve it as a starter to impress your guests or enjoy it as a light lunch with a slice of crusty bread on the side.
Homemade Hummus with Veggie Sticks
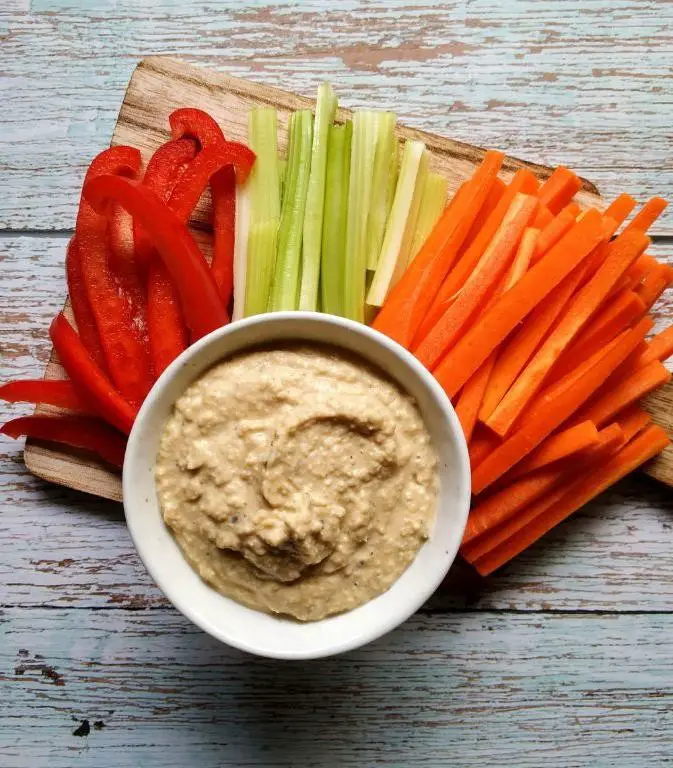
For those looking to whip up a quick, nutritious snack, homemade hummus with veggie sticks is a fantastic choice. This guide will walk you through the process, ensuring a smooth and enjoyable cooking experience.
Ingredients
- 1 can (15 oz) chickpeas, drained and rinsed (I love the creaminess they bring)
- 1/4 cup tahini (extra smooth for that perfect texture)
- 2 tbsp extra virgin olive oil (my go-to for its fruity notes)
- 1 garlic clove, minced (fresh is always best)
- Juice of 1 lemon (about 2 tbsp, for a bright kick)
- 1/2 tsp ground cumin (adds a warm depth)
- Salt to taste (I start with 1/4 tsp and adjust)
- 2-3 tbsp water (as needed for consistency)
- Assorted veggie sticks (carrots, cucumbers, and bell peppers are my favorites)
Instructions
- In a food processor, combine the chickpeas, tahini, olive oil, minced garlic, lemon juice, cumin, and salt.
- Process the mixture on high for 1 minute, then scrape down the sides with a spatula to ensure everything is well incorporated.
- With the processor running, slowly add water, 1 tablespoon at a time, until the hummus reaches your desired consistency. Tip: The hummus should be smooth and creamy, not too thick or runny.
- Taste and adjust seasoning, adding more salt or lemon juice if needed. Tip: Letting the hummus sit for 10 minutes before serving allows the flavors to meld beautifully.
- Transfer the hummus to a serving bowl and drizzle with a little extra olive oil. Tip: For an extra touch, sprinkle with paprika or chopped parsley.
- Serve immediately with fresh veggie sticks on the side for dipping.
Creating this homemade hummus yields a creamy, flavorful dip that pairs perfectly with the crisp freshness of veggie sticks. Consider serving it as part of a larger mezze platter or as a healthy snack any time of day.
Grilled Shrimp Skewers with Mango Salsa

Grilling season is upon us, and what better way to celebrate than with a dish that combines the smoky flavors of the grill with the fresh, vibrant taste of summer? Grilled shrimp skewers with mango salsa are a perfect choice for a quick, delicious meal that feels like a vacation on a plate.
Ingredients
- 1 lb large shrimp, peeled and deveined (I like to leave the tails on for a pretty presentation)
- 2 tbsp extra virgin olive oil (my go-to for its fruity flavor)
- 1 tsp smoked paprika (adds a nice depth)
- 1/2 tsp salt
- 1/4 tsp black pepper
- 2 ripe mangoes, diced (the sweeter, the better)
- 1/4 cup red onion, finely diced
- 1 jalapeño, seeded and minced (adjust to your heat preference)
- 2 tbsp fresh cilantro, chopped
- 1 lime, juiced
Instructions
- Preheat your grill to medium-high heat (about 375°F to 400°F).
- In a large bowl, toss the shrimp with olive oil, smoked paprika, salt, and pepper until evenly coated.
- Thread the shrimp onto skewers, about 4-5 shrimp per skewer, depending on size.
- Grill the shrimp skewers for 2-3 minutes per side, or until the shrimp are pink and opaque. Tip: Don’t overcrowd the grill to ensure even cooking.
- While the shrimp are grilling, combine the diced mangoes, red onion, jalapeño, cilantro, and lime juice in a bowl to make the salsa. Tip: Let the salsa sit for a few minutes to allow the flavors to meld.
- Remove the shrimp skewers from the grill and let them rest for a minute before serving. Tip: This rest period helps the juices redistribute, making the shrimp even more flavorful.
You’ll love the contrast between the smoky, slightly spicy shrimp and the sweet, tangy mango salsa. Serve these skewers over a bed of cilantro lime rice or alongside a crisp green salad for a complete meal that’s as beautiful as it is delicious.
Quinoa Stuffed Acorn Squash
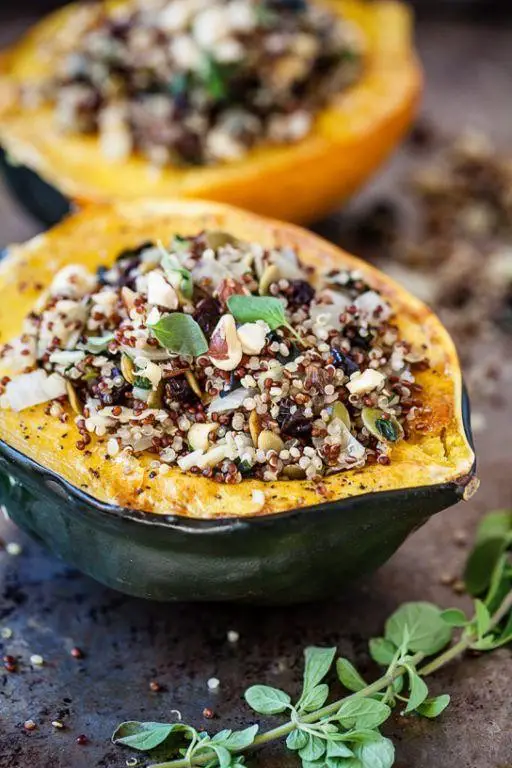
When the autumn air turns crisp, there’s nothing quite like the warmth of a hearty, wholesome dish to bring comfort to your table. Quinoa stuffed acorn squash is a perfect blend of nutty grains and sweet, tender squash, making it a delightful meal that’s as nutritious as it is delicious.
Ingredients
- 2 medium acorn squashes – look for ones that feel heavy for their size, a sign they’re packed with moisture.
- 1 cup quinoa – I always rinse mine under cold water to remove any bitterness.
- 2 cups vegetable broth – homemade is my preference, but store-bought works in a pinch.
- 1 tbsp extra virgin olive oil – my go-to for its fruity notes.
- 1 small onion, diced – yellow onions are my choice for their balance of sweetness and sharpness.
- 2 cloves garlic, minced – fresh is best here for that punch of flavor.
- 1/2 tsp salt – I like to use sea salt for its clean taste.
- 1/4 tsp black pepper – freshly ground makes all the difference.
- 1/4 cup dried cranberries – for a pop of color and a hint of sweetness.
- 1/4 cup chopped pecans – toasted lightly to bring out their nutty essence.
Instructions
- Preheat your oven to 375°F (190°C) to ensure it’s ready for roasting the squash.
- Cut the acorn squashes in half horizontally and scoop out the seeds with a spoon. Tip: A melon baller works wonders for this task.
- Brush the cut sides of the squash with olive oil and place them cut-side down on a baking sheet. Roast for 25 minutes until the flesh is tender when pierced with a fork.
- While the squash roasts, rinse the quinoa under cold water in a fine-mesh strainer to remove its natural coating, which can taste bitter.
- In a medium saucepan, heat the remaining olive oil over medium heat. Add the onion and garlic, sautéing until they’re soft and fragrant, about 5 minutes.
- Add the quinoa to the saucepan along with the vegetable broth, salt, and pepper. Bring to a boil, then reduce the heat to low, cover, and simmer for 15 minutes until the quinoa is fluffy and the liquid is absorbed. Tip: Resist the urge to peek under the lid; letting the steam do its work is key.
- Remove the quinoa from the heat and stir in the dried cranberries and chopped pecans. Tip: Toasting the pecans beforehand enhances their flavor and adds a nice crunch.
- Flip the roasted squash halves cut-side up and divide the quinoa mixture among them, packing it in lightly. Return to the oven for 10 minutes to warm through.
Now the quinoa stuffed acorn squash is ready to serve, offering a delightful contrast between the creamy squash and the crunchy, nutty filling. For an extra touch of elegance, drizzle with a little more olive oil or sprinkle with fresh herbs before serving.
Berry and Spinach Smoothie
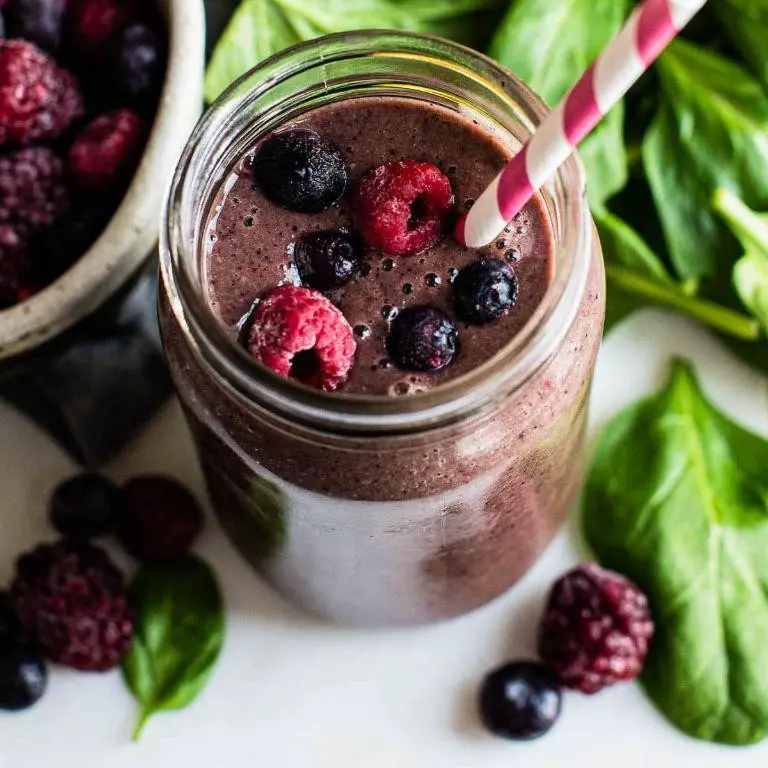
Let’s dive into making a refreshing Berry and Spinach Smoothie, perfect for a quick breakfast or a healthy snack. This recipe is straightforward, ensuring even beginners can whip it up with ease.
Ingredients
- 1 cup frozen mixed berries (I love the blend of strawberries, blueberries, and raspberries for a tangy kick)
- 1 cup fresh spinach (packed, and make sure it’s dry to avoid a watery smoothie)
- 1 banana (ripe, for natural sweetness and creaminess)
- 1/2 cup Greek yogurt (I prefer plain for a tangy contrast, but vanilla works too)
- 1 cup almond milk (unsweetened, to keep it light)
- 1 tbsp honey (optional, but great if you like it sweeter)
Instructions
- Start by adding the frozen mixed berries to your blender. This helps in achieving a thick, frosty texture.
- Add the fresh spinach next. Tip: Tear the leaves slightly if your blender isn’t very powerful.
- Peel the banana, break it into chunks, and add it to the blender. Tip: Using a ripe banana not only sweetens the smoothie naturally but also adds a creamy texture.
- Scoop in the Greek yogurt. Tip: If you’re using vanilla yogurt, you might skip the honey unless you prefer it extra sweet.
- Pour in the almond milk. This amount gives a perfect pour-able consistency, but feel free to adjust based on your preference.
- If using, drizzle the honey over the other ingredients.
- Blend on high for about 45 seconds, or until the mixture is completely smooth. Tip: Stop and scrape down the sides if needed to ensure everything is well incorporated.
After blending, you’ll notice the smoothie has a vibrant purple-green hue, thanks to the spinach and berries. The texture is luxuriously creamy, with a perfect balance of sweetness and tang. Serve it immediately in a chilled glass with a straw, or pour it into a bowl and top with granola and fresh berries for a smoothie bowl variation.
Baked Chicken with Sweet Potatoes
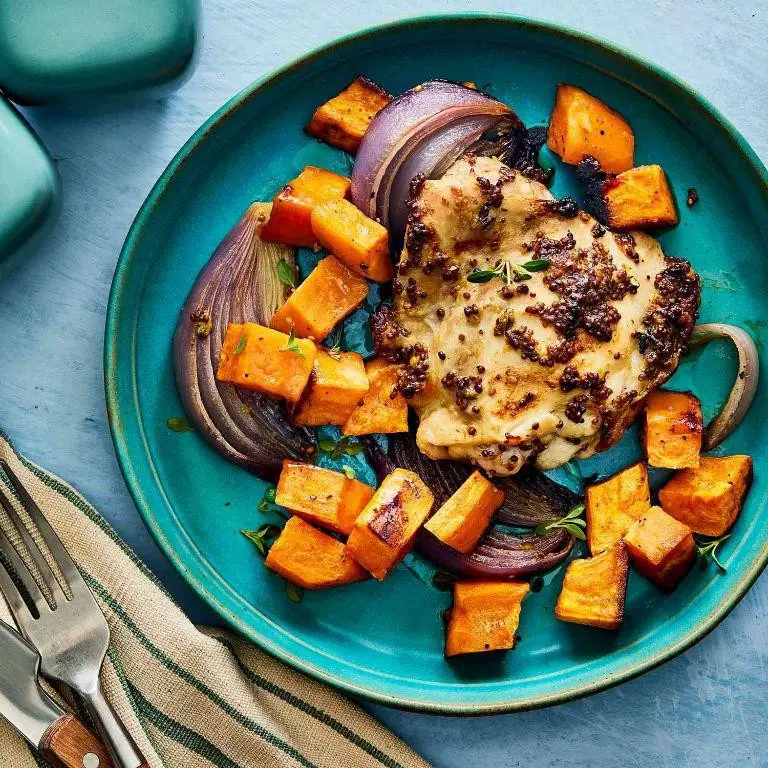
After a long day, there’s nothing quite like the comforting aroma of baked chicken and sweet potatoes wafting through your kitchen. This dish is a perfect blend of savory and sweet, with minimal prep and maximum flavor.
Ingredients
- 2 boneless, skinless chicken breasts (I find organic ones have better texture)
- 2 medium sweet potatoes, peeled and cubed (about 2 cups)
- 2 tbsp extra virgin olive oil (my go-to for its fruity notes)
- 1 tsp garlic powder (fresh minced garlic works too, but powder is quicker)
- 1 tsp smoked paprika (adds a nice depth)
- 1/2 tsp salt (I prefer sea salt for its mild flavor)
- 1/4 tsp black pepper (freshly ground if you have it)
- 1 tbsp honey (local honey adds a lovely floral touch)
Instructions
- Preheat your oven to 375°F (190°C) to ensure it’s ready for baking.
- In a large bowl, toss the sweet potato cubes with 1 tbsp olive oil, 1/2 tsp salt, and 1/4 tsp black pepper until evenly coated.
- Spread the sweet potatoes on a baking sheet in a single layer to ensure even cooking.
- Bake the sweet potatoes for 20 minutes; this pre-cooking helps them get a head start since they take longer than the chicken.
- While the sweet potatoes bake, rub the chicken breasts with the remaining 1 tbsp olive oil, then season with garlic powder, smoked paprika, and the remaining salt.
- After the 20 minutes, push the sweet potatoes to one side of the baking sheet and place the chicken breasts on the other side.
- Drizzle the honey over the chicken for a sweet glaze that caramelizes beautifully in the oven.
- Bake everything together for another 20-25 minutes, or until the chicken reaches an internal temperature of 165°F (74°C) and the sweet potatoes are tender.
- Let the chicken rest for 5 minutes before slicing to keep it juicy.
Enjoy the tender, juicy chicken alongside the caramelized sweet potatoes for a meal that’s as nutritious as it is delicious. For an extra touch, sprinkle with fresh thyme or a dash of chili flakes before serving.
Eggplant Parmesan with Whole Wheat Pasta
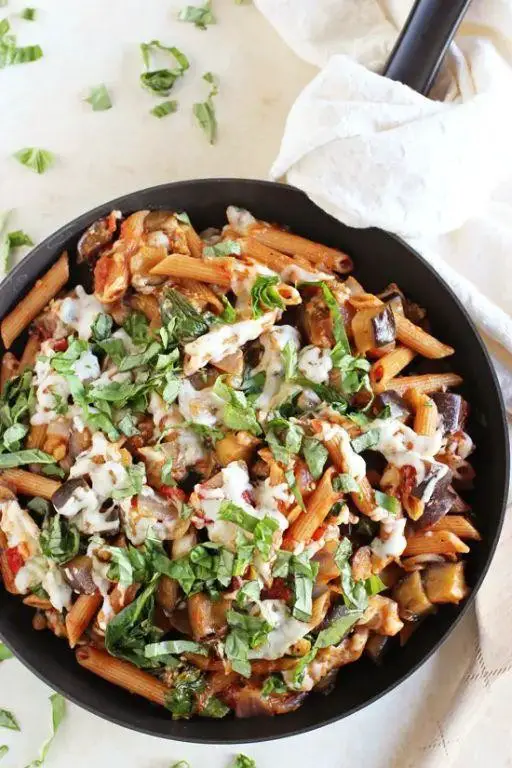
Many home cooks shy away from eggplant, fearing it’s too tricky to get right, but this Eggplant Parmesan with Whole Wheat Pasta is a foolproof way to enjoy its rich, meaty texture. Let’s break it down into simple, manageable steps to ensure delicious results every time.
Ingredients
- 1 large eggplant, sliced into 1/2-inch rounds (I find salting them draws out bitterness and improves texture)
- 1 cup whole wheat pasta (my pantry staple for a nutty flavor and extra fiber)
- 2 cups marinara sauce (homemade or your favorite jarred brand)
- 1 cup shredded mozzarella cheese (for that perfect melt)
- 1/2 cup grated Parmesan cheese (the real deal makes a difference)
- 1/2 cup breadcrumbs (I like panko for extra crunch)
- 1 egg, beaten (room temp eggs blend more smoothly)
- 2 tbsp extra virgin olive oil (my go-to for its fruity notes)
- 1 tsp dried basil (or fresh if you have it)
- Salt and pepper to season
Instructions
- Preheat your oven to 375°F (190°C) to ensure it’s ready for baking.
- Salt the eggplant slices on both sides and let them sit for 30 minutes to draw out moisture, then pat dry.
- Cook the whole wheat pasta according to package instructions until al dente, then drain and set aside.
- Dip each eggplant slice in beaten egg, then coat with breadcrumbs mixed with Parmesan cheese.
- Heat olive oil in a pan over medium heat and fry the eggplant slices until golden brown, about 3 minutes per side.
- In a baking dish, layer marinara sauce, fried eggplant, cooked pasta, and mozzarella cheese. Repeat layers ending with cheese.
- Bake for 25 minutes or until the cheese is bubbly and golden.
- Let it rest for 5 minutes before serving to allow the flavors to meld.
Zesty and hearty, this dish offers a delightful contrast between the crispy eggplant and tender pasta. Serve it with a side of garlic bread to scoop up any leftover sauce, or enjoy it as is for a satisfying meal that’s both comforting and nutritious.
Cucumber and Tomato Salad with Feta
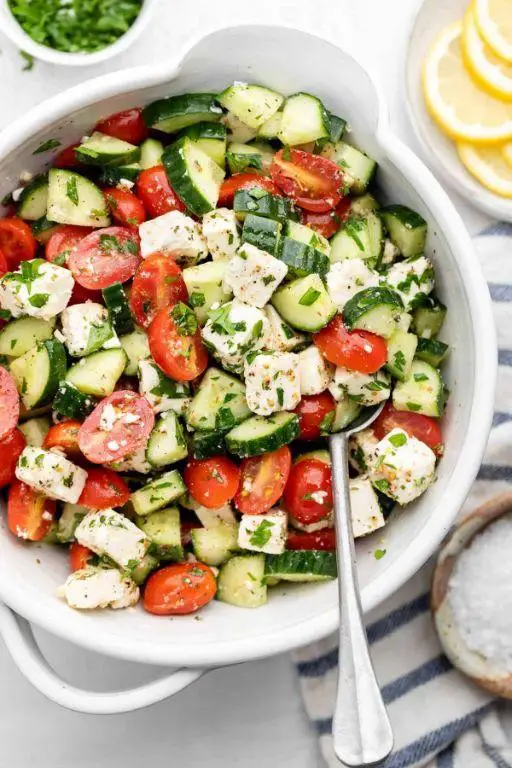
Even the simplest dishes can bring a burst of flavor to your table, and this Cucumber and Tomato Salad with Feta is no exception. Perfect for those warm summer days or when you’re craving something light yet satisfying, this salad combines crisp vegetables with creamy feta for a delightful contrast.
Ingredients
- 2 large cucumbers, peeled and diced (I leave a bit of skin on for color and texture)
- 4 medium tomatoes, diced (ripe but firm works best here)
- 1/2 cup crumbled feta cheese (I love using block feta for its creaminess)
- 1/4 cup extra virgin olive oil (my go-to for dressings)
- 2 tbsp red wine vinegar (adds a nice tang)
- 1 tsp dried oregano (fresh is great if you have it)
- Salt and freshly ground black pepper (to taste, but don’t be shy)
Instructions
- In a large mixing bowl, combine the diced cucumbers and tomatoes.
- In a small bowl, whisk together the extra virgin olive oil, red wine vinegar, dried oregano, salt, and pepper until well blended. Tip: Letting the dressing sit for a few minutes helps the flavors meld.
- Pour the dressing over the cucumber and tomato mixture, gently tossing to ensure everything is evenly coated. Tip: Use a rubber spatula to avoid bruising the tomatoes.
- Sprinkle the crumbled feta cheese over the top of the salad just before serving. Tip: Adding the feta last keeps it from dissolving into the dressing.
Serve this salad immediately to enjoy the crispness of the cucumbers against the juicy tomatoes and creamy feta. It’s a versatile dish that pairs beautifully with grilled meats or can stand alone as a refreshing lunch. Some like to add a handful of kalamata olives for an extra layer of flavor.
Conclusion
Exploring these 20 healthy, clean, and delicious recipes is a fantastic way to nourish your body and delight your taste buds. Each dish is packed with nutrients and flavor, making healthy eating anything but boring. We’d love to hear which recipes become your favorites—drop us a comment below! And if you found this roundup helpful, please share it on Pinterest to spread the goodness. Happy cooking!