There’s nothing quite like starting your day with a warm, crispy waffle fresh from the Dash waffle maker, and we’ve got 18 mouthwatering recipes to transform your breakfast routine. From classic buttermilk to creative twists like pumpkin spice and chocolate chip, these easy-to-follow ideas will have you eager to wake up and whip up something delicious. Dive in and discover your new favorite morning treat!
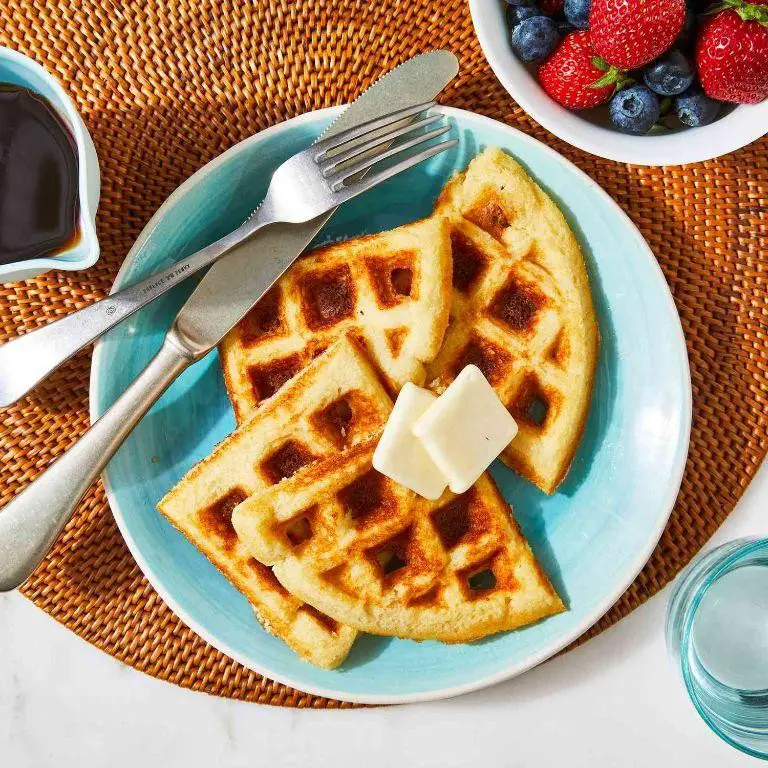
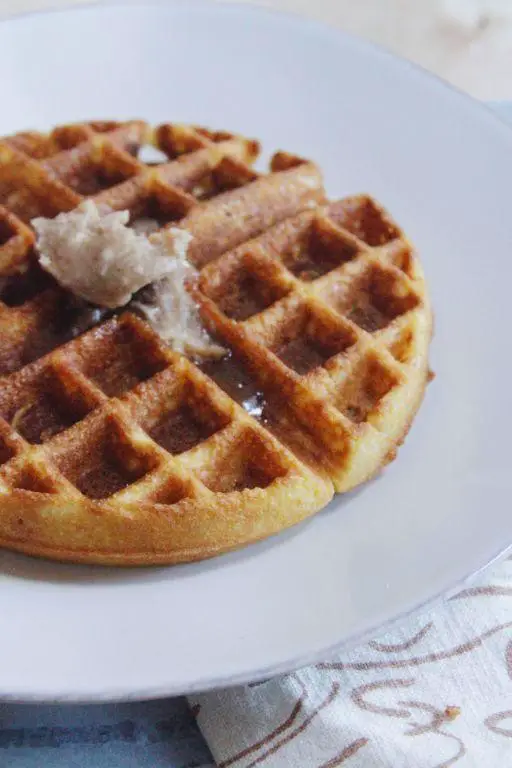
Classic Belgian Waffles
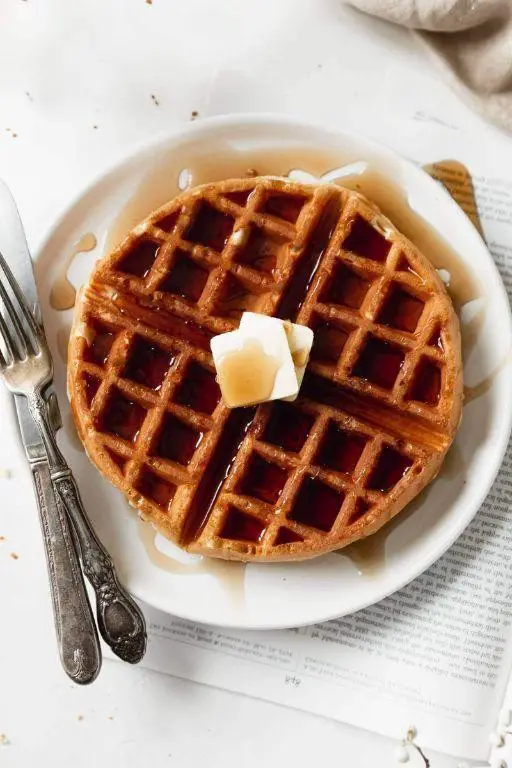
Belgian waffles are a delightful breakfast treat that combines a crispy exterior with a light, fluffy interior. Perfect for a leisurely weekend morning, this recipe will guide you through creating these golden beauties from scratch.
Ingredients
- 2 cups all-purpose flour (I like to sift mine for extra fluffiness)
- 1 tbsp baking powder (freshness is key here)
- 1/4 cup granulated sugar (for that perfect hint of sweetness)
- 1/2 tsp salt (to balance the flavors)
- 2 large eggs (room temperature eggs blend more smoothly)
- 1 1/2 cups whole milk (the richer, the better)
- 1/2 cup unsalted butter, melted (I prefer unsalted to control the saltiness)
- 1 tsp vanilla extract (pure vanilla makes all the difference)
Instructions
- Preheat your waffle iron to 375°F; a properly heated iron ensures a crispy exterior.
- In a large bowl, whisk together the flour, baking powder, sugar, and salt until well combined.
- In another bowl, beat the eggs lightly, then add the milk, melted butter, and vanilla extract, whisking until smooth.
- Pour the wet ingredients into the dry ingredients, stirring gently until just combined. Tip: Overmixing leads to tough waffles.
- Let the batter rest for 5 minutes; this allows the baking powder to activate for fluffier waffles.
- Lightly grease the waffle iron with butter or non-stick spray, then pour 1/2 cup of batter onto the center of the iron.
- Close the lid and cook for about 4-5 minutes, or until the waffles are golden brown and crisp. Tip: Avoid opening the iron too soon to prevent sticking.
- Carefully remove the waffle and repeat with the remaining batter. Tip: Keep cooked waffles warm in a 200°F oven while you finish the batch.
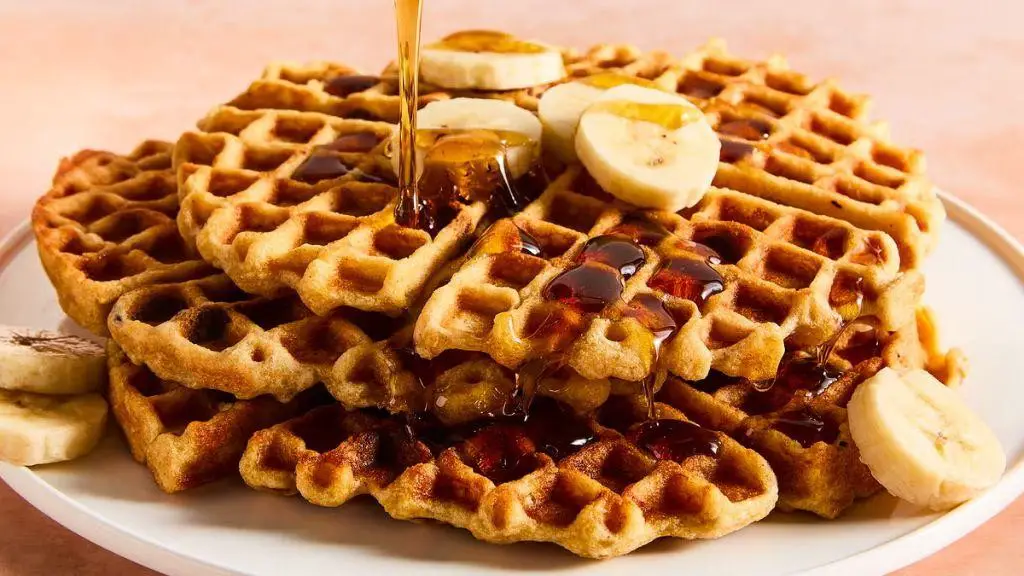
Unbelievably light and crispy, these Belgian waffles are perfect with a drizzle of maple syrup, a dollop of whipped cream, or fresh berries for a burst of color and flavor. Try serving them with a side of crispy bacon for a sweet and savory combination that’s sure to impress.
Blueberry Lemon Waffles
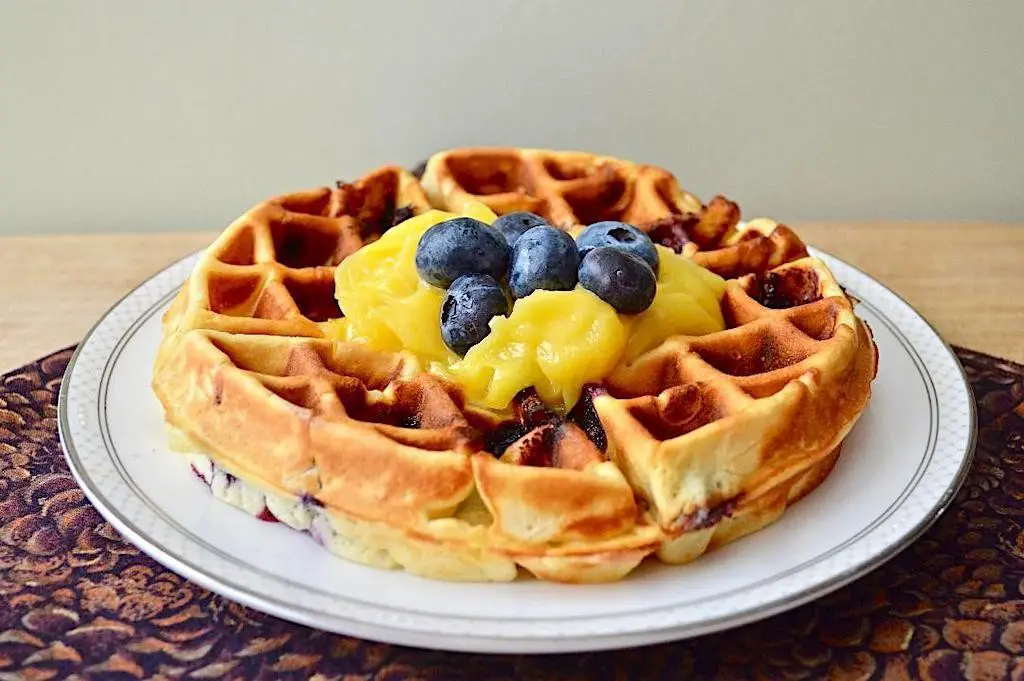
You’re about to embark on a delightful culinary journey with these Blueberry Lemon Waffles, a perfect blend of tangy and sweet that’s sure to brighten your morning. Let’s walk through each step together to ensure your waffles come out perfectly fluffy and bursting with flavor.
Ingredients
- 1 1/2 cups all-purpose flour (I like to sift mine for extra fluffiness)
- 2 tbsp granulated sugar (just the right amount of sweetness)
- 1 tbsp baking powder (the secret to that perfect rise)
- 1/2 tsp salt (balances the flavors beautifully)
- 1 cup milk (whole milk makes them richer, but any works)
- 2 large eggs (room temperature blends better)
- 1/4 cup unsalted butter, melted (cooled slightly to avoid cooking the eggs)
- 1 tsp vanilla extract (pure extract makes all the difference)
- 1 cup fresh blueberries (frozen works too, but don’t thaw)
- Zest of 1 lemon (for that bright, citrusy kick)
Instructions
- Preheat your waffle iron to 375°F; a properly heated iron ensures a crispy exterior.
- In a large bowl, whisk together the flour, sugar, baking powder, and salt until well combined.
- In another bowl, beat the eggs lightly, then add the milk, melted butter, and vanilla extract, whisking until smooth.
- Pour the wet ingredients into the dry ingredients, stirring gently until just combined. Tip: Overmixing leads to tough waffles.
- Fold in the blueberries and lemon zest gently to distribute evenly without crushing the berries.
- Lightly grease the waffle iron with butter or non-stick spray, then pour 1/2 cup of batter onto the center of the iron.
- Close the lid and cook for about 4-5 minutes, or until the waffles are golden brown and crisp. Tip: Don’t peek too early; let them cook undisturbed.
- Carefully remove the waffle and repeat with the remaining batter. Tip: Keep cooked waffles warm in a 200°F oven while you finish the batch.
How these waffles turn out is nothing short of magical—crispy on the outside, tender inside, with pockets of juicy blueberries and a hint of lemon zest. Serve them stacked high with a drizzle of maple syrup and a dollop of whipped cream for an extra indulgent breakfast.
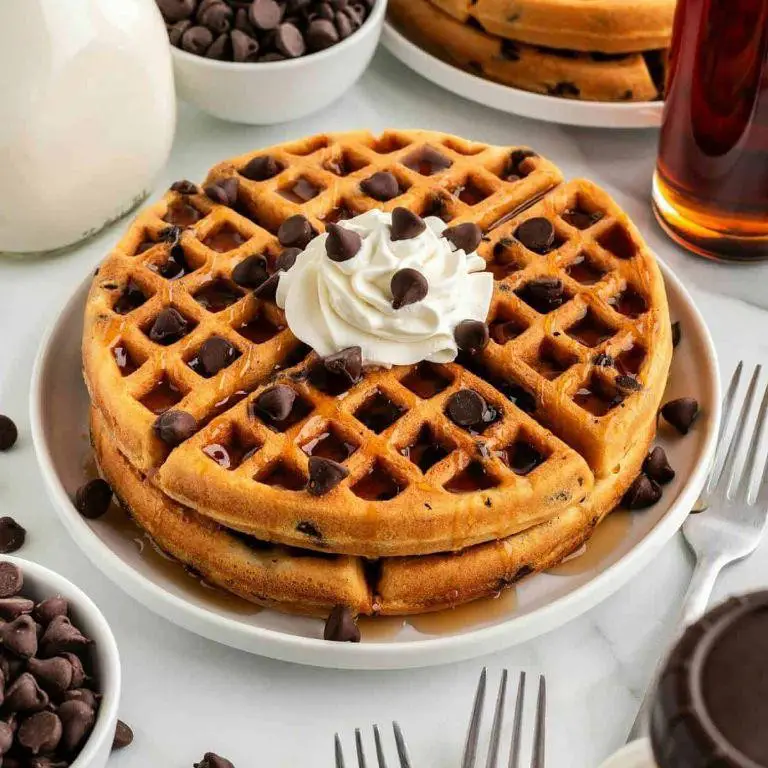
Chocolate Chip Waffles
Today is ‘2025-06-15 03:07:17.163934’, You’re a professional food blogger writing a relatable US-based roundup-style recipe article. Introduce the dish: ‘Chocolate Chip Waffles’ using the structure below.
Tone: Use a methodical, step-by-step tone. Sound like a cooking teacher guiding a beginner.
Write a short 2-3 sentence intro, The first word of your introduction must begin with the letter ‘T’. Do not display the title. Start directly with the introduction.
Ingredients
- 1 1/2 cups all-purpose flour (I like to sift mine for extra fluffiness)
- 2 tbsp granulated sugar (a little extra won’t hurt if you’ve got a sweet tooth)
- 1 tbsp baking powder (the fresher, the better)
- 1/2 tsp salt (I prefer sea salt for its subtle crunch)
- 1 1/4 cups milk (whole milk makes them richer, but any works)
- 1/3 cup melted butter (unsalted is my go-to, but salted adds a nice contrast)
- 2 large eggs (room temperature eggs blend more smoothly)
- 1 tsp vanilla extract (pure extract makes all the difference)
- 1/2 cup chocolate chips (I love dark chocolate, but milk or white are great too)
Instructions
- Preheat your waffle iron to 375°F; a properly heated iron ensures a crispy exterior.
- In a large bowl, whisk together the flour, sugar, baking powder, and salt until well combined.
- In another bowl, beat the milk, melted butter, eggs, and vanilla extract until smooth.
- Pour the wet ingredients into the dry ingredients and stir until just combined; overmixing leads to tough waffles.
- Gently fold in the chocolate chips, distributing them evenly throughout the batter.
- Lightly grease the waffle iron with butter or non-stick spray, then pour 1/2 cup of batter onto the center of the iron.
- Close the lid and cook for about 3-4 minutes, or until the waffles are golden brown and crisp.
- Carefully remove the waffle and repeat with the remaining batter, keeping finished waffles warm in a 200°F oven if needed.
Mmm, these chocolate chip waffles come out with a perfect balance of crispy edges and fluffy centers, the melted chocolate adding gooey pockets of sweetness. Serve them stacked high with a drizzle of maple syrup and a dollop of whipped cream for an indulgent breakfast treat.
Pumpkin Spice Waffles
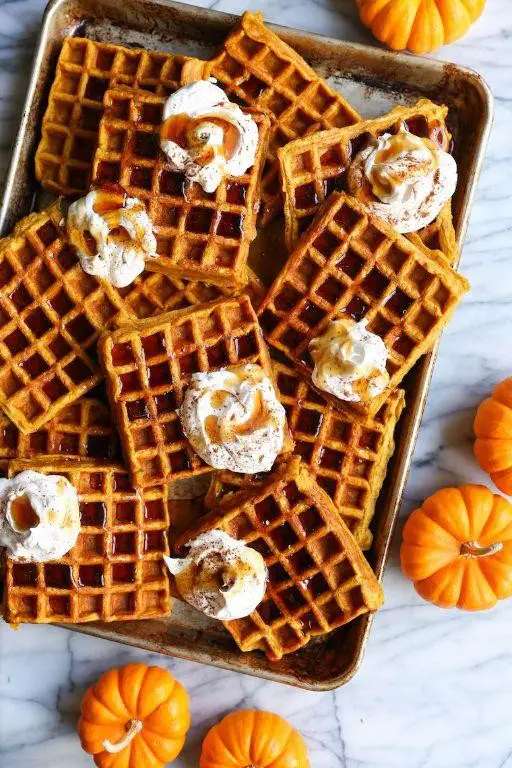
Here’s how to make the most comforting Pumpkin Spice Waffles that’ll fill your kitchen with the cozy aromas of fall, any time of the year. Follow these steps carefully, and you’ll have a delicious breakfast ready in no time.
Ingredients
- 1 1/2 cups all-purpose flour (I like to sift mine for extra fluffiness)
- 2 tsp baking powder (fresh is best for maximum rise)
- 1/2 tsp salt (a pinch more if you’re using unsalted butter)
- 1 tsp ground cinnamon (the heart of pumpkin spice)
- 1/2 tsp ground ginger (for a little warmth)
- 1/4 tsp ground nutmeg (just a whisper)
- 1/4 tsp ground cloves (sparingly, it’s potent)
- 1 cup pumpkin puree (not pumpkin pie filling)
- 3/4 cup milk (whole milk makes them richer)
- 1/2 cup brown sugar (packed for that molasses depth)
- 2 large eggs (room temperature blends better)
- 4 tbsp unsalted butter, melted (cooled slightly)
- 1 tsp vanilla extract (pure, for the best flavor)
Instructions
- Preheat your waffle iron to 375°F; a properly heated iron ensures a crispy exterior.
- In a large bowl, whisk together the flour, baking powder, salt, cinnamon, ginger, nutmeg, and cloves. Tip: Sifting the dry ingredients can prevent lumps.
- In another bowl, mix the pumpkin puree, milk, brown sugar, eggs, melted butter, and vanilla extract until smooth. Tip: Whisk the wet ingredients well to incorporate air, making the waffles lighter.
- Gently fold the wet ingredients into the dry ingredients until just combined. Tip: Overmixing leads to tough waffles; a few lumps are okay.
- Lightly grease the waffle iron with butter or non-stick spray. Pour 1/2 cup of batter onto the center of the iron, close, and cook until the waffle is golden brown and steam stops, about 4-5 minutes.
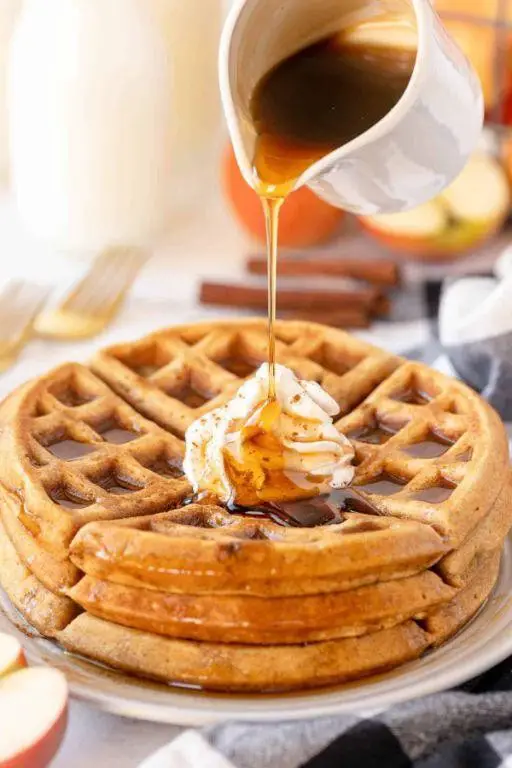
- Serve immediately with maple syrup and a dollop of whipped cream for extra indulgence. These waffles are wonderfully spiced, with a tender interior and crisp edges, perfect for a leisurely weekend breakfast.
Zesty and warmly spiced, these Pumpkin Spice Waffles are a delightful twist on the classic. Try topping them with toasted pecans or a drizzle of caramel for an extra special treat.
Banana Bread Waffles
Unlock the magic of breakfast with these Banana Bread Waffles, a delightful twist on two classics that will make your mornings infinitely better. Perfect for beginners and seasoned cooks alike, this recipe guides you through each step with precision.
Ingredients
- 1 cup all-purpose flour (I swear by King Arthur for consistent results)
- 1 tbsp sugar (a little sweetness goes a long way)
- 1 tsp baking powder (the fresher, the fluffier)
- 1/2 tsp cinnamon (my secret weapon for warmth)
- 1/4 tsp salt (balances the sweetness perfectly)
- 1 large egg, room temp (trust me, it blends better)
- 1 cup mashed ripe banana (about 2 medium, the spottier, the sweeter)
- 1/2 cup milk (whole milk makes them extra rich)
- 2 tbsp melted butter (unsalted, so you control the salt)
- 1 tsp vanilla extract (pure extract makes all the difference)
Instructions
- Preheat your waffle iron to 375°F; a hot iron ensures a crispy exterior.
- In a large bowl, whisk together flour, sugar, baking powder, cinnamon, and salt.
- In another bowl, beat the egg lightly before adding mashed banana, milk, melted butter, and vanilla extract. Tip: Mash the banana with a fork for a rustic texture.
- Pour the wet ingredients into the dry ingredients, stirring just until combined. Tip: Overmixing leads to tough waffles; a few lumps are okay.
- Lightly grease the waffle iron with butter or non-stick spray. Tip: Even greasing prevents sticking without overpowering the flavor.
- Pour 1/2 cup batter onto the center of the iron, close, and cook until golden brown and crisp, about 4-5 minutes.
- Repeat with remaining batter, keeping finished waffles warm in a 200°F oven if needed.
Zesty and comforting, these waffles boast a crispy edge with a soft, banana-packed center. Serve them stacked high with a drizzle of maple syrup and a sprinkle of walnuts for an unforgettable breakfast.
Cinnamon Roll Waffles
Zesty mornings call for something special, and these Cinnamon Roll Waffles are just the ticket. Combining the comfort of cinnamon rolls with the crispiness of waffles, this recipe is a game-changer for breakfast enthusiasts.
Ingredients
- 1 cup all-purpose flour (I swear by King Arthur for consistent results)
- 2 tbsp granulated sugar (a little extra won’t hurt if you’ve got a sweet tooth)
- 1 tsp baking powder (freshness is key, so check the date)
- 1/2 tsp salt (I prefer sea salt for its subtle crunch)
- 1 cup milk (whole milk makes them richer, but any works)
- 1 large egg (room temp eggs blend better, trust me)
- 2 tbsp melted butter (unsalted is my go-to for control over saltiness)
- 1 tsp vanilla extract (pure extract makes all the difference)
- 2 tbsp cinnamon (because you can never have too much)
- 1/4 cup brown sugar (packed tight for that molasses kick)
Instructions
- Preheat your waffle iron to 375°F; a hot iron ensures a crispy exterior.
- In a large bowl, whisk together the flour, granulated sugar, baking powder, and salt.
- In another bowl, beat the milk, egg, melted butter, and vanilla extract until smooth.
- Gently fold the wet ingredients into the dry until just combined; overmixing leads to tough waffles.
- In a small bowl, mix the cinnamon and brown sugar for the filling.
- Pour 1/2 cup batter onto the center of the iron, sprinkle with 1 tbsp cinnamon sugar, then top with another 1/2 cup batter.
- Close the iron and cook for 3-4 minutes until golden and crisp; steam slowing means they’re done.
- Repeat with remaining batter, keeping finished waffles warm in a 200°F oven.
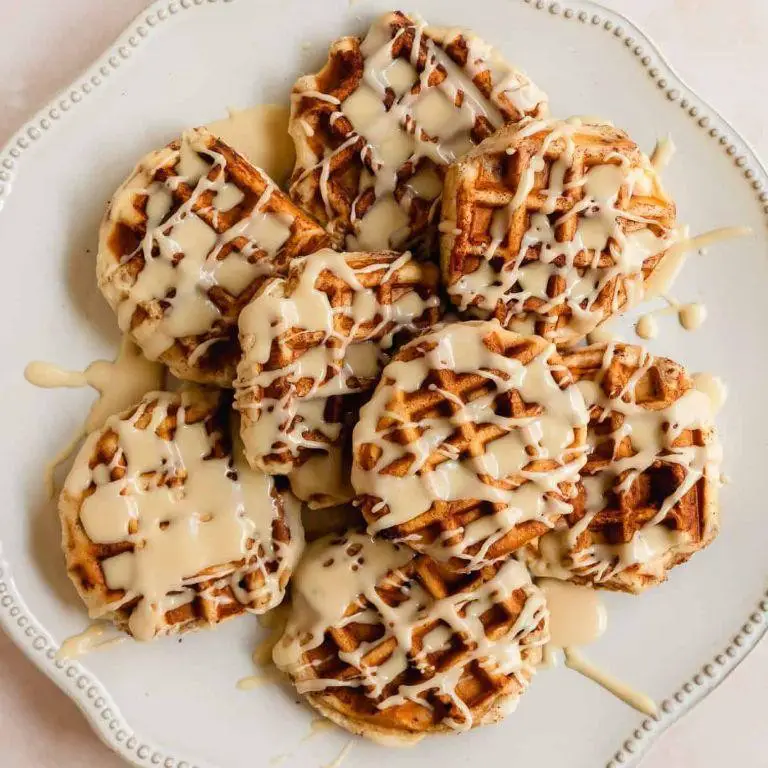
Absolutely divine, these waffles boast a fluffy interior with a caramelized cinnamon swirl. Serve them stacked high with a drizzle of cream cheese glaze for an extra decadent touch.
Red Velvet Waffles
Creating the perfect Red Velvet Waffles is easier than you think, and today, I’ll guide you through each step to ensure your breakfast is as delightful as it is vibrant. Let’s start by gathering our ingredients, each chosen for their role in achieving that signature red velvet taste and texture.
Ingredients
- 1 1/2 cups all-purpose flour (I always sift mine for extra fluffiness)
- 1/4 cup unsweetened cocoa powder (the darker, the better for that rich color)
- 1 tablespoon baking powder (freshness is key to getting those waffles to rise)
- 1/2 teaspoon salt (I use sea salt for a cleaner taste)
- 1/4 cup granulated sugar (adjust slightly if you prefer a sweeter waffle)
- 2 large eggs (room temperature eggs blend more smoothly into the batter)
- 1 1/4 cups buttermilk (for that tangy red velvet signature)
- 1/4 cup melted unsalted butter (cooled slightly to avoid cooking the eggs)
- 1 tablespoon red food coloring (gel-based gives a more vibrant color)
- 1 teaspoon vanilla extract (pure extract makes all the difference)
Instructions
- Preheat your waffle iron to 375°F; this ensures a crispy exterior.
- In a large bowl, whisk together the flour, cocoa powder, baking powder, salt, and sugar until well combined.
- In another bowl, beat the eggs lightly, then add the buttermilk, melted butter, red food coloring, and vanilla extract, mixing until uniform in color.
- Pour the wet ingredients into the dry ingredients, stirring just until combined. Tip: Overmixing leads to tough waffles.
- Let the batter rest for 5 minutes; this allows the baking powder to activate.
- Lightly grease the waffle iron with butter or non-stick spray, then pour 1/2 cup of batter onto the center of the iron. Tip: The amount may vary based on your waffle iron size.
- Close the lid and cook for about 4-5 minutes, or until the waffles are crisp and easily release from the iron. Tip: Avoid opening the lid too early to prevent splitting.
- Serve immediately with your favorite toppings. These waffles are best enjoyed fresh for that perfect contrast of crispy edges and soft, fluffy centers.
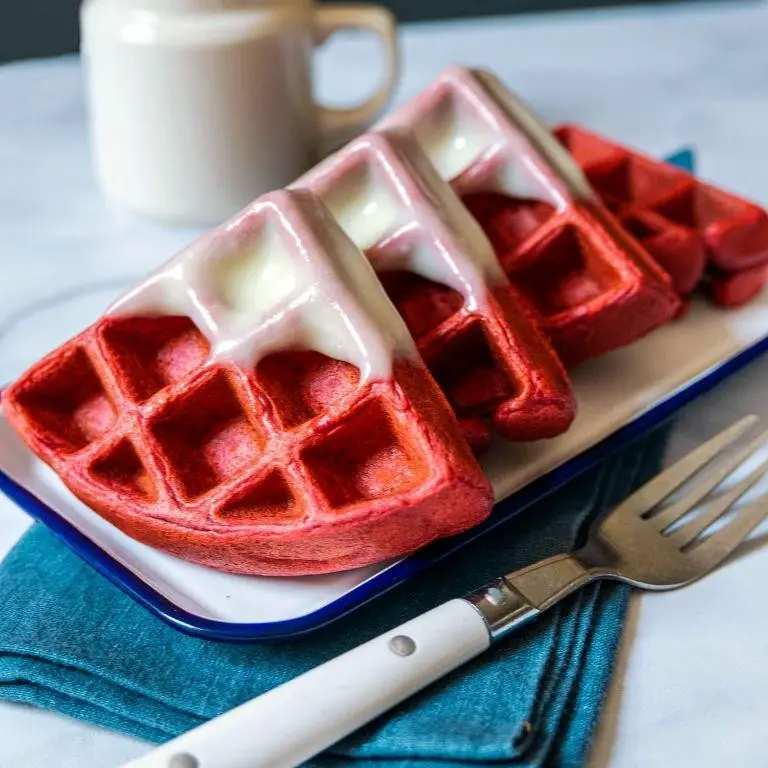
With their deep red hue and subtle cocoa flavor, these Red Velvet Waffles are a showstopper. Try serving them with a dollop of cream cheese frosting and fresh berries for an extra special touch.
Apple Cinnamon Waffles
Now, let’s dive into making these delightful Apple Cinnamon Waffles, a perfect blend of sweet and spicy flavors that will brighten up your morning. This recipe is straightforward, ensuring even beginners can achieve fluffy, golden waffles every time.
Ingredients
- 2 cups all-purpose flour (I like to sift mine for extra fluffiness)
- 2 tablespoons granulated sugar (a little extra won’t hurt if you’ve got a sweet tooth)
- 1 tablespoon baking powder (the fresher, the better for maximum rise)
- 1 teaspoon ground cinnamon (feel free to add a pinch more for that warm spice kick)
- 1/2 teaspoon salt (I prefer sea salt for its subtle flavor)
- 2 large eggs (room temperature eggs blend more smoothly)
- 1 3/4 cups milk (whole milk gives the richest texture)
- 1/2 cup unsalted butter, melted (let it cool slightly to avoid cooking the eggs)
- 1 teaspoon vanilla extract (pure vanilla makes all the difference)
- 1 cup finely diced apples (I love using Honeycrisp for their sweetness and crunch)
Instructions
- Preheat your waffle iron to 375°F; this ensures a crispy exterior.
- In a large bowl, whisk together the flour, sugar, baking powder, cinnamon, and salt.
- In another bowl, beat the eggs lightly, then stir in the milk, melted butter, and vanilla extract.
- Tip: Pour the wet ingredients into the dry ingredients gradually, stirring gently to avoid overmixing.
- Fold in the diced apples until just combined; lumps are okay for tender waffles.
- Lightly grease the waffle iron with butter or non-stick spray, even if it’s non-stick.
- Pour 1/2 cup of batter onto the center of the iron, close the lid, and cook until golden brown, about 4-5 minutes.
- Tip: Avoid opening the iron too soon; steam is key to the waffle’s rise.
- Carefully remove the waffle and repeat with the remaining batter.
- Tip: Keep cooked waffles warm in a 200°F oven on a wire rack to prevent sogginess.
Out of the waffle iron, these Apple Cinnamon Waffles boast a crispy edge with a soft, apple-studded center. Serve them stacked high with a drizzle of maple syrup and a dollop of whipped cream for an extra indulgent breakfast.
Peanut Butter Waffles
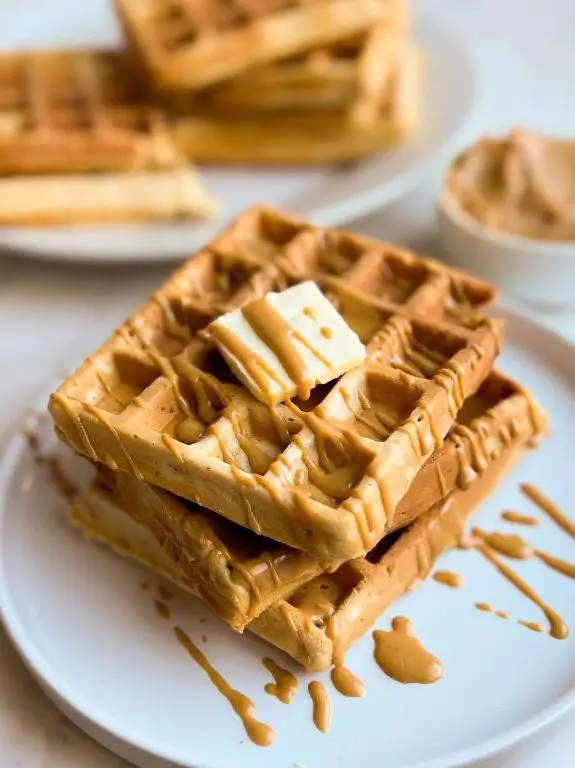
Ready to transform your breakfast routine with something irresistibly nutty and wonderfully fluffy? These Peanut Butter Waffles are a game-changer, combining the rich, creamy taste of peanut butter with the light, crisp texture of classic waffles. Perfect for a lazy weekend morning or a special brunch, this recipe is straightforward enough for beginners but delicious enough to impress any foodie.
Ingredients
- 1 1/2 cups all-purpose flour (I like to sift mine for extra fluffiness)
- 2 tbsp granulated sugar (a little sweetness to balance the peanut butter)
- 1 tbsp baking powder (the secret to those perfect rises)
- 1/2 tsp salt (just enough to enhance all the flavors)
- 1 1/4 cups milk (whole milk makes them richer, but any works)
- 1/2 cup creamy peanut butter (go for the natural kind for the best flavor)
- 1 large egg (room temperature blends better)
- 2 tbsp unsalted butter, melted (plus extra for greasing the waffle iron)
Instructions
- Preheat your waffle iron to 375°F. A properly heated iron ensures a crispy exterior.
- In a large bowl, whisk together the flour, sugar, baking powder, and salt until well combined.
- In another bowl, mix the milk, peanut butter, egg, and melted butter until smooth. Tip: If your peanut butter is too thick, warm it slightly for easier mixing.
- Pour the wet ingredients into the dry ingredients and stir until just combined. Don’t overmix; a few lumps are okay.
- Lightly grease the waffle iron with butter. This prevents sticking and adds flavor.
- Pour 1/2 cup of batter onto the center of the iron. Close the lid and cook until golden brown and crisp, about 4-5 minutes. Tip: Resist the urge to open the iron too soon; patience gives you the perfect waffle.
- Repeat with the remaining batter, keeping finished waffles warm in a 200°F oven if serving all at once.
Delight in the contrast of the crispy edges and soft, peanut buttery centers of these waffles. Serve them stacked high with a drizzle of maple syrup and a sprinkle of chopped peanuts for an extra crunch, or get creative with a dollop of whipped cream and banana slices for a decadent twist.
Strawberry Shortcake Waffles

Strawberry shortcake waffles combine the classic flavors of strawberry shortcake with the convenience of waffles, making for a delightful breakfast or dessert. Start by gathering your ingredients and preheating your waffle iron to ensure everything comes together smoothly.
Ingredients
- 1 1/2 cups all-purpose flour (I like to sift mine for extra fluffiness)
- 2 tbsp granulated sugar (a little extra won’t hurt if you like it sweeter)
- 1 tbsp baking powder (this is key for that perfect rise)
- 1/2 tsp salt (I prefer sea salt for its subtle flavor)
- 1 1/4 cups milk (whole milk makes them richer, but any kind works)
- 1/3 cup melted butter (unsalted is my go-to, but salted adds a nice contrast)
- 1 large egg (room temperature blends more smoothly)
- 1 tsp vanilla extract (pure vanilla makes all the difference)
- 1 cup fresh strawberries, sliced (the riper, the better for sweetness)
- Whipped cream, for serving (homemade or store-bought, both are great)
Instructions
- Preheat your waffle iron to 375°F. A properly heated iron ensures a crispy exterior.
- In a large bowl, whisk together the flour, sugar, baking powder, and salt. This ensures even distribution of the dry ingredients.
- In another bowl, mix the milk, melted butter, egg, and vanilla extract until well combined. Tip: Mixing the wet ingredients separately prevents overworking the flour.
- Pour the wet ingredients into the dry ingredients and stir until just combined. A few lumps are okay; overmixing leads to tough waffles.
- Gently fold in the sliced strawberries. This distributes the fruit evenly without crushing them.
- Lightly grease the waffle iron with butter or non-stick spray. This prevents sticking and helps achieve that golden color.
- Pour 1/2 cup of batter onto the center of the iron, close the lid, and cook for about 4-5 minutes, or until golden brown and crisp. Tip: Resist the urge to open the iron too soon; patience ensures even cooking.
- Serve immediately with a dollop of whipped cream and extra strawberries on top. The contrast of warm waffles and cool cream is heavenly.
Ready to enjoy, these waffles offer a perfect balance of sweet strawberries, creamy topping, and crisp, fluffy waffles. For an extra touch, drizzle with strawberry syrup or sprinkle with powdered sugar before serving.
Gluten-Free Almond Waffles
You’ll find these gluten-free almond waffles to be a delightful twist on the classic breakfast favorite, perfect for those mornings when you’re craving something both nutritious and indulgent.
Ingredients
- 1 cup almond flour – I love the nutty depth it adds, making these waffles irresistibly fragrant.
- 2 tbsp coconut sugar – A healthier sweetener that blends beautifully with the almond flavor.
- 1 tsp baking powder – Essential for that light, airy texture we all crave in waffles.
- 1/4 tsp salt – Just a pinch to balance the sweetness.
- 2 large eggs – I prefer room temperature eggs here for smoother batter consistency.
- 1/4 cup almond milk – Adds moisture without overpowering the almond essence.
- 1 tbsp melted coconut oil – My go-to for a subtle tropical hint and perfect browning.
- 1 tsp vanilla extract – A dash for that warm, comforting aroma.
Instructions
- Preheat your waffle iron to 375°F, ensuring it’s hot enough for a crispy exterior.
- In a large bowl, whisk together the almond flour, coconut sugar, baking powder, and salt until well combined.
- In another bowl, beat the eggs lightly before adding the almond milk, melted coconut oil, and vanilla extract, mixing until smooth.
- Pour the wet ingredients into the dry ingredients, stirring gently to avoid overmixing – a few lumps are perfectly fine.
- Lightly grease the waffle iron with coconut oil to prevent sticking, then pour 1/3 cup of batter onto the center of the iron.
- Close the lid and cook for about 4-5 minutes, or until the waffles are golden brown and crisp. Tip: Resist the urge to open the iron too early to ensure even cooking.
- Carefully remove the waffle and repeat with the remaining batter. Tip: Keep cooked waffles warm in a 200°F oven while you finish the batch.
- Serve immediately with your favorite toppings. Tip: A drizzle of almond butter and fresh berries elevate these waffles to a whole new level.
Mmm, these waffles boast a crispy exterior with a tender, fluffy inside, packed with the rich, nutty flavor of almonds. They’re a fantastic base for both sweet and savory toppings, making them a versatile choice for any meal.
Vegan Coconut Waffles

Let’s dive into making these delightful Vegan Coconut Waffles, a perfect blend of tropical flavor and fluffy texture that’ll brighten any morning. Follow these steps carefully, and you’ll master this recipe in no time.
Ingredients
- 1 1/2 cups all-purpose flour (I like to sift mine for extra fluffiness)
- 1 tbsp baking powder (make sure it’s fresh for the best rise)
- 1/2 tsp salt (I prefer fine sea salt for its mild flavor)
- 1 tbsp sugar (a little sweetness to balance the flavors)
- 1 1/4 cups coconut milk (full-fat gives the richest taste)
- 1/4 cup melted coconut oil (extra virgin is my go-to for its aroma)
- 1 tsp vanilla extract (pure extract makes all the difference)
Instructions
- Preheat your waffle iron to 375°F, ensuring it’s hot enough for a crispy exterior.
- In a large bowl, whisk together the flour, baking powder, salt, and sugar until well combined.
- Add the coconut milk, melted coconut oil, and vanilla extract to the dry ingredients. Stir until just combined; a few lumps are okay. Tip: Overmixing leads to tough waffles.
- Lightly grease the waffle iron with coconut oil. Pour 1/2 cup of batter onto the center of the iron. Tip: The amount may vary based on your iron’s size, so adjust accordingly.
- Close the lid and cook for about 5 minutes, or until the waffle is golden brown and crisp. Tip: Don’t peek too early; patience ensures even cooking.
- Carefully remove the waffle and repeat with the remaining batter.
Crispy on the outside and tender inside, these waffles carry a subtle coconut sweetness that pairs wonderfully with fresh fruit or a drizzle of maple syrup. For an extra tropical twist, top with toasted coconut flakes and a squeeze of lime.
Savory Cheese and Herb Waffles

These savory cheese and herb waffles are a delightful twist on the classic breakfast favorite, offering a perfect balance of cheesy goodness and aromatic herbs. They’re surprisingly easy to make and can elevate any brunch or dinner table.
Ingredients
- 1 1/2 cups all-purpose flour (I like to sift mine for extra fluffiness)
- 1 tbsp baking powder (make sure it’s fresh for the best rise)
- 1/2 tsp salt (I prefer sea salt for its subtle flavor)
- 1/4 tsp black pepper (freshly ground adds a nice kick)
- 1 1/4 cups whole milk (room temperature blends better)
- 1/3 cup unsalted butter, melted (extra virgin olive oil is my go-to for a lighter version)
- 2 large eggs (I prefer room temp eggs here)
- 1 cup shredded sharp cheddar cheese (the sharper, the better for flavor)
- 2 tbsp finely chopped fresh herbs (chives and parsley work wonders)
Instructions
- Preheat your waffle iron to 375°F; a hot iron ensures a crispy exterior.
- In a large bowl, whisk together the flour, baking powder, salt, and black pepper until well combined.
- In another bowl, mix the milk, melted butter, and eggs until smooth. Tip: Whisk the eggs first before adding other liquids for a homogenous mixture.
- Pour the wet ingredients into the dry ingredients and stir until just combined. Overmixing leads to tough waffles.
- Fold in the shredded cheddar cheese and chopped herbs gently. Tip: Reserve some cheese to sprinkle on top before closing the waffle iron for extra cheesiness.
- Lightly grease the waffle iron with butter or oil, then pour about 1/2 cup of batter onto the center. Close the lid and cook for about 5 minutes, or until golden and crispy. Tip: Don’t peek too early; steam is essential for rising.
- Serve immediately. These waffles are best enjoyed hot, with their edges crisp and centers fluffy. For a creative twist, top with a fried egg or avocado slices for a hearty meal.
Cheesy, herby, and with just the right amount of crisp, these waffles are a versatile dish that can swing from breakfast to dinner. The sharpness of the cheddar paired with the freshness of the herbs creates a flavor profile that’s hard to resist.
Bacon and Maple Syrup Waffles
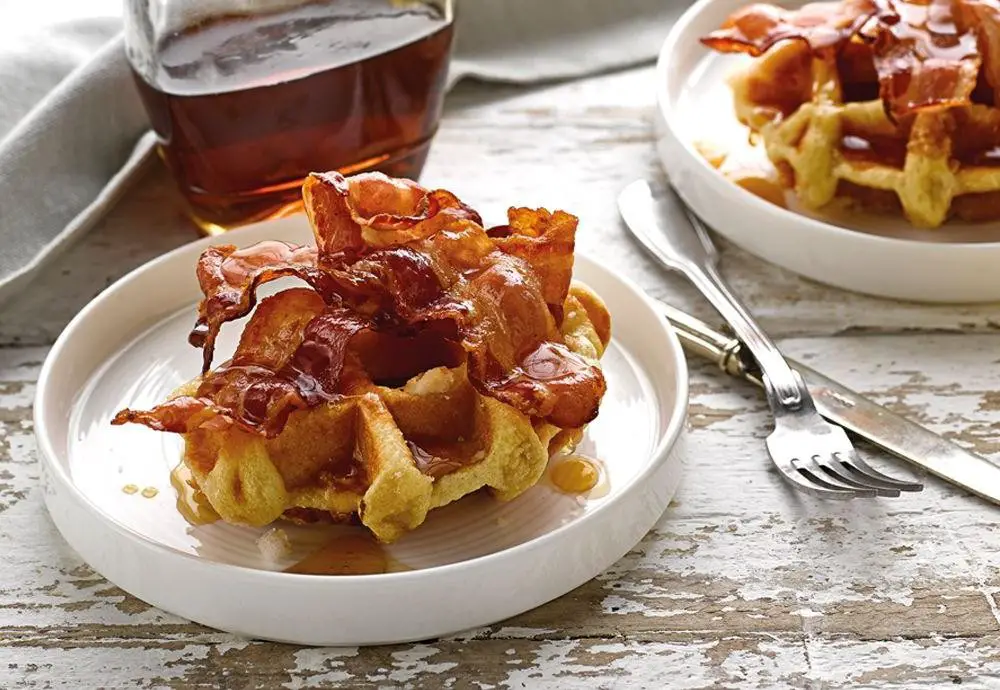
Sometimes, the simplest combinations yield the most delightful results, and that’s exactly what you’ll find with these Bacon and Maple Syrup Waffles. Perfect for a weekend brunch or a special breakfast treat, this recipe balances the savory crunch of bacon with the sweet, comforting embrace of maple syrup.
Ingredients
- 1 cup all-purpose flour (I like to sift mine for extra fluffiness)
- 1 tbsp sugar (a little sweetness to complement the maple)
- 2 tsp baking powder (the key to those perfect waffle nooks)
- 1/2 tsp salt (balances the flavors beautifully)
- 1 cup milk (whole milk makes them richer, but any works)
- 1 large egg (room temperature blends better)
- 2 tbsp melted butter (unsalted, so you control the saltiness)
- 4 strips bacon, cooked crispy and crumbled (thick-cut for that meaty bite)
- 1/4 cup maple syrup (the real deal, please—no imitations)
Instructions
- Preheat your waffle iron to 375°F; a hot iron ensures a crispy exterior.
- In a large bowl, whisk together the flour, sugar, baking powder, and salt.
- In another bowl, beat the egg, then mix in the milk and melted butter.
- Pour the wet ingredients into the dry, stirring just until combined—overmixing leads to tough waffles.
- Gently fold in the crumbled bacon, distributing it evenly throughout the batter.
- Lightly grease the waffle iron with butter or non-stick spray, then pour in enough batter to cover the grid.
- Close the iron and cook for about 5 minutes, or until the waffles are golden brown and crisp.
- Serve immediately, drizzled generously with maple syrup. Tip: For an extra touch, sprinkle a bit more bacon on top.
Zesty and satisfying, these waffles offer a perfect contrast of textures—crispy edges with a soft, fluffy interior. The smoky bacon and sweet maple syrup create a harmony of flavors that’s hard to resist. Try serving them with a side of scrambled eggs for a complete breakfast that’s sure to impress.
Sweet Potato Waffles
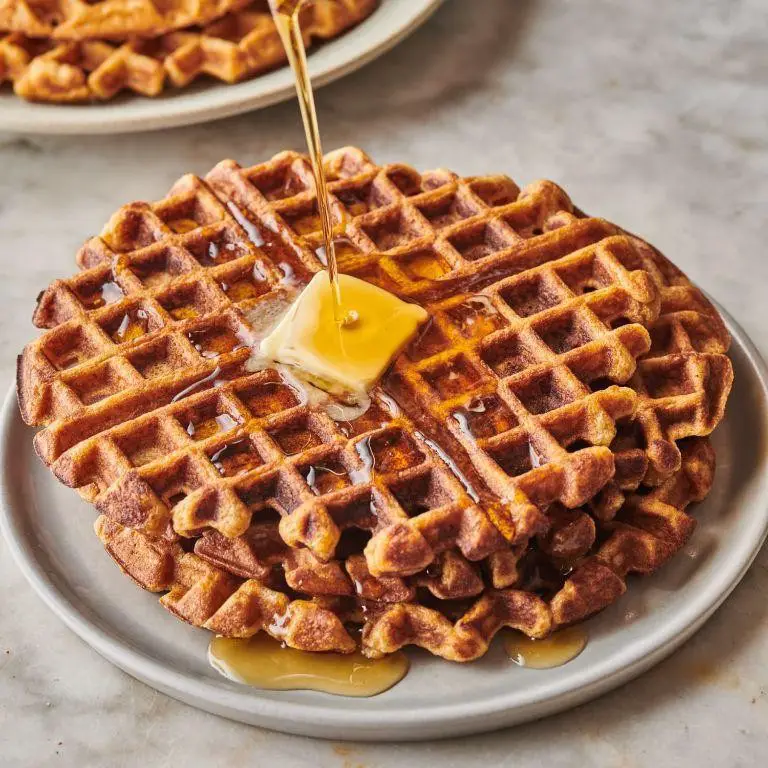
Creating sweet potato waffles is a delightful way to start your morning with a nutritious twist. Combine the natural sweetness of sweet potatoes with the crisp texture of waffles for a breakfast that’s both satisfying and wholesome.
Ingredients
- 1 cup mashed sweet potatoes (I like to bake them the night before for a deeper flavor)
- 2 cups all-purpose flour (for a lighter texture, you can substitute half with whole wheat flour)
- 1 tbsp baking powder (this ensures your waffles are fluffy)
- 1/2 tsp salt (I prefer sea salt for its subtle crunch)
- 2 large eggs, room temperature (they blend more smoothly when not cold)
- 1 1/2 cups milk (any kind works, but I love the richness of whole milk)
- 1/4 cup melted butter (unsalted is my go-to for better control over the dish’s saltiness)
- 2 tbsp brown sugar (it complements the sweet potatoes beautifully)
- 1 tsp vanilla extract (a splash adds a lovely aroma)
Instructions
- Preheat your waffle iron to 375°F; a properly heated iron is key to crispy waffles.
- In a large bowl, whisk together the flour, baking powder, and salt to ensure even distribution.
- In another bowl, mix the mashed sweet potatoes, eggs, milk, melted butter, brown sugar, and vanilla extract until smooth.
- Gently fold the wet ingredients into the dry ingredients until just combined; overmixing can lead to tough waffles.
- Lightly grease the waffle iron with butter or cooking spray to prevent sticking.
- Pour 1/2 cup of batter onto the center of the iron, close the lid, and cook for about 5 minutes or until golden brown and crisp.
- Repeat with the remaining batter, keeping finished waffles warm in a 200°F oven if serving all at once.
Finished waffles boast a crispy exterior with a soft, fluffy interior, enriched by the sweet potato’s natural sweetness. Serve them with a dollop of Greek yogurt and a drizzle of maple syrup for a balanced breakfast, or top with toasted pecans for an added crunch.
Cornbread Waffles with Honey Butter
Goodness, have you ever thought about combining the comforting taste of cornbread with the crispy texture of waffles? Today, we’re diving into a recipe that does just that, creating a delightful breakfast or brunch option that’s sure to impress. Let’s get started with the ingredients and steps to make these Cornbread Waffles with Honey Butter.
Ingredients
- 1 cup all-purpose flour (I like to sift mine for extra fluffiness)
- 1 cup yellow cornmeal (the finer grind works best for a smooth batter)
- 1 tbsp baking powder (make sure it’s fresh for the best rise)
- 1/2 tsp salt (I prefer sea salt for its subtle flavor)
- 1 cup buttermilk (room temperature blends more smoothly)
- 1/4 cup honey (local honey adds a lovely depth of flavor)
- 2 large eggs (room temperature eggs incorporate better)
- 1/4 cup unsalted butter, melted (and a bit more for greasing the waffle iron)
- For the honey butter: 1/2 cup softened butter and 2 tbsp honey
Instructions
- Preheat your waffle iron to 375°F. A properly heated iron ensures crispy edges.
- In a large bowl, whisk together the flour, cornmeal, baking powder, and salt until well combined.
- In another bowl, mix the buttermilk, honey, eggs, and melted butter until smooth. Tip: Whisk the wet ingredients thoroughly to avoid lumps.
- Pour the wet ingredients into the dry ingredients and stir until just combined. Overmixing can lead to tough waffles.
- Lightly grease the waffle iron with melted butter. This prevents sticking and adds flavor.
- Pour 1/2 cup of batter onto the center of the iron. Close the lid and cook for about 5 minutes, or until golden and crisp.
- While the waffles cook, make the honey butter by mixing the softened butter and honey until smooth. Tip: Use a fork to blend them easily.
- Serve the waffles hot with a generous spread of honey butter. Tip: For an extra touch, drizzle a little extra honey on top.
Mmm, these Cornbread Waffles with Honey Butter are a perfect blend of sweet and savory, with a crispy exterior and a soft, fluffy inside. Try serving them with a side of crispy bacon or fresh berries for a delightful contrast of flavors and textures.
Oreo Cookie Waffles
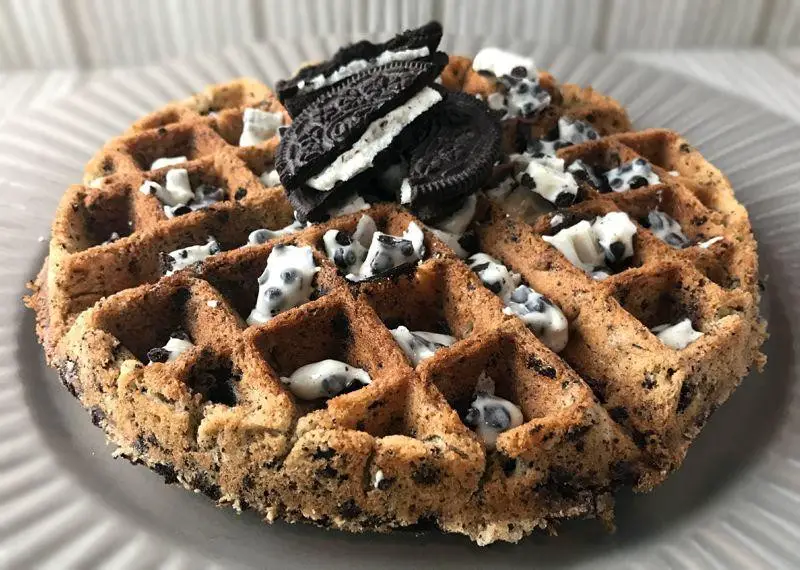
Many mornings call for something sweet, yet effortless to whip up, and that’s where these Oreo Cookie Waffles come into play. Perfect for beginners, this recipe combines the beloved crunch of Oreos with the fluffy warmth of waffles, creating a breakfast treat that’s sure to impress.
Ingredients
- 1 cup all-purpose flour (I like to sift mine for extra fluffiness)
- 2 tbsp granulated sugar (a little extra won’t hurt if you’ve got a sweet tooth)
- 1 tsp baking powder (the fresher, the better for maximum rise)
- 1/2 tsp salt (I always use fine sea salt for even distribution)
- 1 cup milk (whole milk makes them richer, but any kind works)
- 1 large egg (room temperature eggs blend more smoothly)
- 2 tbsp melted butter (unsalted is my preference, but salted adds a nice contrast)
- 1 tsp vanilla extract (pure vanilla makes all the difference)
- 6 Oreo cookies, crushed (reserve a few crumbs for garnish)
Instructions
- Preheat your waffle iron to 375°F; a properly heated iron ensures a crispy exterior.
- In a large bowl, whisk together the flour, sugar, baking powder, and salt until well combined.
- In another bowl, beat the egg lightly before adding the milk, melted butter, and vanilla extract, mixing until smooth.
- Pour the wet ingredients into the dry ingredients, stirring just until combined—overmixing leads to tough waffles.
- Gently fold in the crushed Oreo cookies, saving a tablespoon for topping.
- Lightly grease the waffle iron with butter or non-stick spray, then pour in enough batter to cover the center grid.
- Close the iron and cook for about 4-5 minutes, or until the waffles are golden brown and crisp.
- Carefully remove the waffle and repeat with the remaining batter.
Golden and crisp on the outside with pockets of creamy Oreo goodness inside, these waffles are a delightful twist on the classic. Serve them stacked high with a drizzle of chocolate syrup and a sprinkle of reserved Oreo crumbs for an extra indulgent breakfast or dessert.
Matcha Green Tea Waffles
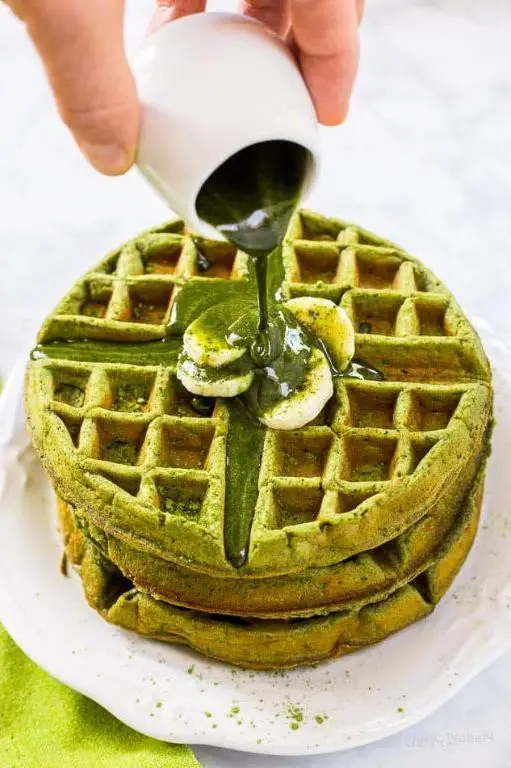
Whisking together the vibrant hues of matcha with the comforting warmth of waffles creates a breakfast that’s both energizing and indulgent. Today, we’re diving into how to make Matcha Green Tea Waffles, a perfect blend of earthy and sweet, with a method that ensures fluffy results every time.
Ingredients
- 1 1/2 cups all-purpose flour (I like to sift mine for extra fluffiness)
- 2 tbsp matcha green tea powder (go for ceremonial grade for the best flavor)
- 1/4 cup granulated sugar (adjust if you prefer less sweetness)
- 1 tbsp baking powder (this is key for that perfect rise)
- 1/4 tsp salt (just a pinch to balance the flavors)
- 1 1/4 cups milk (whole milk makes them richer, but any works)
- 1 large egg (room temperature eggs blend more smoothly)
- 1/4 cup melted unsalted butter (let it cool slightly before mixing)
- 1 tsp vanilla extract (pure vanilla adds a lovely depth)
Instructions
- Preheat your waffle iron to 375°F; this ensures a crispy exterior.
- In a large bowl, whisk together the flour, matcha powder, sugar, baking powder, and salt until no lumps remain.
- In another bowl, beat the egg lightly, then mix in the milk, melted butter, and vanilla extract.
- Pour the wet ingredients into the dry ingredients, stirring just until combined. Tip: Overmixing leads to tough waffles.
- Let the batter rest for 5 minutes; this allows the baking powder to activate.
- Lightly grease the waffle iron with butter or non-stick spray, then pour in the batter according to your iron’s size. Tip: Fill just enough to cover the grid without overflowing.
- Close the lid and cook for about 4-5 minutes, or until the waffles are golden and crisp. Tip: Resist the urge to peek too early to prevent sticking.
- Serve immediately for the best texture. Stack them high with fresh berries and a drizzle of honey, or get creative with a scoop of vanilla ice cream for a dessert twist.
Soft yet crisp, these waffles carry the subtle bitterness of matcha beautifully balanced with sweetness. Enjoy them as a morning treat or an afternoon pick-me-up; their versatility is part of the charm.
Conclusion
From sweet to savory, these 18 Dash waffle maker recipes offer a world of breakfast possibilities that are sure to delight. Whether you’re craving something classic or adventurous, there’s a recipe here to start your day right. We’d love to hear which ones become your favorites—drop us a comment below! And if you enjoyed this roundup, don’t forget to share the love on Pinterest. Happy waffle making!