Packing a punch of flavor without the sugar spike, our collection of 18 Delicious Diabetic Snack Recipes is here to revolutionize your snack time! Whether you’re managing diabetes or simply seeking healthier options, these easy-to-make treats promise satisfaction without compromise. Dive into a world where tasty and healthy coexist, and discover your next favorite snack that keeps both your palate and blood sugar happy. Let’s get snacking!
Avocado and Black Bean Salad

This refreshing Avocado and Black Bean Salad is a perfect blend of creamy and crunchy textures, ideal for a quick lunch or a side dish at your next barbecue. Today, we’ll walk through how to make this vibrant salad step by step, ensuring even beginners can achieve delicious results.
Ingredients
- 2 ripe avocados, diced (choose avocados that yield slightly to pressure)
- 1 can (15 oz) black beans, drained and rinsed (for a firmer texture, rinse under cold water)
- 1/2 cup corn kernels (fresh, frozen, or canned—thaw if frozen)
- 1/4 cup red onion, finely diced (soak in cold water for 10 minutes to mellow the flavor)
- 2 tbsp lime juice (freshly squeezed for the best flavor)
- 1 tbsp olive oil (or any neutral oil)
- 1/4 tsp salt (adjust to taste)
- 1/4 tsp ground cumin (toasted for extra flavor)
Instructions
- In a large bowl, combine the diced avocados, black beans, corn kernels, and finely diced red onion.
- In a small bowl, whisk together the lime juice, olive oil, salt, and ground cumin until well blended.
- Pour the dressing over the avocado and bean mixture. Gently toss to coat all the ingredients evenly, being careful not to mash the avocados.
- Let the salad sit for 5 minutes before serving to allow the flavors to meld together.
Combining the creamy avocados with the hearty black beans and sweet corn creates a delightful contrast in every bite. For an extra touch, serve this salad over a bed of greens or alongside grilled chicken for a complete meal.
Greek Yogurt with Berries and Nuts
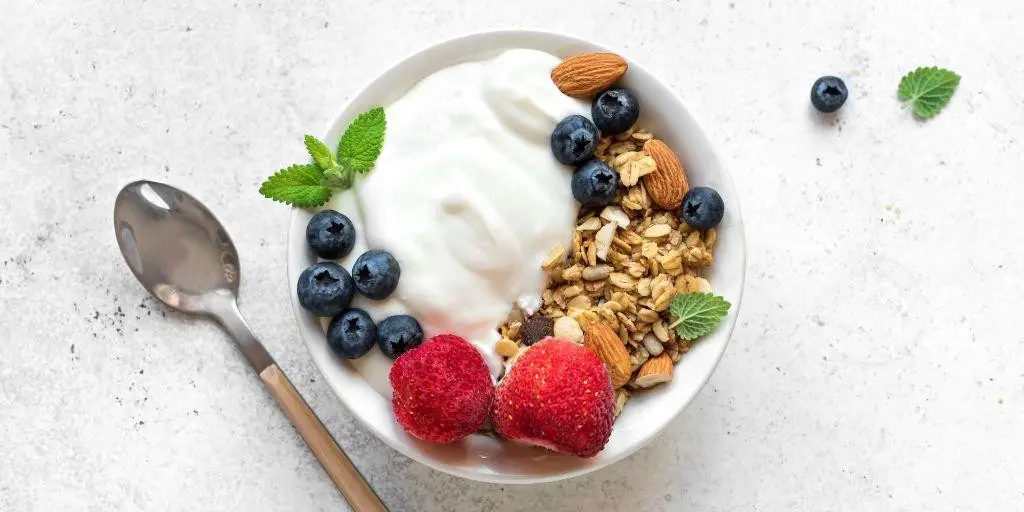
Yearning for a quick, nutritious breakfast or snack? Greek Yogurt with Berries and Nuts is a simple yet satisfying dish that combines creamy texture with the freshness of berries and the crunch of nuts.
Ingredients
- 1 cup Greek yogurt (opt for full-fat for creamier texture)
- 1/2 cup mixed berries (fresh or frozen, thawed)
- 2 tbsp mixed nuts (almonds, walnuts, or your choice, roughly chopped)
- 1 tsp honey (adjust to taste)
Instructions
- Measure 1 cup of Greek yogurt and spoon it into a serving bowl.
- Wash 1/2 cup of mixed berries if using fresh, or thaw if frozen, then pat dry to remove excess moisture.
- Evenly distribute the berries over the yogurt for a balanced flavor in every bite.
- Roughly chop 2 tbsp of mixed nuts to ensure each piece adds texture without overpowering.
- Sprinkle the chopped nuts over the yogurt and berries for a delightful crunch.
- Drizzle 1 tsp of honey over the top to add a touch of sweetness, adjusting according to your preference.
Now this Greek Yogurt with Berries and Nuts offers a harmonious blend of textures and flavors—creamy, crunchy, and slightly sweet. Serve it in a clear glass to showcase the beautiful layers or top with a mint leaf for an extra pop of color.
Roasted Chickpeas
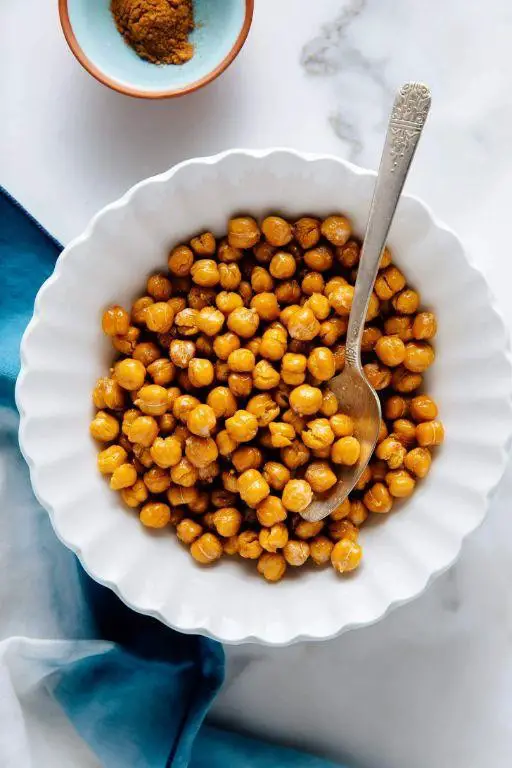
Crunchy, flavorful, and packed with protein, roasted chickpeas are the perfect snack or salad topper that’s surprisingly easy to make at home. Let’s walk through the simple steps to achieve that perfect golden crisp.
Ingredients
- 1 can (15 oz) chickpeas, drained and rinsed (pat dry for extra crispiness)
- 1 tbsp olive oil (or any neutral oil)
- 1/2 tsp salt (adjust to taste)
- 1/2 tsp garlic powder (for a flavor boost)
- 1/4 tsp smoked paprika (adds a subtle smokiness)
Instructions
- Preheat your oven to 400°F (200°C) to ensure it’s hot enough for roasting.
- Spread the dried chickpeas on a baking sheet in a single layer, ensuring they’re not crowded for even roasting.
- Drizzle the chickpeas with olive oil, then sprinkle with salt, garlic powder, and smoked paprika. Toss to coat evenly.
- Roast in the preheated oven for 20-25 minutes, shaking the pan halfway through, until golden and crispy.
- Let the chickpeas cool on the baking sheet for 5 minutes; they’ll crisp up more as they cool.
Variety is the spice of life, and these roasted chickpeas are no exception. Enjoy them as a standalone snack, or sprinkle over soups and salads for an extra crunch. Their versatility and rich flavor profile make them a pantry staple you’ll come back to time and again.
Almond Butter Celery Sticks
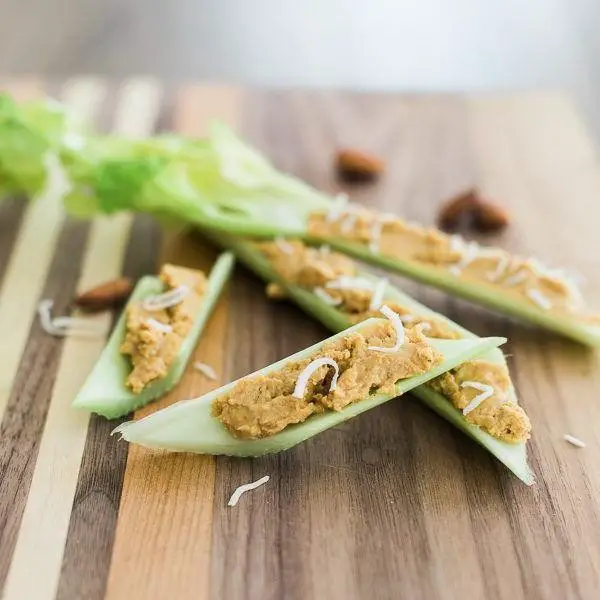
Almond butter celery sticks are a crunchy, creamy snack that’s as nutritious as it is delicious. A perfect blend of textures and flavors, this recipe is a great way to enjoy a healthy treat any time of the day.
Ingredients
- 4 large celery stalks (look for crisp, fresh stalks)
- 1/2 cup almond butter (creamy or crunchy, based on preference)
- 2 tbsp honey (adjust to taste)
- 1/4 cup raisins (or substitute with dried cranberries for a tart twist)
Instructions
- Wash the celery stalks thoroughly under cold running water to remove any dirt or debris.
- Pat the celery stalks dry with a clean kitchen towel to ensure the almond butter sticks well.
- Trim the ends off each celery stalk, then cut them into 3-inch long sticks for easy handling.
- Spread 1-2 tablespoons of almond butter evenly along the groove of each celery stick.
- Drizzle honey lightly over the almond butter for a touch of sweetness.
- Sprinkle raisins evenly over the almond butter and honey, pressing gently to adhere.
- Place the prepared celery sticks on a serving plate and refrigerate for 10 minutes to set the toppings.
Make sure to serve these almond butter celery sticks chilled for the best texture contrast between the crunchy celery and creamy almond butter. The hint of honey and the chewiness of the raisins add layers of flavor and texture that make this snack irresistibly good. Try arranging them on a platter with a variety of dips for a party-friendly presentation.
Cheese and Whole Grain Crackers
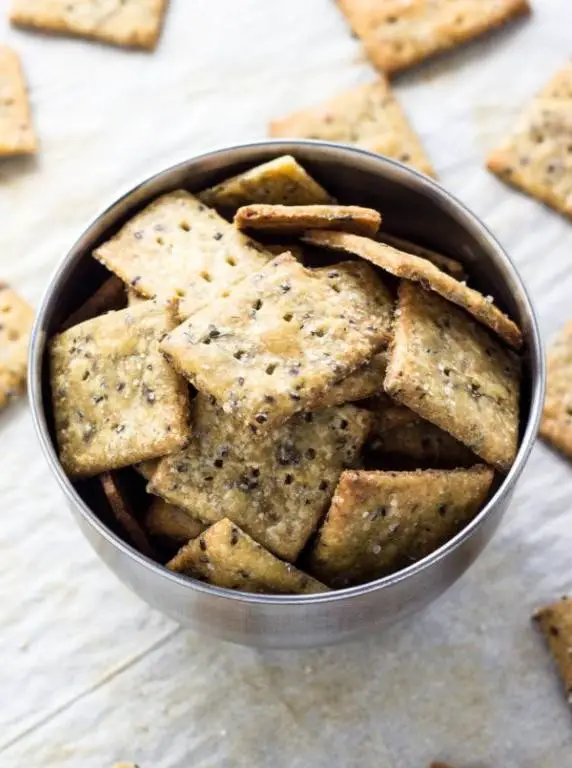
First, let’s dive into making Cheese and Whole Grain Crackers, a simple yet satisfying snack that’s perfect for any time of the day. Follow these steps carefully to ensure your crackers come out perfectly crispy and flavorful.
Ingredients
- 1 cup whole grain flour (for a nuttier flavor)
- 1/2 cup grated cheddar cheese (sharp for more flavor)
- 1/4 cup unsalted butter, chilled and cubed (keeps dough flaky)
- 1/4 tsp salt (adjust to taste)
- 3-4 tbsp cold water (add gradually)
Instructions
- Preheat your oven to 350°F (175°C) to ensure it’s ready for baking.
- In a large bowl, combine the whole grain flour and salt, whisking them together to distribute the salt evenly.
- Add the chilled, cubed butter to the flour mixture. Use your fingers to rub the butter into the flour until the mixture resembles coarse crumbs. Tip: Keeping the butter cold is key to flaky crackers.
- Stir in the grated cheddar cheese until it’s evenly distributed throughout the mixture.
- Gradually add cold water, one tablespoon at a time, mixing until the dough just comes together. Tip: Overworking the dough can make the crackers tough.
- Roll the dough out on a lightly floured surface to about 1/8 inch thickness for crisp crackers.
- Cut the dough into desired shapes using a knife or cookie cutter, then transfer the pieces to a baking sheet lined with parchment paper.
- Bake in the preheated oven for 15-20 minutes, or until the edges are golden brown. Tip: Watch closely towards the end to prevent over-browning.
- Let the crackers cool on the baking sheet for a few minutes before transferring to a wire rack to cool completely.
Baked to perfection, these Cheese and Whole Grain Crackers offer a delightful crunch with a rich, cheesy flavor. Serve them alongside your favorite dip or enjoy them as is for a wholesome snack.
Hard-Boiled Eggs with Mustard

Zesty yet simple, hard-boiled eggs with mustard is a classic dish that combines the creamy texture of eggs with the tangy kick of mustard. Perfect for beginners, this recipe requires minimal ingredients and steps, making it an ideal choice for a quick snack or a protein-packed addition to your meals.
Ingredients
- 4 large eggs (fresh eggs peel more easily)
- 2 tbsp yellow mustard (or Dijon for a sharper taste)
- 1/4 tsp salt (adjust to taste)
- 1/8 tsp black pepper (freshly ground preferred)
Instructions
- Place the eggs in a single layer at the bottom of a saucepan. Cover them with at least 1 inch of cold water to ensure even cooking.
- Bring the water to a rolling boil over high heat. Once boiling, immediately cover the pan and remove it from the heat to let the eggs sit for 12 minutes for perfectly hard-boiled yolks.
- While the eggs are cooking, prepare an ice bath by filling a large bowl with cold water and ice cubes. This stops the cooking process and makes peeling easier.
- After 12 minutes, transfer the eggs to the ice bath using a slotted spoon. Let them cool for at least 5 minutes before peeling.
- Once peeled, slice the eggs in half lengthwise and arrange them on a plate.
- In a small bowl, mix the mustard, salt, and pepper. Adjust the seasoning to your preference.
- Dollop a small amount of the mustard mixture onto each egg half or serve it on the side for dipping.
Oftentimes, the simplest dishes bring the most satisfaction. The creamy yolks paired with the sharp mustard create a delightful contrast in flavors and textures. For a creative twist, try sprinkling some paprika or chopped herbs on top before serving.
Cucumber and Hummus Bites

Unveiling a simple yet refreshing snack that’s perfect for any occasion, these Cucumber and Hummus Bites combine crisp cucumbers with creamy hummus for a delightful contrast in textures. Ideal for beginners, this recipe requires minimal ingredients and effort, making it a great starting point for anyone looking to explore healthy snacks.
Ingredients
- 1 large cucumber, sliced into 1/4-inch rounds (for a firmer bite, choose English cucumbers)
- 1 cup store-bought or homemade hummus (for extra flavor, try roasted red pepper hummus)
- 1 tbsp olive oil (or any neutral oil for drizzling)
- 1/2 tsp paprika (adjust to taste for a smoky flavor)
- Salt to taste (a pinch can enhance the cucumber’s freshness)
Instructions
- Wash the cucumber thoroughly under cold running water to remove any dirt or wax.
- Using a sharp knife, slice the cucumber into 1/4-inch thick rounds, ensuring each piece is uniform for even presentation.
- Pat the cucumber slices dry with a paper towel to prevent the hummus from sliding off.
- Spoon a small amount of hummus onto each cucumber round, spreading it gently with the back of the spoon for an even layer.
- Drizzle a tiny amount of olive oil over the hummus-topped cucumbers for a glossy finish.
- Sprinkle a pinch of paprika and salt over each bite to add color and enhance the flavors.
- Arrange the prepared bites on a serving platter and serve immediately for the best texture and taste.
Just like that, you’ve created a snack that’s not only visually appealing but also packed with flavors and textures. The crispness of the cucumber pairs beautifully with the creamy hummus, while the paprika adds a subtle warmth. For an extra touch, garnish with fresh herbs or a sprinkle of sesame seeds before serving.
Baked Apple Slices with Cinnamon
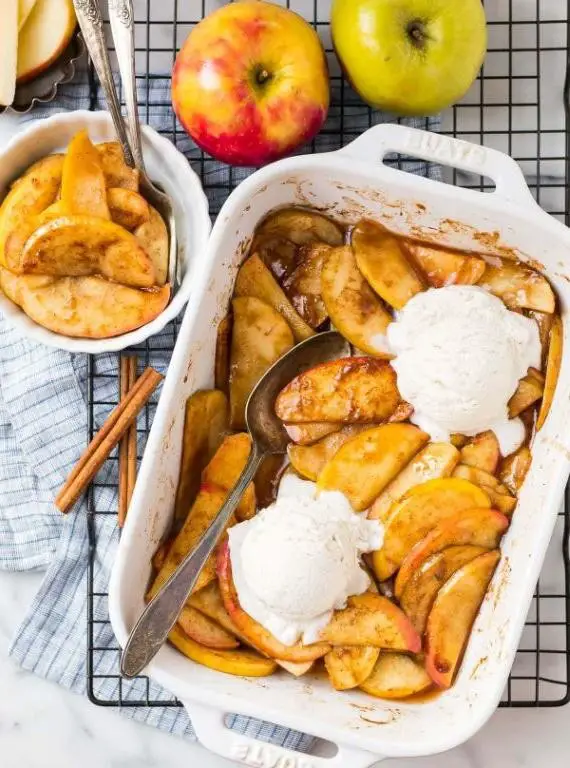
Unlock the cozy flavors of fall any time of year with this simple yet delightful recipe for baked apple slices with cinnamon. Perfect for beginners, this guide will walk you through each step to achieve perfectly tender apples with a warm spice finish.
Ingredients
- 2 large apples, cored and sliced into 1/4-inch pieces (use a mix of sweet and tart for balanced flavor)
- 2 tbsp unsalted butter, melted (or coconut oil for a dairy-free option)
- 1/4 cup brown sugar (adjust to taste)
- 1 tsp ground cinnamon (add more for extra spice)
- 1/2 tsp vanilla extract (optional, for depth of flavor)
Instructions
- Preheat your oven to 375°F (190°C) and line a baking sheet with parchment paper for easy cleanup.
- In a large bowl, toss the apple slices with melted butter until evenly coated. Tip: Ensure each slice is lightly coated to prevent drying out during baking.
- Sprinkle the brown sugar and cinnamon over the apples, then add vanilla extract if using. Mix well to distribute the spices evenly. Tip: Taste a slice before baking to adjust sweetness or spice levels.
- Spread the apple slices in a single layer on the prepared baking sheet. Avoid overlapping to ensure even baking.
- Bake for 25-30 minutes, or until the apples are tender and the edges start to caramelize. Tip: Check at the 20-minute mark to prevent over-baking.
Serve these baked apple slices warm for a comforting dessert, or let them cool and mix into oatmeal or yogurt for a flavorful breakfast. The cinnamon-spiced apples offer a soft texture with a slightly caramelized exterior, making them irresistibly delicious.
Turkey and Cheese Roll-Ups

Great for a quick lunch or a snack, these Turkey and Cheese Roll-Ups are not only easy to make but also packed with flavor. Let’s dive into how you can whip these up in no time.
Ingredients
- 4 large flour tortillas (look for burrito-sized for easier rolling)
- 8 slices turkey breast (thinly sliced works best)
- 4 slices cheddar cheese (or any cheese you prefer)
- 1/4 cup mayonnaise (light or regular, adjust to taste)
- 1 tbsp mustard (Dijon or yellow, for a bit of tang)
- 1 cup baby spinach leaves (washed and dried)
- 1/2 avocado, sliced (adds creaminess)
Instructions
- Lay out the tortillas on a clean, flat surface.
- Spread 1 tablespoon of mayonnaise evenly over each tortilla.
- Add 1/2 tablespoon of mustard on top of the mayonnaise, spreading it lightly.
- Place 2 slices of turkey breast on each tortilla, covering most of the surface.
- Layer 1 slice of cheese on top of the turkey on each tortilla.
- Distribute the baby spinach leaves evenly over the cheese.
- Add avocado slices on top of the spinach.
- Starting at one end, tightly roll up each tortilla, tucking in the ingredients as you go.
- Once rolled, wrap each roll-up in plastic wrap and refrigerate for 10 minutes to set (this makes them easier to slice).
- Remove from the fridge, unwrap, and slice each roll-up into 1-inch pieces using a sharp knife.
The roll-ups offer a delightful mix of textures, from the creamy avocado to the crisp spinach, all wrapped in a soft tortilla. Serve them on a platter with toothpicks for a party or pack them whole for a satisfying lunch on the go.
Peanut Butter and Banana Smoothie
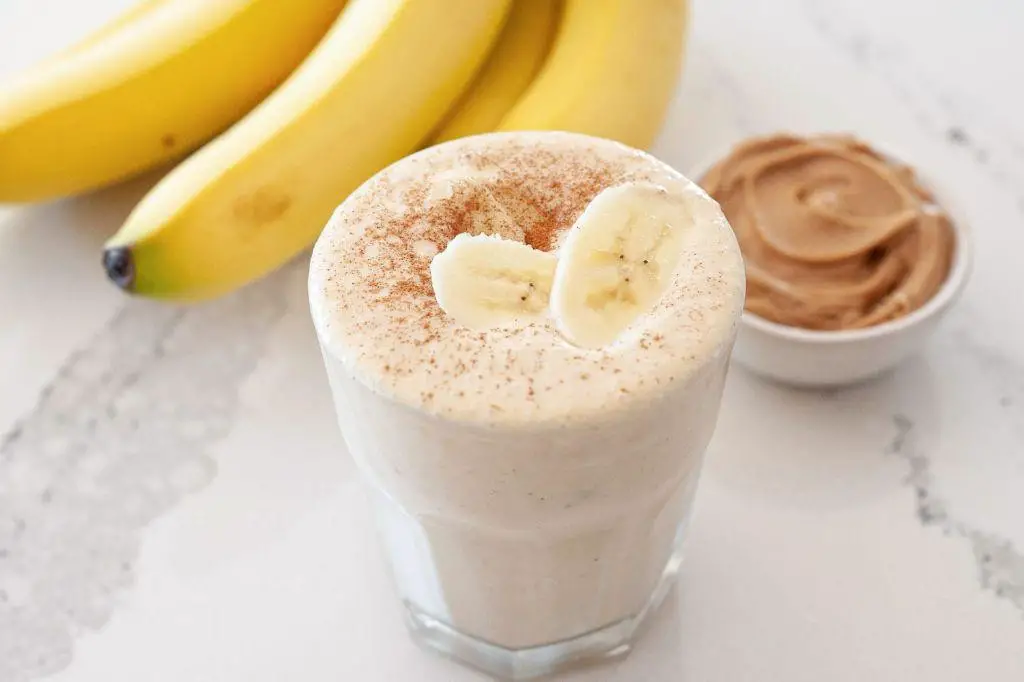
This Peanut Butter and Banana Smoothie is a creamy, nutritious blend that’s perfect for a quick breakfast or a refreshing snack. The combination of peanut butter and banana offers a rich flavor and smooth texture that’s both satisfying and easy to make.
Ingredients
- 1 ripe banana (the riper, the sweeter)
- 2 tablespoons peanut butter (creamy or crunchy, according to preference)
- 1 cup milk (dairy or any plant-based alternative)
- 1/2 cup ice cubes (more for a thicker smoothie)
- 1 teaspoon honey (optional, adjust to sweetness preference)
Instructions
- Peel the banana and break it into chunks for easier blending.
- Add the banana chunks, peanut butter, milk, ice cubes, and honey (if using) into a blender.
- Secure the lid on the blender and blend on high speed for 30 seconds, or until the mixture is smooth and no ice chunks remain.
- Pause blending to scrape down the sides of the blender with a spatula if necessary, ensuring all ingredients are fully incorporated.
- Blend for an additional 10-15 seconds to achieve a uniformly creamy texture.
- Pour the smoothie into a glass and serve immediately for the best texture and flavor.
Smooth and velvety, this smoothie pairs wonderfully with a sprinkle of granola on top for added crunch. For an extra touch of indulgence, drizzle a little extra peanut butter over the surface before serving.
Spinach and Feta Omelette
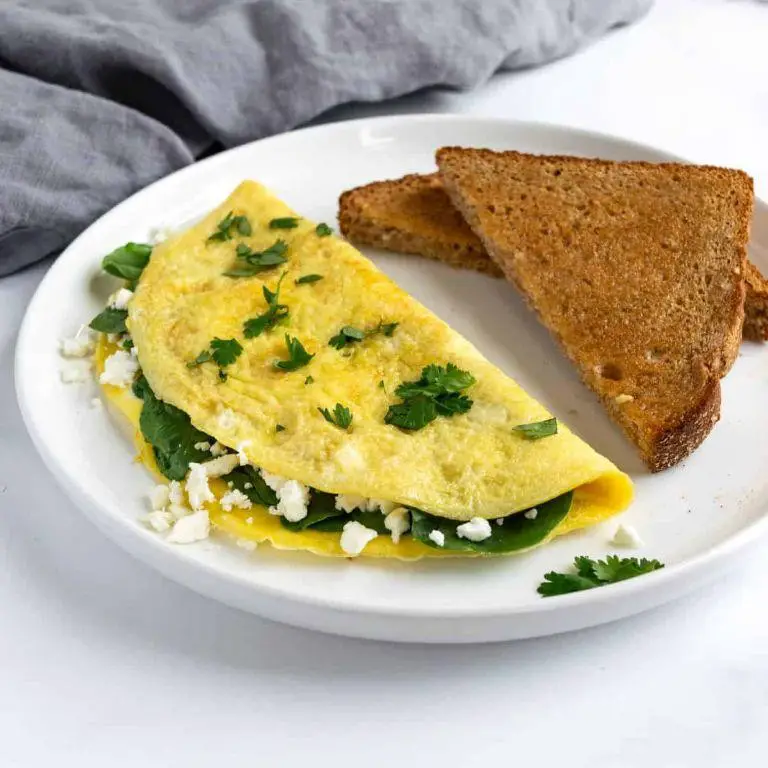
Crafting the perfect Spinach and Feta Omelette starts with understanding the balance between the earthy greens and the tangy cheese. This guide will walk you through each step to ensure a fluffy, flavorful omelette every time.
Ingredients
- 3 large eggs (room temperature for fluffier omelette)
- 1/4 cup fresh spinach, chopped (packed tightly)
- 1/4 cup feta cheese, crumbled (or more to taste)
- 1 tbsp unsalted butter (or any neutral oil)
- Salt and pepper (adjust to taste)
Instructions
- In a medium bowl, whisk the eggs until the yolks and whites are fully combined. Season lightly with salt and pepper.
- Heat a non-stick skillet over medium-low heat (about 300°F) and add the butter, swirling to coat the pan evenly.
- Once the butter is melted and slightly bubbly, pour in the whisked eggs. Let them sit undisturbed for 20 seconds to start setting.
- Using a spatula, gently push the set edges towards the center, tilting the pan to allow the uncooked eggs to fill the space. Repeat until the eggs are mostly set but still slightly runny on top.
- Sprinkle the chopped spinach and crumbled feta evenly over one half of the omelette. Cook for another 30 seconds to wilt the spinach slightly.
- Carefully fold the other half of the omelette over the filling. Slide it onto a plate and let it rest for a minute before serving.
Here’s how it turns out: the omelette is delightfully fluffy with pockets of melted feta and tender spinach. For an extra touch, serve with a side of toasted whole grain bread or a light salad to complement the richness.
Zucchini Chips
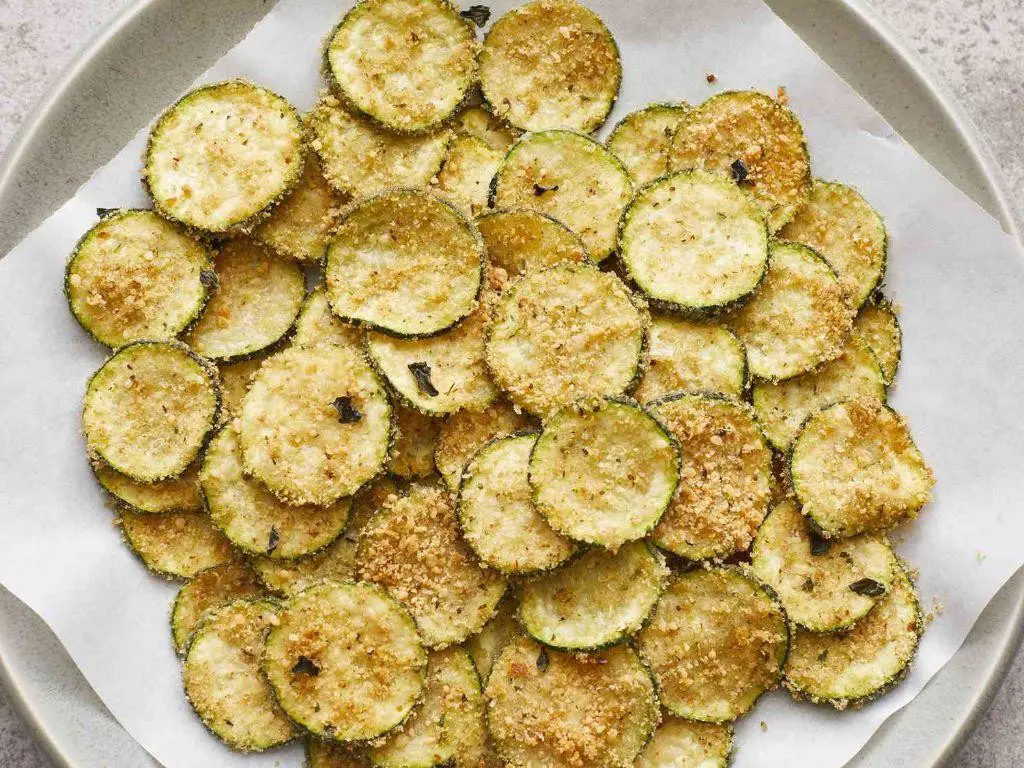
Alright, let’s dive into making some crispy, delightful zucchini chips that are perfect for snacking or as a side dish. These chips are not only easy to make but also a great way to enjoy zucchini in a fun, crunchy form.
Ingredients
- 2 medium zucchinis, thinly sliced (about 1/8 inch thick for even cooking)
- 1 tbsp olive oil (or any neutral oil for a lighter taste)
- 1/2 tsp salt (adjust to taste)
- 1/4 tsp garlic powder (for an extra flavor kick)
- 1/4 tsp black pepper (freshly ground preferred)
Instructions
- Preheat your oven to 225°F. This low temperature is key for dehydrating the zucchini slices slowly, ensuring they become crispy without burning.
- While the oven heats, slice the zucchinis into 1/8 inch thick rounds. Uniform thickness is crucial for even cooking, so take your time with this step.
- In a large bowl, toss the zucchini slices with olive oil, salt, garlic powder, and black pepper until evenly coated. This ensures every chip is flavorful.
- Arrange the slices in a single layer on a baking sheet lined with parchment paper. Avoid overlapping to allow proper air circulation.
- Bake for 2 hours, flipping the slices halfway through. This step requires patience but is essential for achieving the perfect crispiness.
- After baking, let the chips cool on the baking sheet for 10 minutes. They’ll crisp up further as they cool.
Crispy on the outside with a slight chewiness inside, these zucchini chips are a healthier alternative to store-bought snacks. Serve them with a side of ranch dressing or sprinkle with parmesan cheese right out of the oven for an extra flavor boost.
Dark Chocolate Covered Strawberries

Just when you thought strawberries couldn’t get any better, along comes the magic of dark chocolate to elevate them to a whole new level. This simple yet elegant treat is perfect for any occasion, from a romantic dinner to a casual snack, and with this guide, you’ll master it in no time.
Ingredients
- 1 pound fresh strawberries (choose firm, ripe berries for best results)
- 8 ounces dark chocolate chips (high-quality chocolate melts smoother)
- 1 tablespoon coconut oil (helps thin the chocolate for easier dipping)
Instructions
- Wash the strawberries gently under cold water and pat them completely dry with a paper towel. Any moisture can cause the chocolate to seize.
- Line a baking sheet with parchment paper to place the dipped strawberries on later.
- In a microwave-safe bowl, combine the dark chocolate chips and coconut oil. Microwave in 30-second intervals, stirring after each, until fully melted and smooth. Tip: Avoid overheating to prevent the chocolate from burning.
- Hold a strawberry by the stem and dip it into the melted chocolate, swirling to coat it evenly. Allow excess chocolate to drip off.
- Place the dipped strawberry on the prepared baking sheet. Repeat with remaining strawberries.
- Refrigerate the strawberries for at least 30 minutes, or until the chocolate is set. Tip: For a quicker set, you can place them in the freezer for 15 minutes.
Rich, velvety dark chocolate encases the juicy sweetness of the strawberries, creating a contrast that’s both visually appealing and delicious. Try serving them on a platter with a dusting of powdered sugar for an extra touch of elegance.
Pumpkin Seeds Trail Mix
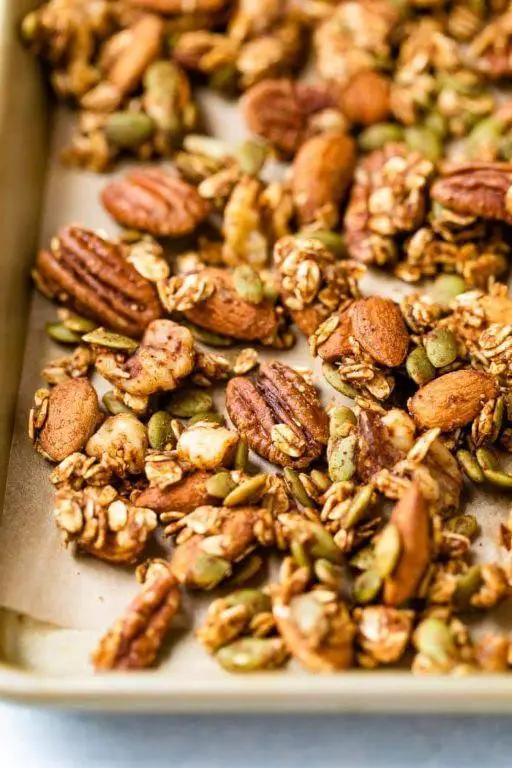
Whipping up a batch of Pumpkin Seeds Trail Mix is a fantastic way to add a nutritious and delicious snack to your day. This recipe is perfect for beginners, offering a simple yet satisfying combination of flavors and textures.
Ingredients
- 1 cup raw pumpkin seeds (also known as pepitas)
- 1/2 cup almonds (whole or slivered, for crunch)
- 1/2 cup dried cranberries (for a sweet contrast)
- 1 tbsp honey (or maple syrup for a vegan option)
- 1/2 tsp cinnamon (adjust to taste)
- 1/4 tsp sea salt (enhances flavors)
Instructions
- Preheat your oven to 300°F (150°C) to ensure it’s ready for toasting the seeds and nuts.
- In a medium bowl, combine the pumpkin seeds and almonds. Drizzle with honey and sprinkle with cinnamon and sea salt. Toss well to coat evenly.
- Spread the mixture in a single layer on a baking sheet lined with parchment paper for easy cleanup.
- Bake for 15 minutes, then stir the mixture to ensure even toasting. Bake for another 10 minutes or until the pumpkin seeds are golden and the almonds are lightly toasted.
- Remove from the oven and let cool completely on the baking sheet. This step is crucial for achieving the perfect crunch.
- Once cooled, transfer the mix to a bowl and stir in the dried cranberries.
Now your Pumpkin Seeds Trail Mix is ready to enjoy! The combination of crunchy pumpkin seeds and almonds with the chewy sweetness of cranberries makes this mix irresistible. Try serving it in small mason jars for a charming, portable snack option.
Cauliflower Popcorn
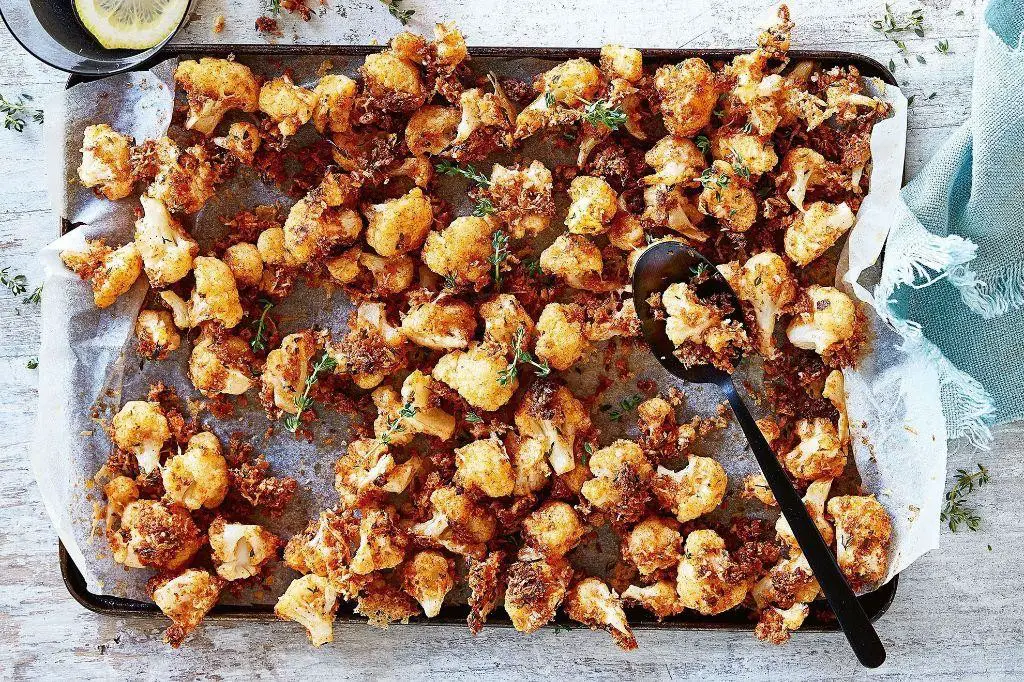
Now, let’s dive into making a snack that’s as fun to eat as it is nutritious. Cauliflower popcorn is a crunchy, flavorful alternative to traditional popcorn, perfect for those looking for a healthier snack option.
Ingredients
- 1 large head of cauliflower, cut into small florets (about the size of popcorn)
- 2 tbsp olive oil (or any neutral oil)
- 1/2 tsp garlic powder
- 1/2 tsp onion powder
- 1/4 tsp salt (adjust to taste)
- 1/4 tsp black pepper (adjust to taste)
Instructions
- Preheat your oven to 425°F (220°C) and line a baking sheet with parchment paper for easy cleanup.
- In a large bowl, toss the cauliflower florets with olive oil until evenly coated. Tip: Make sure the florets are dry before adding oil to ensure crispiness.
- Sprinkle the garlic powder, onion powder, salt, and black pepper over the cauliflower. Toss again to distribute the seasonings evenly. Tip: For extra flavor, you can add a pinch of smoked paprika or nutritional yeast.
- Spread the seasoned cauliflower in a single layer on the prepared baking sheet, ensuring space between each piece for even cooking.
- Bake for 25-30 minutes, flipping halfway through, until the edges are golden brown and crispy. Tip: Keep an eye on them after the 20-minute mark to prevent burning.
Just out of the oven, these cauliflower bites boast a delightful crunch with a savory, slightly nutty flavor. Serve them as a standalone snack or alongside your favorite dip for an extra layer of taste.
Ricotta and Tomato Toast
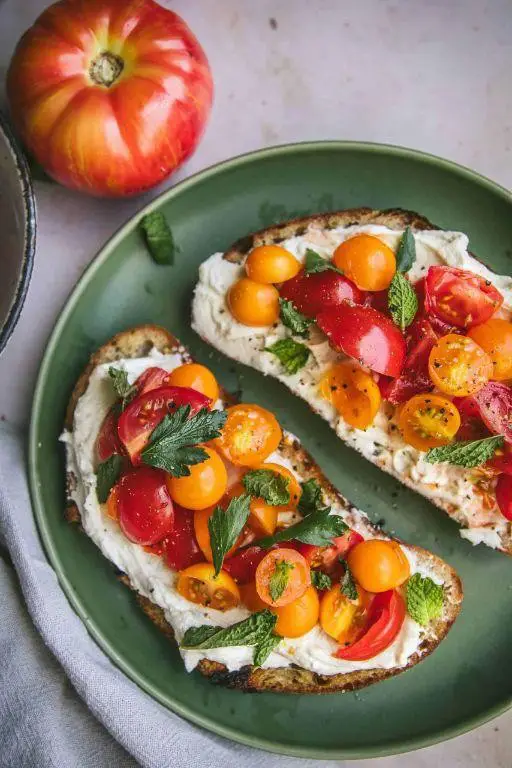
For a quick yet satisfying breakfast or snack, ricotta and tomato toast combines creamy texture with fresh, juicy flavors in just a few simple steps. Follow along to master this easy dish that feels gourmet.
Ingredients
- 2 slices of sourdough bread (or any thick-sliced bread you prefer)
- 1/2 cup ricotta cheese (whole milk for creamier texture)
- 1 medium tomato, sliced (heirloom for more flavor)
- 1 tbsp olive oil (extra virgin recommended)
- Salt and pepper (adjust to taste)
- Fresh basil leaves for garnish (optional but recommended)
Instructions
- Preheat your oven to 375°F (190°C) to toast the bread evenly.
- Place the bread slices on a baking sheet and drizzle lightly with olive oil. Toast in the oven for 5-7 minutes, or until golden and crisp.
- While the bread is toasting, slice the tomato into 1/4-inch thick slices. Tip: Use a serrated knife for cleaner cuts.
- Once the bread is toasted, let it cool for a minute before spreading a generous layer of ricotta cheese on each slice.
- Arrange the tomato slices on top of the ricotta. Season with salt and pepper to taste. Tip: Letting the toast sit for a minute before serving allows the flavors to meld.
- Garnish with fresh basil leaves for a pop of color and flavor. Tip: Tear the basil leaves by hand to release more aroma.
Enjoy the contrast of the crispy toast with the creamy ricotta and the freshness of the tomato. For an extra touch, drizzle with a bit more olive oil or a balsamic glaze before serving.
Edamame with Sea Salt
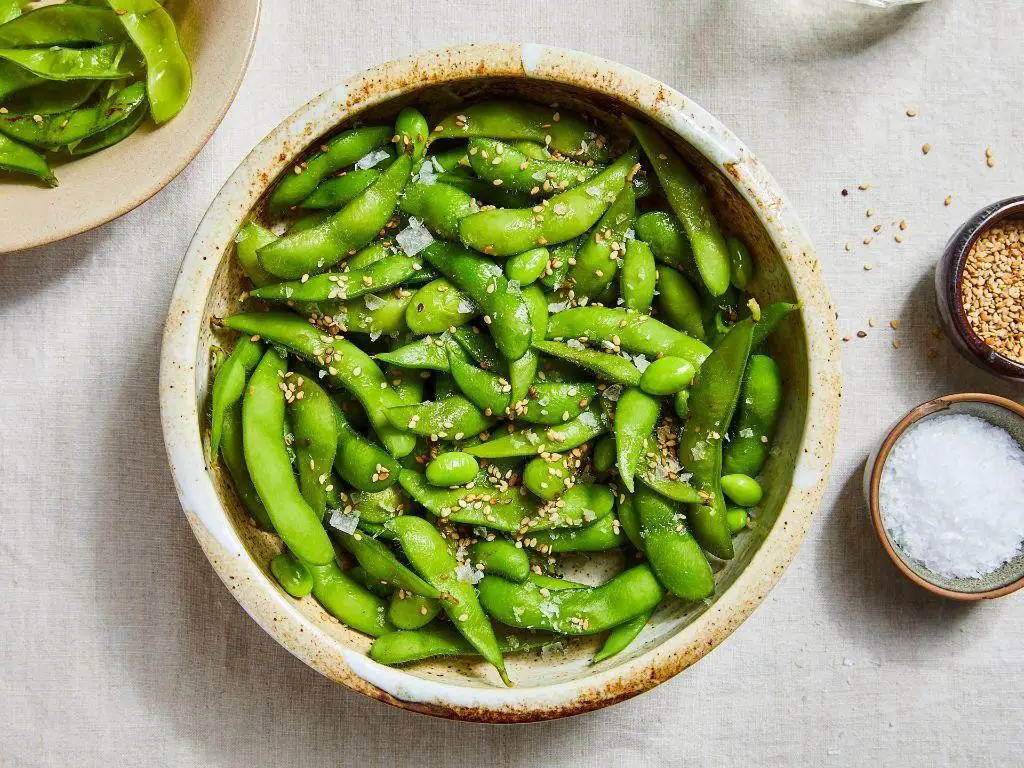
Preparing edamame with sea salt is a simple yet satisfying way to enjoy this nutritious snack. Perfect for beginners, this recipe requires minimal ingredients and effort, making it an ideal choice for a quick, healthy treat.
Ingredients
- 1 pound frozen edamame in pods (thawing not necessary)
- 1 tablespoon sea salt (adjust to taste)
- 2 cups water (for boiling)
Instructions
- Fill a medium pot with 2 cups of water and bring to a rolling boil over high heat.
- Add the frozen edamame pods to the boiling water. No need to thaw; they’ll cook perfectly from frozen.
- Boil the edamame for 5 minutes exactly. This ensures they’re tender but still slightly crisp.
- While the edamame cooks, prepare a bowl of ice water. This will be used to stop the cooking process immediately after boiling.
- After 5 minutes, use a slotted spoon to transfer the edamame from the boiling water to the ice water bath. Let them sit for 1 minute to cool.
- Drain the edamame well and pat dry with a clean kitchen towel to remove excess water.
- Sprinkle the sea salt evenly over the edamame. Toss gently to ensure all pods are lightly coated with salt.
Vibrant and flavorful, these edamame pods offer a delightful contrast between the salty exterior and the sweet, creamy beans inside. Serve them in a large bowl for sharing, or portion into small cups for individual snacking during your next gathering.
Chia Seed Pudding
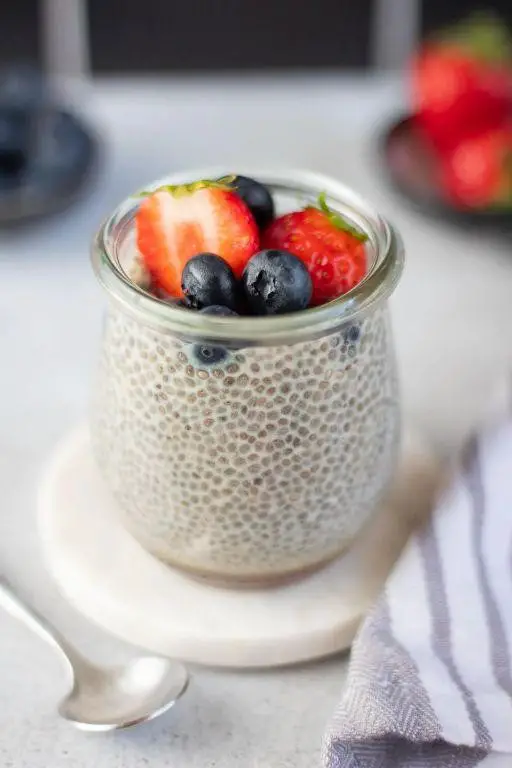
Whether you’re looking for a nutritious breakfast or a satisfying dessert, chia seed pudding is a versatile dish that’s both easy to make and delicious. With just a few simple ingredients and minimal prep time, you can create a creamy, nutrient-packed pudding that’s perfect for any time of the day.
Ingredients
- 1/4 cup chia seeds (for optimal texture, use whole chia seeds)
- 1 cup almond milk (or any milk of your choice, adjust thickness by adding more or less)
- 1 tbsp maple syrup (adjust sweetness to taste)
- 1/2 tsp vanilla extract (for flavor enhancement)
Instructions
- In a medium mixing bowl, combine 1/4 cup chia seeds and 1 cup almond milk.
- Add 1 tbsp maple syrup and 1/2 tsp vanilla extract to the mixture, stirring well to ensure all ingredients are fully incorporated.
- Let the mixture sit for 5 minutes, then stir again to prevent clumping of the chia seeds.
- Cover the bowl with plastic wrap or a lid and refrigerate for at least 4 hours, or overnight, to allow the chia seeds to fully absorb the liquid and expand.
- Before serving, give the pudding a good stir to achieve a uniform consistency. If the pudding is too thick, you can thin it with a little more almond milk.
Delightfully creamy with a slight crunch from the chia seeds, this pudding can be enjoyed plain or topped with fresh fruits, nuts, or a drizzle of honey for extra flavor. Experiment with different toppings to make it your own.
Conclusion
Outstanding options await in our roundup of 18 Delicious Diabetic Snack Recipes! Whether you’re managing diabetes or simply seeking healthier treats, these recipes promise flavor without compromise. We’d love for you to try them out, share which ones became your favorites in the comments, and spread the joy by pinning this article on Pinterest. Happy snacking!