Zesty and packed with protein, these desserts are about to revolutionize your sweet tooth cravings! Whether you’re a fitness enthusiast or just looking for healthier indulgences, our roundup of 20 Delicious High Protein Dessert Recipes offers the perfect blend of nutrition and flavor. Dive into these guilt-free treats that promise to satisfy without the sugar crash. Ready to whip up something amazing? Let’s get started!
Chocolate Protein Mug Cake
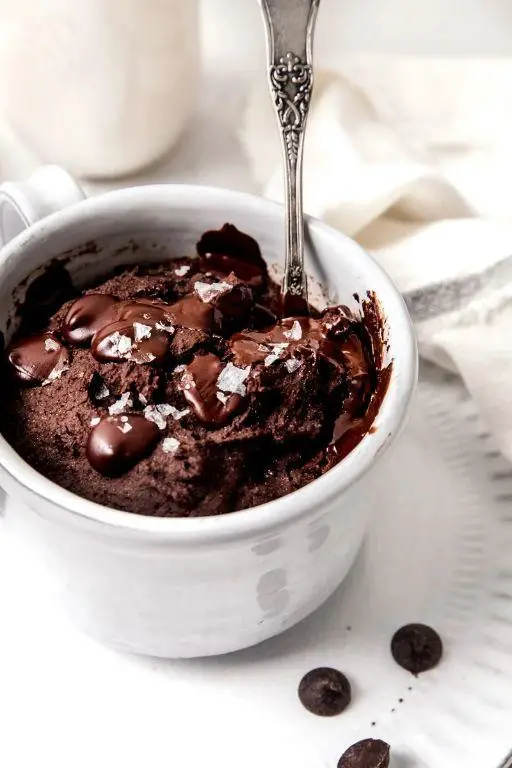
For those nights when you’re craving something sweet but don’t want to spend hours in the kitchen, this chocolate protein mug cake is your go-to. It’s quick, easy, and packed with protein to keep you satisfied.
Ingredients
- 1/4 cup of chocolate protein powder
- 2 tbsp of almond flour
- 1 tbsp of cocoa powder
- 1/4 tsp of baking powder
- a splash of vanilla extract
- 3 tbsp of almond milk
- 1 tbsp of melted coconut oil
- a couple of dark chocolate chips
Instructions
- Grab a microwave-safe mug and lightly grease it with a bit of coconut oil to prevent sticking.
- Add the chocolate protein powder, almond flour, cocoa powder, and baking powder to the mug. Whisk them together until well combined.
- Pour in the vanilla extract, almond milk, and melted coconut oil. Stir until the batter is smooth and no dry spots remain.
- Fold in the dark chocolate chips for that extra chocolatey goodness.
- Microwave on high for about 1 minute. Keep an eye on it—the cake is done when it’s risen and firm to the touch.
- Let it cool for a minute before digging in. Tip: The cake will be hot, so give it a moment to set.
Now you’ve got a fluffy, chocolatey mug cake that’s perfect for a quick dessert or snack. Not only is it delicious, but it’s also a great way to sneak in some protein. Try topping it with a dollop of Greek yogurt or a drizzle of peanut butter for an extra treat.
Vanilla Protein Pancakes
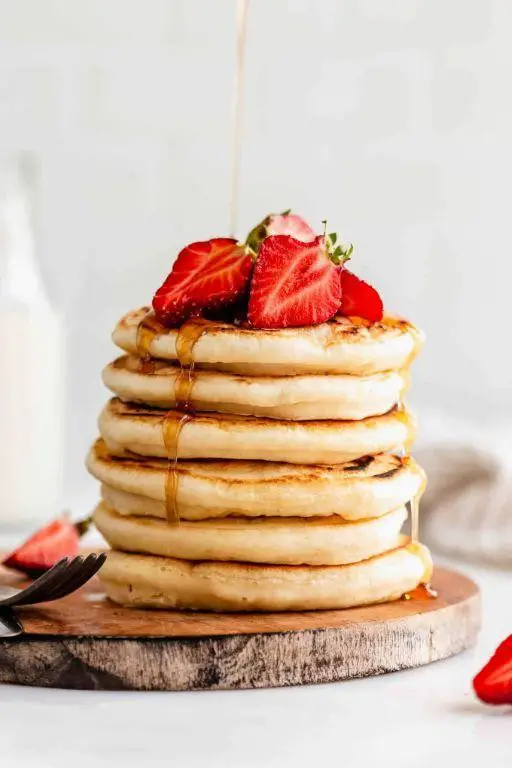
These Vanilla Protein Pancakes are the perfect way to start your day with a protein-packed breakfast that doesn’t skimp on flavor. They’re fluffy, satisfying, and incredibly easy to make, even for beginners.
Ingredients
- 1 cup of all-purpose flour
- a couple of scoops of your favorite vanilla protein powder
- 1 tablespoon of sugar
- a pinch of salt
- 1 teaspoon of baking powder
- a splash of vanilla extract
- 1 cup of milk (any kind you like)
- 1 large egg
- a drizzle of vegetable oil for the pan
Instructions
- In a large bowl, whisk together the flour, protein powder, sugar, salt, and baking powder until well combined.
- In another bowl, mix the milk, egg, and vanilla extract until smooth.
- Pour the wet ingredients into the dry ingredients and stir until just combined. Tip: Don’t overmix; a few lumps are okay for fluffier pancakes.
- Heat a non-stick pan over medium heat and add a drizzle of vegetable oil.
- Pour 1/4 cup of batter onto the pan for each pancake. Tip: Wait until bubbles form on the surface before flipping to ensure they’re cooked through.
- Cook for about 2-3 minutes on each side, or until golden brown. Tip: Keep the heat at medium to prevent burning.
- Serve warm with your favorite toppings.
Zesty and light, these pancakes have a delightful vanilla aroma and a tender texture that pairs wonderfully with fresh berries or a drizzle of maple syrup. For an extra protein boost, top with a spoonful of Greek yogurt.
Peanut Butter Protein Bars
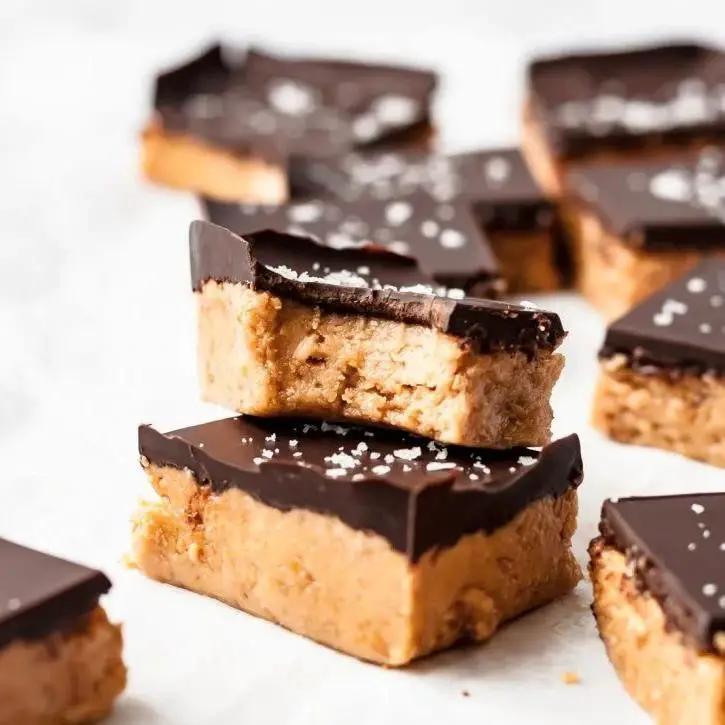
Let’s dive into making these no-bake Peanut Butter Protein Bars, perfect for a quick energy boost or a post-workout snack. They’re incredibly easy to whip up, requiring just a few ingredients and no oven time.
Ingredients
- 1 cup of creamy peanut butter
- 1/2 cup of honey
- 2 cups of rolled oats
- 1 scoop of vanilla protein powder
- A splash of vanilla extract
- A couple of tablespoons of mini chocolate chips
Instructions
- In a large mixing bowl, combine the creamy peanut butter and honey. Microwave for about 30 seconds to make them easier to mix.
- Stir in the rolled oats and vanilla protein powder until everything is well combined. Tip: If the mixture seems too dry, add a bit more honey.
- Add a splash of vanilla extract for extra flavor and mix well.
- Fold in the mini chocolate chips, reserving a few to sprinkle on top.
- Press the mixture firmly into an 8×8 inch pan lined with parchment paper. Tip: Wetting your fingers slightly can help prevent sticking.
- Sprinkle the reserved chocolate chips on top and gently press them into the surface.
- Chill in the refrigerator for at least 2 hours, or until firm. Tip: For quicker setting, you can place them in the freezer for about 30 minutes.
- Once set, lift the bars out using the parchment paper and cut into squares.
These bars are delightfully chewy with a rich peanut butter flavor, punctuated by the sweet bursts of chocolate chips. Try drizzling melted chocolate over the top for an extra indulgent treat.
High Protein Cheesecake
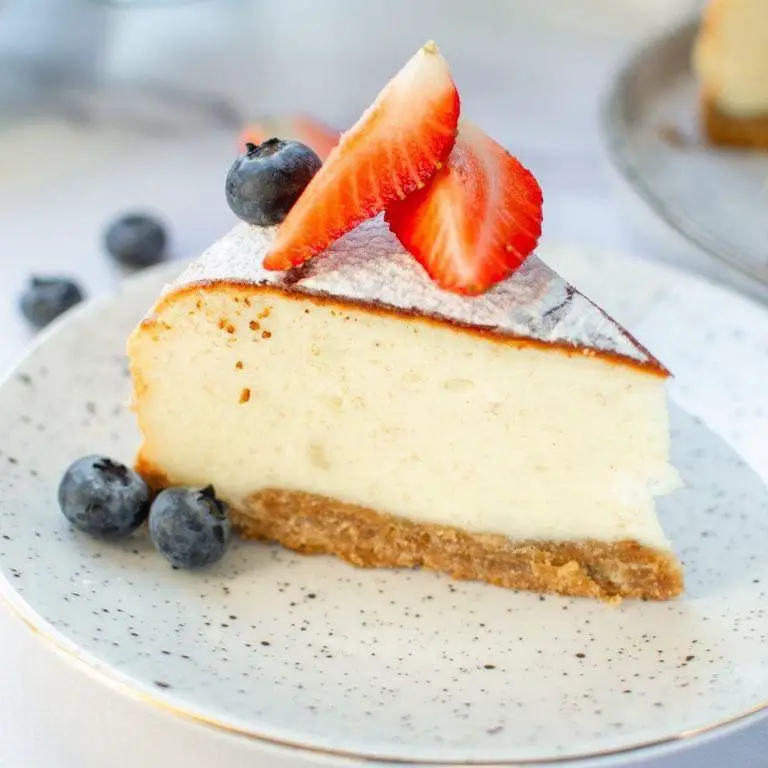
For those who love indulging in desserts without the guilt, this high protein cheesecake is a game-changer. It’s creamy, satisfying, and packed with the goodness your body craves.
Ingredients
- 2 cups of almond flour for that perfect crust
- A splash of vanilla extract to add a hint of sweetness
- 3 tablespoons of melted coconut oil, because it’s all about that healthy fat
- A couple of eggs to bind everything together beautifully
- 1 cup of Greek yogurt for that creamy texture and protein punch
- 1/4 cup of honey, because every cheesecake needs a touch of natural sweetness
- 1 teaspoon of lemon juice to brighten up the flavors
Instructions
- Preheat your oven to 350°F (175°C) to get it ready for baking.
- Mix the almond flour and melted coconut oil in a bowl until it resembles wet sand. Tip: Press the mixture firmly into the pan to avoid a crumbly crust.
- Press the almond flour mixture into the bottom of a springform pan to form the crust. Bake for 10 minutes, then let it cool.
- In a separate bowl, whisk together the eggs, Greek yogurt, honey, vanilla extract, and lemon juice until smooth. Tip: Ensure all ingredients are at room temperature for a smoother mixture.
- Pour the filling over the cooled crust and smooth the top with a spatula.
- Bake for 25 minutes, or until the edges are set but the center is slightly wobbly. Tip: Avoid overbaking to keep the cheesecake creamy.
- Turn off the oven and let the cheesecake cool inside for an hour to prevent cracking.
- Refrigerate for at least 4 hours, or overnight, before serving.
This cheesecake comes out incredibly creamy with a subtle tang from the Greek yogurt, balanced by the sweetness of honey. Try topping it with fresh berries for a refreshing contrast.
Protein Chocolate Chip Cookies

Baking the perfect batch of Protein Chocolate Chip Cookies is simpler than you think, and I’m here to walk you through each step to ensure your cookies come out chewy, chocolatey, and packed with protein.
Ingredients
- 1 cup of almond flour
- a scoop of your favorite vanilla protein powder
- a couple of tablespoons of coconut oil, melted
- a splash of vanilla extract
- 1/4 cup of maple syrup
- a handful of dark chocolate chips
- a pinch of salt
Instructions
- Preheat your oven to 350°F and line a baking sheet with parchment paper.
- In a large bowl, mix together the almond flour, protein powder, and salt until well combined.
- Add the melted coconut oil, vanilla extract, and maple syrup to the dry ingredients, stirring until a dough forms. Tip: If the dough feels too dry, add a teaspoon of water at a time until it comes together.
- Fold in the dark chocolate chips evenly throughout the dough.
- Using a tablespoon, scoop the dough onto the prepared baking sheet, spacing them about 2 inches apart. Tip: For uniformly sized cookies, use a cookie scoop.
- Bake for 10-12 minutes, or until the edges are lightly golden. Tip: The cookies will firm up as they cool, so don’t overbake them if you prefer a chewy texture.
- Let the cookies cool on the baking sheet for 5 minutes before transferring them to a wire rack to cool completely.
These cookies boast a soft, chewy center with a slight crisp around the edges, making them irresistible. Serve them with a glass of cold almond milk for a delightful post-workout snack or pack them in your lunchbox for a sweet treat.
Banana Protein Bread
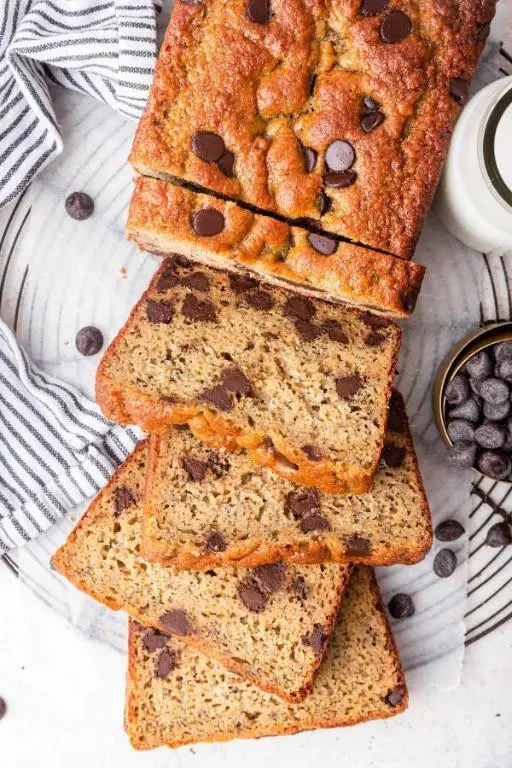
Starting your day with a nutritious and delicious breakfast is easier than you think with this Banana Protein Bread recipe. Simple to make and packed with flavor, it’s the perfect way to use up those overripe bananas sitting on your counter.
Ingredients
- 2 cups of mashed bananas (about 4 medium bananas)
- 1/2 cup of Greek yogurt for that extra protein punch
- 2 eggs, because every good bread needs a binder
- 1/4 cup of honey for a natural sweetness
- 1 tsp of vanilla extract, just a splash for flavor
- 2 cups of whole wheat flour to keep things wholesome
- 1 scoop of your favorite protein powder (about 1/4 cup)
- 1 tsp of baking soda to get that perfect rise
- A pinch of salt to balance the sweetness
Instructions
- Preheat your oven to 350°F (175°C) and grease a 9×5 inch loaf pan. Tip: Lining the pan with parchment paper makes removal a breeze.
- In a large bowl, mash the bananas until smooth. Stir in the Greek yogurt, eggs, honey, and vanilla extract until well combined.
- Add the whole wheat flour, protein powder, baking soda, and salt to the wet ingredients. Mix just until the dry ingredients are incorporated. Tip: Overmixing can lead to dense bread, so fold gently.
- Pour the batter into the prepared loaf pan and smooth the top with a spatula. Tip: For an extra touch, sprinkle some oats or chopped nuts on top before baking.
- Bake for 50-60 minutes, or until a toothpick inserted into the center comes out clean. The bread should be golden brown and pull away slightly from the edges of the pan.
- Let the bread cool in the pan for 10 minutes, then transfer to a wire rack to cool completely. This step is crucial for easy slicing.
Banana Protein Bread is wonderfully moist with a subtle sweetness from the bananas and honey. Serve it warm with a dollop of almond butter for an extra protein boost or toast a slice for a quick and satisfying breakfast on the go.
High Protein Brownies
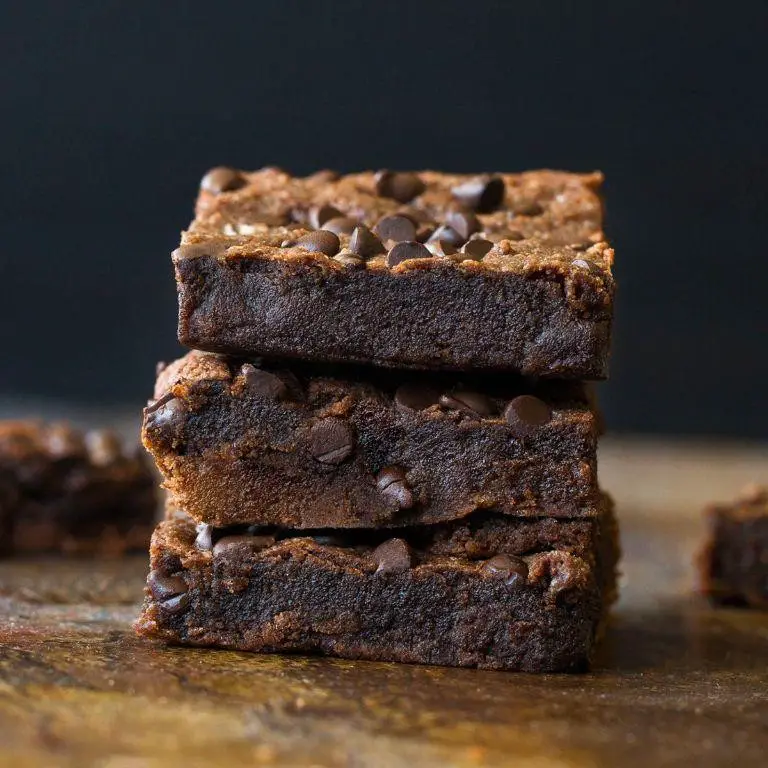
Great news for those who love indulging in sweets without the guilt! These high-protein brownies are not only delicious but also packed with nutrients to fuel your day. Let’s dive into making them with simple, easy-to-follow steps.
Ingredients
- 1 cup of almond flour, because it’s a great gluten-free option
- 1/2 cup of cocoa powder, for that rich chocolatey goodness
- 1/2 cup of protein powder, chocolate or vanilla works fine
- 1/4 cup of honey, to sweeten things up naturally
- 1/4 cup of almond milk, just a splash to get the right consistency
- 2 eggs, to bind everything together
- 1 tsp of vanilla extract, for a hint of flavor
- 1/2 tsp of baking powder, to give them a little lift
- A pinch of salt, to balance the sweetness
Instructions
- Preheat your oven to 350°F (175°C) and line an 8×8 inch baking pan with parchment paper.
- In a large bowl, whisk together the almond flour, cocoa powder, protein powder, baking powder, and salt until well combined.
- Add the honey, almond milk, eggs, and vanilla extract to the dry ingredients. Mix until the batter is smooth and no dry spots remain. Tip: If the batter seems too thick, add a little more almond milk, one tablespoon at a time.
- Pour the batter into the prepared baking pan and smooth the top with a spatula. Tip: Wetting the spatula slightly can help spread the batter more easily.
- Bake for 20-25 minutes, or until a toothpick inserted into the center comes out mostly clean. Tip: Don’t overbake; the brownies will continue to set as they cool.
- Let the brownies cool in the pan for at least 10 minutes before cutting into squares.
Look at how fudgy and rich these brownies turned out! The protein powder adds a subtle depth of flavor, making them a perfect post-workout treat or a healthy dessert option. Serve them warm with a dollop of Greek yogurt for an extra protein boost.
Strawberry Protein Ice Cream
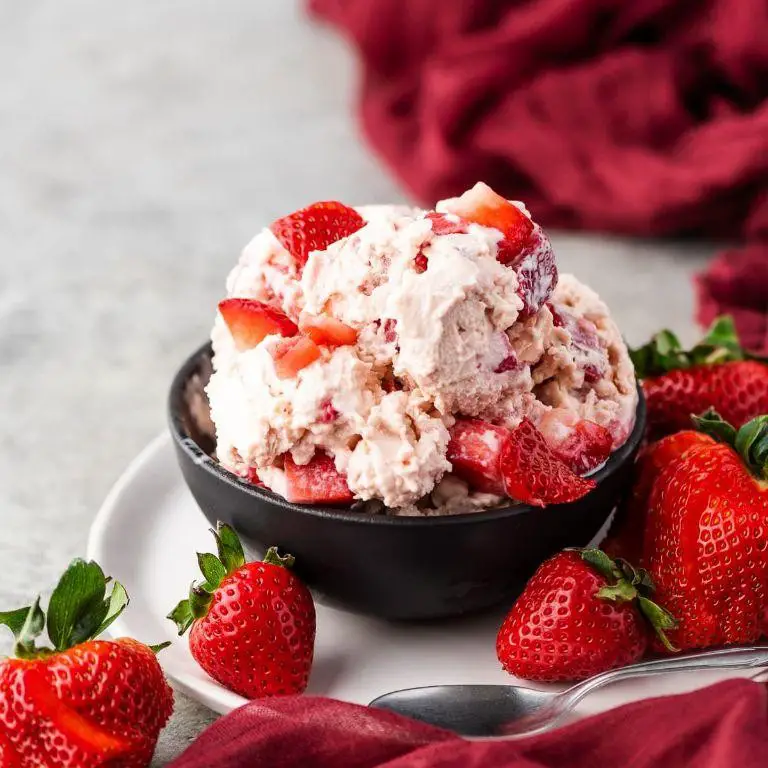
Begin by gathering your ingredients and tools for this simple yet delicious Strawberry Protein Ice Cream. This recipe is perfect for those looking for a healthy, protein-packed dessert option that doesn’t skimp on flavor.
Ingredients
- 2 cups of frozen strawberries
- 1 scoop of your favorite vanilla protein powder
- 1/2 cup of almond milk, plus a splash more if needed
- 1 tbsp of honey, because every sweet treat needs a little natural sweetness
- A couple of ice cubes to thicken it up
Instructions
- First, toss the frozen strawberries into your blender. This ensures they break down easily and give your ice cream that perfect fruity base.
- Add the scoop of vanilla protein powder right on top of the strawberries. This helps distribute it evenly when you start blending.
- Pour in the 1/2 cup of almond milk. If you like your ice cream a bit creamier, don’t hesitate to add that extra splash.
- Drizzle the honey over everything. It’s not just for sweetness; it helps bind the ingredients together.
- Throw in a couple of ice cubes. They’re the secret to getting that thick, scoopable texture.
- Blend on high until smooth. Stop and scrape down the sides if needed to make sure everything is perfectly incorporated.
- Once it’s smooth and creamy, give it a quick taste. If it’s too thick, add a tiny bit more almond milk and blend again.
- Serve immediately for a soft-serve consistency, or pop it in the freezer for 30 minutes if you prefer it firmer.
Mmm, the texture is luxuriously creamy with just the right amount of sweetness from the strawberries and honey. Try topping it with fresh strawberry slices or a sprinkle of granola for an extra crunch.
Blueberry Protein Muffins

You’re about to dive into making some delicious Blueberry Protein Muffins that are as nutritious as they are tasty. Perfect for a quick breakfast or a post-workout snack, these muffins are packed with flavor and protein to keep you energized throughout your day.
Ingredients
- 1 cup of all-purpose flour
- 1 scoop of your favorite vanilla protein powder
- 1/2 cup of sugar
- 1 tsp of baking powder
- A pinch of salt
- 1/2 cup of milk (any kind you like)
- A splash of vanilla extract
- 1 egg
- 2 tbsp of melted butter
- A handful of fresh blueberries
Instructions
- Preheat your oven to 375°F (190°C) and line a muffin tin with paper liners or grease it lightly.
- In a large bowl, whisk together the flour, protein powder, sugar, baking powder, and salt until well combined.
- In another bowl, mix the milk, vanilla extract, egg, and melted butter until smooth.
- Pour the wet ingredients into the dry ingredients and stir until just combined. Be careful not to overmix to keep the muffins tender.
- Gently fold in the blueberries, distributing them evenly throughout the batter.
- Divide the batter evenly among the muffin cups, filling each about 2/3 full.
- Bake for 20-25 minutes, or until a toothpick inserted into the center of a muffin comes out clean.
- Let the muffins cool in the tin for 5 minutes, then transfer them to a wire rack to cool completely.
Very moist and fluffy, these Blueberry Protein Muffins have a delightful burst of berry in every bite. Try serving them warm with a dollop of Greek yogurt for an extra protein boost.
Pumpkin Protein Cookies

Whipping up a batch of Pumpkin Protein Cookies is a fantastic way to enjoy a healthy treat that doesn’t skimp on flavor. These cookies are not only packed with protein but also have that cozy, spiced pumpkin taste we all love in the fall.
Ingredients
- 1 cup of pumpkin puree
- 2 scoops of vanilla protein powder
- 1/2 cup of almond flour
- 1/4 cup of maple syrup
- A splash of vanilla extract
- A couple of dashes of pumpkin pie spice
- 1/2 tsp of baking soda
- A pinch of salt
Instructions
- Preheat your oven to 350°F and line a baking sheet with parchment paper.
- In a large bowl, mix together the pumpkin puree, vanilla protein powder, almond flour, maple syrup, vanilla extract, pumpkin pie spice, baking soda, and salt until well combined. Tip: If the dough feels too sticky, add a bit more almond flour to make it easier to handle.
- Using a tablespoon, scoop the dough onto the prepared baking sheet, spacing them about 2 inches apart. Tip: Wet your fingers slightly to press down the dough into cookie shapes without sticking.
- Bake for 12-15 minutes, or until the edges are just starting to turn golden. Tip: Don’t overbake; the cookies will firm up as they cool.
- Let the cookies cool on the baking sheet for 5 minutes before transferring them to a wire rack to cool completely.
Best enjoyed when they’re slightly warm, these Pumpkin Protein Cookies have a soft, chewy texture with a hint of spice. Try serving them with a dollop of Greek yogurt for an extra protein boost or crumble them over your morning oatmeal for a delicious twist.
Almond Butter Protein Balls
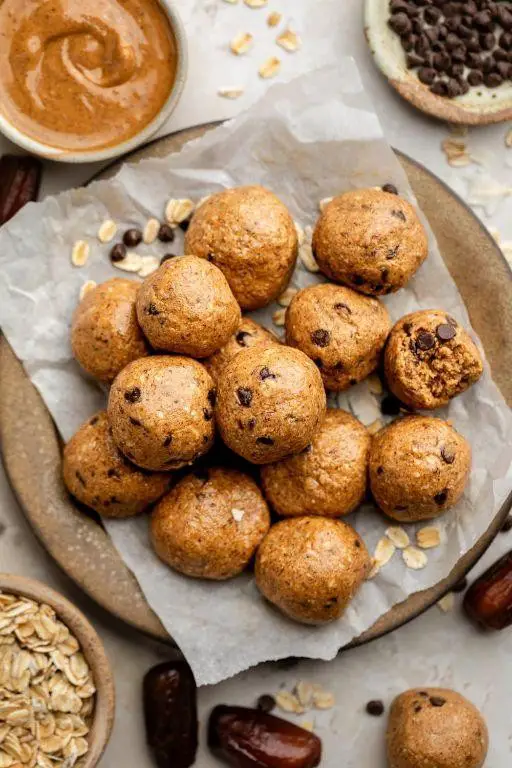
These almond butter protein balls are the perfect snack to fuel your day, packed with protein and energy-boosting ingredients. They’re incredibly easy to make, requiring no baking, and can be customized to your taste preferences.
Ingredients
- 1 cup of almond butter (creamy or crunchy, your choice)
- 1/2 cup of honey (for that natural sweetness)
- 1 cup of old-fashioned oats (the heart of the ball)
- 1/2 cup of vanilla protein powder (to pump up the protein)
- A couple of tablespoons of chia seeds (for that extra crunch and nutrients)
- A splash of vanilla extract (because vanilla makes everything better)
- A pinch of salt (to balance the sweetness)
Instructions
- In a large mixing bowl, combine the almond butter and honey. Stir until they’re well mixed and smooth.
- Add the oats, protein powder, chia seeds, vanilla extract, and salt to the bowl. Mix everything together until all the ingredients are evenly distributed.
- Once the mixture is uniform, use your hands to roll it into small balls, about 1 inch in diameter. Tip: If the mixture is too sticky, wet your hands slightly to make rolling easier.
- Place the balls on a baking sheet lined with parchment paper. Tip: For extra flavor, you can roll the balls in crushed nuts or coconut flakes before chilling.
- Refrigerate the balls for at least 30 minutes to firm up. Tip: This step is crucial for the balls to hold their shape.
- Once chilled, transfer the protein balls to an airtight container. They can be stored in the fridge for up to a week or frozen for longer storage.
Light and satisfying, these almond butter protein balls have a chewy texture with a slight crunch from the chia seeds. They’re subtly sweet with a rich almond flavor, making them a great post-workout snack or a quick breakfast on the go. Try drizzling them with melted dark chocolate for an indulgent twist.
High Protein Tiramisu
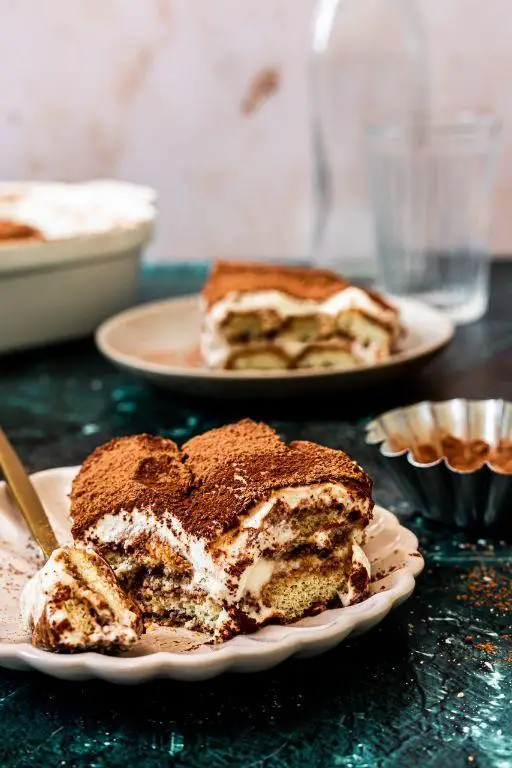
Delving into the world of desserts doesn’t mean you have to leave your health goals behind. This High Protein Tiramisu is a game-changer, combining the classic flavors you love with a nutritious twist that’s surprisingly simple to make.
Ingredients
- 1 cup of mascarpone cheese
- 3 eggs, separated
- 1/4 cup of sugar
- 1 tsp of vanilla extract
- 1 cup of strong brewed coffee, cooled
- a splash of rum (optional)
- a couple of ladyfinger cookies
- 2 tbsp of cocoa powder
- a pinch of salt
Instructions
- In a large bowl, beat the egg yolks with sugar until pale and fluffy. Tip: This step is crucial for a smooth texture, so don’t rush it.
- Add the mascarpone cheese and vanilla extract to the yolk mixture, mixing until just combined. Overmixing can lead to a runny consistency.
- In a separate bowl, whip the egg whites with a pinch of salt until stiff peaks form. Gently fold into the mascarpone mixture to keep the air in.
- Quickly dip each ladyfinger into the coffee (and rum if using) and layer them at the bottom of your serving dish. Tip: A quick dip is all you need; too long and they’ll fall apart.
- Spread half of the mascarpone mixture over the ladyfingers, then repeat with another layer of dipped ladyfingers and the remaining mascarpone.
- Dust the top with cocoa powder. For best results, use a fine sieve to avoid clumps.
- Chill in the refrigerator for at least 4 hours, or overnight. Tip: Patience is key here; the flavors meld beautifully over time.
Creamy, rich, and with just the right amount of coffee kick, this High Protein Tiramisu is a guilt-free indulgence. Serve it chilled with a dusting of extra cocoa or a side of fresh berries for a refreshing contrast.
Chocolate Protein Pudding
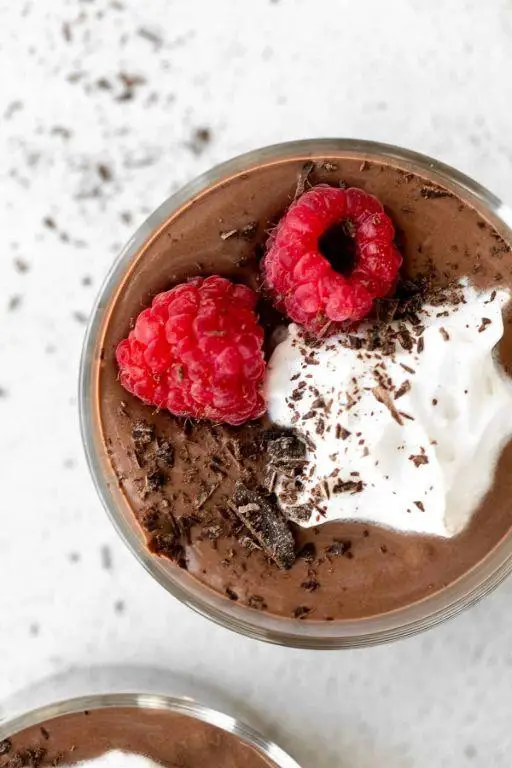
For those days when you’re craving something sweet yet nutritious, this Chocolate Protein Pudding is your go-to. It’s surprisingly simple to whip up, requiring just a few ingredients and minimal effort, making it perfect for beginners.
Ingredients
- 2 cups of almond milk (or any milk you prefer)
- a couple of scoops of your favorite chocolate protein powder
- a splash of vanilla extract
- 1/4 cup of chia seeds
- a drizzle of honey or maple syrup, if you like it sweeter
Instructions
- In a medium bowl, whisk together the almond milk and chocolate protein powder until smooth. Tip: Sifting the protein powder can help avoid lumps.
- Add the vanilla extract and honey or maple syrup to the mixture, stirring well to combine.
- Gently fold in the chia seeds, ensuring they’re evenly distributed throughout the mixture. Tip: Letting the mixture sit for a minute before stirring again helps prevent the chia seeds from clumping.
- Cover the bowl with plastic wrap or a lid and refrigerate for at least 4 hours, or overnight. Tip: The longer it sits, the thicker and creamier the pudding will become.
- Once set, give the pudding a good stir to break up any chia seed clusters that may have formed.
- Serve chilled, topped with fresh berries or a sprinkle of cocoa powder for an extra chocolatey touch.
You’ll love the creamy texture and rich chocolate flavor of this pudding. It’s a versatile dish that can be enjoyed as a healthy dessert or a protein-packed snack any time of the day.
Coconut Protein Macaroons
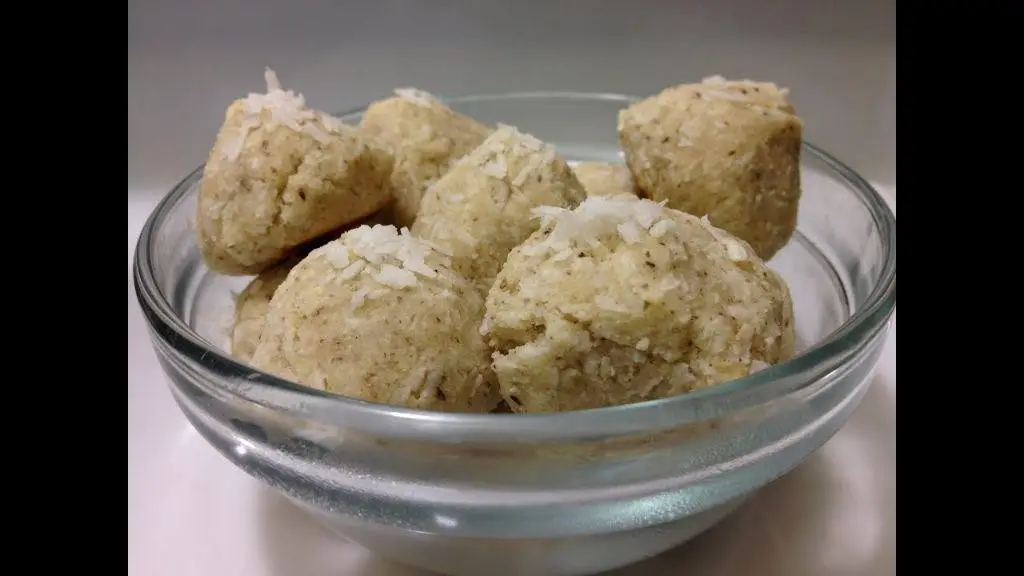
Ready to whip up a batch of delicious Coconut Protein Macaroons? These bite-sized treats are not only packed with flavor but also a great source of protein, making them the perfect snack for anyone looking to satisfy their sweet tooth in a healthier way.
Ingredients
- 2 cups of shredded coconut
- 1/2 cup of vanilla protein powder
- 1/4 cup of honey
- A splash of vanilla extract
- 2 egg whites
- A pinch of salt
Instructions
- Preheat your oven to 325°F and line a baking sheet with parchment paper.
- In a large bowl, mix together the shredded coconut and vanilla protein powder until well combined.
- Add the honey, vanilla extract, and a pinch of salt to the bowl, stirring until everything is evenly mixed. Tip: If the mixture seems too dry, a tiny bit more honey can help bind it together.
- In a separate bowl, beat the egg whites until they form stiff peaks. This will give your macaroons a light, airy texture.
- Gently fold the beaten egg whites into the coconut mixture, being careful not to deflate the egg whites too much.
- Using a tablespoon or a small cookie scoop, drop mounds of the mixture onto the prepared baking sheet, spacing them about an inch apart.
- Bake for 15-20 minutes, or until the macaroons are golden brown on the edges. Tip: Keep an eye on them after 15 minutes to prevent over-browning.
- Let the macaroons cool on the baking sheet for 5 minutes before transferring them to a wire rack to cool completely. Tip: They’ll firm up as they cool, so resist the urge to move them too soon.
Kick back and enjoy these Coconut Protein Macaroons as a post-workout snack or a guilt-free dessert. Their chewy texture and sweet, coconutty flavor make them irresistible, and they’re even better when dipped in dark chocolate for an extra decadent treat.
High Protein Apple Crumble
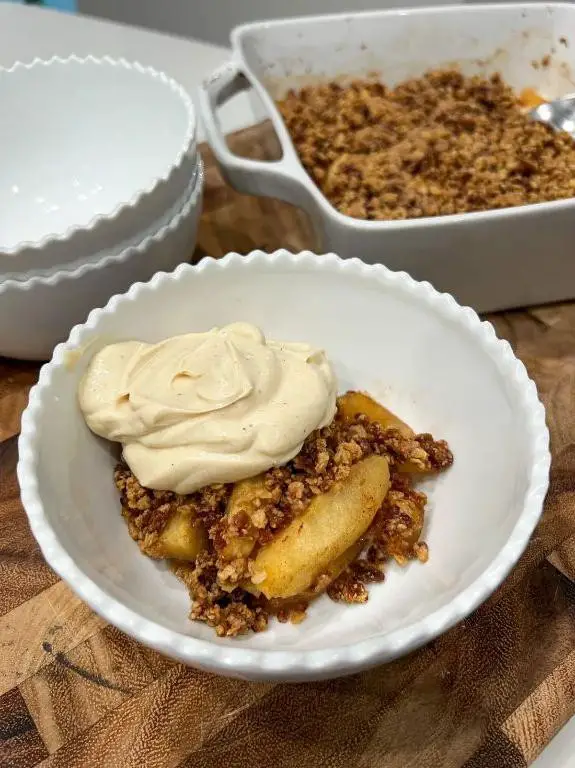
Zesty and wholesome, this High Protein Apple Crumble is a game-changer for anyone looking to indulge in a classic dessert with a nutritious twist. Let’s dive into making this delightful dish that’s as satisfying to prepare as it is to eat.
Ingredients
- 3 cups of peeled and sliced apples (about 4 medium apples)
- A splash of lemon juice to keep the apples from browning
- 1/2 cup of almond flour for that nutty, protein-packed base
- 1/4 cup of vanilla protein powder to boost the protein content
- A couple of tablespoons of maple syrup for natural sweetness
- 1 teaspoon of cinnamon for that warm, spicy kick
- 2 tablespoons of cold butter, cubed, to achieve that perfect crumble texture
Instructions
- Preheat your oven to 350°F (175°C) to ensure it’s ready for baking.
- Toss the sliced apples with a splash of lemon juice in a bowl to prevent browning.
- In a separate bowl, mix the almond flour, vanilla protein powder, cinnamon, and maple syrup until well combined.
- Add the cold, cubed butter to the dry mixture. Use your fingers to rub the butter into the flour until the mixture resembles coarse crumbs.
- Spread the apple slices evenly in a baking dish, then sprinkle the crumble mixture on top.
- Bake for 25-30 minutes, or until the top is golden brown and the apples are tender when pierced with a fork.
- Let it cool for a few minutes before serving to allow the flavors to meld together beautifully.
Yield a crumble that’s irresistibly crispy on top with soft, cinnamon-spiced apples underneath. Perfect warm with a scoop of vanilla ice cream or cold for a quick breakfast treat.
Raspberry Protein Scones
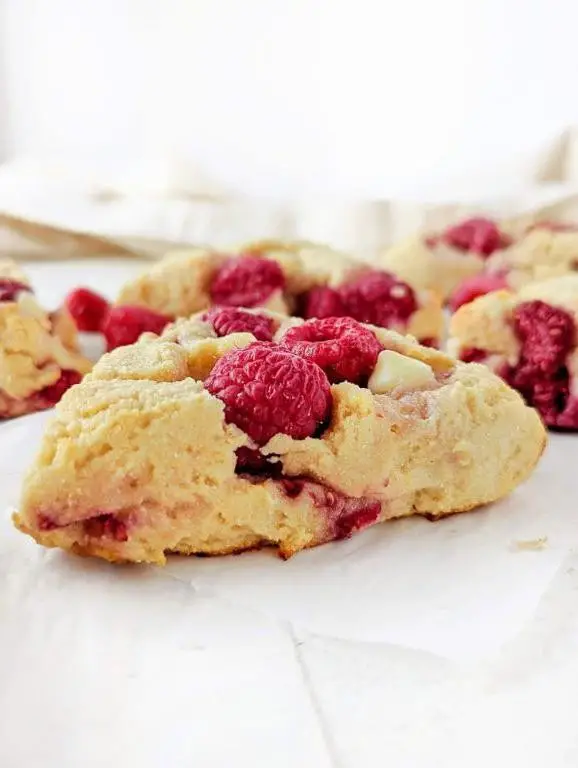
Very few things compare to the joy of biting into a freshly baked scone, especially when it’s packed with the tangy sweetness of raspberries and the wholesome goodness of protein. Today, we’re diving into making Raspberry Protein Scones that are not only delicious but also a great way to fuel your day.
Ingredients
– 2 cups of all-purpose flour
– 1/2 cup of vanilla protein powder
– 1/4 cup of sugar
– 1 tbsp of baking powder
– A pinch of salt
– 1/2 cup of cold butter, cubed
– 1/2 cup of fresh raspberries
– 1/2 cup of heavy cream
– A splash of vanilla extract
– 1 egg, for brushing
Instructions
1. Preheat your oven to 375°F and line a baking sheet with parchment paper.
2. In a large bowl, whisk together the flour, protein powder, sugar, baking powder, and salt.
3. Add the cubed butter to the dry ingredients. Use your fingers to rub the butter into the flour until the mixture resembles coarse crumbs. Tip: Keep the butter cold for flakier scones.
4. Gently fold in the raspberries, being careful not to crush them.
5. In a small bowl, mix the heavy cream and vanilla extract. Pour this into the dry ingredients and stir until just combined. Tip: Don’t overmix to keep the scones tender.
6. Turn the dough onto a floured surface and shape it into a 1-inch thick circle. Cut into 8 wedges.
7. Place the wedges on the prepared baking sheet. Beat the egg and brush it over the tops of the scones for a golden finish.
8. Bake for 20-25 minutes, or until the scones are golden brown and a toothpick inserted comes out clean. Tip: Rotate the baking sheet halfway through for even baking.
Zesty and moist, these Raspberry Protein Scones are perfect with a dollop of clotted cream or a drizzle of honey. The raspberries add a burst of freshness, making them an irresistible treat any time of the day.
Matcha Protein Energy Bites
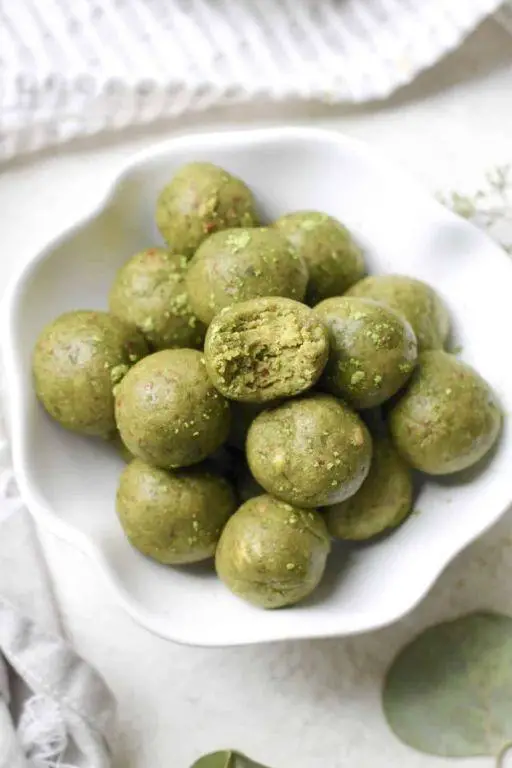
After a long day, we all need a quick, nutritious pick-me-up, and these Matcha Protein Energy Bites are just the ticket. Packed with energy-boosting ingredients, they’re perfect for a post-workout snack or a mid-afternoon boost.
Ingredients
- 1 cup of old-fashioned oats
- A couple of tablespoons of chia seeds
- A splash of vanilla extract
- 1/2 cup of almond butter
- 1/4 cup of honey
- A scoop of vanilla protein powder
- 1 tablespoon of matcha powder
- A pinch of salt
Instructions
- In a large mixing bowl, combine the oats, chia seeds, vanilla extract, almond butter, and honey. Mix until everything is well incorporated.
- Add the vanilla protein powder, matcha powder, and a pinch of salt to the bowl. Stir until the mixture is uniform in color.
- Tip: If the mixture feels too dry, add a teaspoon of water at a time until it holds together when pressed.
- Using your hands, roll the mixture into small balls, about 1 inch in diameter. This recipe should make about 12 bites.
- Tip: For easier rolling, lightly wet your hands to prevent the mixture from sticking.
- Place the energy bites on a baking sheet lined with parchment paper and refrigerate for at least 30 minutes to firm up.
- Tip: For a firmer texture, you can freeze the bites for about an hour before serving.
Zesty with a hint of earthiness from the matcha, these energy bites have a chewy texture that’s satisfying without being heavy. Try rolling them in shredded coconut or cacao powder for an extra flavor twist.
High Protein Lemon Bars
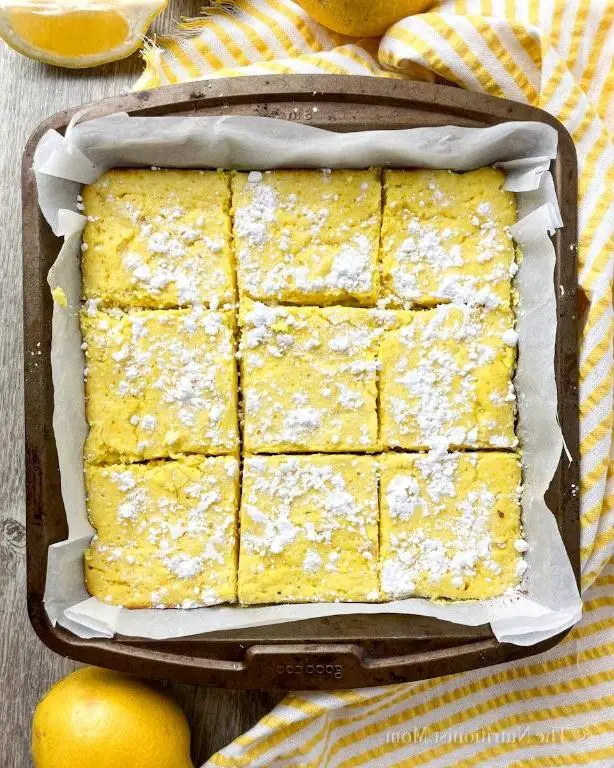
Kickstart your day with these High Protein Lemon Bars, a delightful twist on the classic dessert that packs a nutritious punch. Perfect for those who love a tangy treat without the guilt, this recipe is straightforward and satisfying.
Ingredients
- 1 cup of almond flour
- a couple of scoops of your favorite vanilla protein powder
- 1/4 cup of coconut oil, melted
- a splash of vanilla extract
- 3 eggs
- 1/2 cup of lemon juice
- 1 tbsp of lemon zest
- 1/4 cup of honey
- a pinch of salt
Instructions
- Preheat your oven to 350°F and line an 8×8 inch baking pan with parchment paper.
- In a bowl, mix the almond flour, protein powder, melted coconut oil, and a pinch of salt until it resembles coarse crumbs.
- Press the mixture firmly into the bottom of the prepared pan to form the crust. Bake for 10 minutes until lightly golden. Tip: Use the back of a spoon to smooth the crust evenly.
- While the crust bakes, whisk together the eggs, lemon juice, lemon zest, honey, and vanilla extract in another bowl until smooth.
- Pour the lemon mixture over the baked crust and return to the oven for another 15-20 minutes, or until the filling is set. Tip: The edges should be slightly firm, but the center will jiggle slightly—it will set as it cools.
- Let the bars cool completely in the pan on a wire rack, then refrigerate for at least 2 hours before slicing. Tip: For clean cuts, use a sharp knife dipped in hot water.
Just like that, you’ve got yourself a batch of High Protein Lemon Bars with a creamy, tangy filling atop a nutty, crumbly crust. Serve them chilled with a dusting of powdered protein powder for an extra protein boost or enjoy as is for a refreshing snack.
Oatmeal Protein Cookies
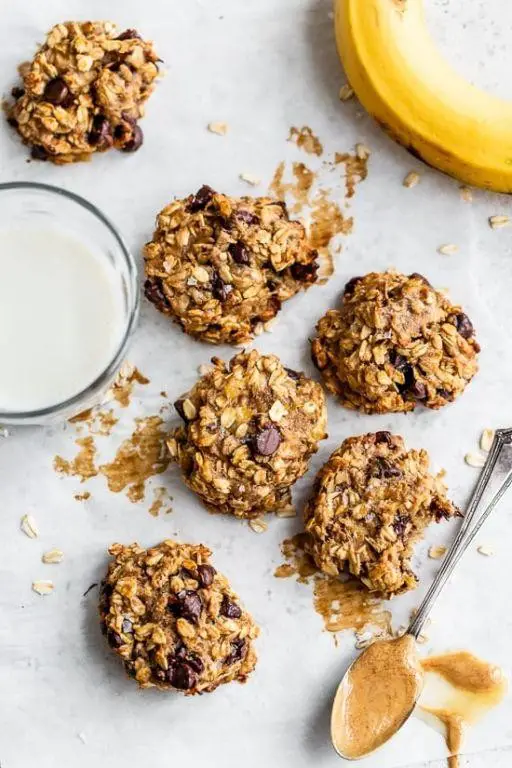
Oatmeal protein cookies are the perfect blend of nutritious and delicious, offering a hearty snack that doesn’t skimp on flavor. Let’s walk through how to make these wholesome treats step by step, ensuring you end up with cookies that are just right.
Ingredients
- 1 cup of rolled oats
- 1/2 cup of almond butter
- 1/4 cup of honey
- A splash of vanilla extract
- A couple of scoops of your favorite protein powder
- 1/2 tsp of baking soda
- A pinch of salt
- 1/4 cup of dark chocolate chips
Instructions
- Preheat your oven to 350°F and line a baking sheet with parchment paper.
- In a large bowl, mix together the rolled oats, almond butter, honey, and vanilla extract until well combined.
- Add the protein powder, baking soda, and salt to the bowl, stirring until the mixture is uniform. Tip: If the dough feels too dry, a tablespoon of milk can help bring it together.
- Fold in the dark chocolate chips, ensuring they’re evenly distributed throughout the dough.
- Using a tablespoon, scoop the dough onto the prepared baking sheet, spacing the cookies about 2 inches apart. Tip: Flatten each cookie slightly with the back of the spoon for even baking.
- Bake for 10-12 minutes, or until the edges are just starting to turn golden. Tip: Keep an eye on them after the 10-minute mark to avoid overbaking.
- Let the cookies cool on the baking sheet for 5 minutes before transferring them to a wire rack to cool completely.
Enjoy these oatmeal protein cookies as a post-workout snack or a healthy dessert. Their chewy texture and rich flavor make them a hit any time of day.
High Protein Carrot Cake
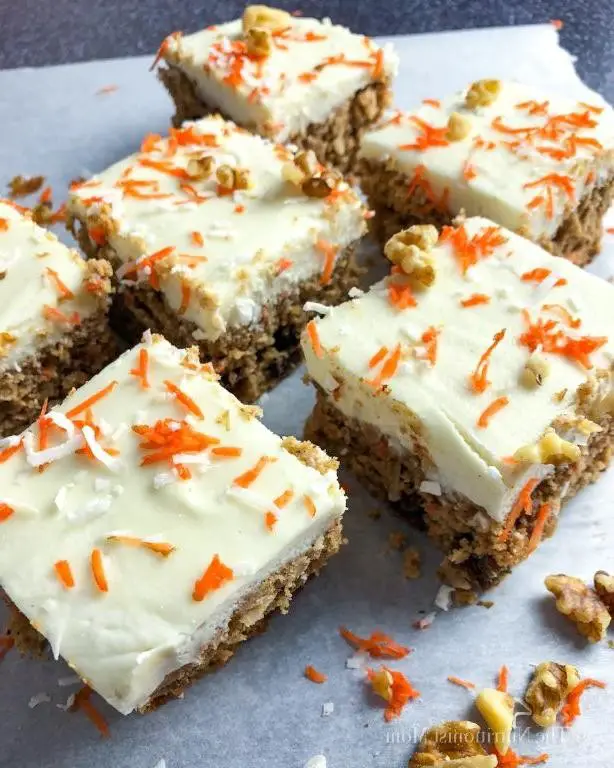
Unbelievably moist and packed with protein, this carrot cake is a game-changer for anyone looking to indulge without the guilt. Perfect for breakfast or a post-workout snack, it’s as nutritious as it is delicious.
Ingredients
- 2 cups of grated carrots
- 1 cup of almond flour
- 1/2 cup of vanilla protein powder
- 1/4 cup of maple syrup
- a splash of vanilla extract
- a couple of eggs
- 1 tsp of cinnamon
- 1/2 tsp of baking soda
- a pinch of salt
Instructions
- Preheat your oven to 350°F and grease an 8-inch baking pan.
- In a large bowl, mix the almond flour, protein powder, cinnamon, baking soda, and salt until well combined.
- Add the eggs, maple syrup, and vanilla extract to the dry ingredients, stirring until the batter is smooth.
- Fold in the grated carrots, ensuring they’re evenly distributed throughout the batter.
- Pour the batter into the prepared pan, smoothing the top with a spatula.
- Bake for 25-30 minutes, or until a toothpick inserted into the center comes out clean.
- Let the cake cool in the pan for 10 minutes before transferring it to a wire rack to cool completely.
Fluffy yet dense, this carrot cake boasts a perfect balance of sweetness and spice. Serve it with a dollop of Greek yogurt for an extra protein boost or enjoy it as is for a satisfying treat.
Conclusion
Absolutely, these 20 high-protein dessert recipes prove that nutritious can also mean delicious! Whether you’re looking to satisfy your sweet tooth or fuel your body, there’s something here for everyone. We’d love to hear which recipes you try and love—drop us a comment below. Don’t forget to share your favorites on Pinterest so others can enjoy these tasty treats too. Happy baking!