Discovering delicious meals that also support your health doesn’t have to be a challenge! Our roundup of 18 Delicious Insulin Resistance Recipes is packed with tasty, easy-to-make dishes perfect for home cooks across North America. Whether you’re looking for quick dinners or comforting favorites, these recipes are designed to delight your taste buds while keeping your health in check. Dive in and find your next favorite meal!
Grilled Salmon with Avocado Salsa
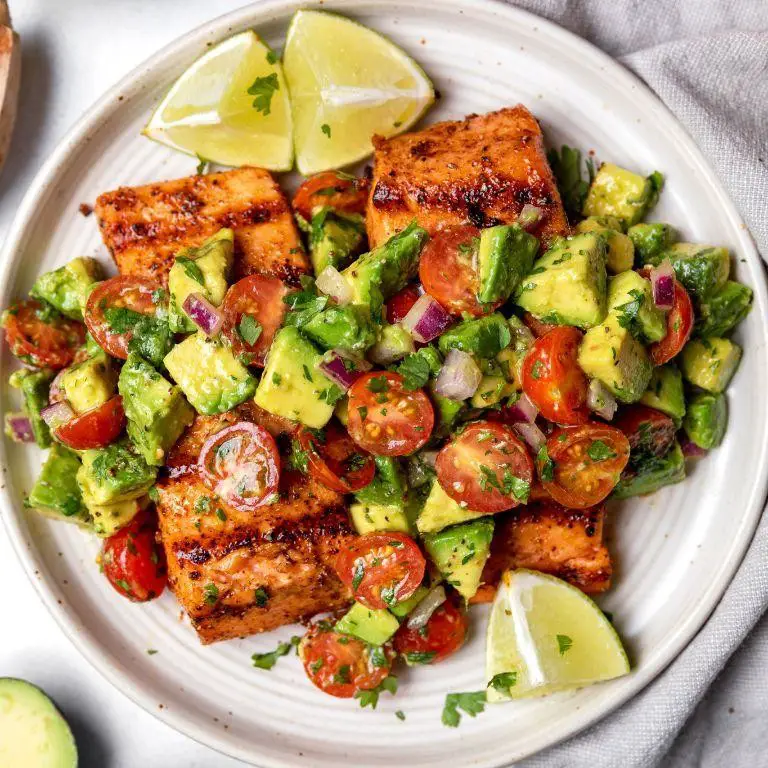
Every home cook deserves a dish that’s both impressive and approachable, and this Grilled Salmon with Avocado Salsa is just that. Let’s break down the process into simple, foolproof steps to ensure your success.
Ingredients
- 1.5 lbs fresh salmon fillet, skin-on
- 2 tbsp rich extra virgin olive oil
- 1 tsp finely ground sea salt
- 1/2 tsp freshly cracked black pepper
- 2 ripe avocados, diced
- 1/4 cup red onion, finely chopped
- 1 jalapeño, seeded and minced
- 2 tbsp fresh cilantro, chopped
- Juice of 1 lime
- 1/2 tsp ground cumin
Instructions
- Preheat your grill to medium-high heat, aiming for 400°F, to ensure a perfect sear without burning.
- Brush the salmon fillet evenly with olive oil, then season both sides with sea salt and black pepper.
- Place the salmon skin-side down on the grill. Close the lid and cook for 6 minutes, resisting the urge to move it for those coveted grill marks.
- Carefully flip the salmon using a wide spatula. Grill for another 4 minutes, or until the internal temperature reaches 145°F for medium doneness.
- While the salmon cooks, combine diced avocados, red onion, jalapeño, cilantro, lime juice, and cumin in a bowl. Gently mix to avoid mashing the avocados.
- Remove the salmon from the grill and let it rest for 3 minutes to allow the juices to redistribute.
- Top the grilled salmon with the avocado salsa just before serving to maintain the salsa’s fresh texture and vibrant color.
Grilled to perfection, the salmon boasts a crispy skin and tender, flaky interior, beautifully complemented by the creamy, zesty avocado salsa. For an extra touch, serve alongside a chilled glass of Sauvignon Blanc to elevate the meal’s freshness.
Quinoa and Black Bean Salad
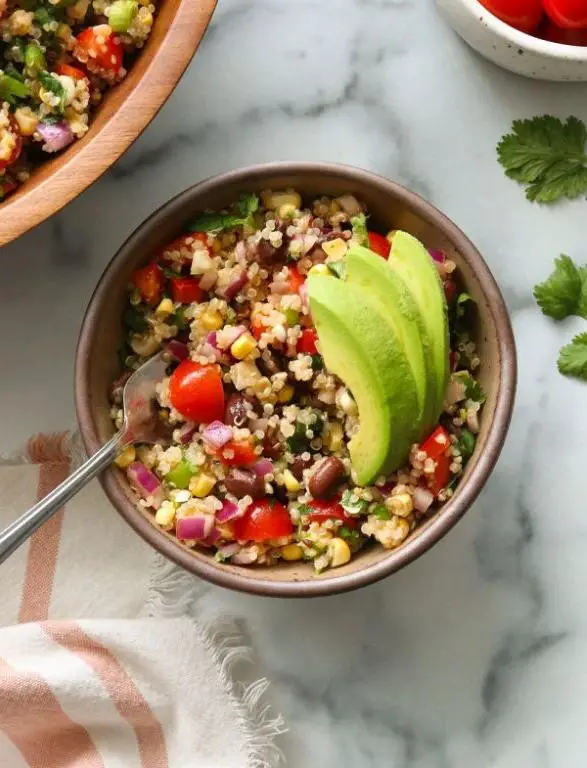
Alright, let’s dive into making a refreshing and nutritious Quinoa and Black Bean Salad that’s perfect for any season. This dish combines fluffy quinoa with hearty black beans, crisp vegetables, and a zesty lime dressing for a meal that’s as satisfying as it is healthy.
Ingredients
- 1 cup uncooked quinoa, rinsed and drained
- 2 cups water
- 1 can (15 oz) black beans, rinsed and drained
- 1 cup cherry tomatoes, halved
- 1/2 cup red onion, finely diced
- 1/4 cup fresh cilantro, chopped
- 1 avocado, diced
- 2 tbsp extra virgin olive oil
- Juice of 2 limes
- 1 tsp ground cumin
- 1/2 tsp sea salt
- 1/4 tsp freshly ground black pepper
Instructions
- In a medium saucepan, combine the quinoa and water. Bring to a boil over high heat, then reduce the heat to low, cover, and simmer for 15 minutes, or until the quinoa is fluffy and the water is absorbed.
- While the quinoa cooks, in a large bowl, mix together the black beans, cherry tomatoes, red onion, and cilantro.
- In a small bowl, whisk together the olive oil, lime juice, cumin, sea salt, and black pepper to create the dressing.
- Once the quinoa is cooked, let it cool for 5 minutes, then fluff it with a fork.
- Add the cooled quinoa to the bowl with the black bean mixture. Pour the dressing over the salad and toss gently to combine.
- Gently fold in the diced avocado just before serving to prevent it from becoming mushy.
Zesty and vibrant, this Quinoa and Black Bean Salad offers a delightful contrast of textures, from the creamy avocado to the crunchy vegetables. Serve it chilled as a standalone meal or alongside grilled chicken for an extra protein boost.
Turkey and Spinach Stuffed Bell Peppers
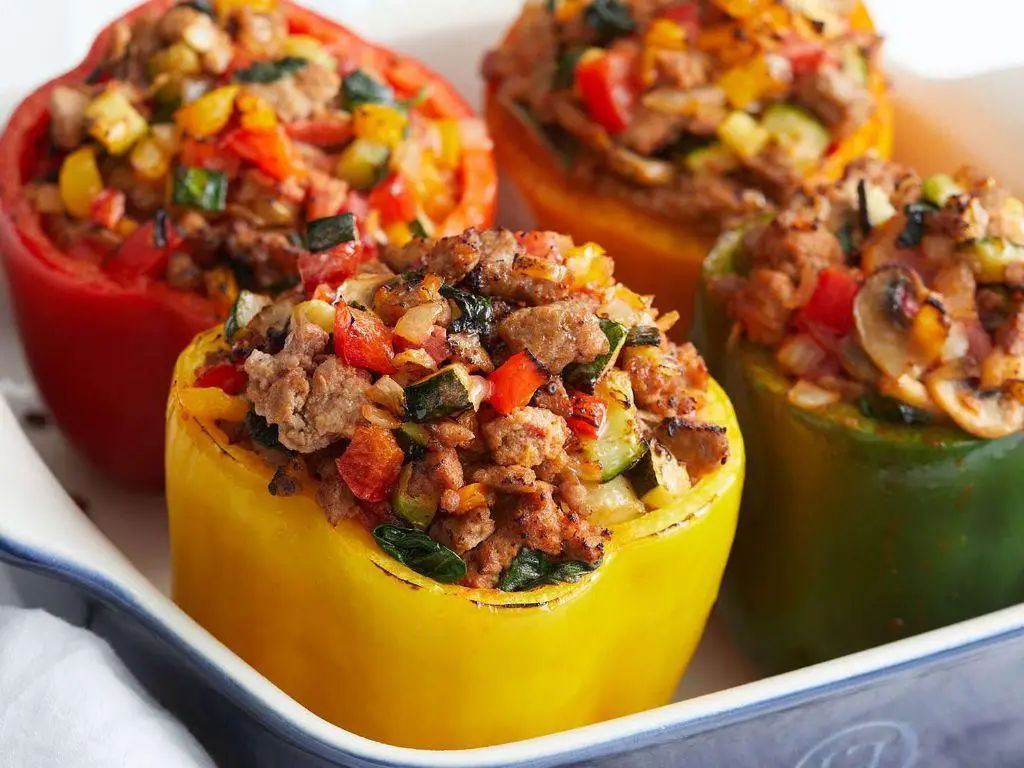
Very few dishes offer the perfect balance of nutrition, flavor, and visual appeal quite like these Turkey and Spinach Stuffed Bell Peppers. Ideal for a wholesome weeknight dinner, this recipe guides you through creating a dish that’s as satisfying to make as it is to eat.
Ingredients
- 4 large, vibrant bell peppers, any color
- 1 lb lean ground turkey
- 2 cups fresh, tender spinach leaves, roughly chopped
- 1 cup cooked, fluffy quinoa
- 1/2 cup sharp, grated cheddar cheese
- 1 tbsp rich extra virgin olive oil
- 1 tsp finely ground black pepper
- 1 tsp aromatic garlic powder
- 1/2 tsp sea salt
Instructions
- Preheat your oven to 375°F (190°C) to ensure it’s perfectly heated for baking the peppers.
- Carefully slice the tops off the bell peppers and remove the seeds and membranes, creating a hollow cavity for the stuffing.
- In a large skillet, heat the extra virgin olive oil over medium heat until shimmering, about 1 minute.
- Add the ground turkey to the skillet, breaking it apart with a spoon, and cook until no pink remains, approximately 5-7 minutes.
- Stir in the chopped spinach, cooked quinoa, garlic powder, black pepper, and sea salt, cooking for an additional 2-3 minutes until the spinach wilts slightly.
- Remove the skillet from heat and gently fold in the grated cheddar cheese until just combined.
- Spoon the turkey and spinach mixture evenly into the prepared bell peppers, packing lightly to fill each cavity.
- Place the stuffed peppers in a baking dish and bake for 25-30 minutes, or until the peppers are tender and the filling is heated through.
- Let the peppers rest for 5 minutes before serving to allow the flavors to meld beautifully.
Delightfully tender bell peppers cradle a savory filling of turkey and spinach, with the quinoa adding a pleasing texture contrast. Serve these stuffed peppers atop a bed of mixed greens for an extra pop of color and freshness.
Chicken and Vegetable Stir-Fry with Cauliflower Rice
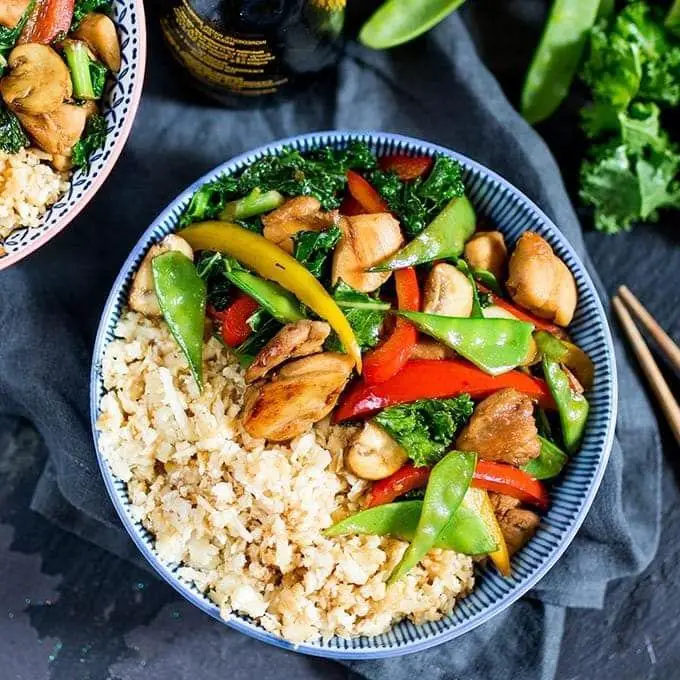
Let’s dive into making a delicious and healthy Chicken and Vegetable Stir-Fry with Cauliflower Rice, a perfect dish for those looking for a quick, nutritious meal. This recipe is straightforward, ensuring even beginners can achieve great results.
Ingredients
- 1 lb boneless, skinless chicken breasts, thinly sliced into strips
- 2 cups cauliflower rice, freshly grated for the best texture
- 1 tbsp rich extra virgin olive oil
- 2 cloves garlic, minced for a pungent kick
- 1 cup colorful bell peppers, thinly sliced
- 1 cup crisp broccoli florets
- 2 tbsp soy sauce, for a deep umami flavor
- 1 tsp finely ground black pepper
- 1/2 tsp crushed red pepper flakes, for a subtle heat
Instructions
- Heat the olive oil in a large skillet over medium-high heat until shimmering, about 1 minute.
- Add the chicken strips to the skillet, spreading them out in a single layer to ensure even cooking. Cook for 5-6 minutes, turning once, until golden brown and cooked through.
- Tip: Avoid overcrowding the pan to prevent steaming the chicken instead of browning it.
- Push the chicken to one side of the skillet and add the minced garlic, bell peppers, and broccoli. Stir-fry for 3-4 minutes until the vegetables are crisp-tender.
- Tip: Stir constantly to prevent the garlic from burning and to evenly cook the vegetables.
- Mix in the cauliflower rice, soy sauce, black pepper, and red pepper flakes. Stir-fry for another 2-3 minutes, until the cauliflower rice is heated through and slightly tender.
- Tip: For extra flavor, let the dish sit for a minute off the heat before serving to allow the flavors to meld.
This stir-fry boasts a delightful contrast of textures, from the tender chicken to the crisp vegetables and fluffy cauliflower rice. The flavors are bold and well-balanced, with a hint of heat from the red pepper flakes. Serve it in a bowl for a cozy meal or pack it for a nutritious lunch on the go.
Lentil Soup with Kale
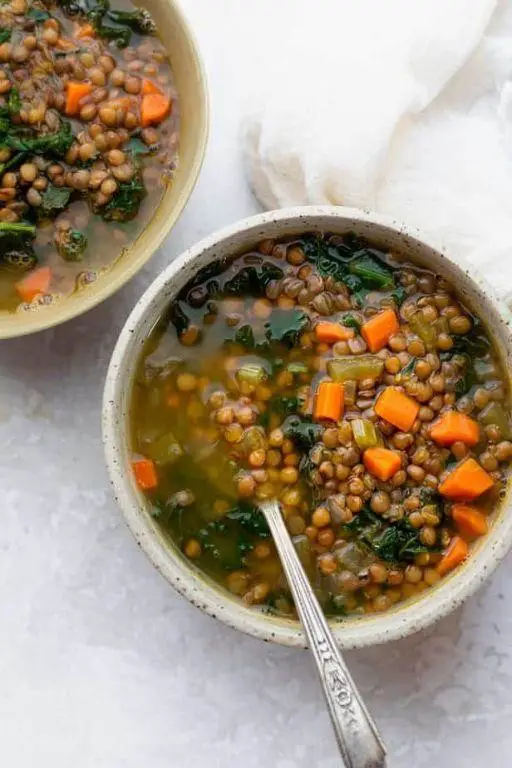
Here’s a comforting bowl of Lentil Soup with Kale that’s both nutritious and bursting with flavor, perfect for any season. Let’s walk through the process together, ensuring every step is clear and manageable, even for beginners.
Ingredients
- 1 cup dried green lentils, rinsed and picked over
- 2 tablespoons rich extra virgin olive oil
- 1 medium onion, finely chopped
- 2 cloves garlic, minced
- 1 large carrot, diced
- 1 stalk celery, diced
- 4 cups low-sodium vegetable broth
- 1 bay leaf
- 1 teaspoon ground cumin
- 1/2 teaspoon smoked paprika
- 2 cups chopped kale, stems removed
- 1 tablespoon fresh lemon juice
- Salt and finely ground black pepper to taste
Instructions
- Heat the olive oil in a large pot over medium heat until shimmering.
- Add the onion, garlic, carrot, and celery, cooking until softened, about 5 minutes, stirring occasionally.
- Stir in the lentils, vegetable broth, bay leaf, cumin, and smoked paprika. Bring to a boil, then reduce heat to low, cover, and simmer for 25 minutes.
- After 25 minutes, check the lentils for tenderness. They should be soft but not mushy. Tip: If the soup is too thick, add a bit more broth or water to reach your desired consistency.
- Add the chopped kale and lemon juice, stirring until the kale is wilted, about 3 minutes. Tip: For extra flavor, let the soup sit for 5 minutes off the heat before serving.
- Season with salt and pepper to taste. Tip: Always taste before adding salt, especially if using store-bought broth which can be salty.
Zesty and hearty, this Lentil Soup with Kale offers a delightful contrast of textures, from the tender lentils to the slightly crisp kale. Serve it with a slice of crusty bread for a complete meal, or top with a dollop of yogurt for a creamy twist.
Baked Cod with Lemon and Herbs
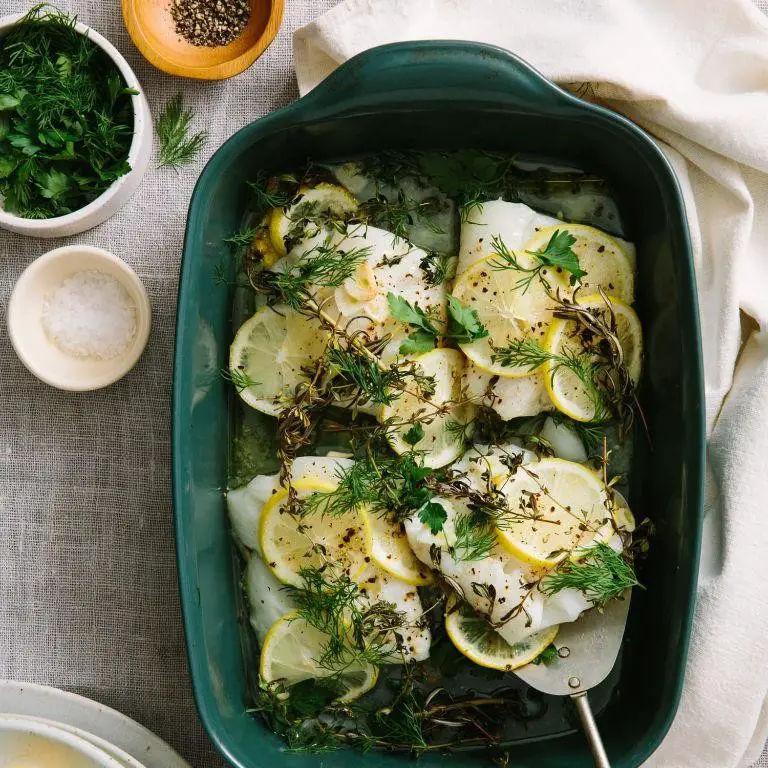
Getting dinner on the table doesn’t have to be complicated, especially when you’re working with a simple, flavorful dish like baked cod. This recipe combines the mild, flaky fish with bright lemon and aromatic herbs for a meal that’s both easy to make and delicious.
Ingredients
- 1.5 lbs fresh cod fillets, skinless and boneless
- 3 tbsp rich extra virgin olive oil
- 2 tbsp freshly squeezed lemon juice
- 1 tsp finely grated lemon zest
- 2 cloves garlic, minced
- 1 tbsp chopped fresh parsley
- 1 tbsp chopped fresh dill
- 1/2 tsp sea salt
- 1/4 tsp finely ground black pepper
- Lemon slices for garnish
Instructions
- Preheat your oven to 375°F (190°C) and lightly grease a baking dish with olive oil.
- Pat the cod fillets dry with paper towels to ensure even cooking and place them in the prepared baking dish.
- In a small bowl, whisk together the olive oil, lemon juice, lemon zest, minced garlic, parsley, dill, sea salt, and black pepper.
- Pour the herb mixture over the cod fillets, making sure they are evenly coated.
- Bake in the preheated oven for 12-15 minutes, or until the fish flakes easily with a fork and is opaque throughout.
- Garnish with lemon slices before serving to add a fresh, vibrant touch.
Just out of the oven, the cod is perfectly tender with a delicate, buttery texture. The lemon and herbs create a bright, flavorful crust that complements the fish beautifully. Serve it over a bed of quinoa or with roasted vegetables for a complete, nutritious meal.
Zucchini Noodles with Pesto and Cherry Tomatoes
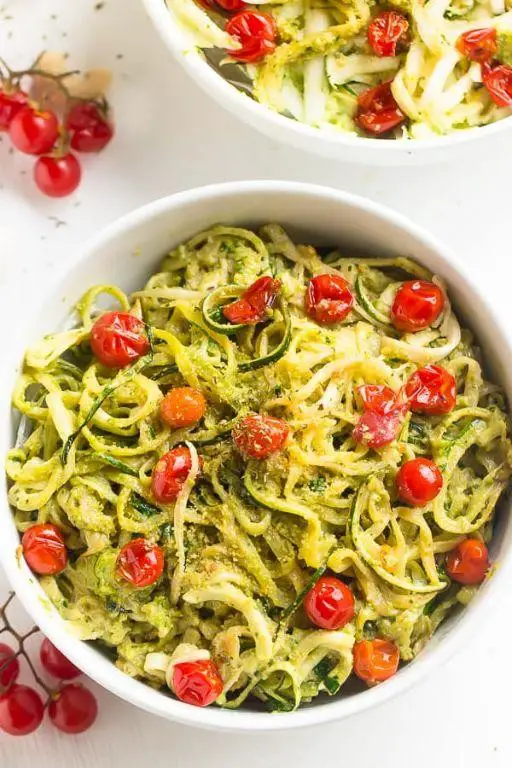
Preparing a light and refreshing meal doesn’t have to be complicated, especially when you have fresh zucchini and vibrant cherry tomatoes at your disposal. This dish combines the simplicity of homemade pesto with the crisp texture of zucchini noodles for a quick, nutritious meal.
Ingredients
- 2 medium zucchinis, spiralized into noodles
- 1 cup fresh basil leaves, tightly packed
- 1/4 cup rich extra virgin olive oil
- 1/4 cup grated Parmesan cheese
- 2 tbsp pine nuts, lightly toasted
- 1 clove garlic, minced
- 1 cup cherry tomatoes, halved
- Salt, to taste
Instructions
- In a food processor, combine the fresh basil leaves, extra virgin olive oil, Parmesan cheese, pine nuts, and minced garlic. Pulse until the mixture forms a smooth paste. Tip: For a brighter pesto, add a squeeze of lemon juice.
- Heat a large skillet over medium heat. Add the zucchini noodles and sauté for 2-3 minutes, just until they begin to soften. Tip: Avoid overcooking to maintain their al dente texture.
- Remove the skillet from heat. Gently fold in the pesto and halved cherry tomatoes until the noodles are evenly coated. Tip: Let the dish sit for a minute to allow the flavors to meld.
- Season with salt to taste and serve immediately.
Here, the zucchini noodles offer a satisfying crunch, while the pesto provides a creamy, herbaceous contrast. For an extra touch of elegance, garnish with additional Parmesan shavings and a drizzle of olive oil.
Eggplant and Chickpea Curry
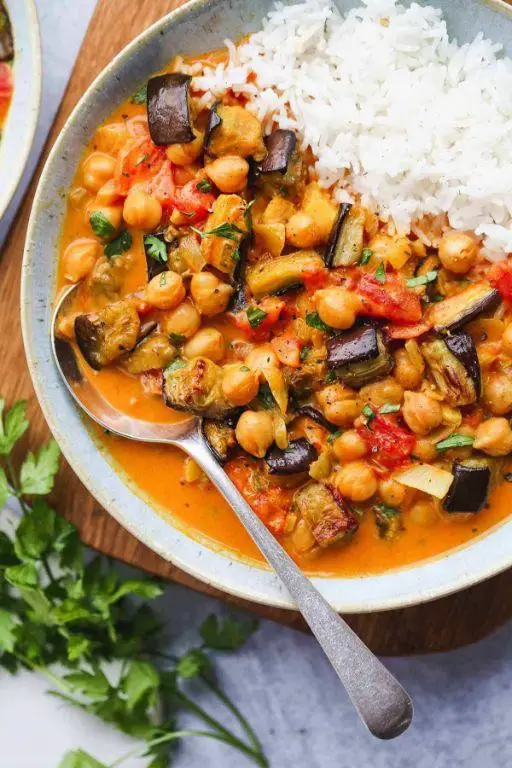
You’ll find this Eggplant and Chickpea Curry to be a comforting dish that’s both nutritious and bursting with flavors, perfect for a cozy dinner. Let’s dive into the methodical process of creating this hearty meal.
Ingredients
- 1 large eggplant, diced into 1-inch cubes
- 1 can (15 oz) chickpeas, drained and rinsed
- 1 cup coconut milk, creamy and full-fat
- 2 tbsp olive oil, rich extra virgin
- 1 medium onion, finely chopped
- 3 garlic cloves, minced
- 1 tbsp ginger, freshly grated
- 1 tbsp curry powder, aromatic and well-balanced
- 1/2 tsp turmeric, ground
- 1/2 tsp cumin, ground
- 1/4 tsp cayenne pepper, for a subtle heat
- Salt, to season
- Fresh cilantro, chopped for garnish
Instructions
- Heat olive oil in a large skillet over medium heat until shimmering.
- Add the finely chopped onion, sautéing until translucent, about 5 minutes.
- Stir in the minced garlic and grated ginger, cooking for another minute until fragrant.
- Sprinkle in the curry powder, turmeric, cumin, and cayenne pepper, toasting the spices for 30 seconds to unlock their flavors.
- Add the diced eggplant to the skillet, stirring to coat evenly with the spice mixture.
- Pour in the coconut milk and bring the mixture to a gentle simmer, then reduce heat to low.
- Cover and let the curry cook for 15 minutes, or until the eggplant is tender.
- Gently fold in the drained chickpeas, heating through for an additional 5 minutes.
- Season with salt to taste, then remove from heat.
- Garnish with freshly chopped cilantro before serving.
Now that your curry is ready, notice the creamy texture of the eggplant paired with the hearty chickpeas, all enveloped in a fragrant, spiced coconut sauce. Serve it over a bed of fluffy basmati rice or with warm naan bread for a complete meal.
Beef and Broccoli with Low-Sodium Soy Sauce
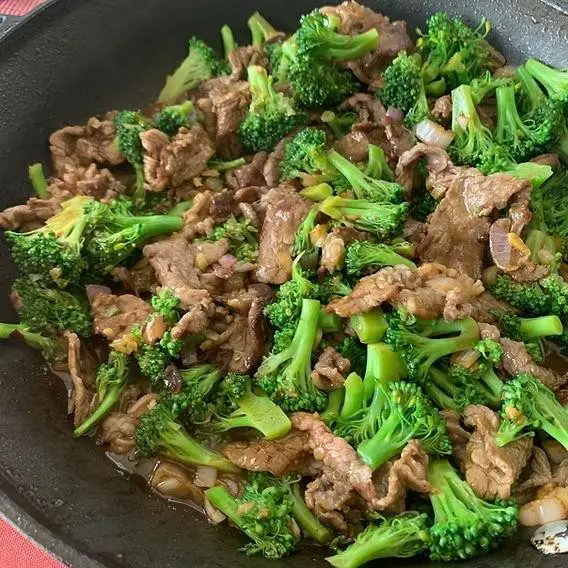
Let’s dive into making a comforting and flavorful Beef and Broccoli dish that’s both easy to prepare and packed with nutrients, thanks to the low-sodium soy sauce that keeps it heart-healthy without sacrificing taste.
Ingredients
- 1 pound flank steak, thinly sliced against the grain for tenderness
- 3 cups fresh broccoli florets, crisp and vibrant green
- 2 tablespoons low-sodium soy sauce, rich and umami-packed
- 1 tablespoon cornstarch, finely powdered for smooth thickening
- 2 tablespoons water, cold and clear
- 2 tablespoons vegetable oil, light and neutral for high-heat cooking
- 2 cloves garlic, minced to release aromatic flavors
- 1 teaspoon fresh ginger, grated for a zesty kick
- 1 tablespoon brown sugar, for a subtle sweetness
- 1/2 teaspoon red pepper flakes, for a hint of heat
Instructions
- In a small bowl, whisk together the low-sodium soy sauce, cornstarch, water, brown sugar, and red pepper flakes until smooth. This creates your sauce mixture.
- Heat 1 tablespoon of vegetable oil in a large skillet over medium-high heat until shimmering, about 1 minute.
- Add the thinly sliced flank steak to the skillet, spreading it out in a single layer. Cook for 2-3 minutes without stirring to allow it to sear, then stir and cook for another 2 minutes until just browned. Remove the steak from the skillet and set aside.
- In the same skillet, add the remaining 1 tablespoon of vegetable oil. Add the minced garlic and grated ginger, sautéing for 30 seconds until fragrant.
- Add the broccoli florets to the skillet, stirring to coat with the garlic and ginger. Cook for 3-4 minutes, until the broccoli is bright green and slightly tender.
- Return the cooked steak to the skillet with the broccoli. Pour the sauce mixture over the top, stirring well to combine everything.
- Cook for an additional 2 minutes, stirring occasionally, until the sauce has thickened and coats the beef and broccoli evenly.
The dish is now ready to serve. The beef should be tender and juicy, while the broccoli remains crisp-tender, all enveloped in a glossy, flavorful sauce. Try serving it over a bed of steamed jasmine rice for a complete meal that’s sure to satisfy.
Spicy Tofu and Vegetable Skillet

For those evenings when you’re craving something hearty yet healthy, this Spicy Tofu and Vegetable Skillet is your go-to dish. It’s a vibrant, flavor-packed meal that comes together in just about 30 minutes, perfect for busy weeknights.
Ingredients
- 1 block (14 oz) firm tofu, pressed and cubed
- 2 tbsp rich extra virgin olive oil
- 1 large bell pepper, thinly sliced
- 1 cup sliced cremini mushrooms
- 2 cloves garlic, minced
- 1 tbsp freshly grated ginger
- 2 tbsp soy sauce
- 1 tbsp sriracha sauce
- 1 tsp toasted sesame oil
- 1/2 cup chopped green onions
- 1 tbsp sesame seeds, for garnish
Instructions
- Heat the olive oil in a large skillet over medium-high heat until shimmering, about 1 minute.
- Add the cubed tofu to the skillet, spreading it out in a single layer. Cook for 5-7 minutes, flipping occasionally, until all sides are golden brown. Tip: Pressing the tofu removes excess water, ensuring a crispier texture.
- Add the bell pepper and mushrooms to the skillet. Cook for 4-5 minutes, stirring occasionally, until the vegetables start to soften.
- Stir in the garlic and ginger, cooking for 1 minute until fragrant. Tip: Fresh ginger adds a bright, spicy note that complements the tofu beautifully.
- Pour in the soy sauce and sriracha, stirring to coat the tofu and vegetables evenly. Cook for another 2 minutes to meld the flavors.
- Drizzle with sesame oil and sprinkle with green onions and sesame seeds. Remove from heat. Tip: Toasting the sesame seeds beforehand enhances their nutty flavor.
One bite of this skillet reveals a delightful contrast between the crispy tofu and tender vegetables, all coated in a spicy, umami-rich sauce. Serve it over a bed of steamed rice or alongside a crisp salad for a complete meal.
Cucumber and Avocado Salad with Lime Dressing
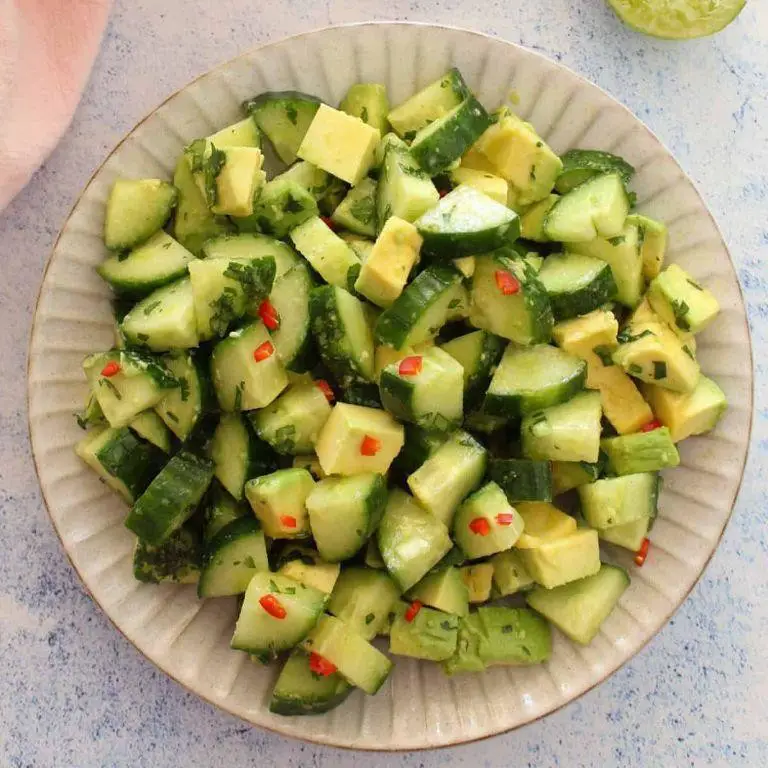
Mastering the art of a refreshing salad starts with choosing the right ingredients and combining them with care. This Cucumber and Avocado Salad with Lime Dressing is a testament to simplicity and flavor, perfect for any season.
Ingredients
- 2 medium cucumbers, crisp and thinly sliced
- 1 ripe avocado, creamy and diced
- 1/4 cup fresh cilantro leaves, finely chopped
- 2 tbsp rich extra virgin olive oil
- 1 tbsp fresh lime juice, zesty
- 1/2 tsp finely ground black pepper
- 1/4 tsp sea salt, coarse
Instructions
- In a large mixing bowl, combine the thinly sliced cucumbers and diced avocado gently to avoid mashing the avocado.
- Add the finely chopped cilantro leaves to the bowl, distributing them evenly among the cucumbers and avocado.
- In a small bowl, whisk together the extra virgin olive oil and fresh lime juice until well combined.
- Drizzle the dressing over the salad, using a spatula to fold it in carefully, ensuring all pieces are lightly coated.
- Sprinkle the finely ground black pepper and coarse sea salt over the salad, adjusting the amounts slightly if desired.
- Let the salad sit for 5 minutes before serving to allow the flavors to meld together beautifully.
This salad boasts a delightful contrast between the crisp cucumbers and creamy avocado, with the lime dressing adding a bright, zesty finish. Try serving it alongside grilled fish or as a standalone light lunch for a refreshing meal.
Roasted Brussels Sprouts with Balsamic Glaze
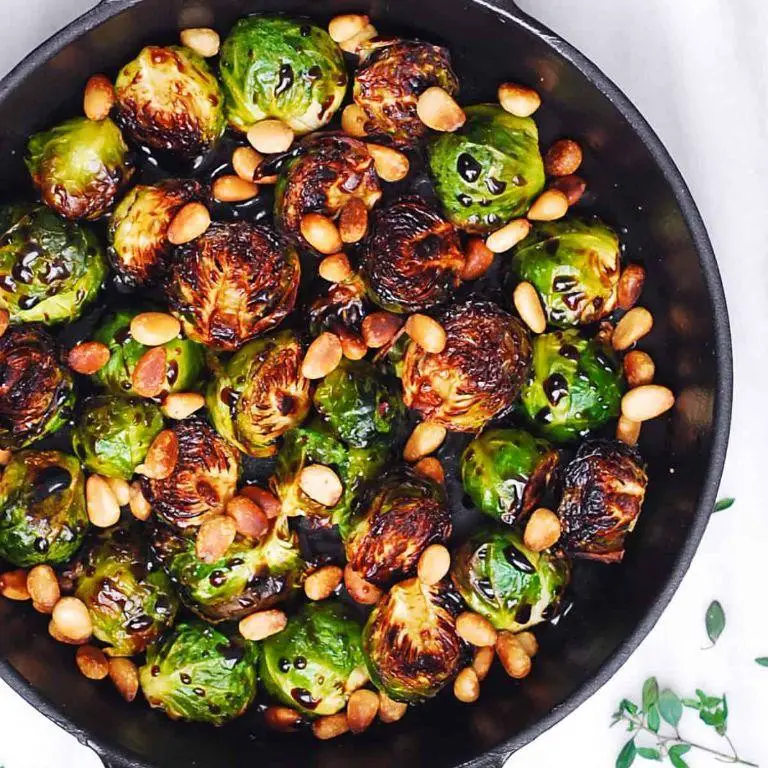
Sometimes, the simplest dishes bring the most satisfaction, especially when they’re as straightforward as Roasted Brussels Sprouts with Balsamic Glaze. This recipe transforms the humble Brussels sprout into a caramelized, tender delight with just a few ingredients and steps.
Ingredients
- 1 pound fresh Brussels sprouts, trimmed and halved
- 2 tablespoons rich extra virgin olive oil
- 1/2 teaspoon finely ground sea salt
- 1/4 teaspoon freshly cracked black pepper
- 2 tablespoons high-quality balsamic vinegar
- 1 tablespoon pure maple syrup
Instructions
- Preheat your oven to 400°F (204°C) to ensure it’s perfectly heated for roasting.
- In a large mixing bowl, toss the halved Brussels sprouts with extra virgin olive oil, sea salt, and black pepper until evenly coated.
- Spread the Brussels sprouts in a single layer on a baking sheet, ensuring they’re not overcrowded for optimal caramelization.
- Roast in the preheated oven for 20 minutes, then flip each sprout halfway through to ensure even browning.
- While the sprouts roast, whisk together the balsamic vinegar and maple syrup in a small bowl to create the glaze.
- After 20 minutes, drizzle the glaze over the sprouts and return to the oven for an additional 5 minutes, allowing the glaze to thicken and adhere to the sprouts.
- Remove from the oven and let cool for a couple of minutes before serving to allow the flavors to meld.
Golden and crispy on the outside with a tender interior, these Brussels sprouts offer a perfect balance of sweet and tangy flavors. Serve them alongside a roasted chicken or as a standout side at your next dinner party for a dish that’s as beautiful as it is delicious.
Chicken Caesar Salad with Homemade Dressing
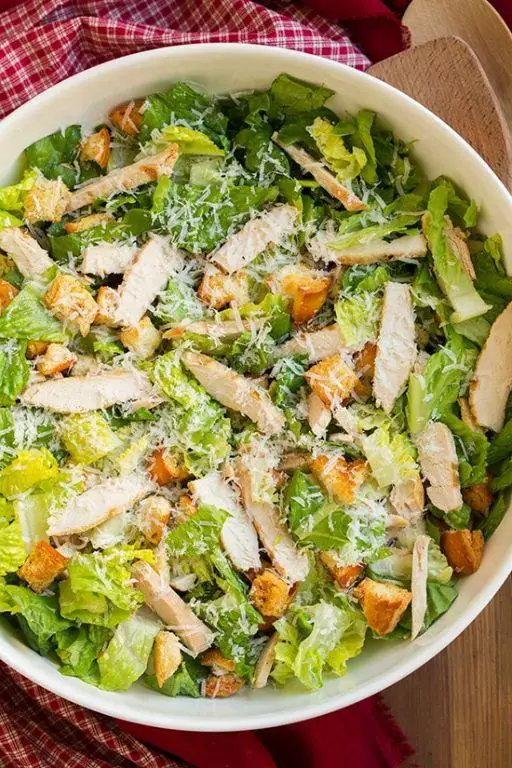
Venturing into the world of homemade salads can transform your dining experience, especially with a classic like Chicken Caesar Salad. This guide will walk you through creating this beloved dish with a homemade dressing that’s sure to impress.
Ingredients
- 1 lb boneless, skinless chicken breasts, trimmed of excess fat
- 3 tbsp rich extra virgin olive oil, divided
- 1 tsp finely ground black pepper
- 1/2 tsp sea salt
- 1 large, crisp romaine lettuce, chopped
- 1/2 cup freshly grated Parmesan cheese
- 1/2 cup homemade croutons, golden and crunchy
- 2 farm-fresh eggs
- 2 cloves garlic, minced
- 1 tbsp Dijon mustard
- 1 tbsp fresh lemon juice
- 1/2 cup mayonnaise, creamy and smooth
- 1 anchovy fillet, finely chopped (optional for depth of flavor)
Instructions
- Preheat your oven to 375°F (190°C) to prepare for baking the chicken.
- Season the chicken breasts evenly with sea salt and finely ground black pepper.
- Heat 1 tbsp of rich extra virgin olive oil in a skillet over medium-high heat. Sear the chicken for 3-4 minutes on each side until golden brown.
- Transfer the skillet to the preheated oven and bake for 15-20 minutes, or until the chicken reaches an internal temperature of 165°F (74°C).
- While the chicken bakes, whisk together the remaining olive oil, minced garlic, Dijon mustard, fresh lemon juice, mayonnaise, and chopped anchovy fillet in a bowl to create the dressing.
- Boil the farm-fresh eggs for 9 minutes for a perfectly soft-boiled texture, then cool under running water and peel.
- Slice the baked chicken into strips and toss with the chopped romaine lettuce, homemade croutons, and freshly grated Parmesan cheese.
- Drizzle the homemade dressing over the salad and top with sliced soft-boiled eggs.
The creamy dressing clings to every leaf, offering a burst of flavor with each bite, while the soft-boiled eggs add a luxurious texture. Serve this salad with a slice of crusty bread to soak up any leftover dressing on your plate.
Shrimp and Asparagus Stir-Fry
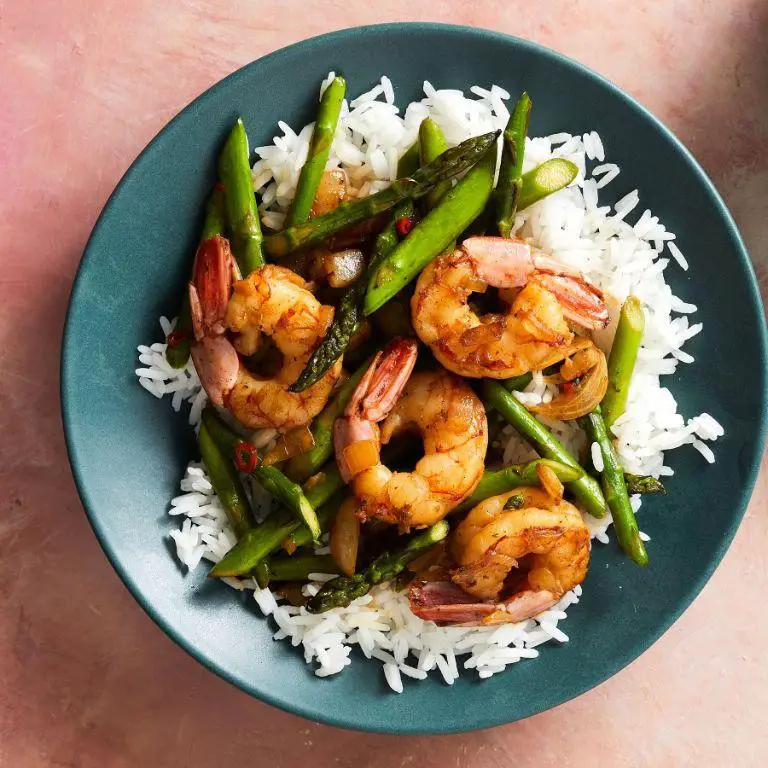
Understanding how to whip up a quick yet flavorful meal is essential for any home cook, and this Shrimp and Asparagus Stir-Fry is a perfect example. It’s a dish that combines simplicity with elegance, making it ideal for both weeknight dinners and special occasions.
Ingredients
- 1 lb large shrimp, peeled and deveined
- 1 bunch fresh asparagus, trimmed and cut into 2-inch pieces
- 2 tbsp rich extra virgin olive oil
- 3 cloves garlic, minced
- 1 tbsp freshly grated ginger
- 1/4 cup low-sodium soy sauce
- 1 tbsp honey
- 1/2 tsp crushed red pepper flakes
- 1 tbsp toasted sesame seeds
Instructions
- Heat 1 tbsp of extra virgin olive oil in a large skillet over medium-high heat until shimmering, about 1 minute.
- Add the shrimp to the skillet in a single layer, cooking for 2 minutes per side until they turn pink and opaque. Remove and set aside.
- In the same skillet, add the remaining 1 tbsp of olive oil, then sauté the asparagus for 3 minutes, stirring occasionally, until bright green and slightly tender.
- Stir in the minced garlic and grated ginger, cooking for 30 seconds until fragrant.
- Return the shrimp to the skillet, then pour in the soy sauce, honey, and red pepper flakes, stirring to coat everything evenly. Cook for another 2 minutes to meld the flavors.
- Sprinkle with toasted sesame seeds before serving.
Perfectly balancing the sweetness of honey with the umami of soy sauce, this stir-fry offers a delightful contrast of textures—crisp asparagus against tender shrimp. Serve it over a bed of steamed jasmine rice or alongside a crisp white wine for an elevated dining experience.
Berry and Spinach Smoothie with Flaxseeds
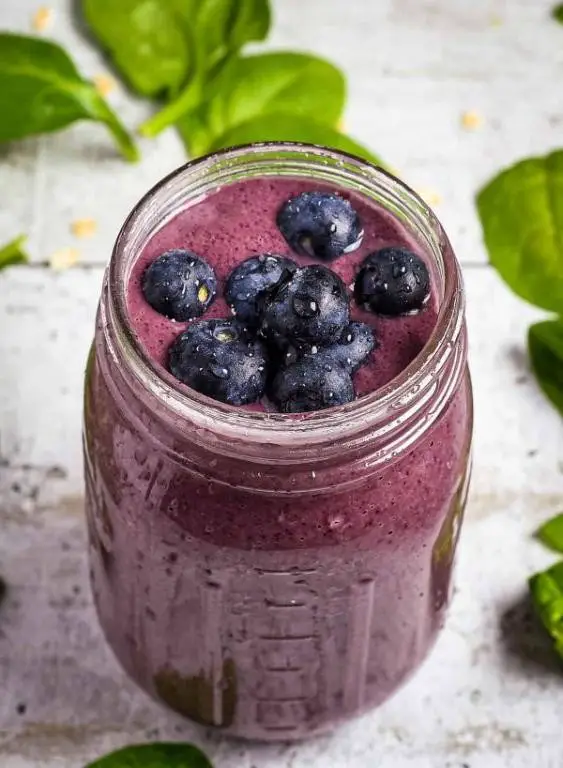
Zesty mornings call for a refreshing start, and what better way to kick off your day than with a nutrient-packed Berry and Spinach Smoothie with Flaxseeds? This vibrant blend is not only a feast for the eyes but also a powerhouse of flavors and health benefits, perfect for beginners to whip up in no time.
Ingredients
- 1 cup of frozen mixed berries (strawberries, blueberries, and raspberries for a sweet and tangy flavor)
- 2 cups of fresh baby spinach leaves (washed and lightly packed for a mild, earthy taste)
- 1 tablespoon of golden flaxseeds (for a nutty crunch and omega-3 boost)
- 1 cup of cold almond milk (unsweetened, for a creamy texture)
- 1 ripe banana (peeled and sliced, for natural sweetness and creaminess)
Instructions
- In a high-speed blender, combine the frozen mixed berries, fresh baby spinach leaves, golden flaxseeds, cold almond milk, and sliced banana.
- Secure the lid tightly and blend on high speed for 45 seconds, or until the mixture is completely smooth and no leafy bits remain. Tip: For a smoother texture, start blending at a lower speed and gradually increase to high.
- Stop the blender and scrape down the sides with a spatula if necessary to ensure all ingredients are fully incorporated. Tip: This step ensures a uniformly smooth smoothie without any unblended patches.
- Pour the smoothie into a tall glass and serve immediately. Tip: For an extra chill, freeze the glass for 5 minutes before serving.
Cool and creamy, this smoothie boasts a delightful balance of sweet berries and earthy spinach, with the flaxseeds adding a subtle crunch. Serve it with a colorful straw or a sprinkle of chia seeds on top for an Instagram-worthy breakfast that’s as nutritious as it is delicious.
Turkey Meatballs with Zucchini Noodles
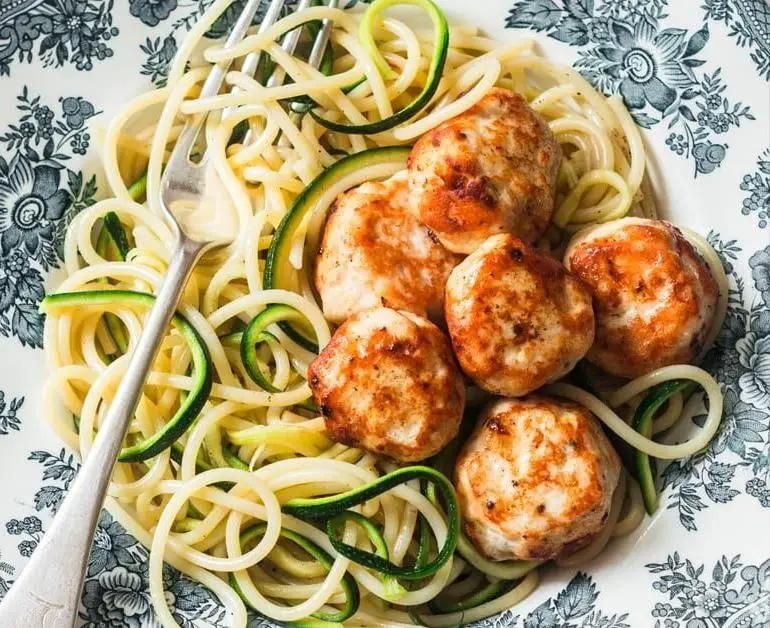
Every home cook needs a go-to recipe that’s both nutritious and satisfying, and this Turkey Meatballs with Zucchini Noodles dish is just that. Easy to prepare and packed with flavor, it’s a perfect meal for any day of the week.
Ingredients
- 1 lb lean ground turkey
- 1/2 cup freshly grated Parmesan cheese
- 1/4 cup finely chopped fresh parsley
- 1 large farm-fresh egg, lightly beaten
- 2 cloves garlic, minced
- 1/2 tsp sea salt
- 1/4 tsp finely ground black pepper
- 2 tbsp rich extra virgin olive oil
- 4 medium zucchinis, spiralized into noodles
- 1 cup marinara sauce, homemade or store-bought
Instructions
- Preheat your oven to 375°F (190°C) and line a baking sheet with parchment paper.
- In a large mixing bowl, combine the ground turkey, Parmesan cheese, parsley, egg, garlic, salt, and pepper. Mix gently until just combined to keep the meatballs tender.
- Shape the mixture into 1-inch meatballs, placing them on the prepared baking sheet as you go. This recipe should yield about 20 meatballs.
- Bake the meatballs in the preheated oven for 20 minutes, or until they’re golden brown and reach an internal temperature of 165°F (74°C).
- While the meatballs bake, heat the olive oil in a large skillet over medium heat. Add the zucchini noodles and sauté for 2-3 minutes, just until they’re tender but still have a bit of crunch.
- Warm the marinara sauce in a small saucepan over low heat, stirring occasionally.
- Once the meatballs are done, serve them over the zucchini noodles and drizzle with the warm marinara sauce.
Great for a light yet fulfilling meal, these turkey meatballs are juicy and flavorful, perfectly complemented by the fresh, crisp zucchini noodles. For an extra touch of elegance, garnish with additional Parmesan and parsley before serving.
Cauliflower and Sweet Potato Mash
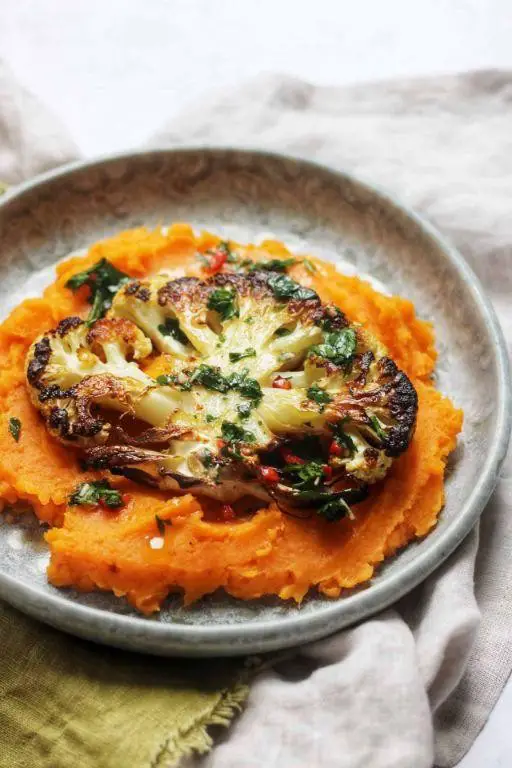
Amidst the hustle of everyday life, finding a dish that’s both nutritious and comforting can be a challenge. This Cauliflower and Sweet Potato Mash is your answer, blending simplicity with flavor in a way that’s sure to delight.
Ingredients
- 1 large sweet potato, peeled and cubed
- 1 medium head of cauliflower, cut into florets
- 2 tablespoons rich extra virgin olive oil
- 1/2 cup warm whole milk
- 2 tablespoons unsalted butter
- 1/2 teaspoon finely ground black pepper
- 1/2 teaspoon sea salt
Instructions
- Preheat your oven to 400°F (204°C) to roast the vegetables evenly.
- Toss the sweet potato cubes and cauliflower florets with 1 tablespoon of olive oil, then spread them on a baking sheet in a single layer for uniform cooking.
- Roast for 25 minutes, or until the vegetables are tender and slightly caramelized, stirring halfway through to ensure even browning.
- Transfer the roasted vegetables to a large bowl. Add the warm milk, butter, remaining olive oil, black pepper, and sea salt.
- Use a potato masher or fork to blend the ingredients until smooth. For a creamier texture, a hand blender can be used briefly.
- Tip: For an extra flavor boost, consider roasting a garlic clove with the vegetables and mashing it in.
- Tip: If the mash is too thick, adjust the consistency by adding more warm milk, one tablespoon at a time.
- Tip: Serve immediately to enjoy the mash at its peak creaminess and warmth.
Rich in flavor and velvety in texture, this mash pairs wonderfully with grilled meats or can be a standout side on its own. For a creative twist, top with crispy fried onions or a sprinkle of smoked paprika before serving.
Grilled Chicken with Roasted Vegetables

Today we’re diving into a simple yet flavorful dish that’s perfect for any season: Grilled Chicken with Roasted Vegetables. This meal combines juicy, herb-infused chicken with caramelized, tender vegetables for a balanced and satisfying dinner.
Ingredients
- 4 boneless, skinless chicken breasts (about 6 oz each)
- 2 tbsp rich extra virgin olive oil
- 1 tsp kosher salt
- 1/2 tsp finely ground black pepper
- 1 tbsp fresh rosemary, finely chopped
- 1 tbsp fresh thyme, finely chopped
- 2 cups baby carrots, halved lengthwise
- 2 cups Brussels sprouts, trimmed and halved
- 1 large red onion, cut into 1-inch wedges
Instructions
- Preheat your grill to medium-high heat (375°F to 400°F) and your oven to 425°F.
- In a small bowl, mix 1 tbsp olive oil, salt, pepper, rosemary, and thyme. Rub this mixture evenly over the chicken breasts.
- Place the chicken on the grill. Cook for 6-7 minutes per side, or until the internal temperature reaches 165°F. Tip: Avoid moving the chicken too much to get those perfect grill marks.
- While the chicken cooks, toss the carrots, Brussels sprouts, and red onion with the remaining 1 tbsp olive oil on a baking sheet. Spread them out in a single layer.
- Roast the vegetables in the preheated oven for 20-25 minutes, stirring halfway through, until they’re tender and lightly charred. Tip: For extra flavor, sprinkle a pinch of salt over the vegetables before roasting.
- Let the chicken rest for 5 minutes before slicing. Tip: Resting the chicken ensures it stays juicy.
- Serve the grilled chicken alongside the roasted vegetables.
Succulent and herbaceous, the chicken pairs beautifully with the sweet and slightly smoky vegetables. For a creative twist, drizzle the plate with a balsamic glaze or sprinkle with crumbled feta cheese before serving.
Conclusion
Healthy eating is a journey, and these 18 delicious insulin resistance recipes are your perfect companions. Packed with nutrients and flavor, they’re designed to support your health without sacrificing taste. We invite you to try these recipes, share your favorites in the comments, and spread the love by pinning this article on Pinterest. Here’s to tasty, healthful meals that everyone can enjoy!