Ever feel like sticking to keto is just too much work? We’ve got you covered with 18 Easy Lazy Keto Recipes for Beginners that prove eating low-carb doesn’t have to be complicated or time-consuming. From quick dinners to comfort food favorites, these recipes are perfect for anyone looking to simplify their keto journey. Keep reading to discover how delicious and effortless keto can be!
Keto Avocado and Egg Breakfast Bowl
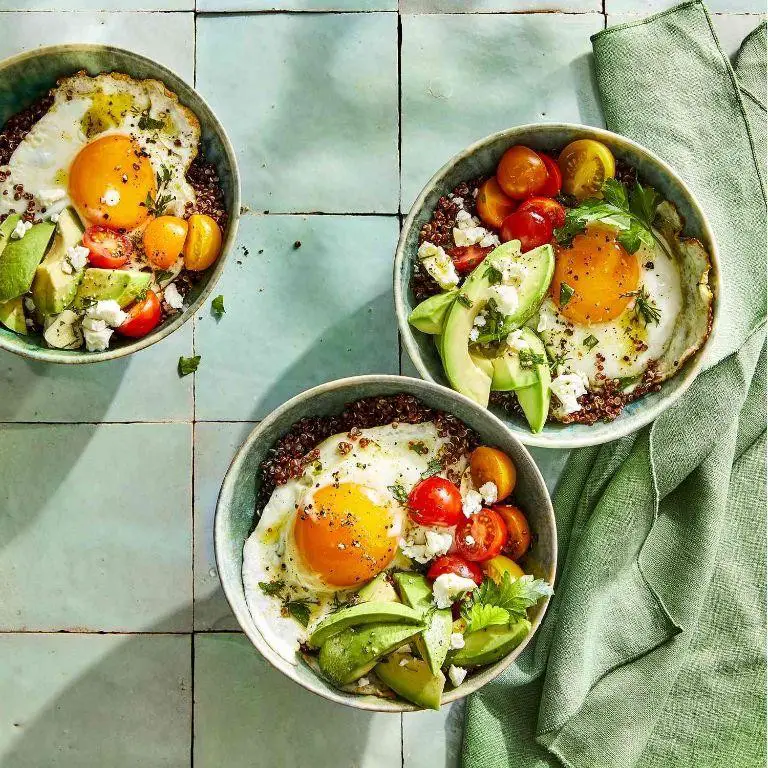
Oh, how I love starting my day with something both nutritious and delicious! This Keto Avocado and Egg Breakfast Bowl has become my go-to morning meal, especially when I’m craving something hearty yet healthy. It’s a breeze to whip up, and the combination of creamy avocado with perfectly cooked eggs is just unbeatable.
Ingredients
- 1 ripe avocado
- 2 large eggs
- A splash of olive oil
- A pinch of salt and pepper
- A couple of cherry tomatoes, halved
- A sprinkle of feta cheese (optional, but oh so good)
Instructions
- Heat a non-stick skillet over medium heat and add a splash of olive oil.
- Once the oil is warm, crack the eggs into the skillet. For sunny-side-up eggs, cover the skillet with a lid and let them cook for about 3 minutes, or until the whites are set but the yolks are still runny.
- While the eggs are cooking, halve the avocado and remove the pit. Scoop the flesh into a bowl and mash it lightly with a fork.
- Season the mashed avocado with a pinch of salt and pepper, then spread it evenly at the bottom of your serving bowl.
- Once the eggs are done, gently place them on top of the mashed avocado.
- Scatter the halved cherry tomatoes around the eggs, and if you’re feeling fancy, sprinkle a bit of feta cheese over everything.
Perfectly creamy avocado pairs wonderfully with the rich, runny egg yolks, creating a dish that’s both satisfying and packed with flavor. Try adding a dash of hot sauce or some fresh herbs on top for an extra kick!
Lazy Keto Chicken Salad
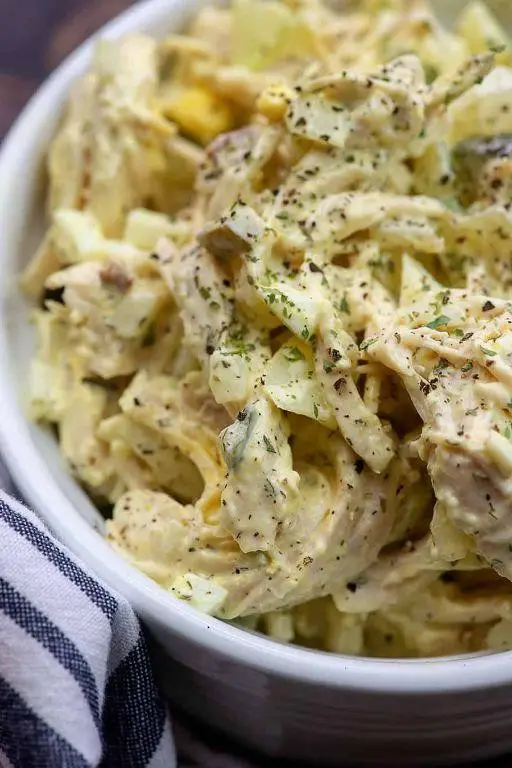
How many times have you stared into the fridge, hoping something keto-friendly would magically appear? That was me last Tuesday, which led to the creation of this Lazy Keto Chicken Salad. It’s my go-to when I want something delicious without the fuss.
Ingredients
- 2 cups of shredded cooked chicken (I use leftovers from last night’s roast)
- A big handful of chopped celery (about 1/2 cup)
- A couple of tablespoons of mayo (just enough to bind it all together)
- A splash of apple cider vinegar (for that tangy kick)
- A pinch of salt and pepper (because seasoning is key)
- 1/4 cup of chopped walnuts (for a crunchy surprise)
Instructions
- Grab a large mixing bowl and toss in the shredded chicken and chopped celery.
- Add the mayo and apple cider vinegar to the bowl. Mix everything until the chicken is nicely coated. Tip: If the salad seems dry, add a tad more mayo.
- Sprinkle in the salt and pepper, then give it another good mix. Taste and adjust the seasoning if needed. Tip: Always taste as you go!
- Fold in the chopped walnuts last to keep them crunchy. Tip: Toast the walnuts lightly for an extra flavor boost.
And just like that, you’ve got a creamy, crunchy, and utterly satisfying chicken salad. It’s perfect on its own, but I love wrapping it in lettuce leaves for a quick keto-friendly lunch. Absolutely no one will guess how little effort went into making it.
Quick Keto Bacon and Eggs
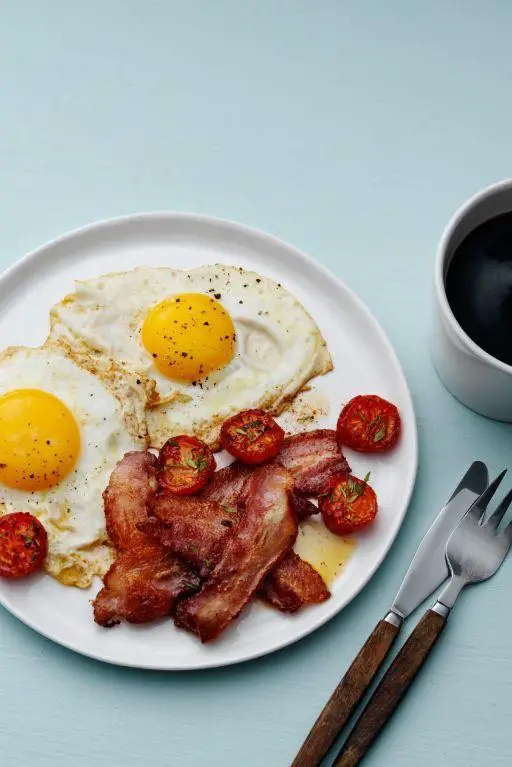
Now, I know what you’re thinking—bacon and eggs? Groundbreaking. But hear me out. This quick keto version has been my go-to breakfast for those mornings when I’m rushing out the door but still want something hearty and satisfying. It’s simple, yes, but with a couple of tweaks, it’s anything but boring.
Ingredients
- A couple of slices of thick-cut bacon
- 2 large eggs
- A splash of heavy cream
- A pinch of salt
- A sprinkle of black pepper
- A tablespoon of butter
Instructions
- Heat a non-stick skillet over medium heat and add the bacon slices. Cook for about 4 minutes on each side until they’re crispy but not burnt. Tip: If you like your bacon extra crispy, cook it for an additional minute on each side.
- Remove the bacon from the skillet and set it aside on a paper towel to drain. Keep the bacon fat in the skillet—that’s gold for flavor!
- In a small bowl, whisk together the eggs, heavy cream, salt, and black pepper until well combined. Tip: Whisking the eggs with cream makes them fluffier.
- Melt the butter in the same skillet over medium-low heat, then pour in the egg mixture. Let it sit for a few seconds before gently stirring with a spatula. Tip: Stirring slowly and gently will give you soft, creamy scrambled eggs.
- Continue cooking the eggs, stirring occasionally, until they’re just set but still moist—about 2-3 minutes.
- Serve the scrambled eggs immediately with the crispy bacon on the side. So there you have it—a breakfast that’s quick, keto-friendly, and packed with flavor. The eggs are creamy, the bacon is perfectly crispy, and together they’re a match made in heaven. Try adding a sprinkle of grated cheese on top for an extra indulgent touch.
Easy Keto Cauliflower Fried Rice
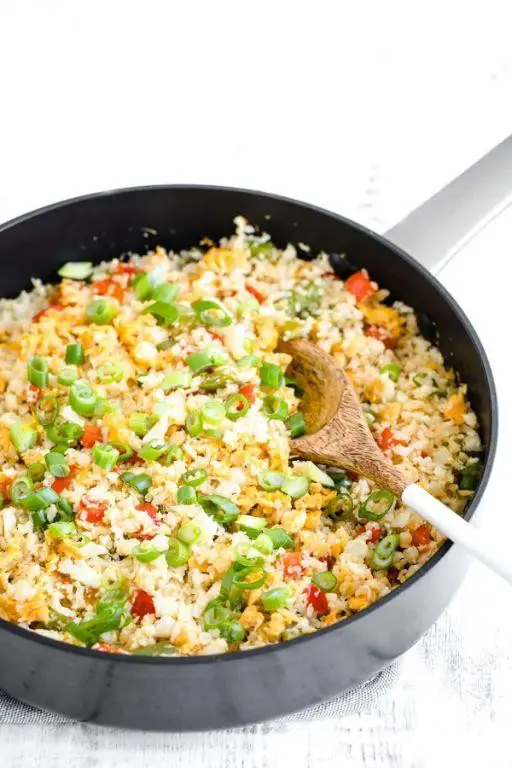
Last week, I found myself staring at a head of cauliflower, wondering how to turn it into something that would satisfy my fried rice cravings without the carbs. That’s when I decided to whip up this Easy Keto Cauliflower Fried Rice, and let me tell you, it was a game-changer.
Ingredients
- 1 medium head of cauliflower, riced (about 4 cups)
- 2 tablespoons of coconut oil
- A couple of eggs, beaten
- A splash of soy sauce (or coconut aminos for a gluten-free option)
- 1 cup of diced chicken breast (pre-cooked)
- Half a cup of frozen peas and carrots
- A pinch of salt and pepper
- 1 teaspoon of minced garlic
Instructions
- Heat a large skillet over medium heat and add 1 tablespoon of coconut oil.
- Add the beaten eggs to the skillet, scrambling them until fully cooked. Remove them from the skillet and set aside.
- In the same skillet, add the remaining tablespoon of coconut oil and the minced garlic, sautéing for about 30 seconds until fragrant.
- Toss in the riced cauliflower, stirring frequently to prevent sticking. Cook for about 5 minutes until it starts to soften.
- Add the diced chicken, frozen peas and carrots, and the scrambled eggs back into the skillet. Mix well.
- Pour in the soy sauce, and season with salt and pepper. Stir everything together and cook for another 2-3 minutes until everything is heated through.
- Tip: For an extra kick, add a dash of sriracha or red pepper flakes while cooking.
- Tip: Make sure your skillet is hot enough before adding the eggs to prevent them from becoming rubbery.
- Tip: If you’re not using pre-cooked chicken, cook it first in the skillet before starting with the eggs.
Craving satisfied! This dish has all the textures and flavors of traditional fried rice but keeps it light and keto-friendly. Serve it in a bowl with a sprinkle of green onions or sesame seeds for an extra touch of flavor and color.
Keto Microwave Mug Bread

Unbelievably, I stumbled upon this keto microwave mug bread recipe during one of those late-night cravings when the thought of waiting for traditional bread to bake was just too much. It’s become my go-to for a quick, satisfying fix that doesn’t derail my diet.
Ingredients
- 1/4 cup almond flour
- 1/2 tsp baking powder
- A pinch of salt
- 1 tbsp melted butter
- 1 egg
- A splash of water
Instructions
- Grab your favorite microwave-safe mug. The bigger, the better to avoid overflow.
- Whisk together the almond flour, baking powder, and salt right in the mug. Tip: Sifting the almond flour can make your bread fluffier.
- Add the melted butter, egg, and a splash of water to the dry ingredients. Mix until just combined. Tip: Don’t overmix to keep the texture light.
- Microwave on high for 90 seconds. Tip: Ovens vary, so start checking at 60 seconds to prevent drying out.
- Let it sit for a minute before turning it out onto a plate. It’ll be hot!
Best enjoyed warm, this mug bread has a surprisingly soft interior with a slightly crisp exterior. Try topping it with avocado or a smear of cream cheese for an extra keto-friendly treat.
Simple Keto Beef Stir Fry
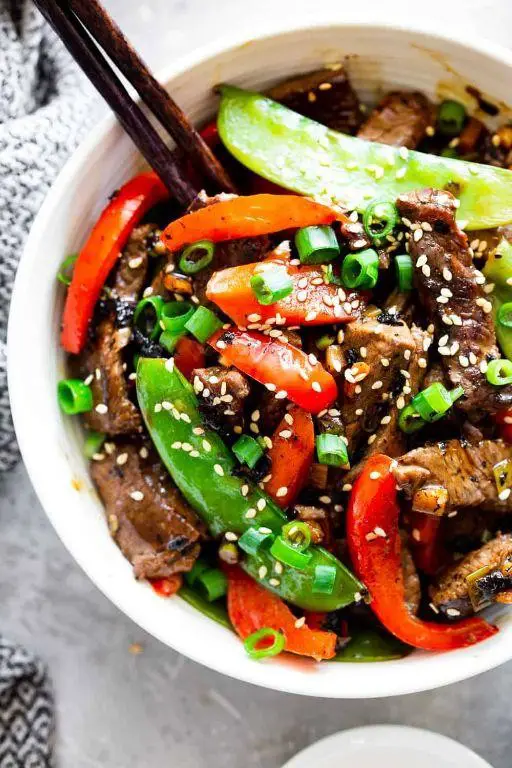
How many times have I found myself staring into the fridge at 6 PM, wondering what to make for dinner that’s both quick and keto-friendly? Too many to count. That’s why this Simple Keto Beef Stir Fry has become my weeknight hero—minimal ingredients, maximum flavor, and ready in a flash.
Ingredients
- 1 lb of thinly sliced beef (I use sirloin for its tenderness)
- A couple of tablespoons of olive oil
- A splash of soy sauce (or coconut aminos for a soy-free version)
- 1 bell pepper, sliced into thin strips
- Half a small onion, thinly sliced
- A handful of broccoli florets
- 2 cloves of garlic, minced
- A pinch of red pepper flakes (because I like a little heat)
- Salt and pepper to season
Instructions
- Heat a large skillet over medium-high heat and add the olive oil. Tip: Make sure the pan is hot before adding the beef to get a nice sear.
- Add the beef to the skillet, seasoning with salt and pepper. Cook for about 2-3 minutes until just browned, then remove from the skillet and set aside. Tip: Don’t overcrowd the pan to ensure each piece gets beautifully browned.
- In the same skillet, add a bit more olive oil if needed, then toss in the garlic, bell pepper, onion, and broccoli. Stir fry for about 4-5 minutes until the veggies are just tender but still crisp.
- Return the beef to the skillet, add the soy sauce and red pepper flakes, and stir everything together for another minute to combine all the flavors. Tip: The soy sauce not only adds flavor but also helps to deglaze the pan, picking up all those tasty bits.
Every bite of this stir fry is a perfect mix of savory beef and crisp-tender veggies, with just the right amount of kick from the red pepper flakes. I love serving it over a bed of cauliflower rice to keep it keto, but it’s just as delicious on its own.
Lazy Keto Cheese Omelette

Oh, how I love those mornings when I’m craving something delicious but want to keep it simple and keto-friendly. That’s when my Lazy Keto Cheese Omelette comes to the rescue—it’s my go-to for a quick, satisfying meal that doesn’t skimp on flavor.
Ingredients
- A couple of large eggs
- A splash of heavy cream
- A pinch of salt
- A dash of black pepper
- A handful of shredded cheddar cheese
- A tablespoon of butter
Instructions
- Crack the eggs into a bowl and whisk them together with the heavy cream until well combined.
- Season the egg mixture with a pinch of salt and a dash of black pepper, whisking again to distribute the seasoning evenly.
- Heat a non-stick skillet over medium heat and melt the tablespoon of butter, making sure it coats the bottom of the pan.
- Pour the egg mixture into the skillet, letting it sit undisturbed for about 30 seconds until the edges start to set.
- Gently lift the edges of the omelette with a spatula, tilting the pan to let the uncooked eggs flow underneath.
- Sprinkle the shredded cheddar cheese evenly over one half of the omelette, then fold the other half over the cheese.
- Cook for another minute or until the cheese starts to melt, then slide the omelette onto a plate.
This omelette turns out fluffy and rich, with the melted cheddar adding a gooey texture that’s just irresistible. Try serving it with a side of avocado or a dollop of salsa for an extra kick!
Keto Slow Cooker Pulled Pork
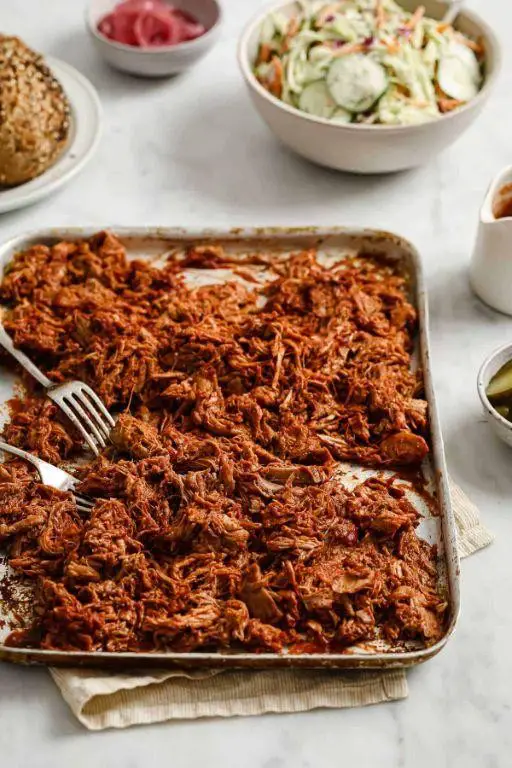
Just when I thought my slow cooker couldn’t surprise me anymore, this Keto Slow Cooker Pulled Pork came along and blew my mind. It’s the perfect set-it-and-forget-it meal that’s both indulgent and guilt-free, making it a staple in my weekly meal prep.
Ingredients
- 3 lbs of pork shoulder (because bigger is always better, right?)
- A generous sprinkle of salt and pepper (to get that flavor foundation right)
- 2 tbsp of olive oil (for that perfect sear)
- 1 cup of chicken broth (a splash of liquid gold to keep things juicy)
- 1/2 cup of your favorite sugar-free BBQ sauce (because we’re keeping it keto)
- A couple of garlic cloves, minced (for that punch of flavor)
- 1 tbsp of smoked paprika (to bring the smoke without the fire)
Instructions
- Start by seasoning your pork shoulder all over with salt and pepper. Don’t be shy; this is where the magic begins.
- Heat the olive oil in a large skillet over medium-high heat. Once hot, sear the pork on all sides until it’s beautifully browned, about 3-4 minutes per side. This step is crucial for locking in those juices.
- Transfer the pork to your slow cooker. Pour in the chicken broth and add the minced garlic and smoked paprika. The broth should come up about halfway up the pork, not covering it completely.
- Cover and cook on low for 8 hours or on high for 4 hours. The pork is ready when it falls apart easily with a fork.
- Once cooked, remove the pork from the slow cooker and shred it with two forks. Mix in the sugar-free BBQ sauce until the pork is evenly coated.
- Tip: If you’re not serving immediately, keep the shredded pork in the slow cooker on the ‘warm’ setting to keep it moist.
- Tip: For an extra layer of flavor, broil the sauced pork on a baking sheet for a few minutes until the edges get crispy.
- Tip: Don’t skip the searing step! It adds depth to the dish that slow cooking alone can’t achieve.
Unbelievably tender and packed with smoky, savory flavors, this pulled pork is a game-changer. Serve it over a bed of cauliflower rice for a complete keto meal, or pile it high on low-carb buns for that classic BBQ sandwich experience without the guilt.
Easy Keto Zucchini Noodles
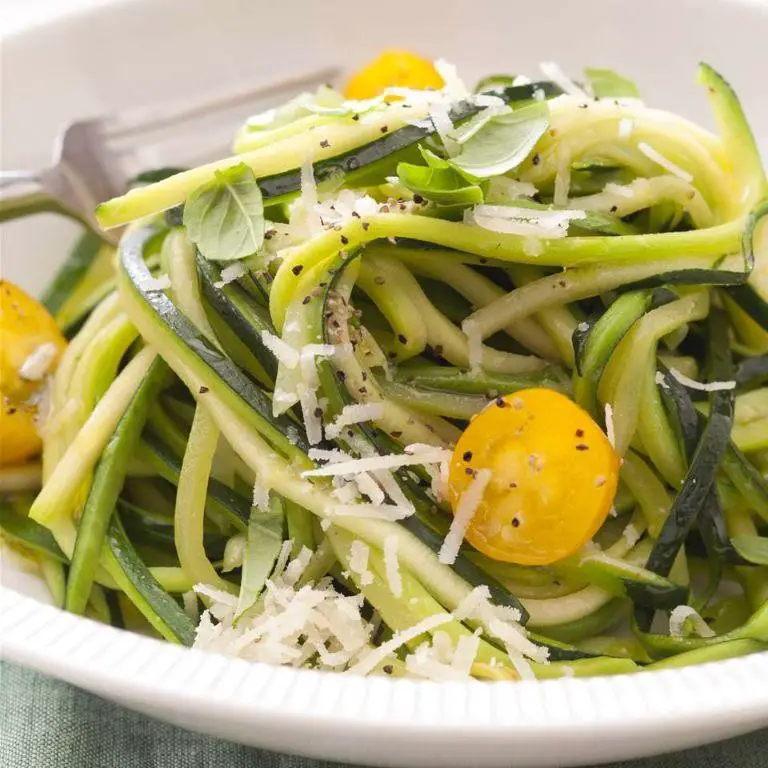
Wow, have you ever found yourself craving pasta but not wanting to break your keto streak? That’s exactly where I was last Tuesday, staring into my fridge, when I spotted a couple of zucchinis that were begging to be turned into noodles. Let me tell you, this dish is a game-changer for anyone looking to keep it low-carb without sacrificing that pasta feel.
Ingredients
- 2 medium zucchinis (about the size of your hand, you know?)
- A splash of olive oil (about 1 tbsp)
- A couple of garlic cloves, minced (because garlic makes everything better)
- A pinch of salt (just enough to wake up the flavors)
- A handful of grated Parmesan cheese (for that cheesy goodness)
- A few basil leaves, torn (for a fresh pop at the end)
Instructions
- First, grab your zucchinis and spiralize them into noodles. No spiralizer? A julienne peeler works in a pinch!
- Heat up that splash of olive oil in a large pan over medium heat. Tip: Don’t let the oil smoke; we’re not frying here.
- Toss in the minced garlic and sauté for about 30 seconds until it’s fragrant. This is your kitchen smelling amazing right now.
- Add the zucchini noodles to the pan. Sprinkle with that pinch of salt. Cook for 2-3 minutes, stirring occasionally. Tip: You want them just tender, not mushy.
- Remove from heat and stir in the Parmesan cheese until it’s nicely melted and coating the noodles.
- Garnish with those torn basil leaves right before serving. Tip: The basil adds a fresh contrast to the rich cheese.
Zucchini noodles have this wonderfully light texture that pairs perfectly with the richness of the Parmesan. Try serving them with a grilled chicken breast on top for a complete meal that’ll satisfy those pasta cravings without the guilt.
Quick Keto Tuna Salad

Sometimes, the simplest dishes bring the most comfort, especially when you’re juggling a busy schedule. That’s why this Quick Keto Tuna Salad has become my go-to lunch—it’s effortless, satisfying, and packed with flavor. I remember whipping this up one afternoon when I was craving something hearty but didn’t want to spend hours in the kitchen.
Ingredients
- 2 cans of tuna in water, drained well
- A couple of tablespoons of mayonnaise (go for the full-fat version for that creamy texture)
- A splash of lemon juice (about a tablespoon, but hey, squeeze a little extra if you love that zing)
- A small handful of diced celery (for that crunch we all crave)
- Salt and pepper to taste (I’m generous with the pepper, but you do you)
Instructions
- Start by flaking the drained tuna into a medium mixing bowl. Breaking it up well ensures every bite is perfect.
- Add the mayonnaise to the tuna. Mix until the tuna is evenly coated. Tip: If the mixture feels dry, add a bit more mayo—it should be creamy but not soggy.
- Squeeze in the lemon juice and stir. This not only adds flavor but also brightens up the dish.
- Toss in the diced celery, mixing gently to distribute it throughout the salad. Tip: If you’re not a fan of celery, cucumbers make a great crunchy substitute.
- Season with salt and pepper, mixing well to combine. Tip: Always taste as you go; it’s the best way to get the seasoning just right.
And just like that, you’ve got a delicious, keto-friendly tuna salad that’s ready in minutes. The texture is wonderfully creamy with just the right amount of crunch from the celery. Serve it over a bed of greens for a light lunch, or scoop it into avocado halves for an extra dose of healthy fats. Absolutely no one will guess how quick it was to make!
Keto No-Bake Cheesecake

After countless attempts to satisfy my sweet tooth without breaking my keto diet, I stumbled upon this no-bake cheesecake recipe that’s become a staple in my kitchen. It’s incredibly easy to whip up, and the best part? No oven required, making it perfect for those hot summer days when you can’t bear to turn on the stove.
Ingredients
- 2 cups of almond flour (for that perfect crust)
- 1/2 cup of melted butter (because everything’s better with butter)
- A pinch of salt (to balance the sweetness)
- 16 oz of cream cheese, softened (this is the star of the show)
- 1/2 cup of powdered erythritol (for sweetness without the guilt)
- A splash of vanilla extract (for that classic cheesecake flavor)
- 1 cup of heavy whipping cream (to make it light and fluffy)
Instructions
- Start by mixing the almond flour, melted butter, and a pinch of salt in a bowl until it resembles wet sand.
- Press the mixture firmly into the bottom of a 9-inch springform pan to form the crust. Pop it in the fridge to set while you work on the filling.
- In a large bowl, beat the softened cream cheese until it’s smooth and lump-free. This is crucial for that silky texture we all love in cheesecake.
- Gradually add the powdered erythritol and vanilla extract to the cream cheese, beating until fully incorporated.
- In a separate bowl, whip the heavy cream until stiff peaks form. Gently fold it into the cream cheese mixture to keep the filling light and airy.
- Pour the filling over the chilled crust, smoothing the top with a spatula. Chill in the refrigerator for at least 4 hours, or overnight for best results.
Creating this keto no-bake cheesecake has been a game-changer for me, offering the perfect balance of creamy texture and rich flavor without the carbs. Serve it with a drizzle of sugar-free chocolate sauce or fresh berries for an extra special touch.
Simple Keto Garlic Butter Steak
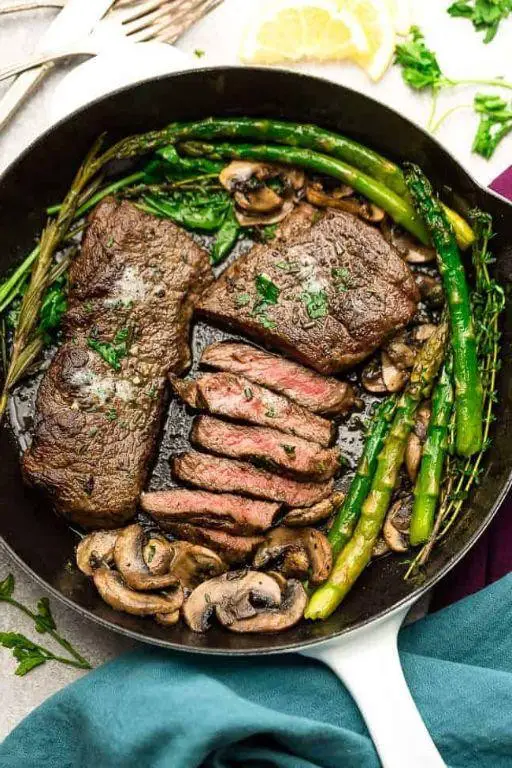
Today, I stumbled upon the most mouthwatering keto-friendly dish that’s not only easy to whip up but also packs a punch in flavor. Let me share with you my latest kitchen adventure with this Simple Keto Garlic Butter Steak that’s become a weeknight favorite.
Ingredients
- A couple of ribeye steaks, about 1 inch thick
- 3 tablespoons of unsalted butter
- 2 cloves of garlic, minced
- A splash of olive oil
- Salt and pepper, just enough to season
- A pinch of dried thyme
Instructions
- Take your steaks out of the fridge and let them sit at room temperature for about 20 minutes. This ensures even cooking.
- Heat a splash of olive oil in a skillet over medium-high heat until it’s shimmering but not smoking.
- Season both sides of the steaks generously with salt and pepper.
- Place the steaks in the skillet. For a perfect medium-rare, cook for about 4 minutes on the first side without moving them. Tip: Pressing down on the steak ensures even contact with the pan.
- Flip the steaks and add the butter, minced garlic, and a pinch of dried thyme to the skillet. Tip: Tilt the skillet slightly and spoon the melted butter over the steaks for extra flavor.
- Continue cooking for another 3-4 minutes, or until the internal temperature reaches 135°F for medium-rare. Tip: Use a meat thermometer for accuracy.
- Remove the steaks from the skillet and let them rest for 5 minutes before slicing. This allows the juices to redistribute.
So there you have it, a perfectly cooked Simple Keto Garlic Butter Steak that’s juicy, flavorful, and incredibly satisfying. Serve it with a side of roasted vegetables or over a bed of cauliflower rice for a complete keto meal that doesn’t skimp on taste.
Lazy Keto Pepperoni Pizza Chips

Now, I don’t know about you, but there are days when I crave something crispy, cheesy, and utterly satisfying without wanting to spend hours in the kitchen. That’s where these Lazy Keto Pepperoni Pizza Chips come in—a game-changer for those lazy evenings.
Ingredients
- A couple of cups of shredded mozzarella cheese
- A handful of pepperoni slices (about 30 should do the trick)
- A splash of olive oil
- A sprinkle of Italian seasoning
- A pinch of garlic powder
Instructions
- Preheat your oven to 400°F and line a baking sheet with parchment paper for easy cleanup.
- Place small piles of shredded mozzarella cheese on the baking sheet, about 2 tablespoons each, spacing them out so they don’t melt together.
- Top each cheese pile with a pepperoni slice. Here’s a tip: slightly fold the pepperoni to give your chips a bit of texture.
- Lightly drizzle or brush the tops with olive oil, then sprinkle with Italian seasoning and garlic powder for that extra flavor kick.
- Bake for 5-7 minutes, or until the edges are golden and crispy. Keep an eye on them after the 5-minute mark to prevent burning.
- Let them cool on the baking sheet for a couple of minutes—they’ll crisp up even more as they cool. Tip number two: patience is key here; rushing this step might leave you with chewy instead of crispy chips.
- Use a spatula to gently lift them off the parchment paper. Tip three: if they stick a bit, a little more patience (or a gentle nudge with the spatula) will do the trick.
Unbelievably crispy with a perfect balance of cheesy and peppery flavors, these chips are a dream. Serve them with a side of marinara for dipping, or just enjoy them straight off the baking sheet—no judgment here.
Keto Avocado Chocolate Mousse
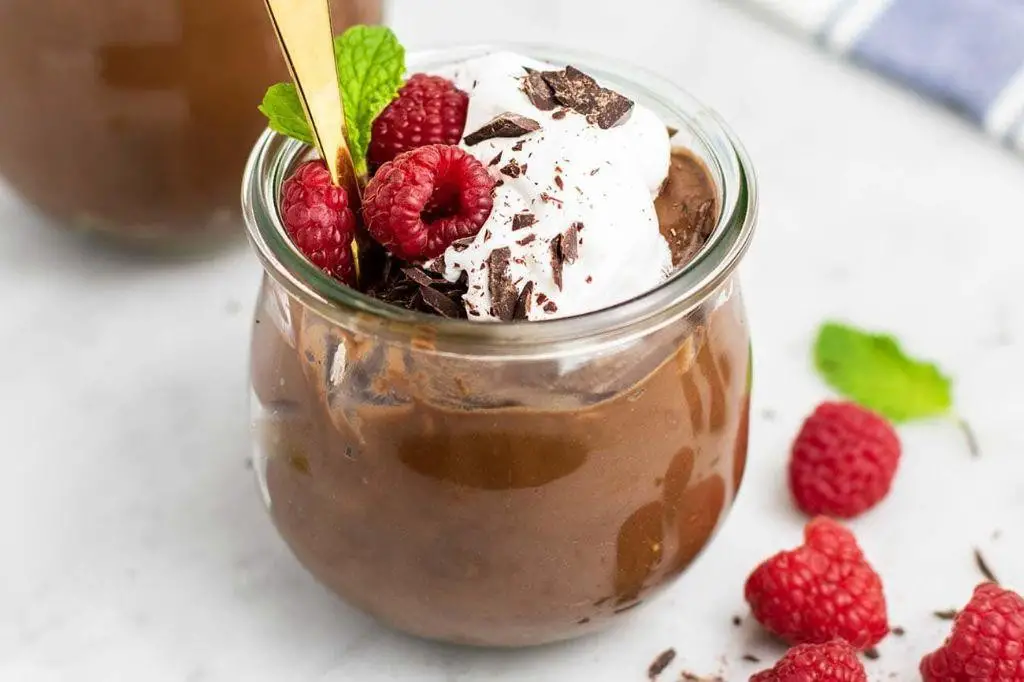
Last weekend, I was craving something sweet but didn’t want to derail my keto diet. That’s when I stumbled upon this incredibly simple yet decadent Keto Avocado Chocolate Mousse. It’s so good, you’d never guess it’s healthy!
Ingredients
- 2 ripe avocados, because they blend smoother and add that creamy texture we’re after
- 1/4 cup of cocoa powder, for that deep chocolate flavor
- 1/4 cup of almond milk, just a splash to get the right consistency
- 3 tbsp of erythritol, or your favorite keto-friendly sweetener to taste
- 1 tsp of vanilla extract, because vanilla makes everything better
- A pinch of salt, to balance the sweetness
Instructions
- Scoop the avocados into a blender or food processor. Tip: Make sure they’re ripe for the smoothest mousse.
- Add the cocoa powder, almond milk, erythritol, vanilla extract, and salt to the blender.
- Blend on high until the mixture is completely smooth, scraping down the sides as needed. This usually takes about 2 minutes.
- Taste and adjust the sweetness if necessary, adding more erythritol a teaspoon at a time.
- Divide the mousse into serving dishes and chill in the fridge for at least 30 minutes. Tip: Chilling helps the flavors meld together beautifully.
- Before serving, give it a quick stir. Tip: For an extra touch, top with a few raspberries or a sprinkle of cocoa powder.
Enjoy the velvety texture and rich chocolate flavor of this mousse. It’s perfect for a guilt-free dessert or even a fancy breakfast treat. Either way, it’s bound to impress!
Easy Keto Chicken Wings
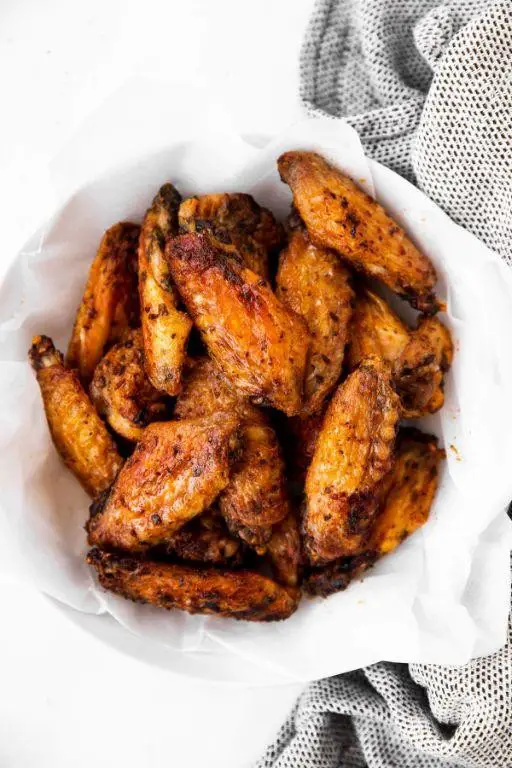
How many times have I found myself staring into the fridge, craving something crispy yet guilt-free? Too many to count, which is exactly how these Easy Keto Chicken Wings became a staple in my kitchen. They’re the perfect blend of crunchy, juicy, and packed with flavor, without any of the carbs.
Ingredients
- 2 pounds of chicken wings, because who can stop at just one?
- A generous drizzle of olive oil, to get them perfectly crispy
- A couple of tablespoons of your favorite keto-friendly hot sauce, for that kick
- A splash of apple cider vinegar, to balance the heat
- A pinch of garlic powder, because garlic makes everything better
- Salt and pepper, to season
Instructions
- Preheat your oven to 400°F (200°C) to ensure it’s hot enough for crispy wings.
- In a large bowl, toss the chicken wings with olive oil, salt, and pepper until they’re evenly coated. Tip: Patting the wings dry before this step helps the oil stick better.
- Spread the wings out on a baking sheet in a single layer, giving them space to crisp up. Crowding the pan steams them instead.
- Bake for 45 minutes, flipping halfway through, until they’re golden and crispy. Tip: For extra crispiness, broil for the last 2-3 minutes, but watch them closely!
- While the wings bake, whisk together the hot sauce, apple cider vinegar, and garlic powder in a small bowl. Tip: Adjust the amount of hot sauce based on your heat preference.
- Toss the baked wings in the sauce until they’re fully coated, then serve immediately.
Out of the oven, these wings are irresistibly crispy on the outside, tender on the inside, with a spicy, tangy glaze that’s downright addictive. Serve them with a side of cool, creamy blue cheese dressing for the ultimate keto-friendly snack.
Quick Keto Green Smoothie
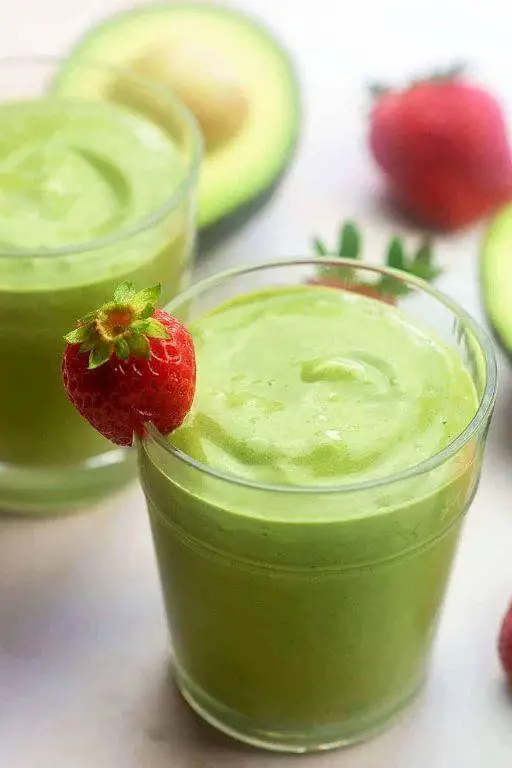
Mornings can be hectic, but starting my day with this Quick Keto Green Smoothie always sets the right tone. It’s my go-to when I need something nutritious, delicious, and ready in minutes—perfect for those days when I’m rushing out the door but still want to keep my keto goals in check.
Ingredients
- A couple of cups of fresh spinach (packed)
- Half an avocado, because creamy is key
- A splash of unsweetened almond milk, just enough to get things moving
- A tablespoon of chia seeds for that omega-3 boost
- A scoop of your favorite vanilla protein powder (make sure it’s keto-friendly)
- A handful of ice cubes to keep it frosty
Instructions
- Grab your blender and toss in the spinach first—it helps to blend the greens more smoothly if they’re at the bottom.
- Add the half avocado and chia seeds next. Pro tip: If your avocado isn’t ripe enough, microwave it for 10 seconds to soften.
- Pour in the almond milk, then add the protein powder. This order prevents the powder from sticking to the bottom.
- Top it all off with ice cubes. The more ice, the thicker your smoothie will be, so adjust according to your preference.
- Blend on high for about 30 seconds, or until everything is smooth and creamy. If it’s too thick, add a bit more almond milk and blend again.
So there you have it—a smoothie that’s as vibrant in color as it is in flavor. The avocado gives it a luxuriously creamy texture, while the spinach keeps it light and fresh. I love pouring mine into a mason jar and sipping it slowly as I plan my day, but it’s also great in a to-go cup with a straw for those extra busy mornings.
Keto Cauliflower Mac and Cheese

Very few things bring me as much comfort as a creamy, cheesy bowl of mac and cheese, but since going keto, I’ve had to get creative. That’s how this Keto Cauliflower Mac and Cheese came to be—a guilt-free twist on the classic that’s just as satisfying.
Ingredients
- 1 large head of cauliflower, cut into bite-sized florets
- 2 cups of shredded sharp cheddar cheese
- 1/2 cup of heavy cream
- 2 tbsp of butter
- A splash of unsweetened almond milk
- A couple of cloves of garlic, minced
- 1/2 tsp of mustard powder
- Salt and pepper to taste
Instructions
- Preheat your oven to 375°F and grease a baking dish with a bit of butter.
- Bring a large pot of salted water to a boil and add the cauliflower florets. Cook for about 5 minutes until just tender, then drain well. Tip: Don’t overcook the cauliflower, or it’ll turn mushy in the oven.
- In the same pot, melt the butter over medium heat and sauté the garlic until fragrant, about 1 minute.
- Stir in the heavy cream, almond milk, and mustard powder, bringing the mixture to a gentle simmer.
- Reduce the heat to low and gradually add the cheddar cheese, stirring until the sauce is smooth and creamy. Tip: Adding the cheese slowly prevents clumping.
- Season the sauce with salt and pepper, then fold in the cooked cauliflower until evenly coated.
- Transfer the mixture to the prepared baking dish and bake for 20 minutes, or until the top is bubbly and slightly golden. Tip: For an extra crispy top, broil for the last 2 minutes.
Finally, this Keto Cauliflower Mac and Cheese is wonderfully creamy with a slight crunch from the baked cheese topping. Serve it straight from the oven with a sprinkle of fresh herbs for a pop of color and flavor.
Simple Keto Salmon with Asparagus
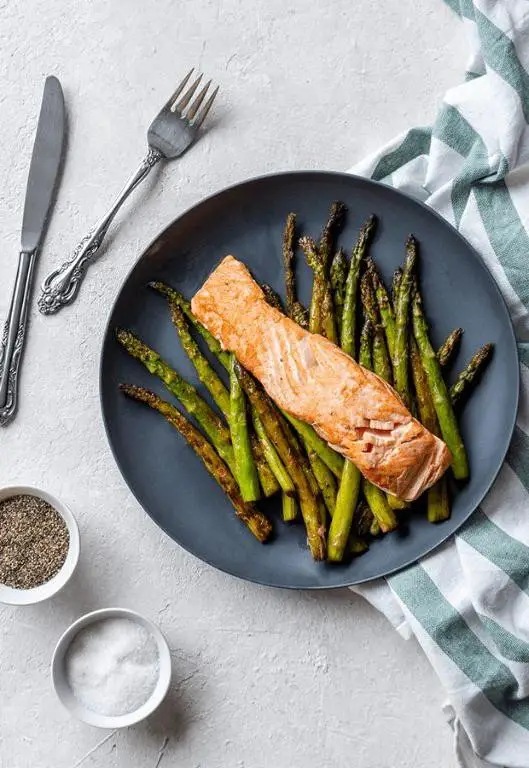
After a long day, there’s nothing I love more than a meal that’s both nutritious and easy to whip up. That’s why this Simple Keto Salmon with Asparagus has become a staple in my kitchen—it’s quick, delicious, and fits perfectly into my low-carb lifestyle.
Ingredients
- 2 salmon fillets (about 6 oz each)
- A bunch of asparagus, trimmed
- 2 tbsp olive oil
- A squeeze of lemon juice
- A couple of garlic cloves, minced
- Salt and pepper, just a pinch each
- A sprinkle of dried dill
Instructions
- Preheat your oven to 400°F (200°C) and line a baking sheet with parchment paper for easy cleanup.
- Place the salmon fillets and asparagus on the prepared baking sheet. Drizzle with olive oil and lemon juice, then sprinkle with minced garlic, salt, pepper, and dill. Tip: Make sure the asparagus is in a single layer to roast evenly.
- Bake for 12-15 minutes, or until the salmon flakes easily with a fork and the asparagus is tender but still crisp. Tip: Don’t overcrowd the baking sheet, or the veggies will steam instead of roast.
- Let the salmon rest for a couple of minutes before serving to allow the juices to redistribute. Tip: This resting time is crucial for the most flavorful bite.
Now, the salmon comes out perfectly flaky and moist, with the asparagus adding a nice crunch. I love serving this dish with a side of cauliflower rice for an extra keto-friendly touch.
Conclusion
Deliciously simple, these 18 lazy keto recipes are perfect for beginners looking to enjoy flavorful meals without the fuss. Whether you’re craving comfort food or something light, this roundup has you covered. We’d love to hear which recipes become your favorites—drop us a comment below! And if you found this collection helpful, don’t forget to share the love on Pinterest. Happy cooking!