Zesty, sweet, and utterly irresistible—mini desserts are the perfect way to satisfy your sweet tooth without the guilt! Whether you’re hosting a party or just treating yourself, these 18 delicious mini dessert recipes are sure to amaze. From bite-sized cheesecakes to tiny tarts, there’s something for every taste. Dive into our roundup and discover your next favorite treat today!
Mini Chocolate Lava Cakes
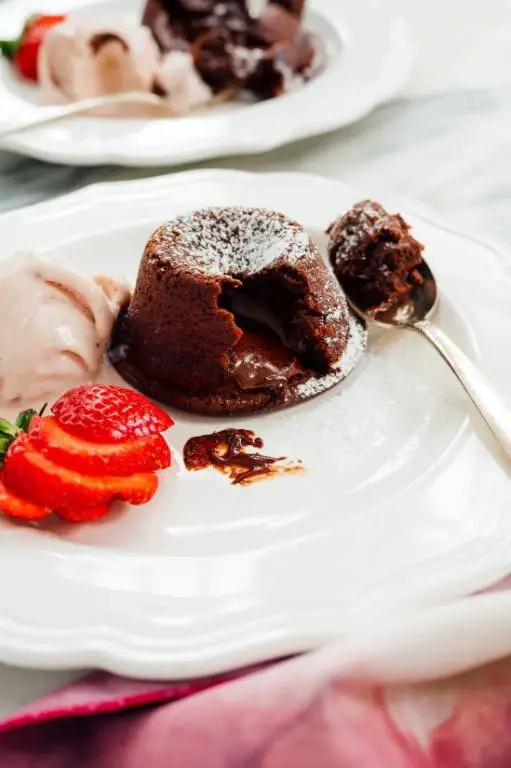
Sometimes, the smallest things hold the most joy, like these Mini Chocolate Lava Cakes. They’re a whisper of sweetness, a moment of warmth in your hands, melting slowly into comfort.
Ingredients
- Butter – ½ cup
- Semi-sweet chocolate – 6 oz
- Eggs – 2
- Sugar – ¼ cup
- Flour – 2 tbsp
Instructions
- Preheat your oven to 425°F. This high heat is crucial for creating that perfect lava flow.
- Butter and lightly flour four ramekins. This ensures your cakes will release beautifully.
- Melt butter and chocolate together in a double boiler, stirring until smooth. Tip: A microwave can also be used, but stir every 30 seconds to prevent burning.
- In a separate bowl, whisk eggs and sugar until light and fluffy. This incorporates air, making the cakes lighter.
- Fold the chocolate mixture into the egg mixture gently, then add flour. Tip: Overmixing can deflate the eggs, so fold just until combined.
- Divide the batter evenly among the ramekins. Tip: Filling them only ¾ full allows room to rise without overflowing.
- Bake for 12 minutes. The edges should be set, but the center will be soft.
- Let stand for 1 minute, then invert onto plates. The wait is brief but essential for the perfect lava flow.
Decadent and rich, these cakes offer a contrast of textures—crisp edges giving way to a molten center. Serve with a dusting of powdered sugar or a scoop of vanilla ice cream for an extra touch of indulgence.
Mini Cheesecakes with Berry Topping
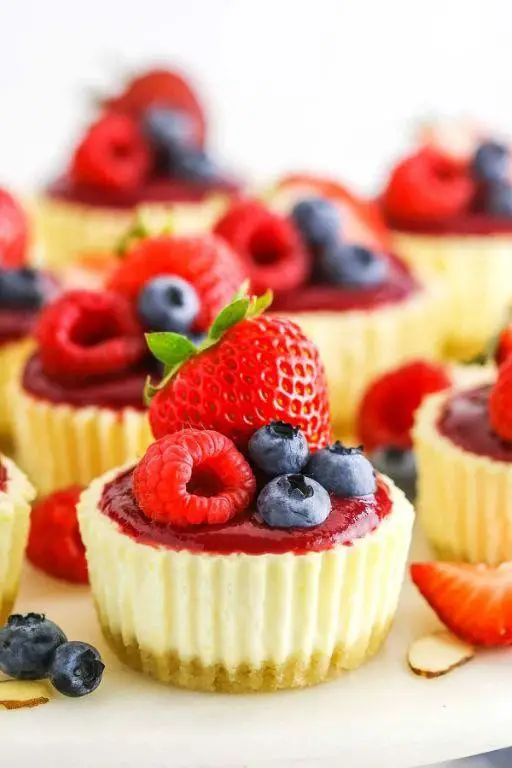
Remembering the first time I made these mini cheesecakes, the kitchen was quiet, the afternoon light filtering through the curtains, and the anticipation of something sweet lingering in the air. It’s a simple joy, creating these little delights, each bite a perfect harmony of creamy and tart.
Ingredients
- Cream cheese – 8 oz
- Sugar – 1/2 cup
- Egg – 1
- Vanilla extract – 1 tsp
- Graham cracker crumbs – 1 cup
- Butter – 3 tbsp, melted
- Mixed berries – 1 cup
Instructions
- Preheat your oven to 325°F. Line a muffin tin with paper liners.
- Mix graham cracker crumbs and melted butter in a bowl until combined. Press 1 tbsp of the mixture into the bottom of each liner. Tip: Use the back of a spoon to press the crumbs firmly for a solid base.
- Beat cream cheese and sugar in a large bowl until smooth. Add egg and vanilla extract, beating until just combined. Tip: Overbeating can incorporate too much air, leading to cracks in your cheesecakes.
- Pour the cream cheese mixture over the crusts, filling each liner 3/4 full. Bake for 20 minutes, or until the edges are set but the centers are slightly jiggly. Tip: The cheesecakes will firm up as they cool, so don’t overbake.
- Let the cheesecakes cool in the tin for 10 minutes, then transfer to a wire rack to cool completely. Top with mixed berries before serving.
Just as the cheesecakes are a blend of textures—creamy filling atop a crunchy crust—the berry topping adds a fresh, juicy contrast. Serve them chilled, perhaps with a drizzle of honey for an extra touch of sweetness.
Mini Lemon Tarts
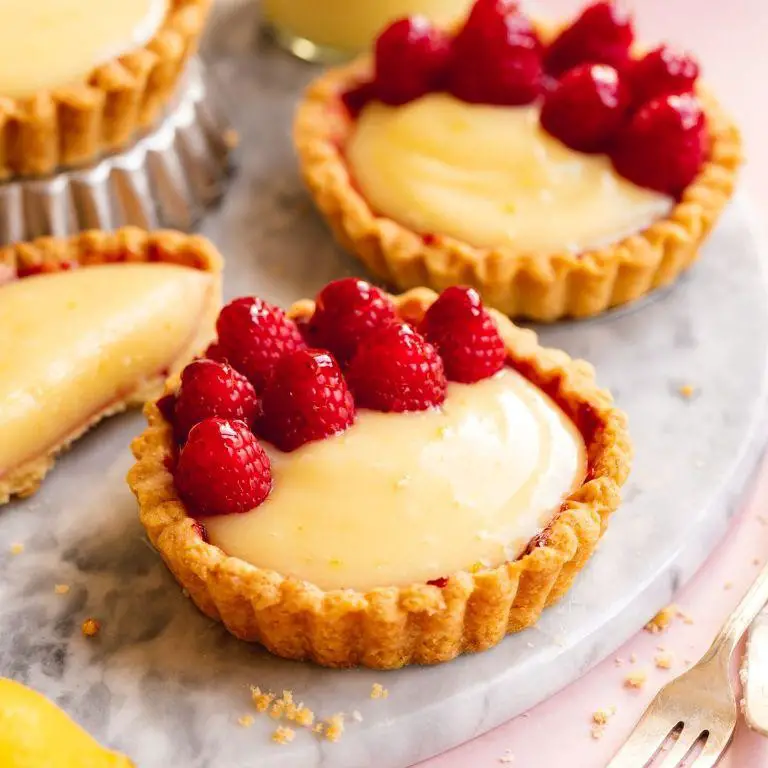
Dappled sunlight filters through the kitchen window as I ponder the simplicity and joy of making mini lemon tarts. These little delights, with their bright flavor and delicate crust, are a testament to the beauty of baking with intention and care.
Ingredients
- Flour – 1 cup
- Butter – ½ cup
- Sugar – ¼ cup
- Egg yolks – 2
- Lemon juice – ¼ cup
- Lemon zest – 1 tbsp
Instructions
- Preheat the oven to 350°F (175°C) to ensure it’s ready for baking.
- Mix 1 cup flour and ¼ cup sugar in a bowl, then cut in ½ cup butter until the mixture resembles coarse crumbs. Tip: Keep the butter cold for a flakier crust.
- Add 2 egg yolks one at a time, mixing until the dough comes together. Tip: Handle the dough as little as possible to prevent toughness.
- Press the dough into mini tart pans, ensuring an even layer on the bottom and sides. Tip: Use a measuring cup to press the dough for uniformity.
- Bake the crusts for 10 minutes, or until lightly golden, then let them cool slightly.
- Whisk together ¼ cup lemon juice, 1 tbsp lemon zest, and remaining sugar, then pour into the pre-baked crusts.
- Bake for another 15 minutes, or until the filling is set but still slightly wobbly in the center.
- Cool the tarts completely on a wire rack before serving to allow the filling to firm up.
Fresh from the oven, these mini lemon tarts offer a delightful contrast between the crisp, buttery crust and the tangy, smooth filling. Serve them with a dusting of powdered sugar or a dollop of whipped cream for an extra touch of elegance.
Mini Red Velvet Cupcakes

Dreaming of a quiet afternoon, the kind that calls for something sweet yet simple, I found myself drawn to the idea of mini red velvet cupcakes. Their rich hue and tender crumb speak of comfort and joy, a small indulgence that feels just right.
Ingredients
- Flour – 1 cup
- Sugar – ¾ cup
- Cocoa powder – 2 tbsp
- Baking soda – ½ tsp
- Salt – ¼ tsp
- Buttermilk – ½ cup
- Vegetable oil – ½ cup
- Egg – 1
- Red food coloring – 1 tbsp
- Vanilla extract – 1 tsp
- White vinegar – ½ tsp
Instructions
- Preheat your oven to 350°F and line a mini cupcake pan with liners.
- In a large bowl, whisk together flour, sugar, cocoa powder, baking soda, and salt until well combined.
- In another bowl, mix buttermilk, vegetable oil, egg, red food coloring, vanilla extract, and white vinegar until smooth.
- Gradually add the dry ingredients to the wet ingredients, stirring until just combined. Tip: Overmixing can lead to dense cupcakes.
- Fill each cupcake liner two-thirds full with batter. Tip: Use a small cookie scoop for even portions.
- Bake for 12-15 minutes, or until a toothpick inserted into the center comes out clean. Tip: Rotate the pan halfway through baking for even cooking.
- Allow the cupcakes to cool in the pan for 5 minutes before transferring to a wire rack to cool completely.
Kindly savor these mini red velvet cupcakes, where the velvety texture meets a subtly tangy flavor, perfect for pairing with a dollop of cream cheese frosting or enjoying as is. Their petite size makes them ideal for sharing or savoring one by one, a little bite of happiness.
Mini Apple Pies

On a quiet afternoon like this, when the light filters through the kitchen window just so, there’s something deeply comforting about the idea of mini apple pies. They’re not just desserts; they’re little parcels of warmth, each bite a reminder of simpler times.
Ingredients
- Flour – 2 cups
- Butter – 1 cup, cold and cubed
- Sugar – ½ cup
- Salt – ½ tsp
- Apples – 3, peeled and diced
- Cinnamon – 1 tsp
Instructions
- Preheat your oven to 375°F (190°C). Tip: Ensuring your oven is properly preheated is key to achieving that perfect golden crust.
- In a large bowl, mix flour, sugar, and salt. Add the cubed butter and use your fingers to rub it into the flour until the mixture resembles coarse crumbs. Tip: The colder the butter, the flakier your crust will be.
- Gradually add 4-6 tbsp of cold water, one tablespoon at a time, mixing until the dough just comes together. Wrap in plastic and chill for 30 minutes.
- While the dough chills, toss the diced apples with cinnamon in a bowl. Tip: Letting the apples sit with the cinnamon for a few minutes enhances the flavor.
- Roll out the chilled dough on a floured surface to about 1/8 inch thickness. Cut into circles to fit your mini pie molds.
- Press the dough circles into the molds, fill with the apple mixture, and cover with another dough circle. Seal the edges with a fork.
- Cut small slits on the top of each pie for steam to escape. Bake for 25-30 minutes, or until the crust is golden and the filling is bubbly.
Vividly golden and fragrant, these mini apple pies offer a delightful contrast between the flaky crust and the soft, spiced apples inside. Serve them warm with a dollop of whipped cream or a scoop of vanilla ice cream for an extra touch of indulgence.
Mini Pumpkin Spice Muffins
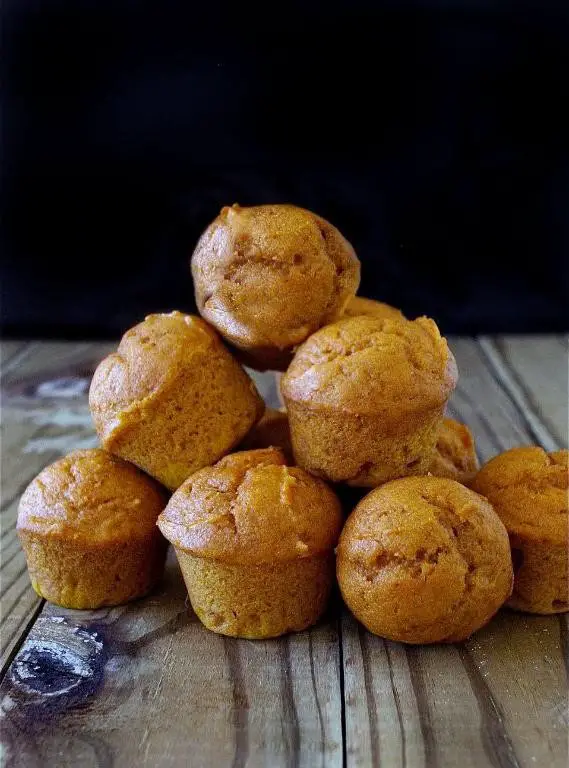
Evenings like these call for something warm, something that whispers of autumn’s approach with every bite. Mini Pumpkin Spice Muffins, with their tender crumb and aromatic spices, are just the thing to ease into the season.
Ingredients
- Flour – 1 cup
- Sugar – ¾ cup
- Pumpkin puree – ½ cup
- Egg – 1
- Butter – ¼ cup, melted
- Pumpkin spice – 1 tsp
- Baking powder – 1 tsp
- Salt – ½ tsp
Instructions
- Preheat your oven to 350°F and line a mini muffin tin with paper liners.
- In a large bowl, whisk together the flour, sugar, pumpkin spice, baking powder, and salt until well combined.
- In another bowl, mix the pumpkin puree, melted butter, and egg until smooth. Tip: Ensure all ingredients are at room temperature for a smoother batter.
- Gently fold the wet ingredients into the dry ingredients until just combined. Tip: Overmixing can lead to dense muffins, so stop as soon as the flour disappears.
- Spoon the batter into the prepared muffin tin, filling each liner about ¾ full. Tip: A small cookie scoop can help distribute the batter evenly.
- Bake for 12-15 minutes, or until a toothpick inserted into the center of a muffin comes out clean.
- Let the muffins cool in the tin for 5 minutes before transferring to a wire rack to cool completely.
Light and moist, these muffins carry the warmth of pumpkin spice in every bite. Serve them with a dollop of whipped cream or alongside your morning coffee for a cozy start to the day.
Mini Banana Bread Loaves
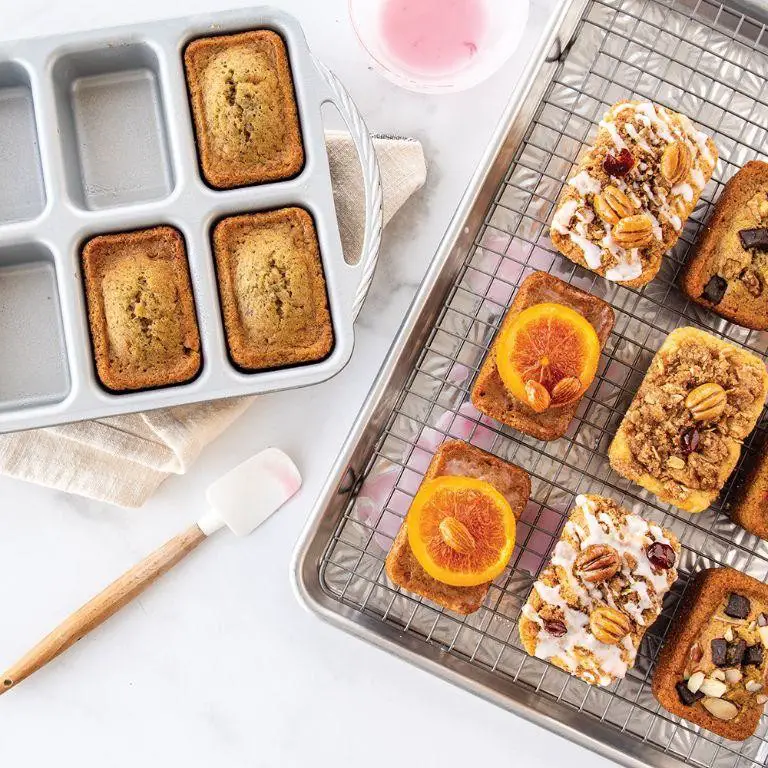
There’s something deeply comforting about the aroma of banana bread wafting through the kitchen, especially when it’s baked into mini loaves that promise personal indulgence. Today, let’s embrace the simplicity and warmth of making Mini Banana Bread Loaves, a treat that feels like a hug in every bite.
Ingredients
- Flour – 1 cup
- Sugar – ¾ cup
- Butter – ½ cup, melted
- Bananas – 2, mashed
- Egg – 1
- Baking soda – 1 tsp
- Salt – ½ tsp
Instructions
- Preheat your oven to 350°F and grease 4 mini loaf pans.
- In a large bowl, mix the melted butter and sugar until well combined.
- Add the egg and mashed bananas to the bowl, stirring until the mixture is smooth.
- Sift together the flour, baking soda, and salt, then gently fold into the wet ingredients until just combined. Tip: Overmixing can lead to dense bread, so stop as soon as the flour disappears.
- Divide the batter evenly among the prepared mini loaf pans. Tip: For even baking, tap the pans lightly on the counter to remove any air bubbles.
- Bake for 25-30 minutes, or until a toothpick inserted into the center comes out clean. Tip: If the tops are browning too quickly, loosely cover with foil.
- Let the loaves cool in the pans for 10 minutes before transferring to a wire rack.
Perfectly moist with a tender crumb, these mini loaves carry the sweet, unmistakable flavor of ripe bananas. Enjoy them warm with a smear of butter, or for an extra treat, drizzle with a simple glaze made from powdered sugar and milk.
Mini Coconut Macaroons
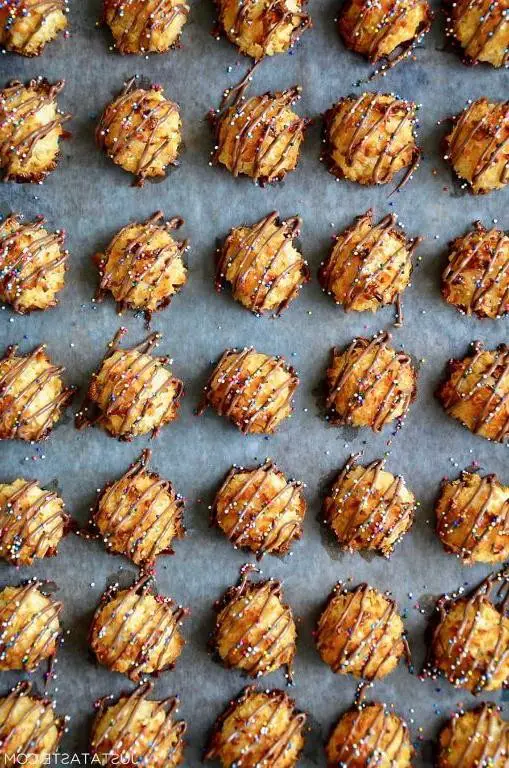
Fondly remembering the first time I tasted these tiny treasures, their sweet, coconutty essence transports me back to a simpler time. Mini Coconut Macaroons are not just a dessert; they’re a bite-sized escape to paradise, perfect for those moments when you crave something sweet yet comforting.
Ingredients
- Sweetened shredded coconut – 2 cups
- Sweetened condensed milk – ½ cup
- Vanilla extract – 1 tsp
- Egg whites – 2
- Salt – ¼ tsp
Instructions
- Preheat your oven to 325°F and line a baking sheet with parchment paper.
- In a large bowl, combine the sweetened shredded coconut, sweetened condensed milk, and vanilla extract. Mix until fully incorporated.
- In a separate bowl, beat the egg whites and salt until stiff peaks form. Tip: Ensure your bowl and beaters are completely clean and dry for the best volume.
- Gently fold the beaten egg whites into the coconut mixture until no white streaks remain. Tip: Fold carefully to keep the mixture light and airy.
- Using a small cookie scoop or a tablespoon, drop the mixture onto the prepared baking sheet, spacing them about 1 inch apart. Tip: Wet your fingers slightly to shape the macaroons into neat mounds if needed.
- Bake for 20-25 minutes, or until the macaroons are golden brown on the edges and bottoms.
- Let the macaroons cool on the baking sheet for 5 minutes before transferring to a wire rack to cool completely.
You’ll find these macaroons delightfully crisp on the outside, with a soft, chewy center that’s irresistibly sweet. For an extra touch, drizzle them with melted dark chocolate or serve alongside a cup of strong coffee to balance their sweetness.
Mini Pecan Pies
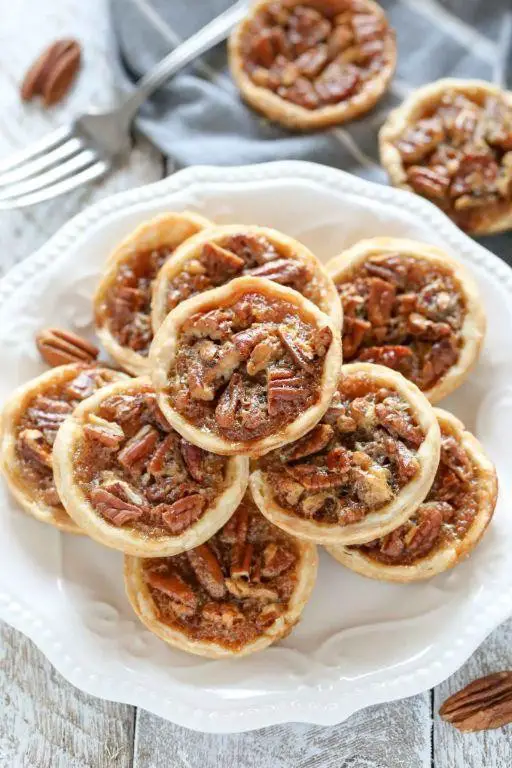
Yesterday, as the golden light of evening spilled across the kitchen counter, I found myself drawn to the comforting simplicity of making mini pecan pies. There’s something about the process, the way the pecans toast and the filling caramelizes, that feels like a quiet celebration of the season.
Ingredients
- Pecans – 1 cup
- Pie crust – 1 package
- Brown sugar – ½ cup
- Eggs – 2
- Vanilla extract – 1 tsp
- Butter – ¼ cup
Instructions
- Preheat your oven to 350°F. This ensures a consistent temperature for baking.
- Roll out the pie crust and cut into small circles to fit a mini muffin tin. Tip: Use a glass slightly larger than the muffin tin openings for perfect fits.
- Press each crust circle into the muffin tin, ensuring there are no air pockets.
- In a bowl, mix the pecans, brown sugar, eggs, vanilla extract, and melted butter until well combined. Tip: Toast the pecans beforehand for a deeper flavor.
- Fill each pie crust with the pecan mixture, leaving a small space at the top.
- Bake for 20 minutes or until the filling is set and the crust is golden. Tip: Check at 15 minutes to prevent over-browning.
- Let the pies cool in the tin for 5 minutes before transferring to a wire rack.
The mini pecan pies emerge with a crisp crust giving way to a gooey, nutty center. Serve them warm with a dollop of whipped cream or a drizzle of caramel for an extra touch of indulgence.
Mini Strawberry Shortcakes
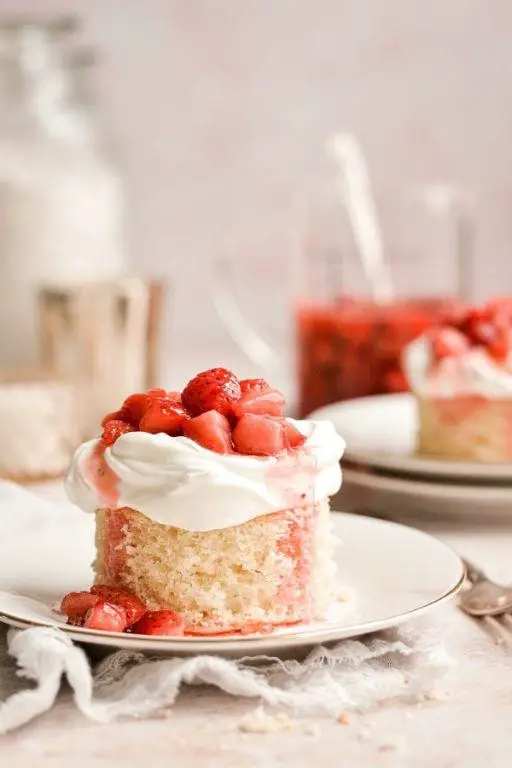
Beneath the soft glow of the morning light, there’s something undeniably comforting about the thought of mini strawberry shortcakes. These little delights, with their tender crumb and bursts of fresh berry, whisper of summer mornings and the simple joy of baking.
Ingredients
- Flour – 1 cup
- Sugar – 2 tbsp
- Baking powder – 1 tsp
- Salt – ¼ tsp
- Butter – ¼ cup, cold and cubed
- Milk – ⅓ cup
- Strawberries – 1 cup, sliced
- Whipped cream – ½ cup
Instructions
- Preheat your oven to 425°F and line a baking sheet with parchment paper.
- In a large bowl, whisk together the flour, sugar, baking powder, and salt.
- Add the cold, cubed butter to the dry ingredients. Use your fingertips to rub the butter into the flour until the mixture resembles coarse crumbs. Tip: Keep the butter cold for flakier shortcakes.
- Pour in the milk and stir just until the dough comes together. Tip: Overmixing will make the shortcakes tough.
- Turn the dough onto a lightly floured surface and pat it into a ½-inch thick rectangle.
- Use a small round cutter to cut out the shortcakes. Place them on the prepared baking sheet. Tip: For even baking, make sure all shortcakes are of uniform thickness.
- Bake for 12-15 minutes, or until golden brown. Let them cool slightly on a wire rack.
- Once cooled, split the shortcakes in half horizontally. Layer the bottom halves with sliced strawberries and a dollop of whipped cream, then replace the tops.
The shortcakes emerge from the oven with a golden hue, their edges crisp against the tender interior. Paired with the sweetness of strawberries and the lightness of whipped cream, they’re a delightful contrast of textures and flavors. Serve them on a vintage plate for a touch of nostalgia, or enjoy them straight from the baking sheet for a truly rustic experience.
Mini Blueberry Crumbles
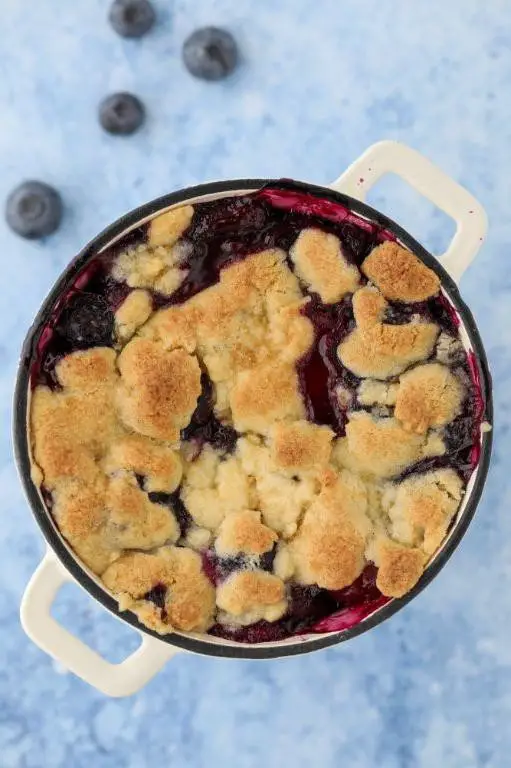
Zesty mornings call for something sweet yet simple, and these Mini Blueberry Crumbles are just that. They’re a humble nod to summer’s bounty, with bursts of blueberry nestled under a golden, buttery topping.
Ingredients
- Blueberries – 2 cups
- Flour – 1 cup
- Sugar – ½ cup
- Butter – ½ cup, cold and cubed
- Salt – ¼ tsp
Instructions
- Preheat your oven to 375°F (190°C) to ensure it’s ready for baking.
- In a bowl, gently toss the blueberries with ¼ cup of sugar to coat them evenly, enhancing their natural sweetness.
- Divide the sugared blueberries evenly among 4 ramekins, creating a vibrant base for your crumbles.
- In another bowl, combine the flour, remaining ¼ cup of sugar, and salt, whisking them together for a uniform mix.
- Add the cold, cubed butter to the flour mixture. Using your fingers, work the butter into the flour until the mixture resembles coarse crumbs, ensuring a flaky topping.
- Sprinkle the crumb mixture generously over the blueberries in each ramekin, covering them completely for a perfect bake.
- Place the ramekins on a baking sheet to catch any drips and bake for 25 minutes, or until the topping is golden and the blueberries are bubbling.
- Let the crumbles cool for 5 minutes before serving, allowing the flavors to meld beautifully.
Lusciously warm, these Mini Blueberry Crumbles offer a delightful contrast between the juicy berries and the crisp, buttery topping. Serve them with a dollop of vanilla ice cream for an extra indulgent treat, or enjoy them as they are, savoring each bite of summer’s simplicity.
Mini Raspberry Chocolate Mousse Cups
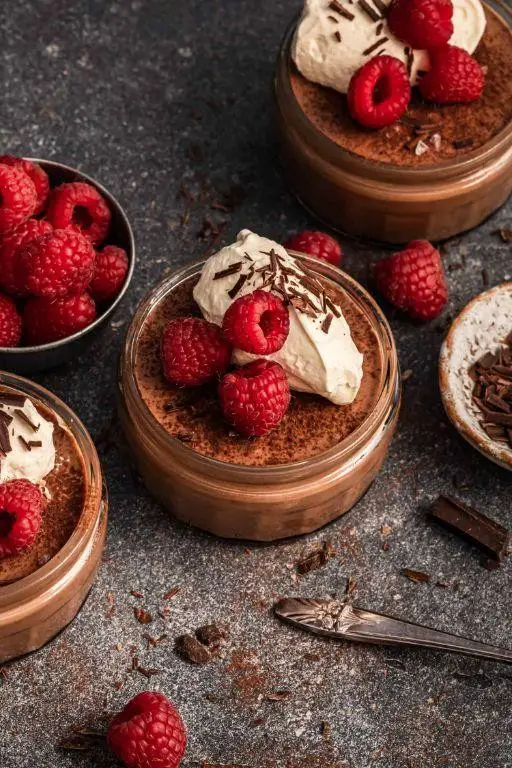
Perhaps there’s no better way to savor the fleeting sweetness of summer than with these Mini Raspberry Chocolate Mousse Cups. Each bite is a delicate balance of tart raspberries and rich chocolate, a reminder to slow down and enjoy the moment.
Ingredients
- Dark chocolate – 1 cup, chopped
- Heavy cream – 1 cup
- Fresh raspberries – ½ cup
- Powdered sugar – 2 tbsp
Instructions
- Place the chopped dark chocolate in a heatproof bowl.
- Heat the heavy cream in a small saucepan over medium heat until it just begins to simmer, about 3-4 minutes. Tip: Watch closely to prevent boiling.
- Pour the hot cream over the chocolate and let sit for 1 minute to soften the chocolate.
- Stir the mixture gently until the chocolate is completely melted and smooth. Tip: Avoid vigorous stirring to prevent air bubbles.
- Divide the chocolate mousse evenly among 4 small cups or glasses.
- Refrigerate the mousse cups for at least 2 hours, or until set. Tip: Covering them with plastic wrap can prevent a skin from forming.
- Before serving, top each mousse cup with fresh raspberries and a light dusting of powdered sugar.
Momentarily, the mousse cups transform into a velvety texture that contrasts beautifully with the juicy burst of raspberries. For an extra touch, serve them with a side of raspberry coulis or a sprinkle of cocoa powder.
Mini Key Lime Pies
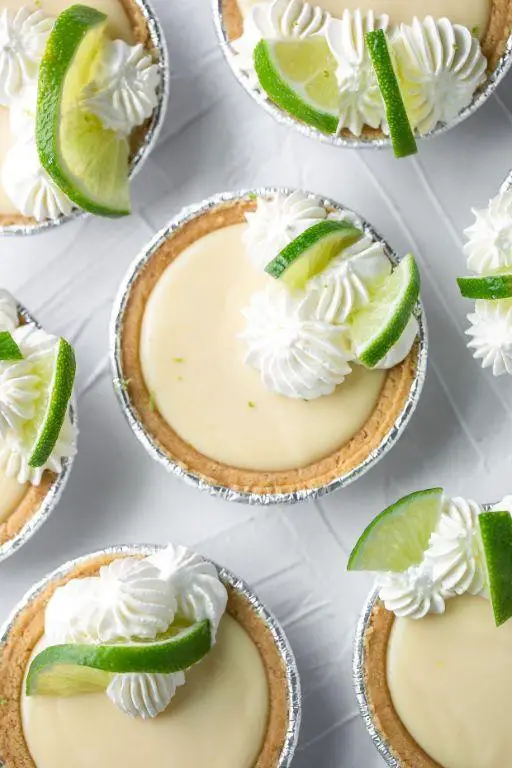
Delicate and bright, these mini key lime pies capture the essence of summer in every bite, offering a perfect balance of tart and sweet that dances lightly on the palate.
Ingredients
- Graham cracker crumbs – 1 cup
- Butter – 5 tbsp, melted
- Sweetened condensed milk – 1 can (14 oz)
- Key lime juice – ½ cup
- Egg yolks – 3
Instructions
- Preheat oven to 350°F. Line a muffin tin with paper liners.
- Mix graham cracker crumbs and melted butter in a bowl until combined. Tip: The mixture should hold together when pressed.
- Press 1 tbsp of the crumb mixture into the bottom of each muffin liner, using the back of a spoon to compact it firmly.
- Bake crusts for 5 minutes, then remove from oven and let cool slightly. Tip: This pre-baking step ensures a crispier crust.
- Whisk together sweetened condensed milk, key lime juice, and egg yolks in a bowl until smooth.
- Pour the filling over the crusts, filling each liner almost to the top.
- Bake for 15 minutes, or until the filling is set but still slightly jiggly in the center. Tip: Overbaking can cause the filling to crack.
- Let the pies cool to room temperature, then refrigerate for at least 2 hours before serving.
Airy yet rich, these pies boast a velvety filling contrasted by the crunchy crust. Serve them chilled, garnished with a dollop of whipped cream and a thin lime slice for an extra touch of elegance.
Mini Carrot Cake Bites
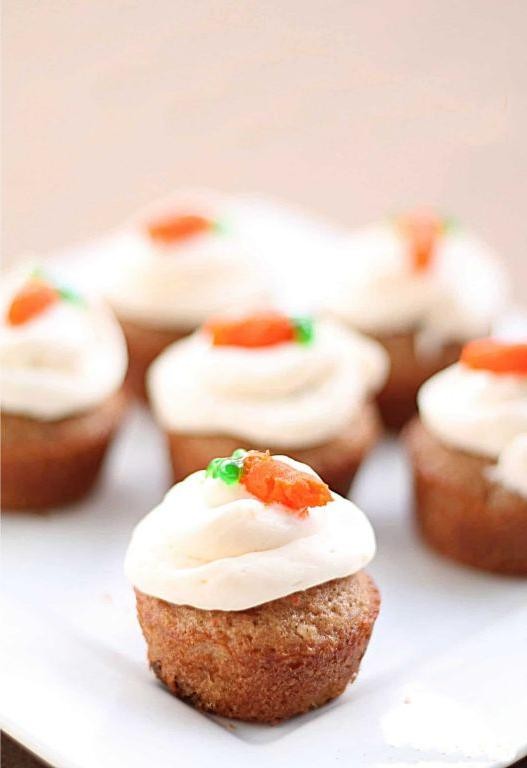
Yesterday, as the afternoon light faded, I found myself craving something sweet yet simple, a treat that wouldn’t require hours in the kitchen but would still satisfy that deep, nostalgic longing for homemade comfort. Mini Carrot Cake Bites, with their moist texture and warm spices, seemed like the perfect answer.
Ingredients
- Flour – 1 cup
- Baking soda – 1 tsp
- Salt – ½ tsp
- Cinnamon – 1 tsp
- Vegetable oil – ½ cup
- Sugar – ¾ cup
- Eggs – 2
- Vanilla extract – 1 tsp
- Carrots – 1 cup, grated
- Cream cheese – 4 oz
- Butter – 2 tbsp
- Powdered sugar – 1 cup
Instructions
- Preheat your oven to 350°F and line a mini muffin tin with paper liners.
- In a medium bowl, whisk together flour, baking soda, salt, and cinnamon. Tip: Sifting the dry ingredients can prevent lumps in your batter.
- In a large bowl, mix vegetable oil and sugar until well combined. Add eggs one at a time, then stir in vanilla extract.
- Gradually add the dry ingredients to the wet ingredients, mixing just until combined. Fold in the grated carrots. Tip: Do not overmix to keep the bites tender.
- Spoon the batter into the prepared muffin tin, filling each liner about ¾ full. Bake for 15-18 minutes, or until a toothpick inserted comes out clean. Tip: Rotate the pan halfway through baking for even cooking.
- While the bites cool, beat cream cheese, butter, and powdered sugar until smooth for the frosting.
- Once completely cool, frost each bite with a dollop of cream cheese frosting.
Warm from the oven, these bites are wonderfully moist, with the carrots adding a subtle sweetness that pairs beautifully with the tangy cream cheese frosting. For an extra touch, sprinkle a little cinnamon on top before serving, or enjoy them as they are, perfect with a cup of tea on a quiet afternoon.
Mini Peanut Butter Cups
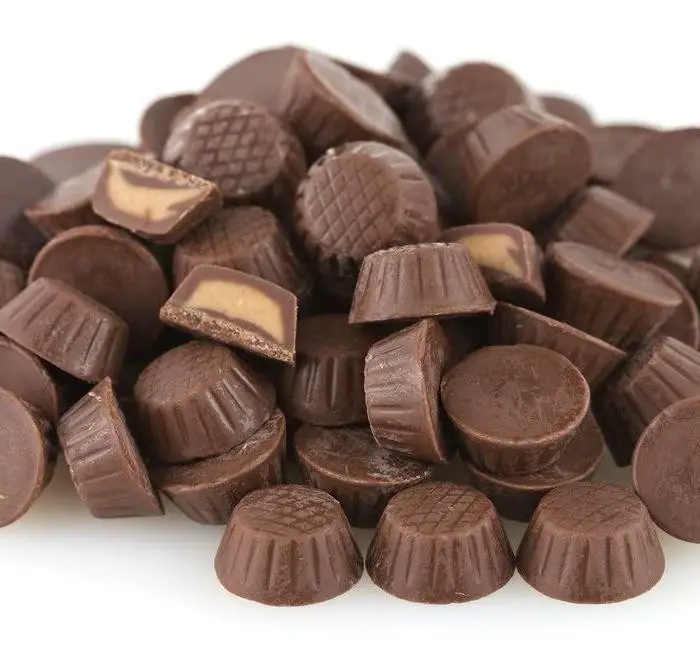
Fondly remembering the first time I stumbled upon the joy of making Mini Peanut Butter Cups, it’s a recipe that feels like a warm hug on a chilly evening. The simplicity of combining just a few ingredients to create something so delightful never fails to amaze me.
Ingredients
- Peanut butter – 1 cup
- Powdered sugar – 1 cup
- Butter – ½ cup
- Chocolate chips – 2 cups
- Mini cupcake liners – 24
Instructions
- Line a mini muffin tin with mini cupcake liners.
- In a medium bowl, mix peanut butter, powdered sugar, and melted butter until smooth.
- Melt chocolate chips in a microwave-safe bowl in 30-second intervals, stirring between each, until fully melted.
- Pour a small amount of melted chocolate into the bottom of each liner, just enough to cover the bottom.
- Freeze the chocolate layer for 5 minutes to set.
- Place a small scoop of the peanut butter mixture on top of the set chocolate layer, pressing down slightly.
- Cover the peanut butter layer with more melted chocolate, ensuring it’s fully enclosed.
- Freeze again for 10 minutes, or until the chocolate is firm.
- Remove from the liners and serve.
Silky smooth chocolate encases a creamy peanut butter center, offering a perfect bite-sized treat. These mini cups are fantastic when served slightly chilled, making them an ideal dessert for summer gatherings.
Mini S’mores Dip
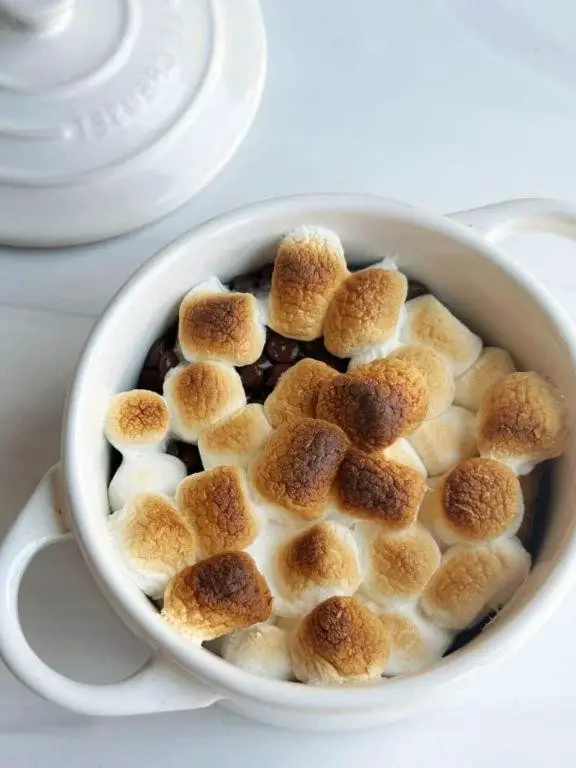
As the evening settles in, there’s something undeniably comforting about the thought of gathering around a simple, sweet treat that brings back memories of campfires and shared stories. This mini s’mores dip is a cozy twist on the classic, perfect for those moments when you crave a little warmth and sweetness without the fuss.
Ingredients
- Chocolate chips – 1 cup
- Marshmallow creme – ½ cup
- Graham crackers – 4, crushed
Instructions
- Preheat your oven to 350°F to ensure it’s ready for baking.
- In a small oven-safe dish, spread the chocolate chips evenly across the bottom.
- Carefully spoon the marshmallow creme over the chocolate chips, aiming for an even layer.
- Sprinkle the crushed graham crackers on top of the marshmallow creme, covering it lightly.
- Place the dish in the preheated oven and bake for 5-7 minutes, or until the marshmallow creme is slightly golden and the chocolate chips have begun to melt.
- Remove the dish from the oven using oven mitts, as it will be hot.
- Let the dip cool for 2 minutes before serving to allow the chocolate to set slightly.
Lusciously gooey with a crisp graham cracker topping, this mini s’mores dip is best enjoyed straight from the oven, with extra graham crackers or fruit for dipping. The contrast between the warm, melted chocolate and the cool, creamy marshmallow creates a delightful sensory experience that’s hard to resist.
Mini Tiramisu Cups
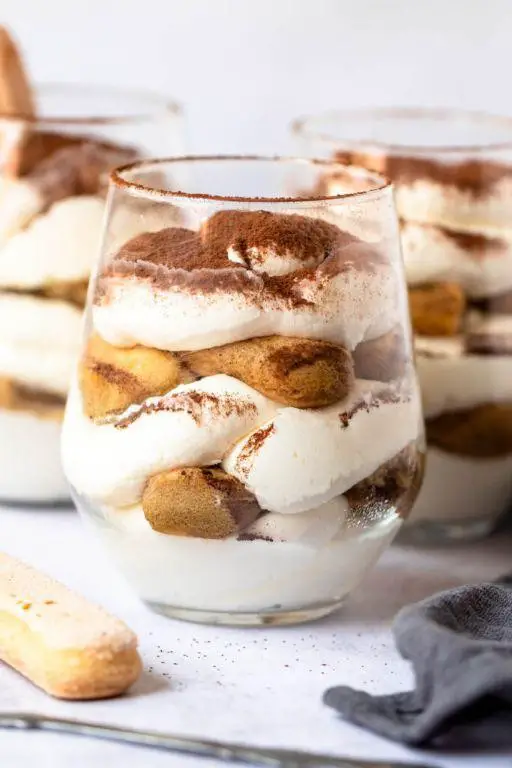
Remembering the first time I tasted tiramisu, its layers of coffee-soaked ladyfingers and mascarpone cream felt like a revelation. These Mini Tiramisu Cups capture that magic in a personal, no-fuss format, perfect for savoring slowly.
Ingredients
- Ladyfingers – 12
- Espresso – ½ cup, cooled
- Mascarpone cheese – 1 cup
- Heavy cream – ½ cup
- Sugar – ¼ cup
- Cocoa powder – 2 tbsp
Instructions
- Brew ½ cup of espresso and let it cool to room temperature, about 20 minutes. Tip: For a stronger coffee flavor, reduce the espresso to ⅓ cup.
- In a large bowl, whip ½ cup of heavy cream and ¼ cup of sugar until stiff peaks form, about 3 minutes.
- Gently fold in 1 cup of mascarpone cheese into the whipped cream until fully incorporated. Tip: Ensure the mascarpone is at room temperature to avoid lumps.
- Quickly dip 12 ladyfingers into the cooled espresso, one at a time, and place them at the bottom of 4 small cups. Tip: Dip for no more than a second to prevent sogginess.
- Divide half of the mascarpone mixture evenly among the cups, smoothing the top with a spoon.
- Repeat the layers with the remaining dipped ladyfingers and mascarpone mixture.
- Dust the tops with 2 tbsp of cocoa powder using a fine sieve for an even coating.
- Chill in the refrigerator for at least 4 hours, or overnight, to set. Tip: Cover with plastic wrap if chilling overnight to prevent absorbing other flavors.
The first spoonful reveals a cloud-like texture, with the espresso lending a gentle bitterness that balances the sweet cream. Serve these cups with a drizzle of chocolate syrup or a sprinkle of cinnamon for an extra touch of warmth.
Mini Vanilla Bean Panna Cottas
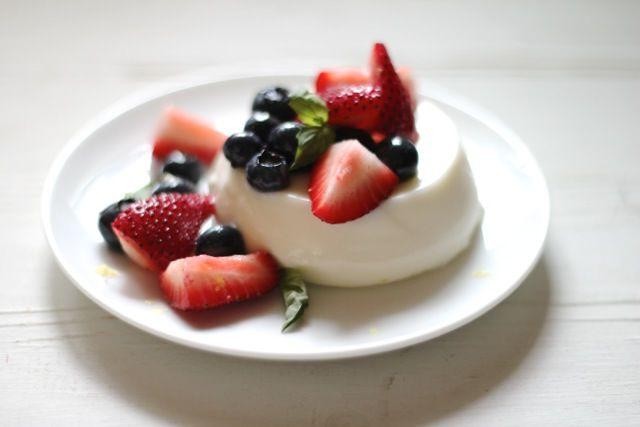
Under the soft glow of the kitchen light, there’s something deeply comforting about preparing Mini Vanilla Bean Panna Cottas. It’s a process that invites patience, a gentle stirring of ingredients that promises a dessert both elegant and soothing.
Ingredients
- Heavy cream – 1 cup
- Whole milk – 1 cup
- Granulated sugar – ¼ cup
- Vanilla bean – 1
- Powdered gelatin – 1 tsp
- Cold water – 2 tbsp
Instructions
- In a small bowl, sprinkle the powdered gelatin over the cold water. Let it bloom for 5 minutes.
- Split the vanilla bean lengthwise and scrape out the seeds. Tip: Use the back of your knife for easier scraping.
- In a saucepan over medium heat, combine the heavy cream, whole milk, granulated sugar, and vanilla bean seeds. Heat until the mixture is warm and the sugar has dissolved, about 5 minutes, stirring occasionally. Do not let it boil.
- Remove the saucepan from the heat. Add the bloomed gelatin to the warm mixture, stirring until completely dissolved. Tip: Ensure the mixture is warm enough to dissolve the gelatin but not too hot to avoid altering its setting properties.
- Strain the mixture through a fine-mesh sieve into a jug to remove any undissolved gelatin or vanilla bean pieces. This ensures a smooth texture.
- Divide the mixture evenly among 4 small ramekins or glasses. Tip: Pouring the mixture into a jug first makes it easier to distribute evenly.
- Refrigerate the panna cottas for at least 4 hours, or until set. They should wobble slightly when gently shaken.
Rich in vanilla flavor with a silky, melt-in-your-mouth texture, these Mini Vanilla Bean Panna Cottas are a delight. Serve them with a drizzle of honey or a sprinkle of fresh berries for a touch of brightness.
Conclusion
Unleash your sweet tooth with these 18 mini dessert recipes, perfect for any occasion! Whether you’re a baking novice or a seasoned pro, there’s something here to delight everyone. We’d love to hear which recipes you try and adore—drop a comment below with your favorites. Don’t forget to share the sweetness by pinning this article on Pinterest for your fellow dessert lovers to discover!