Oh, the joy of transforming your favorite indulgent dishes into healthier versions without sacrificing flavor! Our ’18 Delicious Recipe Rehab Recipes Healthy’ roundup is here to inspire your kitchen adventures with meals that are as nutritious as they are tasty. Whether you’re craving comfort food or looking for quick dinner solutions, these recipes promise to delight your taste buds and keep you coming back for more. Dive in!
Avocado and Egg Breakfast Bowl
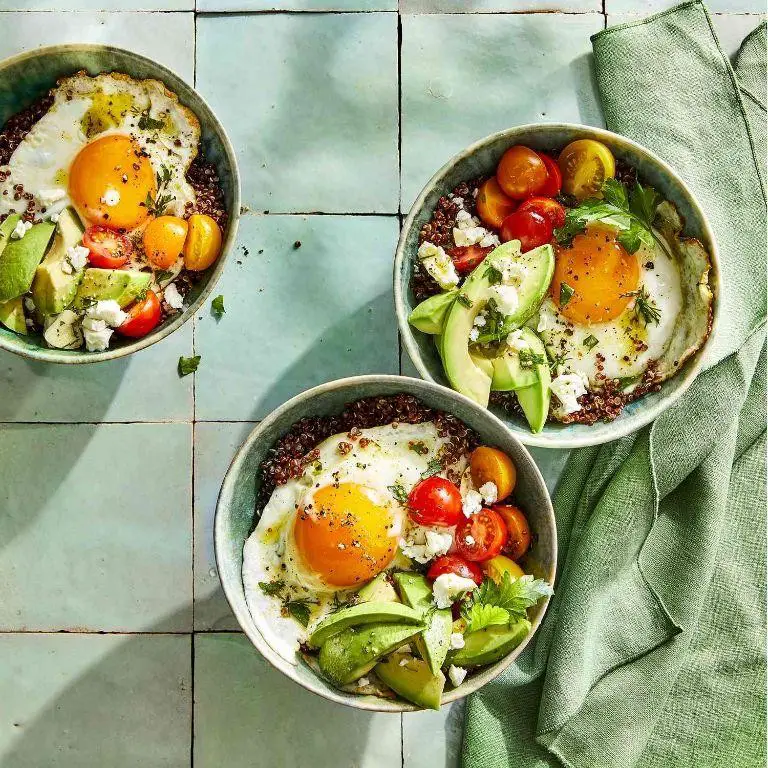
Breakfast has always been my favorite meal of the day, and there’s nothing quite like starting the morning with a dish that’s both nutritious and delicious. This Avocado and Egg Breakfast Bowl has become a staple in my kitchen, especially on those busy mornings when I need something quick yet satisfying.
Ingredients
- 1 ripe avocado (look for one that’s slightly soft to the touch)
- 2 large eggs (fresh eggs will give the best results)
- 1/2 cup cherry tomatoes, halved (or any small tomatoes you have on hand)
- 1 tbsp olive oil (or any neutral oil)
- Salt and pepper to taste (I like to use sea salt for extra flavor)
- 1/4 tsp red pepper flakes (optional, for a bit of heat)
- 1 tbsp fresh cilantro, chopped (parsley works too if you’re not a cilantro fan)
Instructions
- Heat the olive oil in a non-stick skillet over medium heat (about 350°F).
- While the skillet heats, crack the eggs into a small bowl to avoid shell pieces.
- Once the oil is shimmering, gently pour the eggs into the skillet. Cook for 3 minutes for runny yolks, or 5 minutes for set yolks.
- While the eggs cook, slice the avocado in half, remove the pit, and scoop the flesh into a bowl. Mash lightly with a fork.
- Add the halved cherry tomatoes to the skillet with the eggs during the last minute of cooking to warm them slightly.
- Season the avocado with salt, pepper, and red pepper flakes, then top with the cooked eggs and warmed tomatoes.
- Garnish with fresh cilantro before serving.
Rich in flavors and textures, this breakfast bowl combines the creaminess of avocado with the richness of eggs, all brightened up by the fresh tomatoes and cilantro. For an extra touch, serve it with a slice of toasted sourdough to scoop up every last bite.
Quinoa and Black Bean Salad

Deliciously fresh and packed with protein, this Quinoa and Black Bean Salad has become my go-to lunch during the busy workweek. It’s a dish that reminds me of the vibrant flavors I discovered on a trip to the Southwest, and now, I love whipping it up whenever I need a quick, nutritious meal that doesn’t skimp on taste.
Ingredients
- 1 cup quinoa, rinsed (for a fluffier texture)
- 2 cups water (or vegetable broth for extra flavor)
- 1 can (15 oz) black beans, drained and rinsed (to remove excess sodium)
- 1 cup corn kernels (fresh or frozen and thawed)
- 1 red bell pepper, diced (for a sweet crunch)
- 1/4 cup cilantro, chopped (or parsley if you’re not a cilantro fan)
- 2 tbsp olive oil (or any neutral oil)
- 1 lime, juiced (about 2 tbsp, adjust to taste)
- 1 tsp cumin (for a warm, earthy flavor)
- Salt and pepper to taste (start with 1/2 tsp salt)
Instructions
- In a medium saucepan, combine the quinoa and water. Bring to a boil over high heat, then reduce the heat to low, cover, and simmer for 15 minutes, or until the water is absorbed and the quinoa is tender.
- While the quinoa cooks, in a large bowl, mix together the black beans, corn, red bell pepper, and cilantro.
- Once the quinoa is done, fluff it with a fork and let it cool for 5 minutes to avoid wilting the vegetables when mixed.
- Add the slightly cooled quinoa to the bowl with the vegetables.
- In a small bowl, whisk together the olive oil, lime juice, cumin, salt, and pepper to create the dressing.
- Pour the dressing over the quinoa and vegetable mixture, and toss gently to combine everything evenly.
- Let the salad sit for 10 minutes before serving to allow the flavors to meld together beautifully.
Bright and hearty, this salad offers a delightful contrast of textures from the fluffy quinoa to the crisp bell pepper. Serve it chilled in a hollowed-out bell pepper for an edible bowl that’s as fun to eat as it is nutritious.
Grilled Chicken with Steamed Vegetables
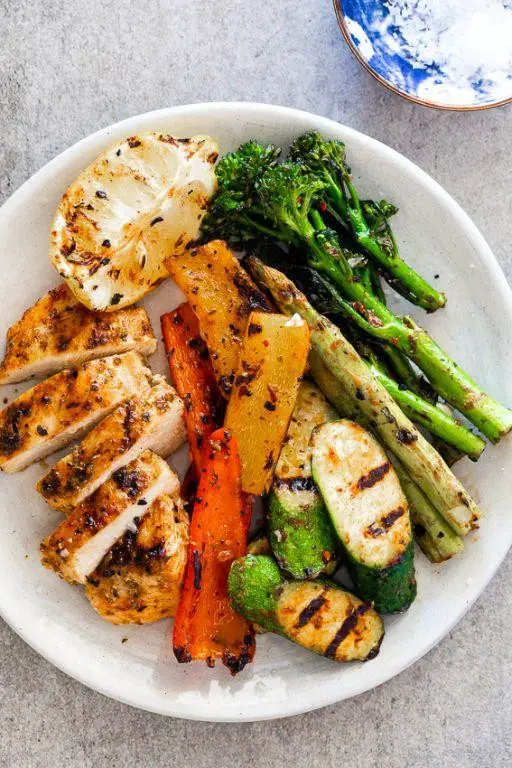
Today, as I was rummaging through my fridge, I realized it’s been a while since I made something both healthy and hearty. That’s when the idea of Grilled Chicken with Steamed Vegetables popped into my head—a dish that’s as nutritious as it is delicious, perfect for a summer evening.
Ingredients
- 2 boneless, skinless chicken breasts (about 1 lb total)
- 1 tbsp olive oil (or any neutral oil)
- 1 tsp salt (adjust to taste)
- 1/2 tsp black pepper (freshly ground preferred)
- 1 cup broccoli florets
- 1 cup carrots, sliced
- 1/2 cup water (for steaming)
Instructions
- Preheat your grill to medium-high heat (about 375°F to 400°F). Tip: A well-heated grill ensures juicy chicken with beautiful grill marks.
- While the grill heats, rub the chicken breasts with olive oil, then season both sides with salt and pepper.
- Place the chicken on the grill. Cook for 6-7 minutes on the first side, then flip and cook for another 5-6 minutes, or until the internal temperature reaches 165°F. Tip: Avoid pressing down on the chicken to keep it moist.
- Meanwhile, bring 1/2 cup of water to a boil in a pot fitted with a steamer basket. Add the broccoli and carrots, cover, and steam for 5 minutes, or until tender-crisp. Tip: Don’t overcook the veggies to retain their vibrant color and nutrients.
- Remove the chicken from the grill and let it rest for 5 minutes before slicing. This allows the juices to redistribute.
- Serve the grilled chicken alongside the steamed vegetables. Here’s how it turns out: the chicken is succulent with a smoky char, while the veggies are crisp and fresh. For an extra touch, drizzle with a bit of lemon juice or your favorite sauce.
Sweet Potato and Kale Hash

Just last weekend, I found myself staring into the abyss of my fridge, wondering what to whip up for brunch. That’s when this Sweet Potato and Kale Hash was born—a dish that’s as nourishing as it is delicious, perfect for those lazy weekend mornings or a quick weeknight dinner.
Ingredients
- 2 medium sweet potatoes, peeled and diced into 1/2-inch cubes (about 3 cups)
- 1 bunch kale, stems removed and leaves chopped (about 4 cups)
- 1 medium onion, diced (about 1 cup)
- 2 tbsp olive oil (or any neutral oil)
- 1/2 tsp smoked paprika (adjust to taste)
- 1/2 tsp garlic powder
- Salt and pepper to taste
- 2 eggs (optional, for serving)
Instructions
- Heat olive oil in a large skillet over medium heat (about 350°F).
- Add diced onions to the skillet, sautéing until translucent, about 3-4 minutes.
- Add sweet potatoes to the skillet, stirring to coat with oil. Cover and cook for 10 minutes, stirring occasionally, until they begin to soften.
- Sprinkle smoked paprika, garlic powder, salt, and pepper over the sweet potatoes, stirring to evenly distribute the spices.
- Add chopped kale to the skillet, mixing it in with the sweet potatoes. Cover and cook for an additional 5 minutes, or until the kale is wilted and the sweet potatoes are tender.
- If using eggs, make two wells in the hash and crack an egg into each. Cover the skillet and cook for 3-4 minutes, or until the eggs are cooked to your liking.
Here’s the thing about this hash—it’s got the perfect balance of sweet and savory, with a texture that’s both tender and slightly crispy. Serve it straight from the skillet for a rustic touch, or top with a fried egg for that extra protein punch.
Salmon with Asparagus and Lemon

This time of year always has me craving something light yet satisfying, and that’s exactly what this Salmon with Asparagus and Lemon delivers. I remember the first time I made this dish; it was a breezy spring evening, and the simplicity of the ingredients let their natural flavors shine through.
Ingredients
- 1 lb salmon fillet (skin-on for extra crispiness)
- 1 bunch asparagus, trimmed (about 1 lb)
- 2 tbsp olive oil (or any neutral oil)
- 1 lemon, thinly sliced (plus extra for serving)
- 1 tsp salt (adjust to taste)
- 1/2 tsp black pepper (freshly ground preferred)
- 2 cloves garlic, minced (for a fragrant touch)
Instructions
- Preheat your oven to 400°F (200°C) to ensure it’s hot enough for roasting.
- Line a baking sheet with parchment paper for easy cleanup, then arrange the salmon and asparagus in a single layer.
- Drizzle olive oil over the salmon and asparagus, then season with salt and black pepper. Tip: Rubbing the minced garlic onto the salmon before seasoning adds depth.
- Place lemon slices on top of the salmon for a citrusy aroma that infuses as it cooks.
- Roast in the preheated oven for 12-15 minutes, or until the salmon flakes easily with a fork and the asparagus is tender-crisp. Tip: Don’t overcrowd the pan to ensure everything cooks evenly.
- Serve immediately, garnished with additional lemon slices if desired. Tip: A sprinkle of fresh dill or parsley can add a pop of color and freshness.
With its buttery salmon, crisp-tender asparagus, and bright lemon notes, this dish is a celebration of spring flavors. I love serving it over a bed of quinoa or with a side of roasted baby potatoes for a more hearty meal.
Turkey and Spinach Stuffed Peppers
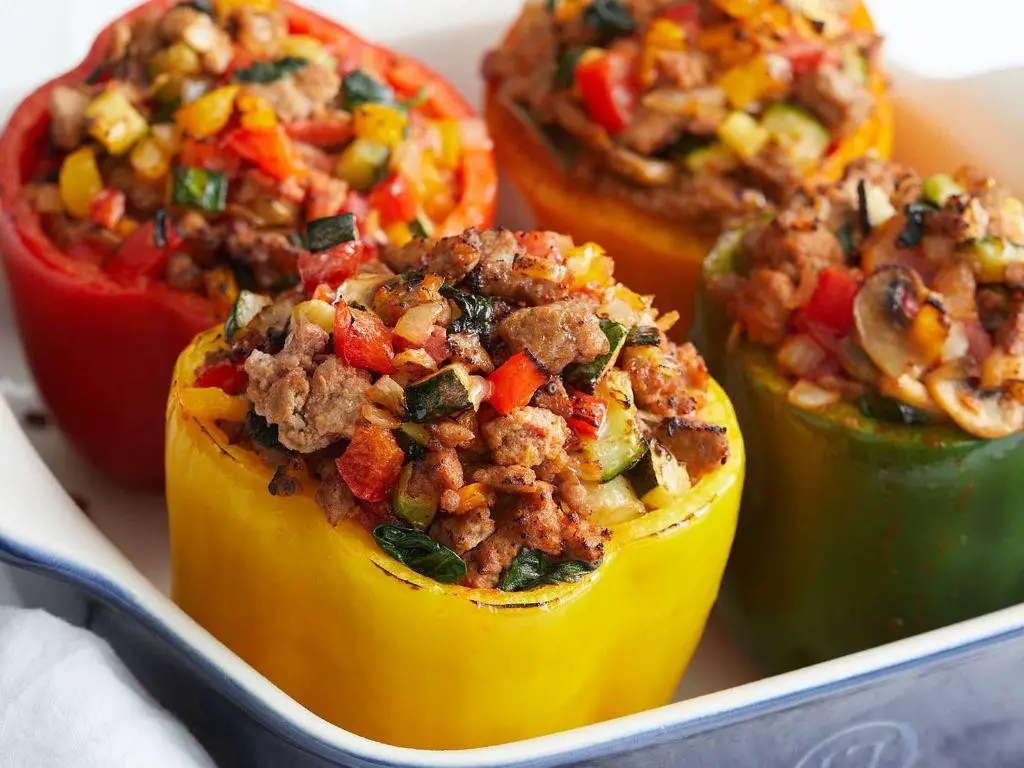
Over the years, I’ve found that stuffed peppers are the perfect canvas for experimenting with flavors, and this Turkey and Spinach Stuffed Peppers recipe is a testament to that. It’s a dish that brings comfort and nutrition to the table, especially on those busy weeknights when you want something hearty yet healthy.
Ingredients
- 4 large bell peppers, any color (tops cut off and seeds removed)
- 1 tbsp olive oil (or any neutral oil)
- 1 lb ground turkey (lean for healthier option)
- 2 cups fresh spinach, chopped (packed)
- 1 cup cooked quinoa (for added protein and texture)
- 1/2 cup shredded mozzarella cheese (plus extra for topping)
- 1 tsp garlic powder (adjust to taste)
- 1 tsp onion powder (adjust to taste)
- Salt and pepper to taste
- 1 cup marinara sauce (homemade or store-bought)
Instructions
- Preheat your oven to 375°F (190°C) and lightly grease a baking dish with olive oil.
- In a large skillet over medium heat, heat 1 tbsp olive oil and cook the ground turkey until no longer pink, about 5-7 minutes. Tip: Break the turkey into small pieces as it cooks for even browning.
- Add the chopped spinach, cooked quinoa, garlic powder, onion powder, salt, and pepper to the skillet. Stir well to combine and cook for another 2-3 minutes until the spinach wilts.
- Remove the skillet from heat and stir in 1/2 cup mozzarella cheese until melted and well incorporated.
- Stand the prepared bell peppers upright in the greased baking dish and evenly divide the turkey mixture among them. Tip: Press the filling down gently to pack it in without tearing the peppers.
- Top each stuffed pepper with marinara sauce and a sprinkle of additional mozzarella cheese.
- Bake in the preheated oven for 25-30 minutes, or until the peppers are tender and the cheese is bubbly and slightly golden. Tip: For extra browning, broil for the last 2-3 minutes, watching closely to prevent burning.
Delightfully, these stuffed peppers come out with a perfect balance of tender peppers and a savory, cheesy filling. Serve them alongside a crisp salad or over a bed of rice for an even more fulfilling meal.
Zucchini Noodles with Pesto
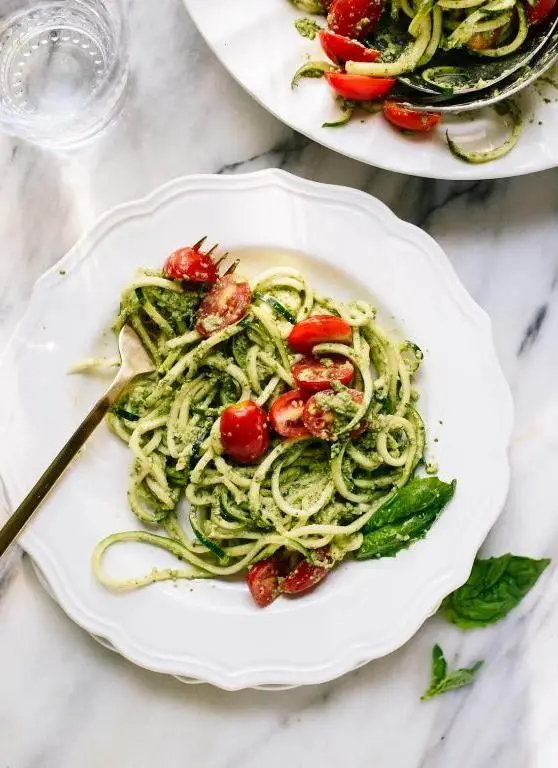
Unbelievably, it wasn’t until last summer that I discovered the magic of zucchini noodles, or ‘zoodles,’ as they’re affectionately called. I was drowning in zucchini from my garden and decided to give them a whirl with some homemade pesto—it was a game-changer. Now, it’s my go-to dish when I need something light yet satisfying, and it’s perfect for those days when you’re craving pasta but want to keep it low-carb.
Ingredients
- 2 medium zucchinis (spiralized into noodles)
- 1 cup fresh basil leaves (packed)
- 1/4 cup pine nuts (toasted for extra flavor)
- 1/2 cup grated Parmesan cheese (plus extra for serving)
- 1/2 cup olive oil (or any neutral oil)
- 2 garlic cloves (minced)
- Salt (adjust to taste)
- Black pepper (adjust to taste)
Instructions
- Start by spiralizing the zucchinis into noodles. If you don’t have a spiralizer, a julienne peeler works in a pinch.
- Toast the pine nuts in a dry skillet over medium heat for 2-3 minutes, or until golden brown. Keep an eye on them to prevent burning.
- In a food processor, combine the basil, toasted pine nuts, Parmesan, garlic, salt, and pepper. Pulse until finely chopped.
- With the processor running, slowly drizzle in the olive oil until the pesto is smooth. Taste and adjust seasoning if necessary.
- Heat a large skillet over medium heat. Add the zucchini noodles and cook for 2-3 minutes, just until they’re warmed through but still crisp.
- Remove the skillet from heat and toss the zucchini noodles with the pesto until evenly coated.
- Serve immediately, garnished with extra Parmesan cheese and a sprinkle of black pepper.
What I love most about this dish is how the freshness of the zucchini pairs perfectly with the rich, herby pesto. For an extra touch, try topping it with grilled chicken or shrimp for a protein-packed meal. It’s a dish that’s as versatile as it is delicious, and it’s sure to become a staple in your kitchen just like it has in mine.
Cauliflower Rice Stir Fry

Diving into the world of healthy eating doesn’t mean you have to sacrifice flavor, and my latest obsession, Cauliflower Rice Stir Fry, is proof of that. It’s a dish that came to me during one of those ‘I need to eat better but I’m craving something hearty’ moments, and it’s been a staple in my kitchen ever since.
Ingredients
- 1 large head of cauliflower, riced (about 4 cups)
- 2 tbsp olive oil (or any neutral oil)
- 1 cup diced carrots (for a sweet crunch)
- 1 cup frozen peas (thawed for even cooking)
- 2 cloves garlic, minced (because garlic makes everything better)
- 2 tbsp soy sauce (adjust to taste)
- 1 tsp sesame oil (for that authentic stir-fry flavor)
- 2 eggs, beaten (for protein)
- Salt and pepper to taste
Instructions
- Heat olive oil in a large skillet over medium-high heat (about 350°F).
- Add diced carrots and sauté for 3 minutes until slightly softened.
- Stir in minced garlic and cook for another 30 seconds until fragrant.
- Add riced cauliflower to the skillet, spreading it out evenly. Cook for 5 minutes, stirring occasionally, until it starts to brown.
- Push the cauliflower mixture to one side of the skillet. Pour beaten eggs into the other side and scramble until fully cooked, about 2 minutes.
- Mix the scrambled eggs with the cauliflower mixture. Add peas, soy sauce, and sesame oil. Stir well to combine and cook for another 2 minutes.
- Season with salt and pepper to taste, then remove from heat.
My favorite thing about this dish is how the cauliflower rice soaks up all the flavors, giving you a satisfying bite every time. Serve it topped with a fried egg for an extra layer of texture, or alongside some grilled chicken for a complete meal.
Greek Yogurt with Berries and Nuts

Remember those mornings when you’re craving something sweet yet healthy, but time isn’t on your side? That’s exactly how I stumbled upon this Greek Yogurt with Berries and Nuts recipe—a quick, nutritious fix that never fails to brighten my day.
Ingredients
- 1 cup Greek yogurt (opt for full-fat for creamier texture)
- 1/2 cup mixed berries (fresh or frozen, thawed)
- 2 tbsp honey (adjust to sweetness preference)
- 1/4 cup mixed nuts (almonds, walnuts, or your choice)
- 1 tsp vanilla extract (optional for extra flavor)
Instructions
- In a medium bowl, scoop 1 cup of Greek yogurt. Tip: Let the yogurt sit at room temperature for 5 minutes to soften slightly for easier mixing.
- Drizzle 2 tbsp of honey over the yogurt. Tip: Warm the honey for a few seconds if it’s too thick to drizzle easily.
- Add 1 tsp vanilla extract to the yogurt and honey mixture, stirring gently to combine. Tip: This step is optional but adds a lovely depth of flavor.
- Wash 1/2 cup of mixed berries and pat them dry if using fresh. If using frozen, ensure they’re thawed and any excess water is drained.
- Layer the berries over the yogurt mixture.
- Chop 1/4 cup of mixed nuts roughly and sprinkle them on top for a crunchy contrast.
- Serve immediately, or chill in the refrigerator for up to 2 hours if you prefer a cooler dish.
Velvety smooth yogurt paired with the juicy burst of berries and the satisfying crunch of nuts makes every spoonful a delight. Try serving it in a clear glass to showcase the beautiful layers, or mix everything together for a homely, comforting bowl.
Lentil Soup with Whole Grain Bread

Remember those chilly evenings when all you crave is something warm, hearty, and comforting? That’s exactly how I felt last week, which led me to whip up this incredibly satisfying Lentil Soup with Whole Grain Bread. It’s the kind of meal that feels like a hug in a bowl, especially when paired with a slice of toasted whole grain bread for dipping.
Ingredients
- 1 cup dried lentils (rinsed and drained)
- 1 tbsp olive oil (or any neutral oil)
- 1 medium onion, diced (about 1 cup)
- 2 carrots, diced (about 1 cup)
- 2 celery stalks, diced (about 1 cup)
- 3 garlic cloves, minced
- 6 cups vegetable broth (adjust saltiness to taste)
- 1 tsp ground cumin (toasted for extra flavor)
- 1/2 tsp smoked paprika
- Salt and pepper to taste
- 4 slices whole grain bread (for serving)
Instructions
- Heat olive oil in a large pot over medium heat until shimmering.
- Add diced onion, carrots, and celery. Cook, stirring occasionally, until vegetables soften, about 5 minutes.
- Stir in minced garlic, ground cumin, and smoked paprika. Cook for 1 minute until fragrant.
- Add rinsed lentils and vegetable broth. Bring to a boil, then reduce heat to low. Cover and simmer for 25 minutes, or until lentils are tender.
- Season with salt and pepper to taste. For a smoother texture, blend half of the soup and mix it back in.
- While the soup simmers, toast the whole grain bread until golden and crisp.
- Serve the soup hot with a slice of toasted whole grain bread on the side.
Just imagine the creamy texture of the lentils against the crunch of the toasted bread, with the smoky undertones of paprika and cumin tying it all together. This dish is perfect for a cozy night in, and leftovers taste even better the next day as the flavors meld together.
Baked Cod with Roasted Brussels Sprouts
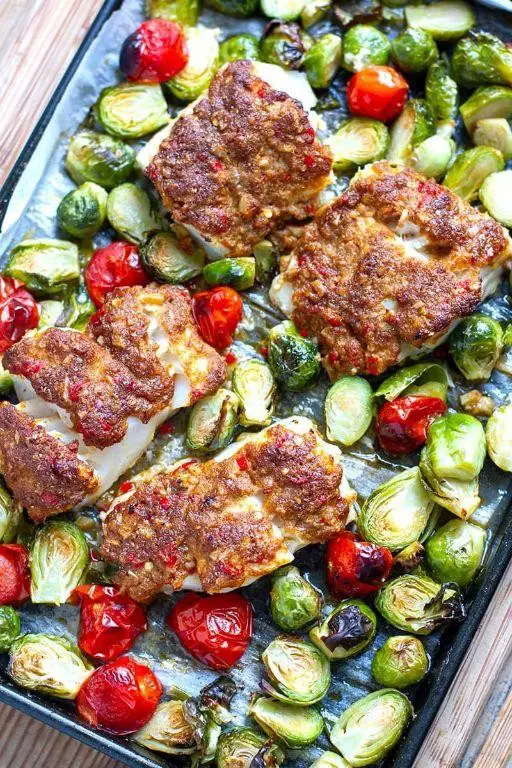
Zesty and fresh, this baked cod with roasted Brussels sprouts is a dish that brings the ocean’s bounty and the earth’s harvest together in a harmonious blend. I remember the first time I tried this combination; it was a chilly evening, and the warmth of the oven made my kitchen feel like a cozy haven.
Ingredients
- 1 lb cod fillets (thaw if frozen)
- 1 lb Brussels sprouts, halved (trim the stems)
- 2 tbsp olive oil (or any neutral oil)
- 1 tsp garlic powder (adjust to taste)
- 1/2 tsp salt (adjust to taste)
- 1/4 tsp black pepper (freshly ground preferred)
- 1 lemon, sliced (for garnish)
Instructions
- Preheat your oven to 400°F (200°C) to ensure it’s hot enough for roasting.
- Toss the halved Brussels sprouts with 1 tbsp olive oil, garlic powder, salt, and pepper on a baking sheet, spreading them out in a single layer for even cooking.
- Roast the Brussels sprouts in the preheated oven for 20 minutes, stirring halfway through, until they’re golden and crispy on the edges.
- While the sprouts roast, pat the cod fillets dry with paper towels to ensure a good sear, then season both sides with the remaining salt and pepper.
- After the sprouts have roasted for 20 minutes, push them to one side of the baking sheet and place the cod fillets on the other side. Drizzle the remaining 1 tbsp olive oil over the cod.
- Return the baking sheet to the oven and bake for 12-15 minutes, or until the cod is opaque and flakes easily with a fork.
- Garnish with lemon slices before serving to add a bright, citrusy note that complements the dish perfectly.
Wonderfully simple yet elegant, this dish offers a delightful contrast between the tender, flaky cod and the crispy, caramelized Brussels sprouts. Serve it over a bed of quinoa or with a side of crusty bread to soak up the lemony juices for a complete meal.
Chickpea and Spinach Curry

Many evenings, I find myself craving something hearty yet healthy, and that’s when this Chickpea and Spinach Curry comes to mind. It’s a dish that’s as nourishing as it is flavorful, perfect for those nights when you want to curl up with a bowl of something comforting without spending hours in the kitchen.
Ingredients
- 2 tbsp olive oil (or any neutral oil)
- 1 medium onion, finely chopped
- 3 garlic cloves, minced
- 1 tbsp ginger, grated (fresh is best)
- 1 tsp ground cumin
- 1 tsp ground coriander
- 1/2 tsp turmeric
- 1/4 tsp cayenne pepper (adjust to taste)
- 1 can (15 oz) chickpeas, drained and rinsed
- 1 can (14.5 oz) diced tomatoes
- 1 cup coconut milk (full fat for creaminess)
- 2 cups fresh spinach, roughly chopped
- Salt to taste
Instructions
- Heat olive oil in a large skillet over medium heat until shimmering.
- Add the chopped onion and sauté until translucent, about 5 minutes, stirring occasionally.
- Stir in the minced garlic and grated ginger, cooking for another minute until fragrant.
- Add the ground cumin, coriander, turmeric, and cayenne pepper, toasting the spices with the onion mixture for about 30 seconds to release their flavors.
- Pour in the diced tomatoes with their juices, stirring to combine with the spices and onions.
- Add the chickpeas and coconut milk, bringing the mixture to a gentle simmer. Let it cook uncovered for 10 minutes, allowing the flavors to meld.
- Fold in the fresh spinach and cook just until wilted, about 2 minutes. Season with salt to taste.
Rich in flavors and textures, this curry is a delightful mix of creamy coconut milk, hearty chickpeas, and vibrant spinach. Serve it over a bed of fluffy rice or with warm naan bread to soak up every last bit of the delicious sauce.
Beef and Broccoli Stir Fry
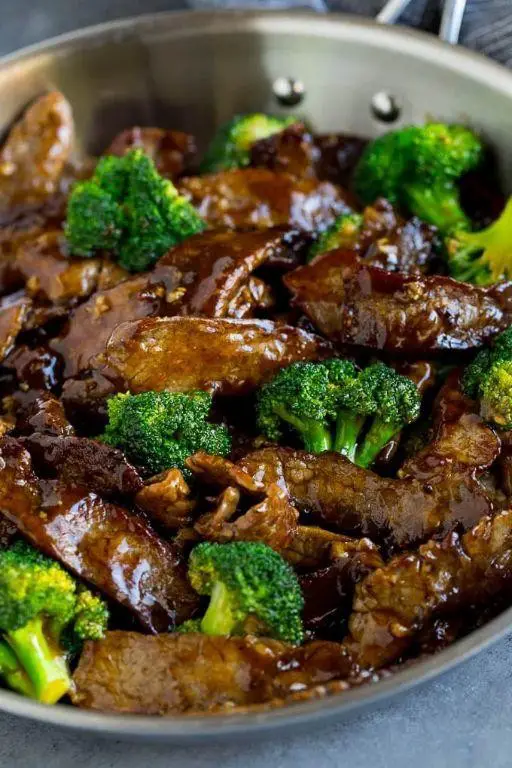
Nothing beats the comfort of a quick and flavorful stir fry after a long day, and my Beef and Broccoli Stir Fry is a weeknight hero in my kitchen. It’s a dish that brings back memories of my first attempt at cooking, where I learned the importance of high heat and quick cooking to keep the beef tender and the broccoli crisp.
Ingredients
- 1 lb flank steak, thinly sliced against the grain (freeze for 30 minutes for easier slicing)
- 3 cups broccoli florets (fresh or frozen, no need to thaw)
- 2 tbsp vegetable oil (or any neutral oil)
- 3 cloves garlic, minced (more if you love garlic)
- 1/4 cup soy sauce (low sodium preferred)
- 2 tbsp brown sugar (adjust to taste)
- 1 tbsp cornstarch (for thickening the sauce)
- 1/2 cup water (or beef broth for extra flavor)
- 1 tsp sesame oil (adds a nutty finish)
Instructions
- In a small bowl, whisk together soy sauce, brown sugar, cornstarch, and water until smooth. Set aside.
- Heat 1 tbsp vegetable oil in a large skillet or wok over high heat until shimmering.
- Add the beef in a single layer and cook undisturbed for 1 minute to sear, then stir-fry for another minute until just browned. Remove beef and set aside.
- In the same skillet, add remaining 1 tbsp oil and the broccoli. Stir-fry for 2 minutes until bright green but still crisp.
- Push the broccoli to the sides, add minced garlic to the center, and cook for 30 seconds until fragrant.
- Return the beef to the skillet, pour the sauce over, and stir everything together. Cook for 1-2 minutes until the sauce thickens and coats the beef and broccoli evenly.
- Drizzle with sesame oil, give it a final stir, and remove from heat.
Just like that, you’ve got a dish with the perfect balance of savory and sweet, with the beef meltingly tender and the broccoli with just the right amount of crunch. Serve it over a bed of steamed rice or noodles for a complete meal that’s sure to satisfy.
Shrimp and Avocado Salad
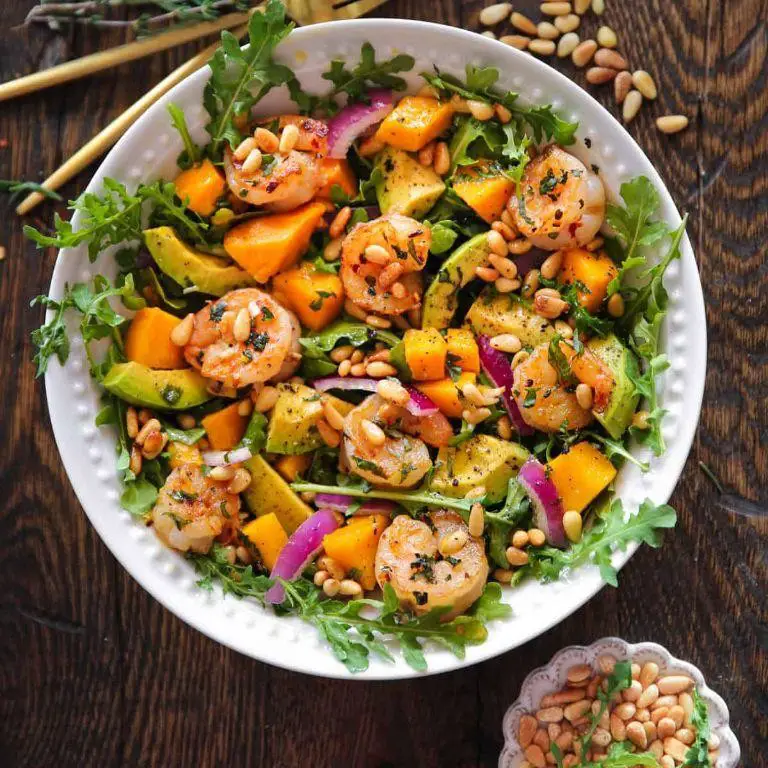
Kicking off the summer with a dish that’s as refreshing as a dip in the pool, this Shrimp and Avocado Salad has become my go-to for lazy weekend lunches. It’s a breeze to throw together, and the combination of creamy avocado with succulent shrimp is downright addictive.
Ingredients
- 1 lb shrimp, peeled and deveined (medium size works best)
- 2 ripe avocados, diced (look for slightly soft to the touch)
- 1/4 cup red onion, finely chopped (soak in cold water for 5 minutes to mellow the bite)
- 1/4 cup cilantro, chopped (or parsley if you’re not a cilantro fan)
- 2 tbsp lime juice (freshly squeezed for the best flavor)
- 1 tbsp olive oil (or any neutral oil)
- 1/2 tsp salt (adjust to taste)
- 1/4 tsp black pepper (freshly ground preferred)
Instructions
- In a large bowl, toss the shrimp with 1 tbsp olive oil, 1/4 tsp salt, and 1/8 tsp black pepper until evenly coated.
- Heat a large skillet over medium-high heat. Once hot, add the shrimp in a single layer. Cook for 2 minutes per side, or until the shrimp are pink and opaque. Tip: Don’t overcrowd the pan to ensure even cooking.
- Transfer the cooked shrimp to a plate and let them cool to room temperature, about 10 minutes. Tip: Cooling prevents the avocado from becoming mushy when mixed.
- In the same bowl used for the shrimp, combine the diced avocado, red onion, cilantro, lime juice, remaining salt, and black pepper. Gently toss to mix. Tip: Add the avocado last to keep it from breaking apart too much.
- Add the cooled shrimp to the avocado mixture and gently fold together until just combined.
Perfect for those who love a meal that’s both light and satisfying, this salad boasts a delightful contrast between the creamy avocado and the tender shrimp. Serve it on a bed of mixed greens for an extra crunch or scoop it up with some crispy tortilla chips for a fun twist.
Vegetable and Tofu Stir Fry
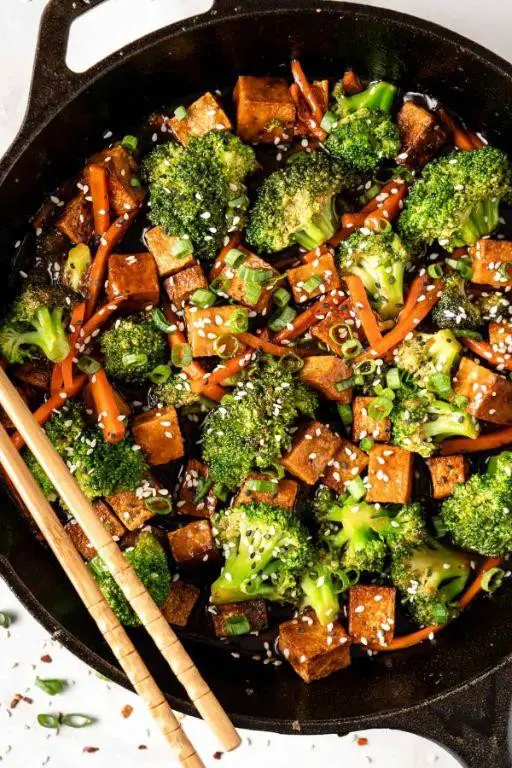
Zesty flavors and vibrant colors come together in this Vegetable and Tofu Stir Fry, a dish that’s as pleasing to the eye as it is to the palate. I remember the first time I whipped this up on a whim, using whatever veggies I had in the fridge, and it’s been a staple in my kitchen ever since.
Ingredients
- 1 block firm tofu, pressed and cubed (for better texture)
- 2 tbsp vegetable oil (or any neutral oil)
- 1 cup broccoli florets (fresh or frozen)
- 1 bell pepper, sliced (any color you prefer)
- 2 carrots, julienned (for a sweet crunch)
- 3 tbsp soy sauce (adjust to taste)
- 1 tbsp sesame oil (for aroma)
- 2 cloves garlic, minced (because garlic makes everything better)
- 1 tsp ginger, grated (fresh is best)
- 1/2 tsp red pepper flakes (optional, for heat)
Instructions
- Heat vegetable oil in a large skillet or wok over medium-high heat until shimmering, about 1 minute.
- Add cubed tofu in a single layer and cook until golden brown on all sides, about 3-4 minutes per side. Tip: Don’t overcrowd the pan to ensure even browning.
- Remove tofu from the skillet and set aside on a plate lined with paper towels to drain excess oil.
- In the same skillet, add a bit more oil if needed, then toss in garlic and ginger, stirring for about 30 seconds until fragrant.
- Add broccoli, bell pepper, and carrots to the skillet. Stir-fry for 5-6 minutes until vegetables are crisp-tender. Tip: Keep the heat high to prevent the veggies from becoming soggy.
- Return the tofu to the skillet, drizzle with soy sauce and sesame oil, and sprinkle red pepper flakes if using. Toss everything together and cook for another 2 minutes to combine flavors. Tip: A splash of water can help deglaze the pan and create a light sauce.
- Serve hot over a bed of steamed rice or noodles for a complete meal.
Bursting with textures from the crispy tofu to the crunchy vegetables, this stir-fry is a symphony of flavors. Try garnishing with sesame seeds or sliced green onions for an extra pop of color and taste.
Whole Wheat Pasta with Marinara Sauce
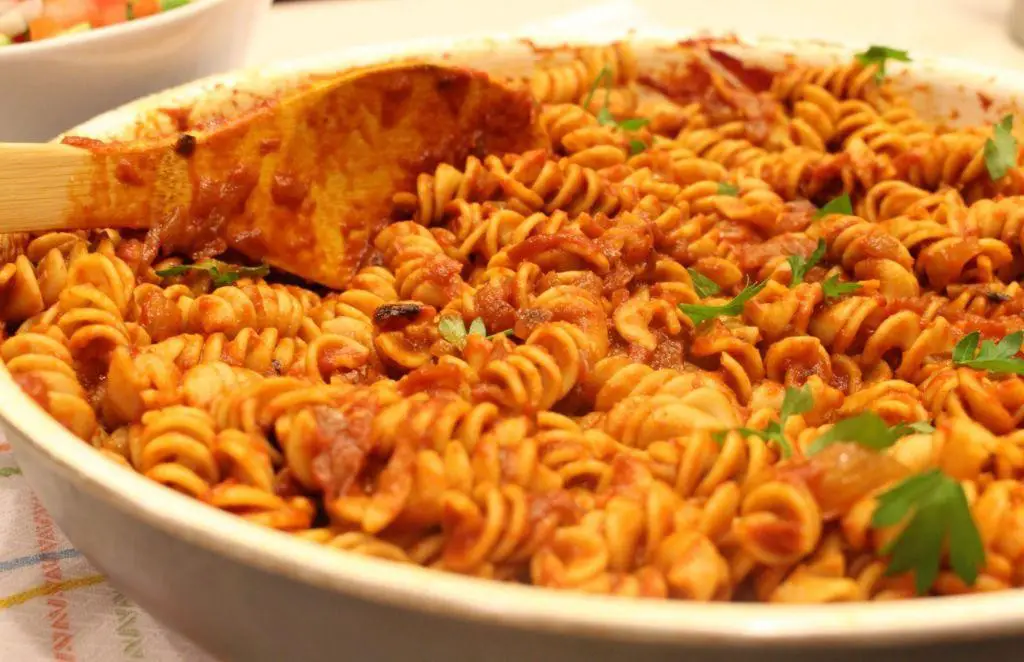
How many times have I found myself staring into the pantry, craving something comforting yet wholesome? That’s how this whole wheat pasta with marinara sauce became a staple in my kitchen. It’s the perfect blend of hearty and healthy, with a sauce that’s both rich and vibrant.
Ingredients
- 8 oz whole wheat pasta (or any pasta of your choice)
- 2 tbsp olive oil (or any neutral oil)
- 3 cloves garlic, minced (adjust to taste)
- 1 can (28 oz) crushed tomatoes (San Marzano for best flavor)
- 1 tsp dried basil (fresh basil works too, double the amount)
- 1/2 tsp salt (adjust to taste)
- 1/4 tsp black pepper (freshly ground preferred)
- 1/4 tsp red pepper flakes (optional, for a bit of heat)
Instructions
- Bring a large pot of salted water to a boil over high heat. Tip: Salting the water flavors the pasta from the inside out.
- Add the whole wheat pasta to the boiling water and cook according to package instructions, usually about 8-10 minutes, until al dente.
- While the pasta cooks, heat olive oil in a large skillet over medium heat. Add minced garlic and sauté for about 1 minute, until fragrant but not browned. Tip: Overcooking garlic can make it bitter.
- Stir in the crushed tomatoes, dried basil, salt, black pepper, and red pepper flakes. Bring the sauce to a simmer, then reduce the heat to low and let it cook for about 10 minutes, stirring occasionally. Tip: Simmering the sauce deepens the flavors.
- Drain the pasta, reserving 1/2 cup of the pasta water. Add the drained pasta to the skillet with the marinara sauce, tossing to combine. If the sauce is too thick, add a little of the reserved pasta water to loosen it.
Kind of magical how simple ingredients come together to create something so satisfying, isn’t it? The whole wheat pasta adds a nutty depth that pairs beautifully with the bright, tangy marinara. Serve it with a sprinkle of Parmesan and a side of garlic bread for a meal that feels like a hug.
Grilled Fish Tacos with Cabbage Slaw

Every summer, I find myself craving something light yet satisfying, and that’s when these grilled fish tacos with cabbage slaw come to the rescue. There’s something about the smoky fish paired with the crisp slaw that just screams summer to me, and I bet you’ll feel the same way after trying them.
Ingredients
- 1 lb white fish fillets (like cod or tilapia, skinless)
- 2 tbsp olive oil (or any neutral oil)
- 1 tsp chili powder (adjust to taste)
- 1/2 tsp garlic powder
- 1/2 tsp cumin
- Salt to taste
- 8 small corn tortillas
- 2 cups shredded cabbage (green or purple)
- 1/4 cup mayonnaise
- 1 tbsp lime juice
- 1/4 cup chopped cilantro
Instructions
- Preheat your grill to medium-high heat, about 375°F.
- In a small bowl, mix together olive oil, chili powder, garlic powder, cumin, and salt. Brush this mixture evenly over both sides of the fish fillets.
- Grill the fish for about 3-4 minutes per side, or until it flakes easily with a fork. Tip: Don’t flip the fish more than once to keep it from falling apart.
- While the fish is grilling, warm the tortillas on the grill for about 30 seconds per side. Keep them wrapped in a clean towel to stay warm.
- In a medium bowl, toss the shredded cabbage with mayonnaise, lime juice, and cilantro until well coated. Tip: Let the slaw sit for a few minutes to soften slightly.
- Flake the grilled fish into large pieces. Assemble the tacos by placing fish on each tortilla and topping with the cabbage slaw. Tip: Add a squeeze of lime juice on top for extra freshness.
These tacos are all about the contrast between the tender, smoky fish and the crunchy, tangy slaw. I love serving them with an extra lime wedge on the side for that perfect finishing touch.
Berry and Spinach Smoothie

After a long morning of chasing deadlines, I found myself craving something refreshing yet nutritious to kickstart my day. That’s when I stumbled upon the idea of a Berry and Spinach Smoothie, a vibrant blend that’s as pleasing to the eye as it is to the palate.
Ingredients
- 1 cup frozen mixed berries (strawberries, blueberries, raspberries—no need to thaw)
- 1 cup fresh spinach, tightly packed (baby spinach works best for a milder taste)
- 1 banana, peeled and sliced (for natural sweetness and creaminess)
- 1/2 cup Greek yogurt (or any yogurt you prefer, for a protein boost)
- 1 cup almond milk (adjust for desired thickness)
- 1 tbsp honey (optional, adjust to taste)
Instructions
- Add the frozen mixed berries, fresh spinach, sliced banana, Greek yogurt, and almond milk into a high-powered blender.
- Blend on high for 30 seconds, then pause to scrape down the sides with a spatula to ensure everything is incorporated evenly.
- If the smoothie is too thick, add a splash more almond milk and blend again for 10 seconds. Tip: For a colder smoothie, add a few ice cubes before blending.
- Taste the smoothie and, if desired, add honey for extra sweetness. Blend for another 5 seconds to combine.
- Pour the smoothie into a tall glass and serve immediately. Tip: Garnish with a few fresh berries or a spinach leaf on top for an Instagram-worthy presentation.
This Berry and Spinach Smoothie is wonderfully creamy with a perfect balance of sweetness and tartness from the berries. The spinach adds a nutritional punch without overpowering the flavors, making it a great way to sneak in some greens. Try serving it with a sprinkle of granola on top for added crunch.
Conclusion
Concluding our culinary journey, these 18 rehab recipes are not just healthy but bursting with flavor, proving that nutritious eating can be delicious. We invite you to whip up these dishes, share your favorites in the comments, and spread the love by pinning this article on Pinterest. Happy cooking!