Picture this: a golden, juicy rotisserie chicken ready to transform into a week’s worth of mouthwatering meals. Whether you’re craving quick dinners, seasonal favorites, or cozy comfort food, these 18 delicious rotisserie recipes have got you covered for every occasion. Dive in and discover how easy it is to turn that humble bird into something truly spectacular. Let’s get cooking!
Classic Rotisserie Chicken with Herbs
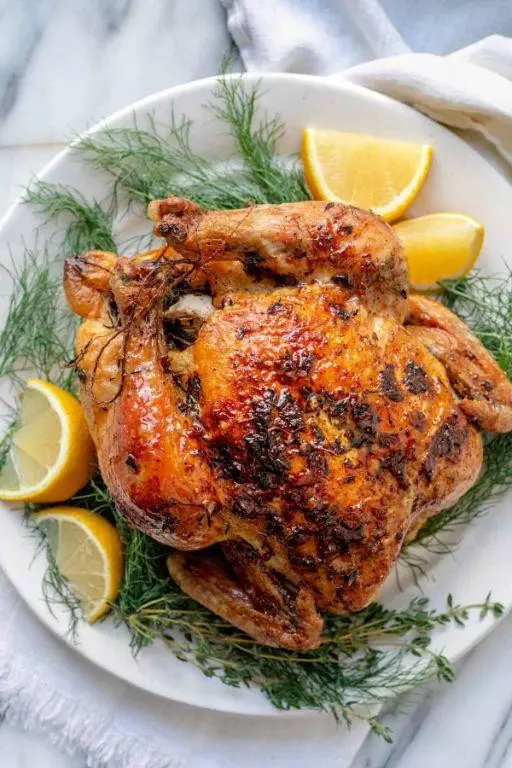
Let’s face it, nothing says ‘I’ve got my life together’ quite like pulling a golden, herb-scented rotisserie chicken out of the oven. It’s the culinary equivalent of a mic drop.
Ingredients
- 1 whole chicken (about 4 lbs), because size matters
- A generous glug of olive oil, for that slick look
- A couple of garlic cloves, minced, because vampires
- A handful of fresh rosemary, because we’re fancy
- A handful of fresh thyme, for that earthy vibe
- 1 lemon, halved, for a zesty punch
- Salt and pepper, to make it taste like food
Instructions
- Preheat your oven to 375°F. No rushing greatness.
- Pat the chicken dry with paper towels. A dry chicken is a crispy chicken.
- Rub the chicken all over with olive oil. Think of it as a spa treatment.
- Season the chicken inside and out with salt and pepper. Don’t be shy.
- Stuff the cavity with the garlic, rosemary, thyme, and lemon halves. It’s like a surprise party inside.
- Truss the chicken legs with kitchen twine. Keep it classy.
- Roast for about 1 hour and 15 minutes, or until the juices run clear when you poke the thigh. Patience is a virtue.
- Let it rest for 10 minutes before carving. Good things come to those who wait.
Perfectly juicy with a crispy skin that’s herby and bright, this chicken is begging to be the star of your next dinner table drama. Serve it with a side of roasted veggies or shred it for tacos that’ll make your Tuesday feel like a Friday.
Rotisserie Pork Loin with Apple Glaze
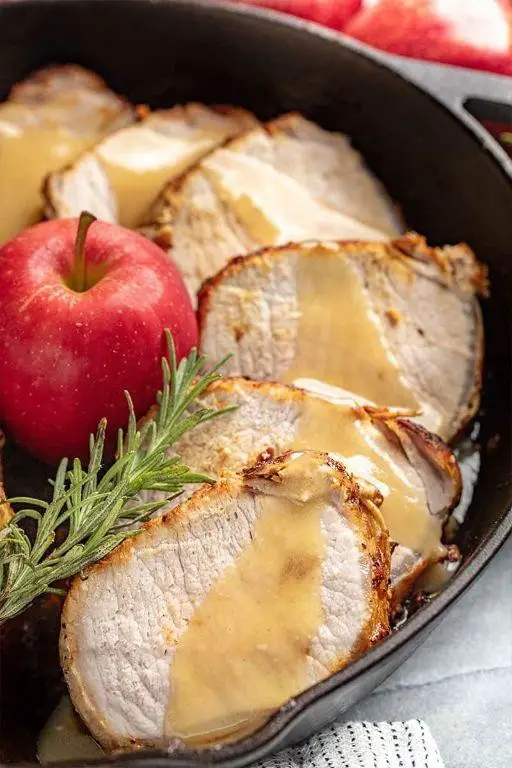
Now, who said pork loin had to be boring? Not us, especially when it’s spinning to golden perfection on a rotisserie and slathered with a sweet-tangy apple glaze that’ll have your taste buds doing a happy dance. This dish is the weeknight hero you didn’t know you needed, turning the humble pork loin into a showstopper with minimal fuss.
Ingredients
- 1 pork loin (about 3 lbs), because size matters when it comes to leftovers
- A generous glug of olive oil, for that slick, non-stick magic
- 2 cups apple juice, the secret behind that sticky-sweet glaze
- 1/4 cup brown sugar, for a touch of caramelized goodness
- A couple of garlic cloves, minced, because garlic makes everything better
- 1 tbsp Dijon mustard, for a little tangy kick
- A pinch of salt and pepper, to season like a pro
Instructions
- Preheat your rotisserie to a toasty 375°F. No rotisserie? No problem. Your oven on a rack works too, but where’s the fun in that?
- Rub the pork loin all over with olive oil, then season it with salt and pepper. Think of it as giving the pork a spa treatment.
- Skewer the pork loin onto the rotisserie spit, making sure it’s balanced so it spins like a dream. Imbalance leads to uneven cooking, and we’re all about that even golden crust.
- While the pork starts its spin, mix apple juice, brown sugar, minced garlic, and Dijon mustard in a saucepan. Bring to a simmer over medium heat, then reduce to low and let it thicken into a glaze, about 15 minutes. Stir occasionally unless you enjoy scrubbing burnt sugar off your pan.
- After the pork has been spinning for about 30 minutes, start brushing it with the apple glaze every 10 minutes. This builds layers of flavor and ensures a sticky, caramelized exterior.
- Cook until the pork reaches an internal temperature of 145°F, about 1 to 1.5 hours total. Yes, a meat thermometer is your best friend here.
- Let the pork rest for 10 minutes before slicing. This keeps all those juicy juices right where they belong—inside the meat.
Finally, this rotisserie pork loin with apple glaze is a masterpiece of juicy tenderness with a caramelized crust that’s downright addictive. Serve it sliced over a bed of creamy mashed potatoes or chop it up for next-level pork sandwiches. Either way, it’s a win.
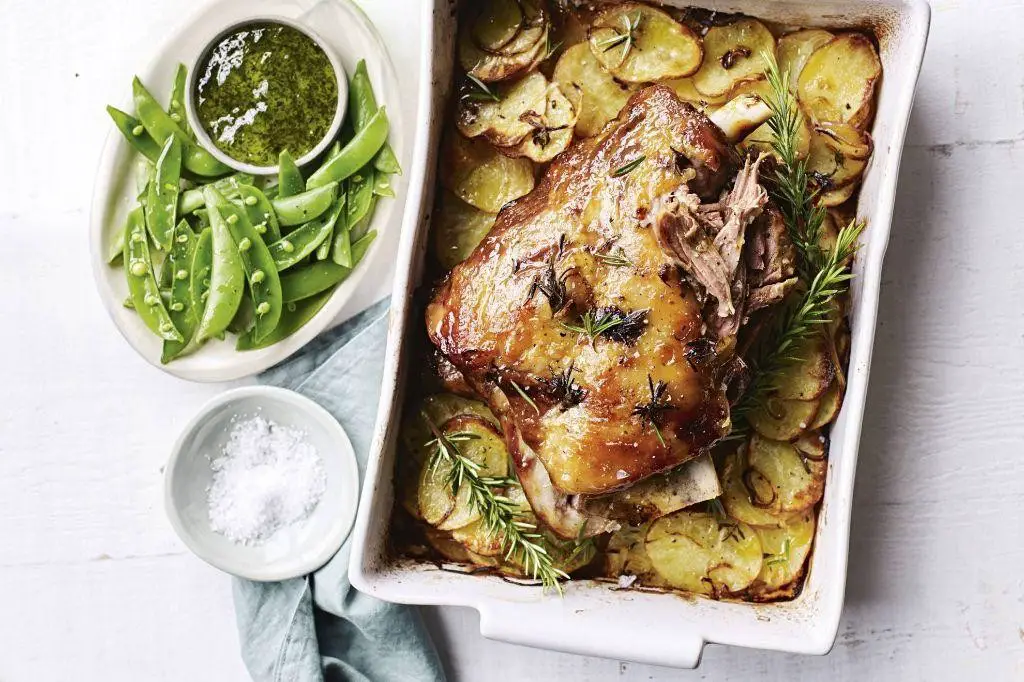
Garlic and Herb Rotisserie Lamb
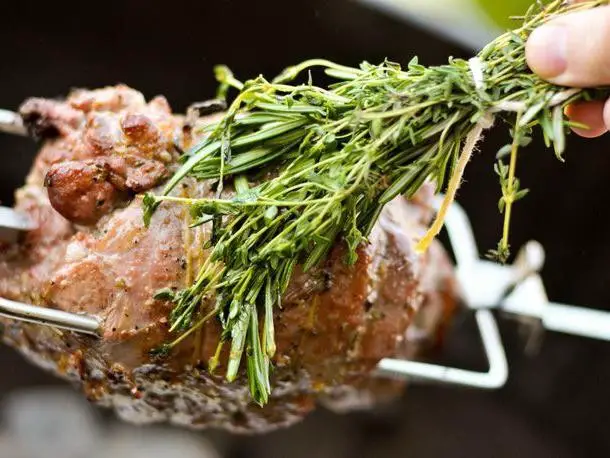
Get ready to turn your kitchen into a gourmet lamb haven with this Garlic and Herb Rotisserie Lamb recipe that’s so flavorful, it’ll have your taste buds dancing the tango!
Ingredients
- A 5-pound leg of lamb (because bigger is always better, right?)
- A generous glug of olive oil (about 1/4 cup)
- A handful of fresh rosemary (because dried herbs are so last season)
- A couple of garlic cloves, minced (or more, we don’t judge)
- A splash of lemon juice (about 2 tbsp, for that zesty kick)
- A pinch of salt and pepper (to make everything nice and snazzy)
Instructions
- Preheat your rotisserie to a toasty 350°F because we’re not cooking this lamb in a sauna.
- While the rotisserie heats up, mix the olive oil, rosemary, garlic, lemon juice, salt, and pepper in a bowl like you’re concocting a magic potion.
- Rub this herby goodness all over the lamb, making sure every nook and cranny is covered. Tip: Use your hands for this – it’s messy but oh-so-satisfying.
- Skewer the lamb onto the rotisserie spit, securing it tightly so it doesn’t pull a Houdini during cooking.
- Let it spin and sizzle for about 2 hours, or until the internal temperature hits a perfect 145°F for medium-rare. Tip: Use a meat thermometer unless you’re into guessing games.
- Once done, let the lamb rest for 15 minutes. This isn’t just a suggestion – it’s the secret to juicy meat. Tip: Cover it loosely with foil to keep it warm without steaming.
How about that? You’ve just made a lamb that’s crispy on the outside, tender on the inside, and packed with flavors that’ll make your dinner guests think you’ve been hiding a chef’s hat. Serve it with a side of roasted veggies or slice it up for the most epic sandwiches ever.
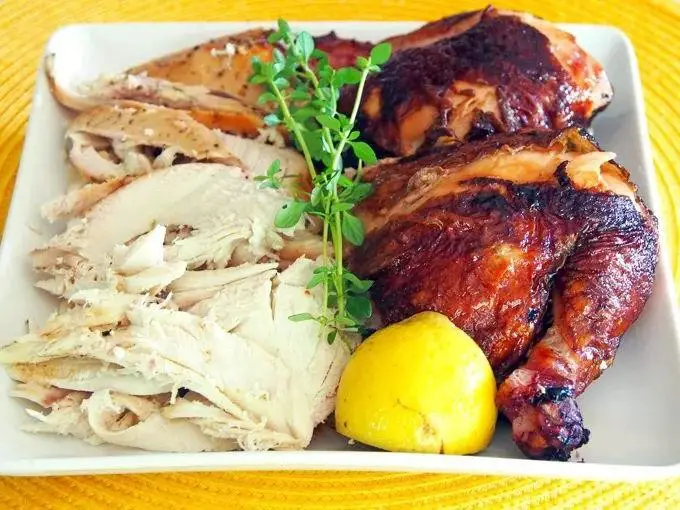
Rotisserie Turkey Breast with Cranberry Sauce
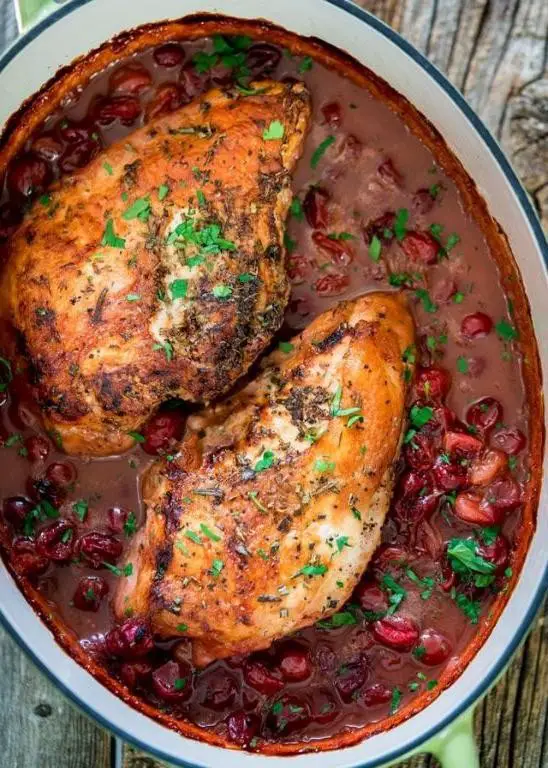
Just when you thought turkey was only for Thanksgiving, here comes this rotisserie turkey breast with cranberry sauce to shake up your weeknight dinner routine. It’s like the holiday came early, minus the stress and the in-laws.
Ingredients
- A 3 to 4-pound turkey breast (because size does matter)
- A couple of tablespoons of olive oil (for that golden glow)
- A generous sprinkle of salt and pepper (the dynamic duo)
- A splash of orange juice (for a little zing)
- A cup of cranberry sauce (homemade or store-bought, no judgment here)
Instructions
- Preheat your rotisserie to 325°F. Like preheating your heart for love, but for turkey.
- Rub the turkey breast all over with olive oil. Think of it as applying sunscreen before a beach day.
- Season the turkey with salt and pepper. Don’t be shy; this bird can handle it.
- Skewer the turkey breast onto the rotisserie spit. Secure it tightly, unless you enjoy a game of ‘catch the flying turkey’.
- Cook for about 1.5 to 2 hours, or until the internal temperature hits 165°F. Use a meat thermometer; guessing games are for carnival midways.
- In the last 10 minutes of cooking, brush the turkey with orange juice for a glossy finish. It’s like the turkey’s final touch-up before its big debut.
- Let the turkey rest for 10 minutes before slicing. Good things come to those who wait, especially juicy turkey.
- Serve with cranberry sauce on the side or drizzled on top. Because every superstar needs a good sidekick.
Flaky on the outside, juicy on the inside, and that cranberry sauce? It’s the tangy cherry on top of this succulent masterpiece. Try serving it over a bed of wild rice or alongside some roasted Brussels sprouts for a meal that’ll have everyone asking for seconds.
Spicy Rotisserie Chicken Wings
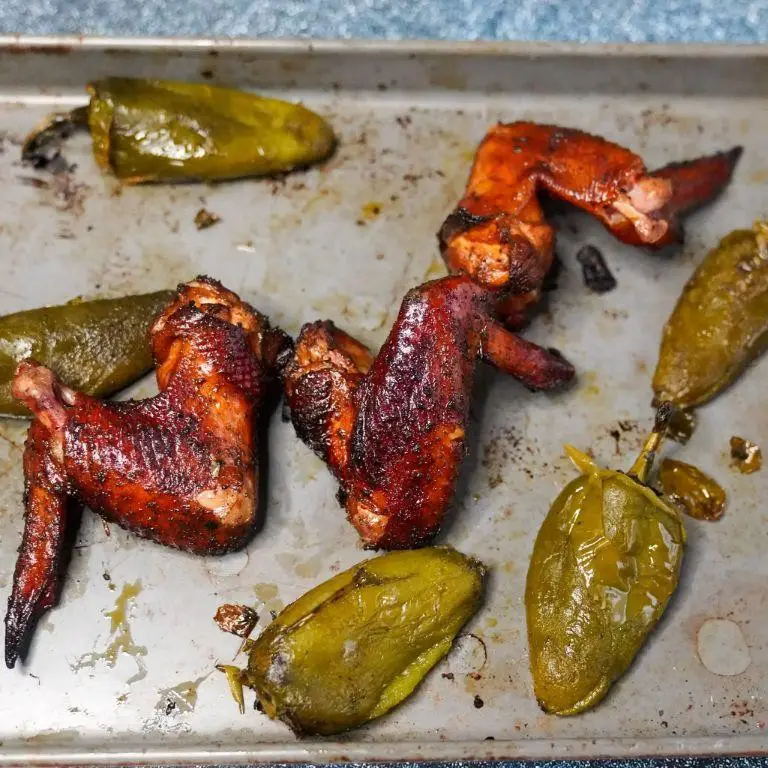
Let’s face it, your taste buds are bored, and these Spicy Rotisserie Chicken Wings are here to save the day—like a flavor superhero, but with more crunch and less cape.
Ingredients
- 2 lbs of chicken wings (because size does matter)
- A generous glug of olive oil (about 2 tbsp)
- A couple of garlic cloves, minced (unless you’re avoiding vampires)
- A splash of soy sauce (2 tbsp, for that umami kick)
- 1 tbsp of smoked paprika (for a whisper of the BBQ pit)
- 1 tsp of cayenne pepper (turn up the heat, or not, we don’t judge)
- A pinch of salt (because even wings need a little love)
- 1/2 cup of honey (for that sweet, sweet embrace)
Instructions
- Preheat your oven to 375°F (190°C)—no wing left behind means even cooking.
- In a bowl, toss the wings with olive oil, garlic, soy sauce, paprika, cayenne, and salt until they’re dressed to impress. Tip: Use your hands for this—it’s messy but effective.
- Spread the wings on a baking sheet in a single layer. Crowding is for elevators, not chicken wings.
- Roast for 25 minutes, then flip each wing with the care of a pancake you’re not about to ruin. Tip: This is the perfect time to admire your handiwork.
- Brush the wings with honey and return to the oven for another 10 minutes, until they’re sticky, golden, and irresistible. Tip: Keep an eye out—honey burns faster than your last diet resolution.
- Let them rest for 5 minutes. Patience is a virtue, especially when it prevents mouth burns.
Kick back and behold: these wings are a crispy, sticky, spicy-sweet masterpiece. Serve them with a side of cool ranch or blue cheese dressing to tame the heat, or go rogue and drizzle with extra honey for the brave souls.
Rotisserie Beef Ribs with BBQ Sauce

Oh boy, are you in for a treat with these rotisserie beef ribs slathered in BBQ sauce that’ll have your taste buds doing the cha-cha! Perfect for those days when you want to impress without the stress, this dish is all about big flavors and even bigger smiles.
Ingredients
- A couple of beef ribs (about 2 pounds)
- A generous glug of olive oil
- A splash of apple cider vinegar
- 1 cup of your favorite BBQ sauce
- A pinch of salt and a bigger pinch of black pepper
- 2 cloves of garlic, minced (because garlic is life)
Instructions
- Preheat your rotisserie to a toasty 350°F because we’re not cooking ice cubes here.
- Rub those beef ribs down with olive oil like you’re applying sunscreen at the beach—every inch needs love.
- Sprinkle the salt, pepper, and minced garlic over the ribs, massaging it in like it’s a tiny spa day for them.
- Skewer the ribs onto the rotisserie spit, making sure they’re secure so they don’t go flying—safety first, folks.
- Let them spin and sizzle for about 1.5 hours, or until they’re so tender they practically wave hello.
- Brush on the BBQ sauce during the last 15 minutes, adding layers like you’re painting a masterpiece.
- Once they’re gloriously sticky and caramelized, take them off the heat and let them rest for 5 minutes—patience is a virtue, especially with ribs.
Heavenly doesn’t even begin to cover it—these ribs are fall-off-the-bone tender with a smoky sweetness that’s downright addictive. Serve them up with a side of coleslaw or go rogue and pile them high on a toasted bun for a sandwich that means business.
Honey Glazed Rotisserie Duck
Zesty and bold, this honey glazed rotisserie duck is about to become the star of your dinner table, turning an ordinary evening into a feast fit for royalty. With a crispy skin that whispers sweet nothings of honey and a meat so tender it practically begs to be devoured, this dish is a playful twist on classic comfort.
Ingredients
- 1 whole duck, because going half is never an option
- A generous glug of honey, for that sweet, sweet love
- A couple of garlic cloves, minced, to keep things interesting
- A splash of soy sauce, for that umami kick
- A pinch of salt and pepper, because seasoning is key
- 1 tbsp of olive oil, to keep things slick
Instructions
- Preheat your rotisserie to 325°F, because patience is a virtue, especially in cooking.
- Rub the duck all over with olive oil, then season with salt and pepper. This is your moment to give it some love.
- In a small bowl, mix together honey, minced garlic, and soy sauce. This glaze is the secret handshake to flavor town.
- Carefully place the duck on the rotisserie spit, ensuring it’s secure. We’re aiming for a spin, not a splat.
- Cook for about 2 hours, basting with the glaze every 30 minutes. This is where the magic happens, turning good into great.
- Check the internal temperature with a meat thermometer; it should read 165°F in the thickest part. No guesswork here, just science.
- Let the duck rest for 10 minutes before carving. This isn’t just a suggestion; it’s a commandment for juicy meat.
How does it turn out? Imagine a crust so crackly it sings, with meat that falls off the bone in juicy, flavorful shreds. Serve it atop a wild rice pilaf or, for the bold, shred it into tacos for a duck twist on taco Tuesday.
Rotisserie Cornish Hens with Rosemary

Yikes, it’s already 2025, and if you’re anything like me, you’re probably still trying to figure out how to impress your dinner guests without spending all day in the kitchen. Enter the rotisserie Cornish hens with rosemary – your new go-to for a dish that’s as easy as it is elegant.
Ingredients
- A couple of Cornish hens, because one is never enough
- A splash of olive oil, for that golden crisp we all crave
- A handful of fresh rosemary sprigs, because dried herbs are so last decade
- A pinch of salt and pepper, to make everything right in the world
- A teaspoon of garlic powder, for that kick
Instructions
- Preheat your rotisserie to 375°F – no guessing games here.
- Give those hens a good rub down with olive oil, salt, pepper, and garlic powder. Think of it as a spa day for your poultry.
- Stuff the cavity with rosemary sprigs – this is where the magic happens.
- Secure the hens on the rotisserie spit, making sure they’re balanced so they cook evenly. Tip: If they’re wobbling, they’re not happy.
- Let them spin and sizzle for about 1 hour or until the internal temperature hits 165°F. Tip: No thermometer? The juices should run clear when you poke the thigh.
- Let them rest for 10 minutes before serving – patience is a virtue, especially when it comes to juicy meat.
Unbelievably juicy with a crispy skin that’s packed with flavor, these hens are begging to be the star of your next dinner party. Serve them on a platter with the rosemary sprigs as a garnish, and watch as your guests marvel at your culinary prowess.
Lemon Pepper Rotisserie Chicken
Picture this: a golden, juicy rotisserie chicken, its skin crackling with the zesty punch of lemon and the bold kick of pepper, ready to steal the show at your dinner table. It’s the kind of dish that makes you want to do a little happy dance while no one’s watching.
Ingredients
- 1 whole rotisserie chicken (because we’re keeping it easy and delicious)
- A generous glug of olive oil (about 2 tbsp)
- The zest and juice of 2 lemons (for that sunny vibe)
- A couple of tbsp of freshly ground black pepper (because we’re not messing around)
- A pinch of salt (to make everything pop)
- A splash of water (just to keep things moist)
Instructions
- Preheat your oven to 375°F because we’re about to get this party started.
- Place your rotisserie chicken on a baking dish. Drizzle it with olive oil like you’re anointing it the king of dinner.
- Sprinkle the chicken with lemon zest, black pepper, and salt. Rub it in like you’re giving the chicken a relaxing spa treatment.
- Squeeze the lemon juice over the chicken, making sure every inch gets a taste of that citrusy goodness.
- Add a splash of water to the bottom of the dish to keep the chicken moist while it reheats.
- Pop it in the oven for about 15 minutes, or until the skin is crispy and the chicken is heated through. Tip: Keep an eye on it to prevent the skin from burning.
- Let it rest for a few minutes before carving. Tip: This lets the juices redistribute, making every bite succulent.
- Carve and serve. Tip: Pair it with a simple salad or roasted veggies for a meal that’s both easy and impressive.
Delight in the crispy, flavorful skin and the tender, juicy meat that’s bursting with lemon pepper goodness. Serve it up with some crusty bread to soak up all those delicious juices, or shred it for tacos that’ll have everyone coming back for seconds.
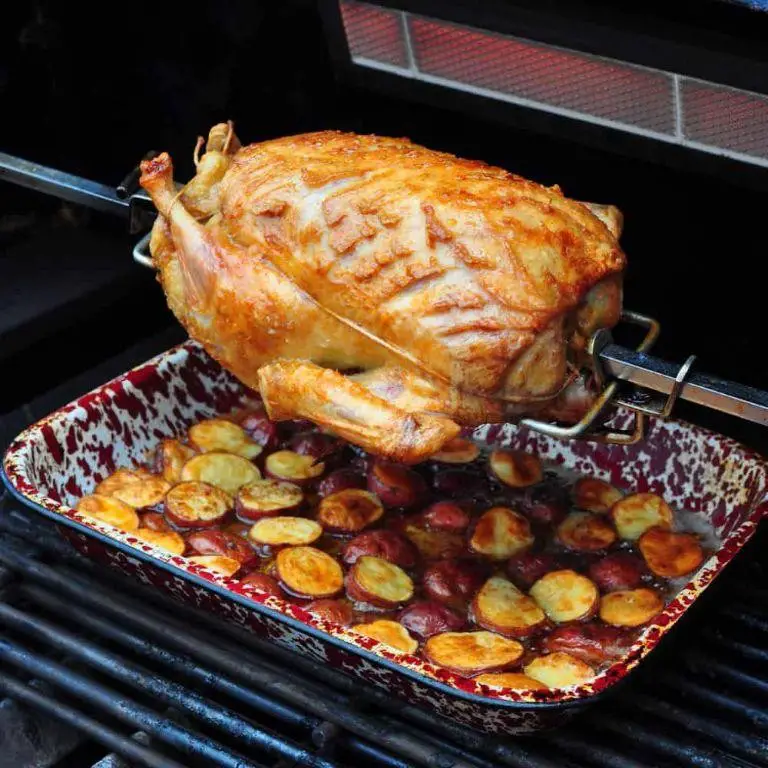
Rotisserie Pork Shoulder with Mustard Rub
So, you’ve decided to embark on a culinary adventure that promises to be as bold and flavorful as your last attempt at karaoke—Rotisserie Pork Shoulder with Mustard Rub. This dish is the perfect blend of juicy, tender pork with a kick of mustard that’ll have your taste buds dancing faster than your uncle at a wedding.
Ingredients
- A hefty 4-pound pork shoulder (because size does matter)
- A generous 1/4 cup of yellow mustard (the kind that’s been sitting in your fridge since last summer)
- A couple of tablespoons of olive oil (for that slick, greasy goodness)
- A splash of apple cider vinegar (to pretend we’re being healthy)
- A tablespoon of brown sugar (because sweet and savory is the ultimate power couple)
- A teaspoon of garlic powder (for that breath that could kill a vampire)
- A teaspoon of smoked paprika (to add some smokiness without the fire department showing up)
- Salt and pepper to taste (though let’s be honest, you’re going to oversalt it)
Instructions
- Preheat your rotisserie to a toasty 325°F—no one likes a cold shoulder, especially not your pork.
- In a bowl, mix together the mustard, olive oil, apple cider vinegar, brown sugar, garlic powder, smoked paprika, salt, and pepper until it’s as smooth as your pickup lines.
- Slather that mustard rub all over the pork shoulder like it’s sunscreen at the beach—miss a spot, and you’ll regret it.
- Secure the pork shoulder on the rotisserie spit, making sure it’s balanced unless you enjoy your meat with a side of chaos.
- Let it spin and sizzle for about 3 hours, or until the internal temperature hits 195°F—patience is a virtue, especially when pork is involved.
- Once it’s done, let it rest for 15 minutes. This isn’t just a suggestion; it’s the difference between juicy and Jurassic.
Mustard lovers, rejoice! This pork shoulder is so tender it’ll fall apart with a stern look, and the mustard rub gives it a tangy punch that’s brighter than your future. Serve it piled high on a bun or alongside some roasted veggies for a meal that’s as satisfying as finally understanding the plot of Inception.
Rotisserie Leg of Lamb with Mint Jelly
Ever dreamed of a dish that screams ‘feast’ without you having to slave away in the kitchen? Enter the rotisserie leg of lamb with mint jelly – your ticket to impressing the in-laws or just treating yourself to something spectacularly succulent.
Ingredients
- A 5 to 6-pound leg of lamb (because size matters when it comes to leftovers)
- A generous glug of olive oil (about 1/4 cup, but who’s measuring?)
- A couple of garlic cloves, minced (or more, we don’t judge)
- A tablespoon of rosemary, chopped (fresh is best, but dried in a pinch)
- A teaspoon of salt (sea salt if you’re fancy)
- A half teaspoon of black pepper (freshly ground, please)
- A splash of lemon juice (about 2 tablespoons, for that zing)
- A cup of mint jelly (store-bought is fine, homemade is heroic)
Instructions
- Preheat your rotisserie to a toasty 325°F – no rushing perfection.
- Rub the leg of lamb all over with olive oil, because it deserves a good massage.
- Mix the minced garlic, rosemary, salt, pepper, and lemon juice in a bowl, then rub this fragrant mixture all over the lamb. Pro tip: Make small incisions in the lamb and stuff some of the mixture inside for extra flavor bombs.
- Secure the lamb on the rotisserie spit, ensuring it’s balanced so it spins like a dream, not a nightmare.
- Let it roast for about 20 minutes per pound, or until the internal temperature hits 145°F for medium-rare. Use a meat thermometer – guessing games are for carnival booths.
- Once done, let the lamb rest for 15 minutes. This isn’t laziness; it’s letting the juices redistribute like a good gossip.
- While the lamb rests, gently warm the mint jelly in a saucepan over low heat, stirring occasionally, until it’s just loose enough to drizzle.
- Carve the lamb against the grain for maximum tenderness, and serve with the warmed mint jelly on the side.
Final thoughts: This lamb is so tender, it practically melts in your mouth, with the mint jelly adding a sweet, herby contrast that’ll have your taste buds doing backflips. Serve it atop a heap of roasted veggies or alongside a crisp salad for a meal that’s as balanced as your life aspires to be.
Rotisserie Chicken Thighs with Soy Sauce Marinade
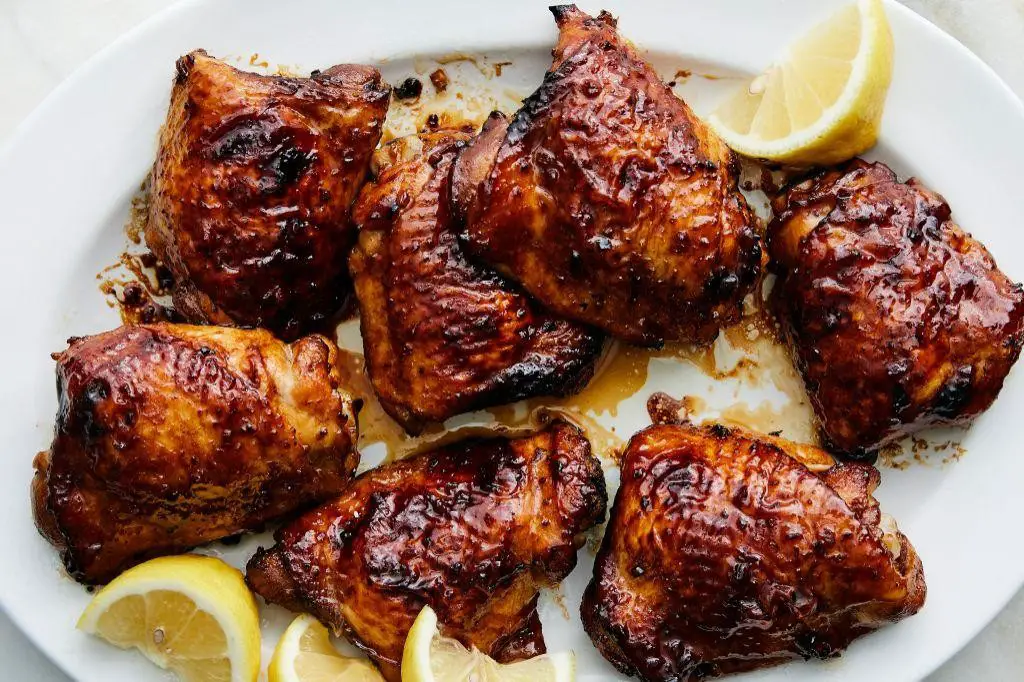
Just when you thought chicken thighs couldn’t get any more irresistible, along comes this rotisserie version with a soy sauce marinade that’s downright addictive. Perfect for those ‘I can’t even’ weeknights or when you’re trying to impress your in-laws without actually trying too hard.
Ingredients
- 4 chicken thighs (because, let’s be real, who stops at one?)
- A generous splash of soy sauce (about 1/4 cup)
- A couple of garlic cloves, minced (or more, we don’t judge)
- A tablespoon of honey (for that sweet, sweet balance)
- A dash of olive oil (to keep things slick)
- A pinch of red pepper flakes (for a little kick)
Instructions
- Preheat your rotisserie to 375°F because patience is a virtue, especially when deliciousness is on the line.
- In a bowl, whisk together the soy sauce, minced garlic, honey, olive oil, and red pepper flakes. Tip: Taste the marinade and adjust the honey or soy sauce if needed—your palate, your rules.
- Add the chicken thighs to the marinade, ensuring each piece is thoroughly coated. Let them soak up the goodness for at least 30 minutes in the fridge. Tip: The longer they marinate, the more flavorful they’ll be, but even 30 minutes will do in a pinch.
- Secure the chicken thighs on the rotisserie spit, making sure they’re balanced to cook evenly. Tip: If you’re using a rotisserie basket, arrange the thighs in a single layer for the best results.
- Cook for about 45 minutes, or until the internal temperature reaches 165°F and the skin is gloriously golden and crispy.
Yum! These thighs come out with a perfect balance of savory and sweet, with a slight kick that keeps you coming back for more. Serve them over a bed of fluffy rice or chop them up for a killer chicken salad—either way, you’re winning.
Rotisserie Beef Tenderloin with Red Wine Sauce

Howdy, food lovers! Imagine a dish so luxurious it could make a steakhouse jealous, yet so simple you’ll be whipping it up like a weeknight spaghetti. That’s right, we’re talking about a rotisserie beef tenderloin that’s as tender as your heart after watching a puppy video, paired with a red wine sauce that’s richer than a billionaire’s chocolate stash.
Ingredients
- 1 beef tenderloin (about 2 lbs), because size does matter here
- A couple of tbsp of olive oil, for that slick move
- Salt and pepper, the dynamic duo of seasoning
- A splash of red wine (about 1 cup), choose one you’d drink, not the cooking wine from the back of your pantry
- 1 cup beef broth, for that deep, soulful flavor
- A pat of butter (2 tbsp), because butter makes everything better
- 2 cloves garlic, minced, for a little kick
- A sprinkle of thyme (1 tsp), because we’re fancy like that
Instructions
- Preheat your rotisserie to a toasty 375°F. We’re aiming for golden perfection, not a charcoal briquette.
- Rub the beef tenderloin with olive oil, then season generously with salt and pepper. Think of it as giving the beef a spa treatment.
- Skewer the beef onto the rotisserie spit, making sure it’s balanced so it spins like a ballerina, not a wobbly toddler.
- Let it roast for about 25-30 minutes, or until it hits an internal temp of 135°F for medium-rare. Use a meat thermometer, because guessing games are for carnival midways, not dinner.
- While the beef is doing its thing, heat a splash of olive oil in a pan over medium heat. Add the garlic and thyme, and let them sizzle until fragrant, about 30 seconds. Don’t let the garlic burn, unless you’re into that bitter life.
- Pour in the red wine and beef broth, then let it simmer until it reduces by half, about 10 minutes. This is where the magic happens, folks.
- Whisk in the butter until the sauce is glossy and luxurious. This is no time for skimping.
- Once the beef is done, let it rest for 10 minutes. This isn’t just a suggestion—it’s the law of the land for juicy meat.
- Slice the beef, drizzle with that heavenly red wine sauce, and prepare for applause.
Perfectly pink in the middle with a crust that’s just begging to be devoured, this beef tenderloin is a showstopper. Serve it with a side of roasted veggies or over a pile of creamy mashed potatoes for a meal that’ll have everyone asking for seconds. And that sauce? Let’s just say you might want to make extra for… research purposes.
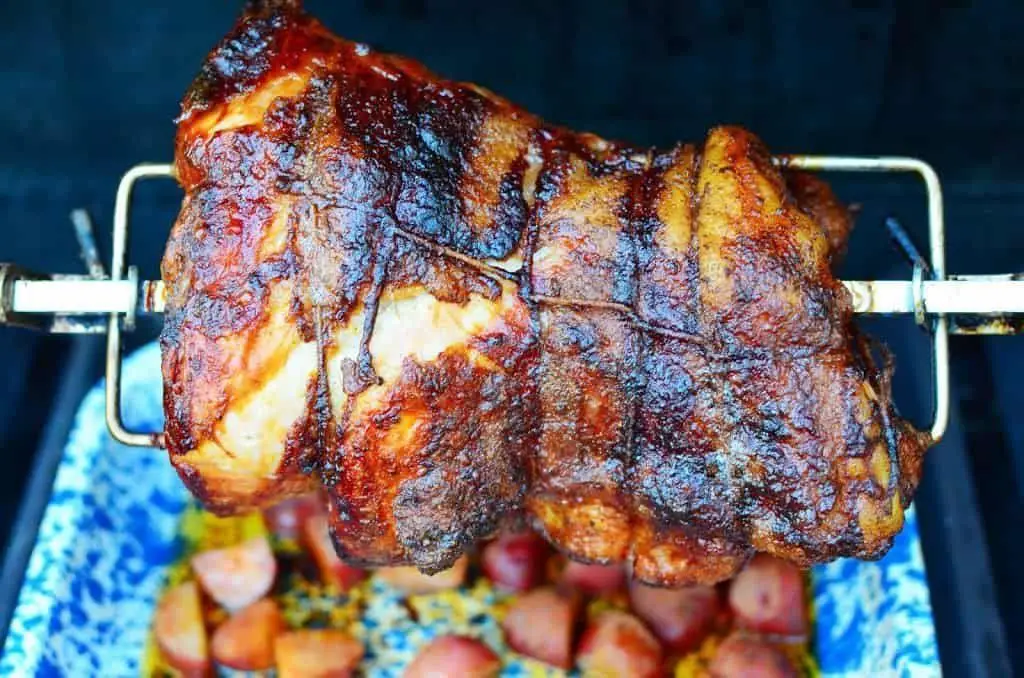
Rotisserie Pork Belly with Brown Sugar Glaze

Buckle up, buttercups, because we’re about to take your taste buds on a joyride with this rotisserie pork belly that’s so good, it’ll have you writing love letters to your oven. Perfectly crispy on the outside, melt-in-your-mouth tender on the inside, and glazed with a brown sugar concoction that’s the culinary equivalent of a bear hug.
Ingredients
- A 3-pound slab of pork belly (because size matters)
- A generous 1/2 cup of brown sugar (for that sweet, sweet love)
- A couple of tablespoons of soy sauce (for that umami kick)
- A splash of apple cider vinegar (to cut through the richness)
- A pinch of salt (because we’re not savages)
- A teaspoon of garlic powder (for a little bit of that garlicky goodness)
Instructions
- Preheat your rotisserie to a toasty 325°F because we’re not cooking ice cubes here.
- Score the pork belly skin in a criss-cross pattern like you’re playing tic-tac-toe. This isn’t just for looks; it helps the fat render and the skin get crispy.
- Rub the pork belly all over with salt and garlic powder. Be thorough, like you’re applying sunscreen at the beach.
- Place the pork belly on the rotisserie spit and let it spin its way to glory for about 2.5 hours. You’re looking for that golden-brown color that screams ‘eat me.’
- While the pork is doing its thing, mix the brown sugar, soy sauce, and apple cider vinegar in a bowl. Stir until the sugar dissolves, creating a glaze that’s stickier than a toddler’s fingers.
- During the last 30 minutes of cooking, brush the glaze onto the pork belly every 10 minutes. This builds up layers of flavor like a delicious lasagna.
- Once the pork belly reaches an internal temperature of 165°F, take it off the rotisserie and let it rest for 10 minutes. Patience is a virtue, especially when it comes to juicy meat.
Velvety on the inside with a crackling crust that sings with every bite, this pork belly is a showstopper. Serve it sliced over a heap of creamy mashed potatoes or chop it up for the most epic tacos your Tuesday has ever seen.
Rotisserie Chicken Drumsticks with Hot Sauce

Unbelievably easy and outrageously tasty, these rotisserie chicken drumsticks with hot sauce are about to become your weeknight heroes. Perfect for when you’re craving something spicy, succulent, and seriously low-effort.
Ingredients
- 4 chicken drumsticks (because who can stop at just one?)
- A generous glug of olive oil (about 2 tbsp)
- A couple of dashes of your favorite hot sauce (we’re talking 1-2 tbsp, but hey, live dangerously)
- A pinch of salt (just enough to make the flavors pop)
- A sprinkle of garlic powder (because garlic makes everything better)
Instructions
- Preheat your oven to 375°F (no peeking until it’s fully heated!).
- Toss the drumsticks with olive oil, hot sauce, salt, and garlic powder in a bowl. Get in there with your hands—it’s the best way to ensure every inch is coated.
- Arrange the drumsticks on a baking sheet lined with parchment paper (for easy cleanup, because who likes scrubbing pans?).
- Pop them in the oven and bake for 35-40 minutes, flipping halfway through, until they’re golden brown and the juices run clear.
- Let them rest for a couple of minutes (patience is a virtue, especially when it comes to juicy chicken).
Outrageously crispy on the outside, tender on the inside, and packing just the right amount of heat, these drumsticks are begging to be served with a side of cool ranch or tucked into a fluffy bun for the ultimate spicy chicken sandwich.
Rotisserie Turkey Legs with Garlic Butter
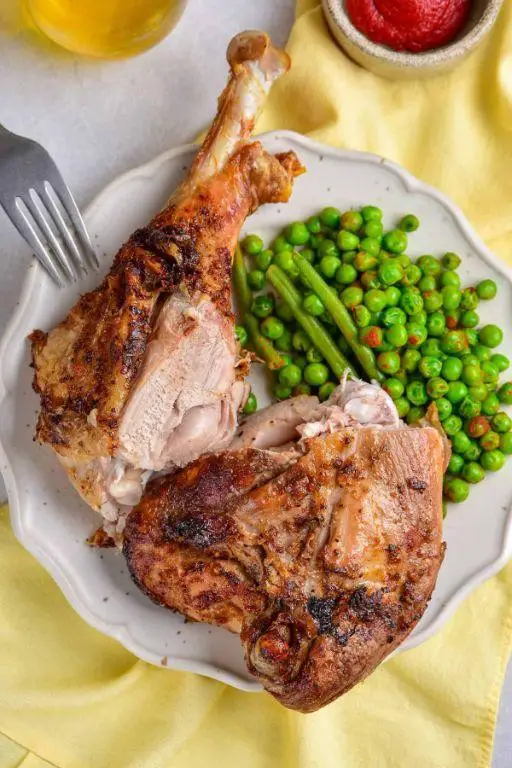
Unbelievably juicy and packed with flavor, these rotisserie turkey legs are about to become your new favorite way to poultry. Slathered in garlic butter, they’re the perfect combo of crispy skin and tender meat that’ll have you forgetting all about that dry Thanksgiving turkey.
Ingredients
- 2 rotisserie turkey legs (because who has time to cook a whole bird?)
- 1/2 cup of unsalted butter, softened (for that rich, velvety slather)
- 4 cloves of garlic, minced (the more, the merrier, right?)
- A splash of olive oil (just to keep things slick)
- A couple of sprigs of fresh rosemary (for that fancy touch)
- Salt and pepper (the dynamic duo of seasoning)
Instructions
- Preheat your rotisserie to a toasty 325°F. If you’re using an oven, set it to the same temp and grab a roasting rack.
- In a small bowl, mash together the softened butter, minced garlic, and a pinch of salt and pepper until it’s well combined. Pro tip: Let the butter sit out for a bit to soften naturally—microwaving can make it too runny.
- Pat the turkey legs dry with paper towels (this helps the skin get extra crispy) and rub them all over with the olive oil. Season generously with salt and pepper.
- Slather the garlic butter all over the turkey legs, making sure to get under the skin for maximum flavor. Throw in those rosemary sprigs for aroma.
- Secure the legs on the rotisserie spit or place them on the roasting rack. Cook for about 1.5 hours, or until the internal temperature hits 165°F. Tip: Baste with the drippings every 30 minutes for an even more decadent finish.
- Let the legs rest for 10 minutes before serving. This lets the juices redistribute, so you don’t lose all that goodness when you cut into it.
These turkey legs come out with a crackling skin that gives way to succulent, garlic-infused meat. Serve them up with a side of roasted veggies or, for a real treat, dunk them in a homemade gravy boat. Trust us, your taste buds will thank you.
Rotisserie Duck Breast with Orange Sauce
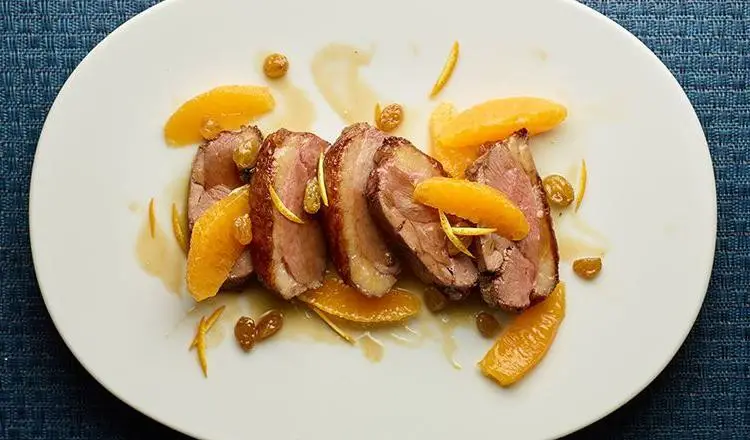
Today’s the day we ditch the chicken and give duck the spotlight it deserves, especially when it’s slathered in a zesty orange sauce that’ll make your taste buds do a happy dance.
Ingredients
- 2 duck breasts (because one is just a tease)
- A splash of olive oil (just enough to make the pan say ‘hello’)
- 1 cup of fresh orange juice (squeeze it yourself for bragging rights)
- A couple of tablespoons of honey (for that sweet, sweet love)
- 1 tablespoon of soy sauce (the secret umami bomb)
- A pinch of salt and pepper (to remind the duck who’s boss)
Instructions
- Preheat your oven to 375°F because we’re about to get toasty.
- Score the duck breast skin in a criss-cross pattern; this isn’t just for looks—it helps render that fat beautifully.
- Heat a splash of olive oil in an oven-proof pan over medium heat. Place the duck breasts skin-side down and cook for 5 minutes until golden and crispy. Flip and cook for another 2 minutes.
- Pop the pan into the oven and roast for 8-10 minutes for medium-rare. Want it more done? Add a couple of minutes, but don’t blame us if it’s less juicy.
- While the duck is doing its thing in the oven, whisk together the orange juice, honey, and soy sauce in a small saucepan over medium heat. Let it simmer and reduce by half, about 5 minutes, until it’s gloriously sticky.
- Pull the duck out of the oven and let it rest for 5 minutes. This isn’t laziness—it’s science, allowing the juices to redistribute.
- Slice the duck, drizzle with that orange sauce, and sprinkle with a pinch of salt and pepper to finish.
Serve this bad boy with the confidence of a chef who knows they’ve just made something spectacular. The duck? Crispy on the outside, tender on the inside. The sauce? A tangy, sweet hug that brings it all together. Try it over a bed of wild rice or with roasted veggies for a plate that’s as colorful as it is delicious.
Rotisserie Lamb Chops with Herb Crust
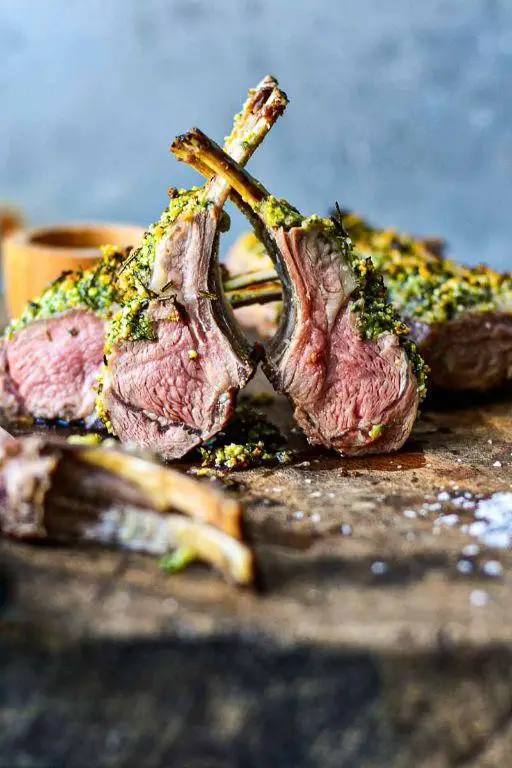
Prepare to have your taste buds do a happy dance because these Rotisserie Lamb Chops with Herb Crust are about to become the star of your dinner table. Perfectly seasoned and juicy, they’re a game-changer for any meat lover.
Ingredients
- a couple of lamb chops (about 1.5 lbs)
- a generous splash of olive oil
- 2 tbsp of minced garlic
- a handful of fresh rosemary, finely chopped
- a handful of fresh thyme, finely chopped
- 1 tsp of salt
- 1/2 tsp of black pepper
- 1/2 cup of breadcrumbs
Instructions
- Preheat your rotisserie to a toasty 375°F. This ensures your lamb chops will be perfectly cooked and juicy.
- In a small bowl, mix together the olive oil, minced garlic, rosemary, thyme, salt, and pepper. This herb mixture is your flavor powerhouse, so don’t skimp!
- Rub the herb mixture all over the lamb chops, making sure they’re fully coated. For maximum flavor, let them marinate for at least 30 minutes.
- Press the breadcrumbs onto the lamb chops to create a crispy, golden crust. Tip: For extra crunch, you can lightly toast the breadcrumbs before applying.
- Secure the lamb chops on the rotisserie spit, ensuring they’re balanced to cook evenly. This might take a bit of patience, but it’s worth it.
- Cook for about 25 minutes, or until the internal temperature reaches 145°F for medium-rare. Tip: Use a meat thermometer to avoid guesswork.
- Let the lamb chops rest for 5 minutes before serving. This allows the juices to redistribute, making every bite succulent.
Get ready to savor the crispy herb crust giving way to tender, flavorful lamb. Serve these beauties with a side of roasted veggies or a fresh salad for a meal that’s sure to impress.
Conclusion
Whether you’re planning a cozy family dinner or a festive gathering, our roundup of 18 Delicious Rotisserie Recipes offers something for every occasion. From savory meats to flavorful veggies, these recipes promise to delight your taste buds and simplify your cooking. We’d love to hear which dishes become your favorites—drop us a comment below! Don’t forget to share the love by pinning this article on Pinterest for easy reference. Happy cooking!