Celebrating Shavuot has never been tastier! Whether you’re hosting a festive gathering or simply looking to indulge in some creamy, cheesy delights, our roundup of 18 delicious Shavuot recipes is your go-to guide. From traditional blintzes to innovative dairy dishes, we’ve got something to satisfy every craving. Dive in and discover the perfect dishes to make your celebration unforgettable.
Cheese Blintzes with Berry Compote
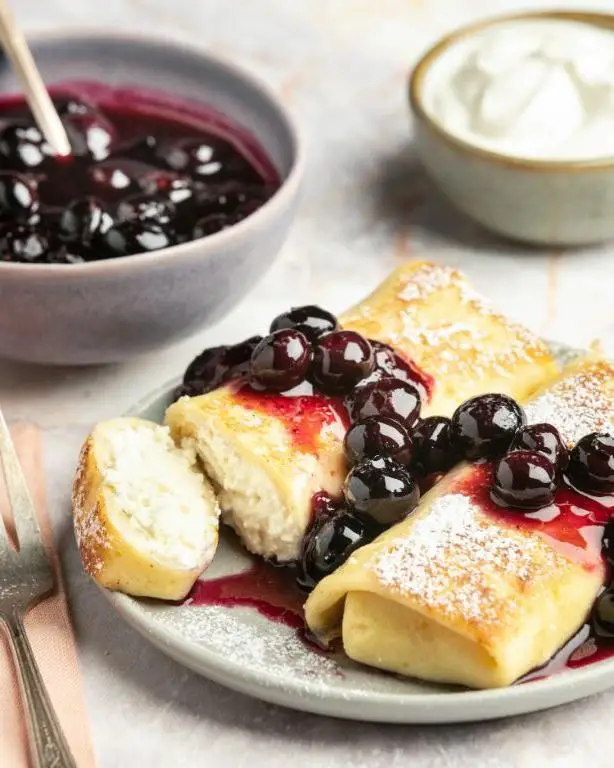
Whipping up a batch of Cheese Blintzes with Berry Compote is easier than you think, and I’m here to guide you through each step to ensure your breakfast or brunch is nothing short of spectacular.
Ingredients
- 1 cup of all-purpose flour
- A pinch of salt
- 2 large eggs
- 1 1/4 cups of milk, plus a splash more if needed
- 2 tbsp of melted butter, plus a bit extra for the pan
- 1 cup of ricotta cheese
- 1/4 cup of cream cheese, softened
- 2 tbsp of sugar
- 1 tsp of vanilla extract
- 2 cups of mixed berries (your choice!)
- 1/4 cup of water
- 1/4 cup of sugar (for the compote)
- A squeeze of lemon juice
Instructions
- In a large bowl, whisk together the flour and salt.
- Make a well in the center and crack in the eggs. Gradually whisk in the milk and melted butter until the batter is smooth. Let it rest for 15 minutes; this makes for tender blintzes.
- Heat a non-stick pan over medium heat and brush with a little melted butter. Pour in 1/4 cup of batter, swirling to coat the pan thinly. Cook for about 1 minute until the edges lift, then flip and cook for another 30 seconds. Repeat with remaining batter.
- In a bowl, mix ricotta, cream cheese, sugar, and vanilla until smooth. Spoon 2 tbsp onto each blintz, fold in the sides, then roll up.
- For the compote, combine berries, water, sugar, and lemon juice in a saucepan. Simmer over low heat for 10 minutes until syrupy.
- Serve the blintzes warm with the berry compote drizzled on top.
Just imagine the creamy cheese filling against the tart berry compote, all wrapped in a delicate, slightly crispy blintz. Perfect for a lazy weekend brunch or a fancy breakfast in bed.
Creamy Spinach and Ricotta Stuffed Shells

Very few dishes can match the comfort and elegance of stuffed shells, especially when filled with a creamy blend of spinach and ricotta. This recipe is perfect for those looking to impress at dinner or simply treat themselves to a hearty, homemade meal.
Ingredients
- a box of jumbo pasta shells
- a couple of cups of ricotta cheese
- a handful of fresh spinach, chopped
- a splash of olive oil
- a pinch of salt and pepper
- a cup of marinara sauce
- a sprinkle of grated Parmesan cheese
Instructions
- Preheat your oven to 375°F to get it ready for baking.
- Boil the jumbo pasta shells according to the package instructions until al dente, then drain and set aside. Tip: Add a splash of olive oil to the water to prevent sticking.
- In a bowl, mix the ricotta cheese, chopped spinach, a pinch of salt, and pepper until well combined. Tip: Squeeze out excess water from the spinach to keep the filling from getting soggy.
- Spread a thin layer of marinara sauce at the bottom of a baking dish.
- Carefully fill each shell with the ricotta and spinach mixture and place them seam side up in the dish. Tip: Use a small spoon or a piping bag for easier filling.
- Pour the remaining marinara sauce over the stuffed shells and sprinkle with Parmesan cheese.
- Bake in the preheated oven for 25 minutes, or until the sauce is bubbly and the cheese is lightly golden.
When these shells come out of the oven, the ricotta is luxuriously creamy, and the spinach adds a fresh, slightly earthy flavor. Serve them with a side of garlic bread to soak up any extra sauce, or add a crisp salad for a lighter meal.
Decadent Chocolate Babka
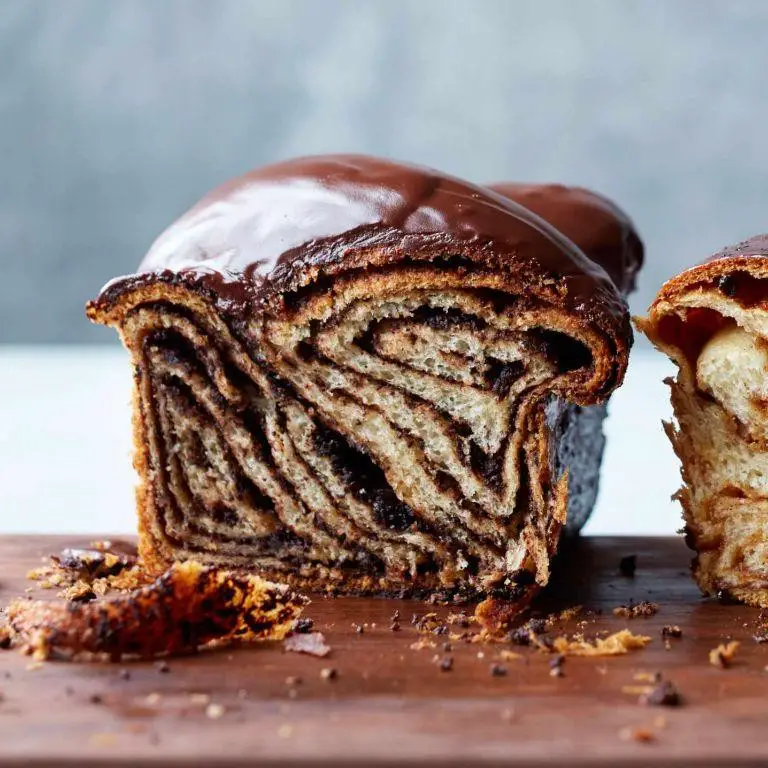
Over the years, I’ve found that making Decadent Chocolate Babka is not just about baking; it’s about creating a masterpiece that’s as fun to make as it is to eat. Let’s dive into the process, step by step, to ensure your babka turns out perfectly twisted and delicious every time.
Ingredients
- 3 cups of all-purpose flour, plus a little extra for dusting
- 1/4 cup of granulated sugar
- 1 packet (2 1/4 tsp) of instant yeast
- A pinch of salt
- 1/2 cup of whole milk, warmed to about 110°F
- 2 large eggs, at room temperature
- 1/2 cup (1 stick) of unsalted butter, softened, plus a bit more for greasing
- 1 cup of semi-sweet chocolate chips
- 1/4 cup of cocoa powder
- 1/2 cup of packed brown sugar
- A splash of vanilla extract
Instructions
- In a large bowl, whisk together the flour, granulated sugar, yeast, and salt.
- Add the warmed milk, eggs, and softened butter to the dry ingredients. Mix until a dough forms.
- Tip: If the dough feels too sticky, add a tablespoon of flour at a time until it’s manageable.
- Knead the dough on a lightly floured surface for about 10 minutes, until smooth and elastic.
- Place the dough in a greased bowl, cover with a towel, and let it rise in a warm place for 1 to 1.5 hours, or until doubled in size.
- While the dough rises, mix the chocolate chips, cocoa powder, brown sugar, and vanilla extract in a bowl to make the filling.
- Tip: For an extra chocolatey babka, you can add more chocolate chips to the filling.
- Once risen, punch down the dough and roll it out on a floured surface into a 16×12-inch rectangle.
- Spread the chocolate filling evenly over the dough, leaving a small border around the edges.
- Starting from the long side, tightly roll the dough into a log. Cut the log in half lengthwise, then twist the two pieces together.
- Tip: Don’t worry if some filling spills out; it adds to the babka’s rustic charm.
- Transfer the twisted dough to a greased loaf pan, cover, and let it rise for another 30 minutes.
- Preheat your oven to 350°F. Bake the babka for 30-35 minutes, or until golden brown and a toothpick inserted comes out clean.
Very rich and tender, this chocolate babka boasts layers of gooey chocolate in every bite. Serve it warm with a dollop of whipped cream or enjoy it as is for a truly indulgent treat.
Fluffy Cheese Soufflé

Sometimes, the thought of making a soufflé can intimidate even the most enthusiastic home cooks, but fear not! This fluffy cheese soufflé is surprisingly straightforward, especially when you follow these step-by-step instructions.
Ingredients
- 4 large eggs, separated
- 1 cup of grated Gruyère cheese
- 1/2 cup of whole milk
- 3 tbsp of unsalted butter
- 3 tbsp of all-purpose flour
- A pinch of salt
- A dash of cayenne pepper
- A splash of vanilla extract (trust me on this one)
Instructions
- Preheat your oven to 375°F (190°C) and butter a 1.5-quart soufflé dish.
- In a saucepan, melt the butter over medium heat, then whisk in the flour until smooth. Cook for 2 minutes to remove the raw flour taste.
- Gradually add the milk, whisking constantly until the mixture thickens, about 3 minutes. Remove from heat.
- Stir in the egg yolks one at a time, then add the Gruyère, salt, cayenne, and vanilla. Mix well.
- In a separate bowl, beat the egg whites until stiff peaks form. Gently fold into the cheese mixture.
- Pour the batter into the prepared dish and smooth the top. Run your thumb around the edge to help it rise evenly.
- Bake for 25-30 minutes until puffed and golden. Do not open the oven door during the first 20 minutes to prevent collapsing.
Unbelievably light and airy, this soufflé boasts a rich, cheesy flavor with a hint of warmth from the cayenne. Serve it immediately straight from the oven, perhaps with a simple green salad for a delightful contrast.
Homemade Challah with Honey Butter
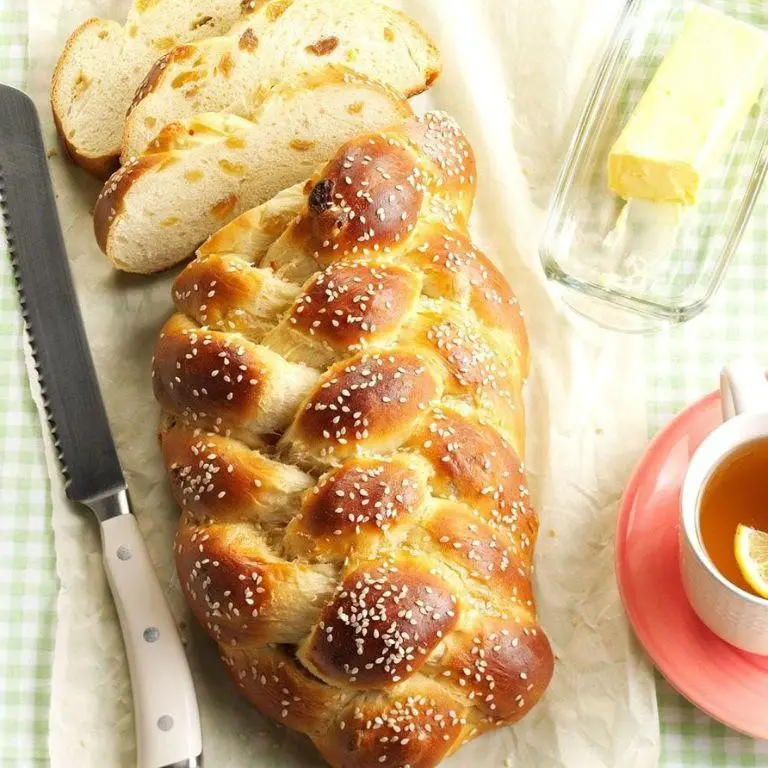
You’ll find that making Homemade Challah with Honey Butter is a rewarding experience, perfect for beginners and seasoned bakers alike. This guide will walk you through each step, ensuring your bread turns out soft, fluffy, and beautifully braided.
Ingredients
- 4 cups of all-purpose flour
- a couple of eggs, plus one more for egg wash
- a splash of warm water (about 1 cup)
- a packet of active dry yeast
- a pinch of salt
- a quarter cup of sugar
- a stick of unsalted butter, melted
- a dollop of honey for the honey butter
Instructions
- In a large bowl, dissolve the yeast and a teaspoon of sugar in warm water. Let it sit for 5 minutes until frothy.
- Add the remaining sugar, melted butter, eggs, and salt to the yeast mixture. Stir until well combined.
- Gradually mix in the flour, one cup at a time, until a dough forms. Tip: If the dough feels too sticky, add a little more flour.
- Knead the dough on a floured surface for about 10 minutes until smooth and elastic. Tip: The dough is ready when it springs back when poked.
- Place the dough in a greased bowl, cover with a damp cloth, and let it rise in a warm place for 1 hour or until doubled in size.
- Punch down the dough and divide it into 3 equal parts. Roll each part into a long rope and braid them together on a baking sheet.
- Brush the braid with egg wash and let it rise for another 30 minutes. Tip: For a shiny crust, brush with egg wash again before baking.
- Preheat your oven to 375°F and bake the challah for 25-30 minutes until golden brown.
- While the challah cools, mix softened butter with honey to make the honey butter.
Golden and slightly sweet, this challah has a tender crumb that pairs wonderfully with the creamy honey butter. Try serving it warm with a drizzle of extra honey for a decadent treat.
Lemon Blueberry Cheesecake Bars
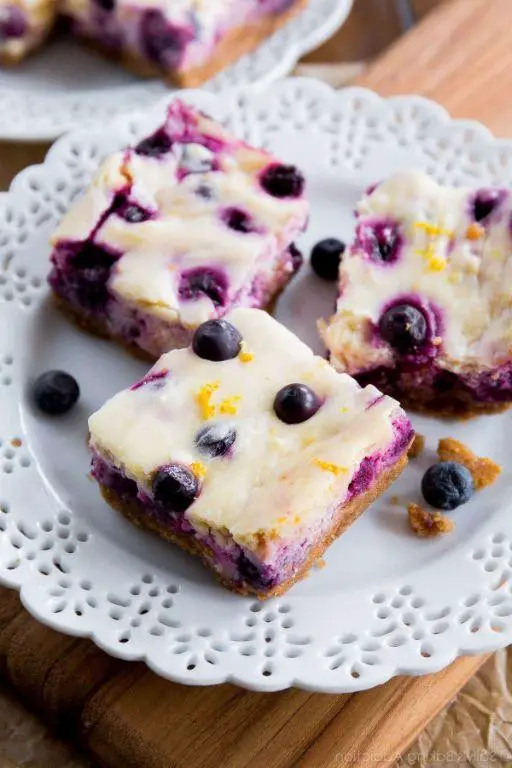
Savor the perfect blend of tangy and sweet with these Lemon Blueberry Cheesecake Bars, a delightful treat that combines the zest of lemon with the juiciness of blueberries atop a creamy cheesecake layer. Ideal for beginners, this recipe breaks down each step to ensure success.
Ingredients
– 1 1/2 cups of graham cracker crumbs (just crush them up real fine)
– 1/2 cup of melted butter (that’s about a stick, give or take)
– 2 cups of cream cheese (let it sit out to get cozy to room temp)
– 3/4 cup of sugar (because sweet is the name of the game)
– 2 eggs (the binding heroes)
– 1/4 cup of lemon juice (freshly squeezed for that zing)
– 1 tsp of vanilla extract (a splash for flavor)
– 1 cup of fresh blueberries (a handful more for good luck)
Instructions
1. Preheat your oven to 350°F (175°C) and grab an 8×8 inch baking pan.
2. Mix the graham cracker crumbs and melted butter until they’re best friends, then press them into the pan to form the crust. Bake for 10 minutes until golden.
3. While the crust cools, beat the cream cheese and sugar until smooth. Tip: Scrape the sides of the bowl to keep it even.
4. Add the eggs one at a time, then the lemon juice and vanilla, mixing well after each.
5. Gently fold in the blueberries to avoid turning the batter purple. Tip: Toss them in a bit of flour to prevent sinking.
6. Pour the mixture over the crust and bake for 35 minutes or until the center is just set. Tip: A slight jiggle is okay; it’ll firm up as it cools.
7. Let it cool completely, then chill in the fridge for at least 2 hours before slicing.
You’ll love the creamy texture paired with the crunch of the crust, and the bursts of blueberry in every bite. Try serving these bars with a dollop of whipped cream or a sprinkle of lemon zest for an extra touch of elegance.
Mushroom and Cheese Kreplach
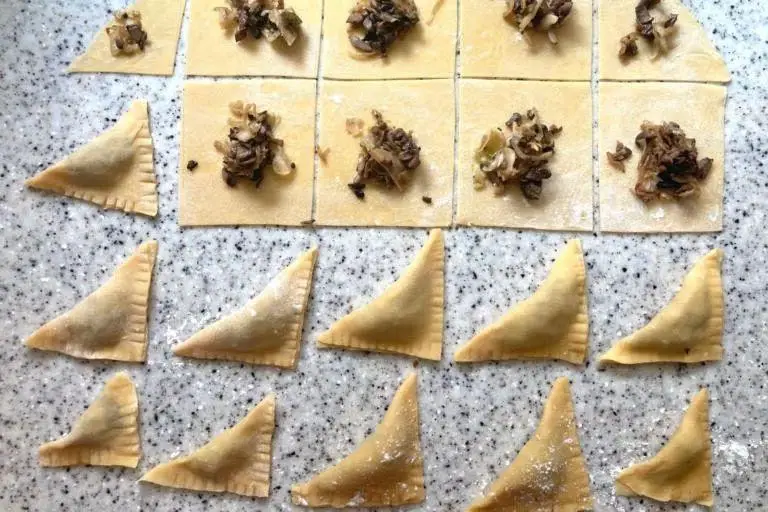
Zesty and comforting, Mushroom and Cheese Kreplach is a delightful dish that combines the earthy flavors of mushrooms with the creamy richness of cheese, all wrapped in a tender dough. Perfect for beginners, this recipe walks you through each step to ensure delicious results every time.
Ingredients
– 2 cups of all-purpose flour, plus a bit extra for dusting
– A pinch of salt
– 2 large eggs
– A splash of water, just enough to bring the dough together
– 1 cup of finely chopped mushrooms (any kind you like)
– 1 tablespoon of olive oil
– A couple of cloves of garlic, minced
– 1 cup of shredded cheese (cheddar or mozzarella works great)
– A dash of black pepper for seasoning
Instructions
1. In a large bowl, mix the flour and salt together. Make a well in the center and crack the eggs into it.
2. Gradually mix the eggs into the flour, adding a splash of water as needed, until a dough forms. Tip: The dough should be smooth but not sticky. If it’s too dry, add a bit more water.
3. Knead the dough on a floured surface for about 5 minutes, then cover it with a damp cloth and let it rest for 30 minutes.
4. While the dough rests, heat the olive oil in a pan over medium heat. Add the mushrooms and garlic, cooking until the mushrooms are soft and all the liquid has evaporated, about 5-7 minutes. Tip: Don’t rush this step; letting the mushrooms cook properly ensures they’re flavorful.
5. Stir in the shredded cheese and black pepper, then remove the pan from the heat and let the filling cool slightly.
6. Roll out the dough on a floured surface until it’s about 1/8 inch thick. Cut into 3-inch squares.
7. Place a small spoonful of the mushroom and cheese filling in the center of each square. Fold the dough over the filling to form a triangle, pressing the edges to seal. Tip: Use a bit of water on the edges if they’re not sticking together.
8. Bring a large pot of salted water to a boil. Cook the kreplach in batches for about 3-4 minutes, or until they float to the top.
9. Serve the kreplach hot, perhaps with a dollop of sour cream or a sprinkle of fresh herbs for an extra touch of flavor. Golden and inviting, these kreplach offer a satisfying bite with a creamy, umami-packed center that’s sure to impress.
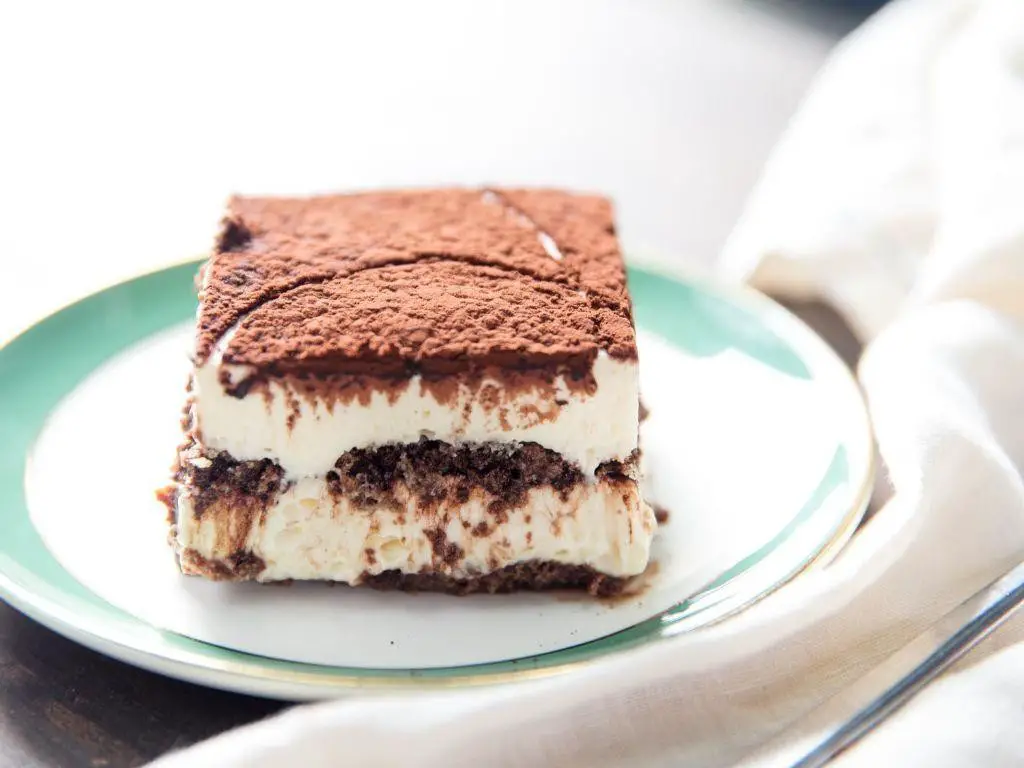
Rich and Creamy Tiramisu
You’ve probably heard of tiramisu, but have you ever tried making it at home? This rich and creamy dessert is easier to prepare than you might think, and I’m here to guide you through each step to ensure your tiramisu is nothing short of perfection.
Ingredients
- 6 large egg yolks
- 3/4 cup of granulated sugar
- A splash of vanilla extract
- 1 cup of mascarpone cheese, at room temperature
- 1 1/2 cups of heavy cream
- A couple of cups of strong brewed coffee, cooled
- 2 tablespoons of coffee liqueur (optional)
- 24-30 ladyfingers
- A dusting of cocoa powder for garnish
Instructions
- In a heatproof bowl, whisk together the egg yolks and sugar until well combined.
- Place the bowl over a pot of simmering water (double boiler method) and whisk constantly for about 10 minutes, until the mixture is thick and pale. Tip: This step cooks the eggs safely and creates a smooth base for your tiramisu.
- Remove from heat and stir in the vanilla extract. Let it cool slightly.
- Add the mascarpone cheese to the egg mixture and beat until smooth.
- In a separate bowl, whip the heavy cream to stiff peaks. Gently fold the whipped cream into the mascarpone mixture to keep it light and airy. Tip: Folding instead of stirring preserves the fluffiness of the cream.
- Mix the cooled coffee with coffee liqueur in a shallow dish. Quickly dip each ladyfinger into the coffee mixture—just a second or two on each side to avoid sogginess.
- Arrange a layer of dipped ladyfingers in the bottom of a 9×13 inch dish. Spread half of the mascarpone mixture over the ladyfingers. Repeat with another layer of ladyfingers and the remaining mascarpone mixture.
- Cover and refrigerate for at least 4 hours, preferably overnight. Tip: This resting time allows the flavors to meld and the dessert to set properly.
- Before serving, dust the top with cocoa powder for that classic tiramisu finish.
Just imagine slicing into this tiramisu to reveal its layers of coffee-soaked ladyfingers and velvety mascarpone cream. The contrast between the bold coffee flavor and the sweet, creamy filling is simply irresistible. Serve it chilled with a sprinkle of cocoa powder or a drizzle of chocolate sauce for an extra indulgent touch.
Savory Cheese and Herb Scones

Out of all the baked goods to master, scones are surprisingly simple and endlessly versatile. Today, we’re diving into savory cheese and herb scones that are perfect for breakfast or as a side to your favorite soup.
Ingredients
- 2 cups of all-purpose flour
- 1 tablespoon of baking powder
- A pinch of salt
- 1/2 cup of cold butter, cubed
- 1 cup of shredded sharp cheddar cheese
- A couple of tablespoons of fresh herbs (think chives or thyme)
- 3/4 cup of milk, plus a splash more for brushing
Instructions
- Preheat your oven to 400°F (200°C) and line a baking sheet with parchment paper.
- In a large bowl, whisk together the flour, baking powder, and salt.
- Add the cold butter cubes to the flour mixture. Using your fingertips, rub the butter into the flour until the mixture resembles coarse crumbs. Tip: Keep the butter cold for flakier scones.
- Stir in the shredded cheddar and fresh herbs until evenly distributed.
- Gradually add the milk, stirring just until the dough comes together. Tip: Overmixing leads to tough scones, so mix until just combined.
- Turn the dough out onto a lightly floured surface and gently pat it into a 1-inch thick circle.
- Cut the dough into 8 wedges and transfer them to the prepared baking sheet. Brush the tops with a splash of milk for a golden finish.
- Bake for 15-20 minutes, or until the scones are golden brown and a toothpick inserted into the center comes out clean. Tip: Rotate the baking sheet halfway through for even browning.
Vibrant with the sharpness of cheddar and the freshness of herbs, these scones have a tender crumb and a crispy exterior. Serve them warm with a dollop of butter or alongside a creamy tomato soup for a comforting meal.
Sweet Noodle Kugel with Raisins and Cinnamon
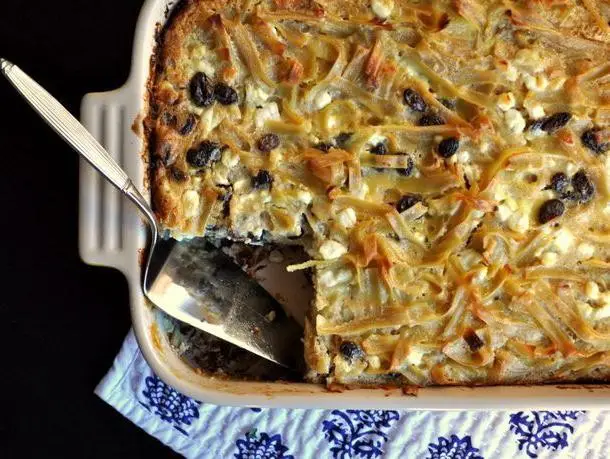
This comforting Sweet Noodle Kugel with Raisins and Cinnamon is a classic dish that brings warmth and sweetness to any table. Today, we’ll walk through how to make this delightful bake step by step, ensuring even beginners can achieve perfect results.
Ingredients
- 8 oz wide egg noodles
- 4 tbsp unsalted butter, melted
- 3 large eggs
- 1 cup sour cream
- 1 cup cottage cheese
- 1/2 cup sugar
- 1 tsp vanilla extract
- 1/2 tsp cinnamon
- 1/4 tsp salt
- a handful of raisins
- a sprinkle of cinnamon sugar for topping
Instructions
- Preheat your oven to 350°F and grease a 9×13 inch baking dish lightly.
- Boil the egg noodles according to package instructions until al dente, then drain and return to the pot.
- Stir the melted butter into the noodles until they’re evenly coated.
- In a separate bowl, whisk together the eggs, sour cream, cottage cheese, sugar, vanilla extract, cinnamon, and salt until smooth.
- Fold the egg mixture into the noodles gently, then stir in the raisins.
- Pour the noodle mixture into the prepared baking dish and spread it out evenly.
- Sprinkle the top with cinnamon sugar for a sweet, crunchy topping.
- Bake for 45 minutes, or until the edges are golden and the center is set.
- Let the kugel cool for about 10 minutes before slicing to allow it to set properly.
Ultimate comfort in every bite, this kugel is creamy with a slight chew from the noodles, sweet with bursts of raisins, and spiced just right with cinnamon. Serve it warm with a dollop of whipped cream for an extra indulgent treat.
Traditional Cheese Latkes
These traditional cheese latkes are a delightful twist on the classic potato pancake, offering a creamy, cheesy center with a crispy golden exterior. Perfect for breakfast or a cozy brunch, they’re surprisingly simple to make with just a handful of ingredients.
Ingredients
- 2 cups of shredded potatoes, squeezed dry
- 1 cup of cottage cheese
- a couple of eggs
- a splash of milk
- 1/2 cup of all-purpose flour
- a pinch of salt
- 2 tbsp of butter, for frying
Instructions
- In a large bowl, mix the shredded potatoes, cottage cheese, eggs, and milk until well combined.
- Gently fold in the flour and salt, ensuring the mixture is evenly coated without overmixing.
- Heat a large skillet over medium heat and melt a tablespoon of butter.
- For each latke, drop a heaping tablespoon of the mixture into the skillet, flattening slightly with the back of the spoon.
- Cook for about 3-4 minutes on each side, or until golden brown and crispy. Tip: Don’t overcrowd the skillet to ensure even cooking.
- Transfer the cooked latkes to a paper towel-lined plate to drain any excess butter. Tip: Keep them warm in a low oven while you finish the batch.
- Repeat with the remaining mixture, adding more butter to the skillet as needed. Tip: If the latkes are browning too quickly, lower the heat slightly.
The result is a batch of irresistibly crispy latkes with a soft, cheesy interior. Serve them hot with a dollop of sour cream or apple sauce for a traditional touch, or get creative with a drizzle of honey for a sweet and savory combo.
Vanilla Bean Cheesecake with Strawberry Glaze
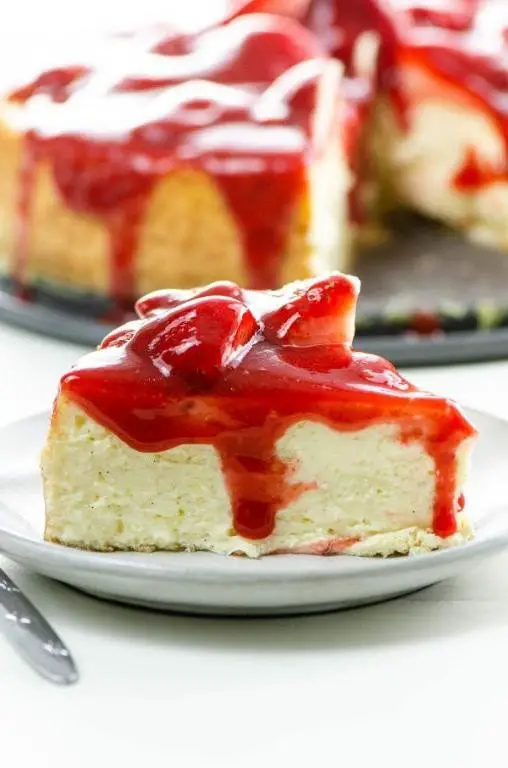
First, let’s dive into creating a dessert that’s as delightful to make as it is to eat. This vanilla bean cheesecake with strawberry glaze is a perfect blend of creamy and fruity, ideal for any occasion. Follow these steps carefully, and you’ll have a dessert that’s sure to impress.
Ingredients
- 2 cups of graham cracker crumbs (just crush them up real fine)
- 1/2 cup of melted butter (that’s one stick, melted)
- 3 packages of cream cheese (8 oz each, make sure it’s at room temperature)
- 1 cup of sugar (granulated, for that sweet touch)
- 3 eggs (large, and yes, room temperature matters here too)
- 1 vanilla bean (split and scraped, or a splash of vanilla extract if you’re in a pinch)
- 1 cup of sour cream (for that tangy smoothness)
- 1 cup of strawberry jam (for the glaze, homemade or store-bought)
- A couple of fresh strawberries (for garnish, because we eat with our eyes first)
Instructions
- Preheat your oven to 325°F. This low and slow approach is key for a crack-free cheesecake.
- Mix the graham cracker crumbs and melted butter until it feels like wet sand. Press firmly into the bottom of a 9-inch springform pan. Tip: Use the bottom of a glass to get an even layer.
- Bake the crust for 10 minutes, then let it cool. This step ensures your crust won’t get soggy.
- Beat the cream cheese and sugar until smooth. Add eggs one at a time, mixing just until blended. Overmixing incorporates too much air, which can cause cracks.
- Stir in the vanilla bean seeds and sour cream. Pour over the crust.
- Bake for 45 minutes, then turn off the oven and leave the door slightly open for another hour. This gradual cooling prevents sinking.
- Once cooled, spread the strawberry jam over the top. Chill for at least 4 hours, or overnight for best results.
- Garnish with fresh strawberries before serving.
The cheesecake should be creamy with a slight tang, perfectly balanced by the sweet strawberry glaze. Try serving it with a drizzle of chocolate sauce for an extra decadent touch.
Whipped Feta and Herb Dip
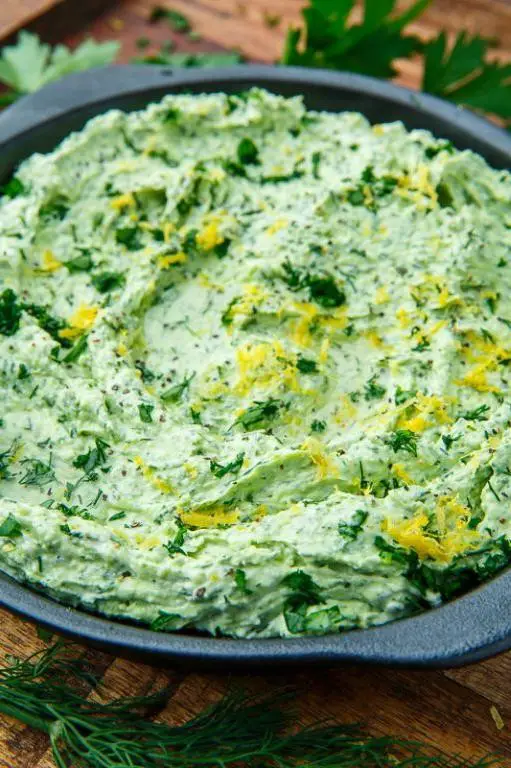
Start by gathering your ingredients and tools for this creamy, tangy dip that’s perfect for any gathering. Simple to make yet impressive, this whipped feta and herb dip combines the salty bite of feta with the freshness of herbs for a crowd-pleasing appetizer.
Ingredients
- 8 oz block of feta cheese, crumbled
- 1/2 cup Greek yogurt
- A couple of tablespoons of olive oil
- A splash of lemon juice
- A handful of fresh dill, chopped
- A handful of fresh mint, chopped
- 1 small garlic clove, minced
- A pinch of black pepper
Instructions
- In a food processor, combine the crumbled feta and Greek yogurt. Blend until smooth, about 1 minute.
- With the processor running, slowly drizzle in the olive oil until the mixture is creamy and well combined.
- Add the lemon juice, dill, mint, minced garlic, and black pepper to the processor. Pulse a few times until the herbs are finely chopped and evenly distributed throughout the dip.
- Transfer the dip to a serving bowl. For the best flavor, let it chill in the refrigerator for at least 30 minutes before serving.
- Tip: If the dip is too thick, add a teaspoon of water at a time until you reach your desired consistency.
- Tip: For an extra touch of elegance, drizzle a little more olive oil on top and sprinkle with additional chopped herbs before serving.
- Tip: This dip can be made a day ahead. Just cover and refrigerate until you’re ready to serve.
Velvety smooth with a bright herby kick, this whipped feta dip is a versatile companion to crunchy vegetables, warm pita bread, or as a spread for sandwiches. Its creamy texture and bold flavors make it a standout dish that’s as easy to love as it is to make.
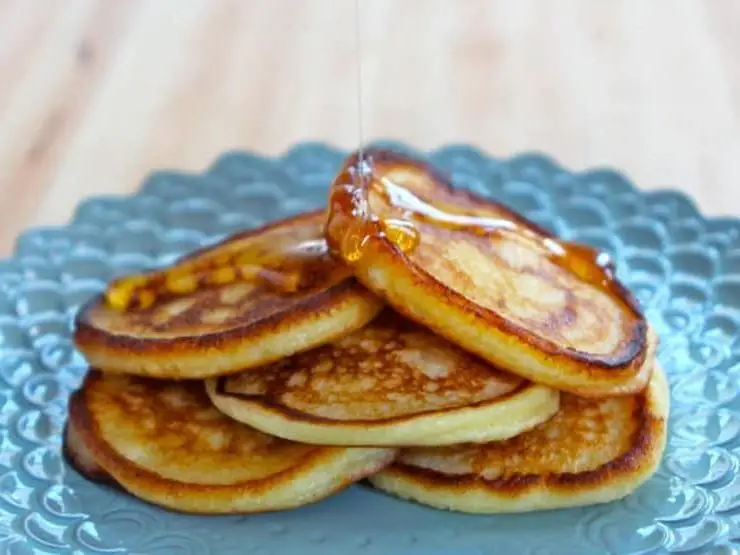
Zesty Lemon Ricotta Pancakes
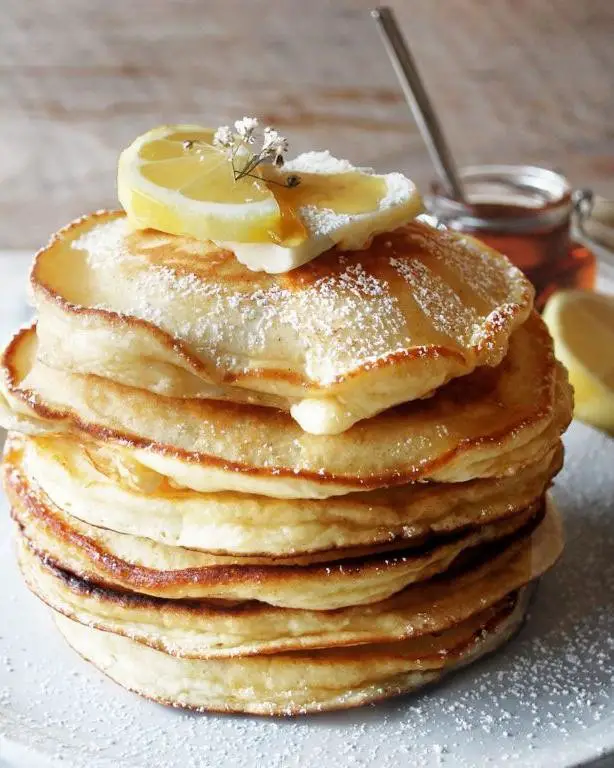
Very few things brighten up a morning like a stack of fluffy, citrus-infused pancakes. Today, we’re diving into making Zesty Lemon Ricotta Pancakes, a recipe that promises a delightful balance of tangy and sweet, perfect for those who love a little zest in their breakfast.
Ingredients
- 1 cup of all-purpose flour
- 2 tablespoons of sugar
- 1 teaspoon of baking powder
- A pinch of salt
- 1 cup of ricotta cheese
- 2 large eggs
- Zest of 1 lemon
- Juice of half a lemon
- A splash of milk
- Butter for greasing
Instructions
- In a large bowl, whisk together the flour, sugar, baking powder, and salt until well combined.
- In another bowl, mix the ricotta cheese, eggs, lemon zest, and lemon juice until smooth. Tip: For extra fluffy pancakes, let the batter sit for 5 minutes before cooking.
- Gently fold the wet ingredients into the dry ingredients, adding a splash of milk to reach your desired batter consistency. Tip: The batter should be thick but pourable.
- Heat a non-stick skillet over medium heat and melt a small amount of butter. Tip: To test if the skillet is ready, drop a bit of batter; if it sizzles, it’s perfect.
- Pour 1/4 cup of batter for each pancake onto the skillet. Cook until bubbles form on the surface and the edges look set, about 2-3 minutes.
- Flip the pancakes and cook for another 1-2 minutes, until golden brown and cooked through.
Combining the creamy richness of ricotta with the bright flavor of lemon, these pancakes are irresistibly light and fluffy. Serve them stacked high with a drizzle of maple syrup and a sprinkle of extra lemon zest for an extra zing.
Baked Macaroni and Cheese with a Crunchy Top
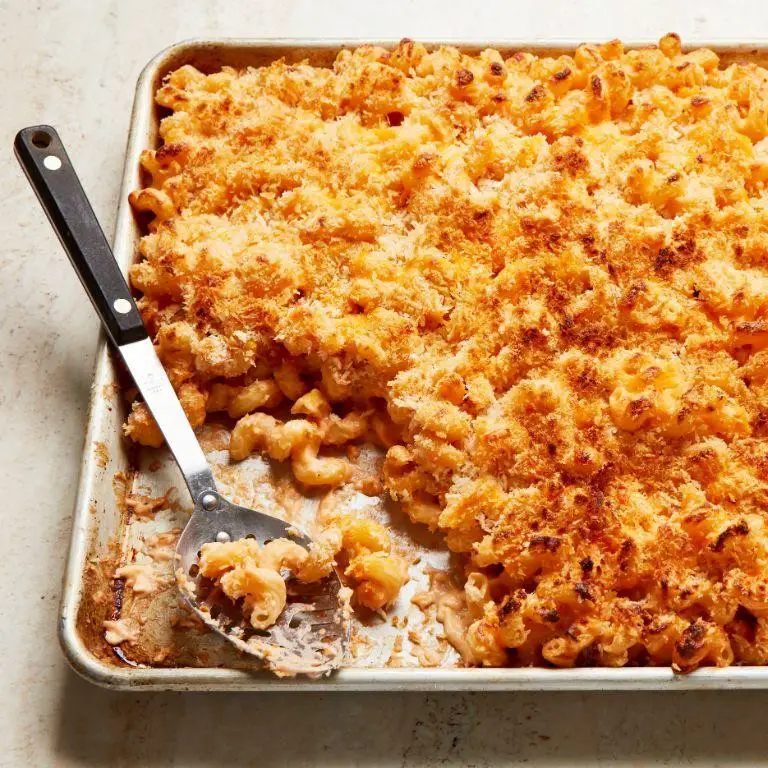
Comfort food at its finest, this baked macaroni and cheese with a crunchy top is a classic dish that’s sure to please. Let’s walk through the steps to create this creamy, cheesy masterpiece with that irresistible crispy topping.
Ingredients
- 2 cups of elbow macaroni
- 3 tablespoons of butter
- 3 tablespoons of all-purpose flour
- 2 cups of milk, plus a splash more if needed
- 2 cups of shredded sharp cheddar cheese
- 1/2 cup of grated Parmesan cheese
- 1/2 teaspoon of salt
- 1/4 teaspoon of black pepper
- 1/2 cup of breadcrumbs
- 1 tablespoon of olive oil
Instructions
- Preheat your oven to 375°F (190°C) and grease a baking dish lightly.
- Cook the macaroni according to the package instructions until al dente, then drain and set aside.
- In a saucepan, melt the butter over medium heat. Stir in the flour to create a roux, cooking for about 1 minute until golden.
- Gradually whisk in the milk, ensuring no lumps form, and cook until the mixture thickens, about 5 minutes. Tip: Keep stirring to prevent the sauce from sticking to the pan.
- Remove the saucepan from heat and stir in the cheddar and Parmesan cheeses until melted and smooth. Season with salt and pepper.
- Combine the cheese sauce with the cooked macaroni, mixing well to coat every piece. If the mixture seems too thick, add a splash of milk to loosen it.
- Transfer the macaroni mixture to the prepared baking dish.
- In a small bowl, mix the breadcrumbs with olive oil until evenly coated, then sprinkle over the macaroni. Tip: For extra crunch, you can toast the breadcrumbs lightly before sprinkling.
- Bake for 20-25 minutes, or until the top is golden and crispy. Tip: Keep an eye on it during the last few minutes to avoid over-browning.
- Let it sit for 5 minutes before serving to allow the sauce to set slightly.
Mmm, the contrast between the creamy macaroni and the crispy breadcrumb topping is simply divine. Serve it straight from the oven with a side of steamed veggies for a comforting meal that’s both satisfying and easy to make.
Chocolate Chip Rugelach
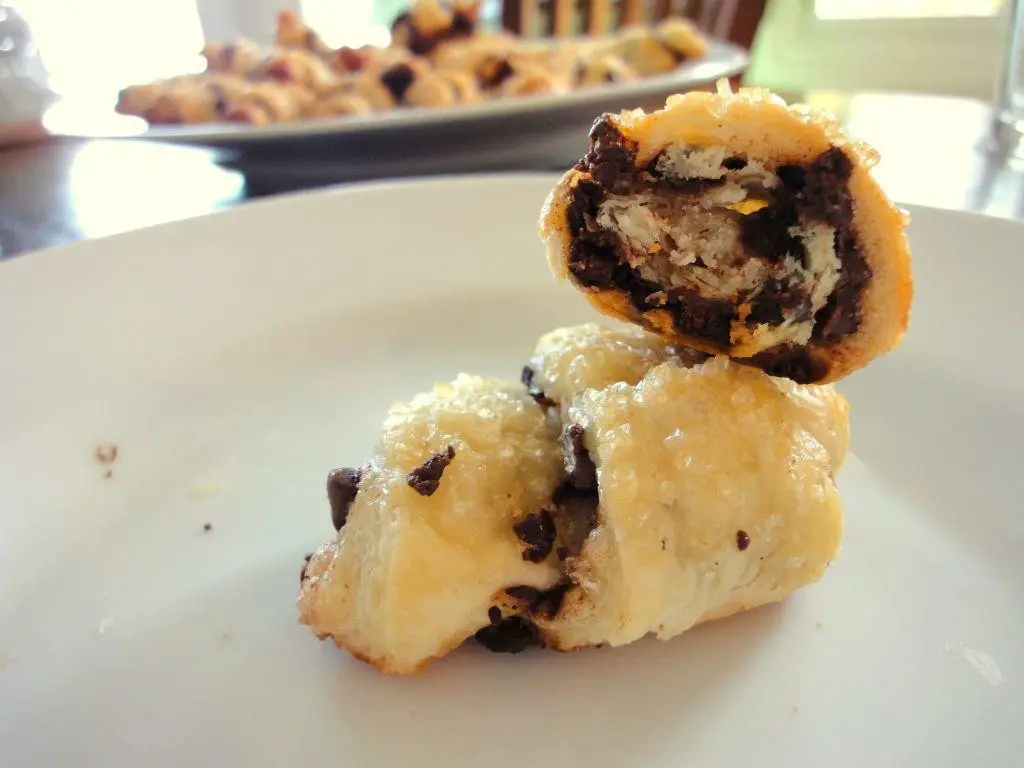
Creating the perfect Chocolate Chip Rugelach is easier than you think, especially when you follow these simple steps. Let’s dive into the process together, ensuring every bite is as delightful as intended.
Ingredients
- 2 cups of all-purpose flour, because that’s the base of our dough
- 1 cup of unsalted butter, cold and cut into small pieces for that flaky texture
- 8 oz of cream cheese, softened to room temperature to blend smoothly
- A pinch of salt, just to balance the sweetness
- 1/2 cup of granulated sugar, for a touch of sweetness in the dough
- 1 cup of mini chocolate chips, because regular ones are just too big
- A splash of vanilla extract, for that classic flavor
- 1 egg, beaten, for brushing to get that golden finish
- A couple of tablespoons of cinnamon sugar, for sprinkling on top
Instructions
- Start by combining the flour and salt in a large bowl. Whisk them together to ensure they’re well mixed.
- Add the cold butter pieces and cream cheese to the bowl. Use your fingers or a pastry cutter to blend them into the flour until the mixture resembles coarse crumbs.
- Tip: Keep everything as cold as possible to ensure a flaky texture. If the butter starts to melt, pop the bowl in the fridge for 10 minutes.
- Stir in the sugar and vanilla extract until just combined. Then, gently fold in the mini chocolate chips.
- Divide the dough into 4 equal parts, wrap each in plastic, and chill in the fridge for at least 1 hour. This makes the dough easier to handle.
- Preheat your oven to 350°F (175°C) and line a baking sheet with parchment paper.
- On a lightly floured surface, roll one dough portion into a 1/8-inch thick circle. Cut into 8 wedges like a pizza.
- Tip: If the dough sticks, sprinkle a bit more flour on your rolling pin and surface.
- Starting from the wide end, roll each wedge towards the point to form a crescent shape. Place on the baking sheet.
- Brush each rugelach with the beaten egg and sprinkle generously with cinnamon sugar.
- Tip: For extra shine, you can brush them with egg wash again halfway through baking.
- Bake for 20-25 minutes, or until golden brown. Let them cool on the sheet for 5 minutes before transferring to a wire rack.
Out of the oven, these rugelach are irresistibly flaky with a buttery richness, punctuated by melty chocolate chips. Serve them warm with a dusting of powdered sugar for an extra sweet touch, or alongside your morning coffee for a delightful treat.
Garlic and Herb Cream Cheese Spread
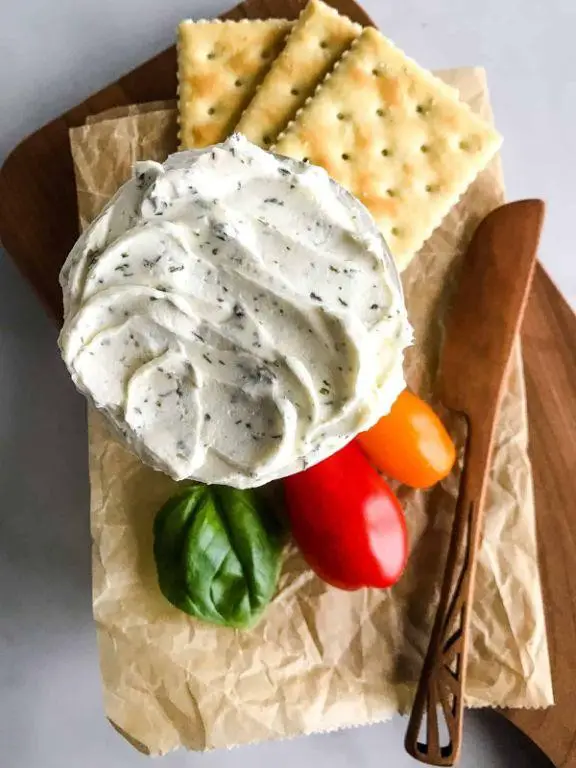
Ready to elevate your snack game with minimal effort? This Garlic and Herb Cream Cheese Spread is your go-to for adding a burst of flavor to any meal or snack, and it’s surprisingly simple to make.
Ingredients
- 8 oz of cream cheese, softened to room temperature
- 2 cloves of garlic, minced (because fresh is best!)
- A handful of fresh parsley, finely chopped
- A couple of tbsp of fresh chives, snipped into tiny pieces
- A splash of lemon juice for that zesty kick
- A pinch of salt to bring all the flavors together
Instructions
- Start by placing the softened cream cheese in a medium mixing bowl. Tip: If you forgot to take the cream cheese out of the fridge, microwaving it for 10 seconds can soften it without melting.
- Add the minced garlic, chopped parsley, snipped chives, lemon juice, and salt to the bowl.
- Using a fork or a hand mixer, blend all the ingredients together until smooth and well combined. Tip: For a chunkier spread, mix by hand and leave some bits of herbs for texture.
- Taste the spread and adjust the seasoning if necessary. Tip: Remember, the flavors will meld and intensify after chilling, so go easy on the salt at first.
- Transfer the spread to a serving dish, cover, and refrigerate for at least an hour to let the flavors develop.
Zesty and creamy, this spread is perfect on bagels, as a dip for veggies, or even as a flavorful addition to sandwiches. The fresh herbs and garlic give it a bright, aromatic quality that’s hard to resist, making it a versatile staple in your fridge.
Puff Pastry Cheese Straws

Very few snacks strike the perfect balance between elegance and ease quite like puff pastry cheese straws. Let me guide you through creating these flaky, cheesy delights that are sure to impress at any gathering.
Ingredients
- 1 sheet of frozen puff pastry, thawed
- a cup of grated sharp cheddar cheese
- a couple of tablespoons of grated Parmesan cheese
- a splash of heavy cream
- a pinch of cayenne pepper
- a sprinkle of salt
Instructions
- Preheat your oven to 400°F (200°C) and line a baking sheet with parchment paper.
- Unfold the thawed puff pastry sheet on a lightly floured surface to prevent sticking.
- Brush the entire surface of the puff pastry with a thin layer of heavy cream to help the cheese adhere.
- Evenly sprinkle the grated cheddar, Parmesan, a pinch of cayenne pepper, and salt over the cream-brushed pastry.
- Gently roll over the toppings with a rolling pin to press them into the pastry.
- Using a sharp knife or pizza cutter, cut the pastry into strips about 1/2 inch wide.
- Twist each strip a couple of times and place them on the prepared baking sheet, leaving space between each.
- Bake for 12-15 minutes, or until the straws are puffed and golden brown. Keep an eye on them to prevent burning.
- Let the cheese straws cool on the baking sheet for a few minutes before transferring to a wire rack.
Light as air with a satisfying crunch, these cheese straws are a testament to the magic of puff pastry. Serve them alongside a glass of wine for an effortlessly chic appetizer or pack them in a lunchbox for a gourmet snack.
Conclusion
Vibrant and varied, this collection of 18 Delicious Shavuot Recipes offers something for every festive table. From creamy cheesecakes to savory blintzes, each dish is a celebration of flavor and tradition. We invite you to try these recipes, share your favorites in the comments, and spread the joy by pinning this article on Pinterest. Happy cooking and an even happier Shavuot!