Savory, sweet, or umami-packed, soy sauce is the secret ingredient that can transform any dish from good to unforgettable. Whether you’re whipping up a quick weeknight dinner, celebrating with seasonal favorites, or craving some comfort food, our roundup of 18 delicious soy sauce recipes has something for every occasion. Dive in and discover how this versatile condiment can elevate your cooking in ways you’ve never imagined!
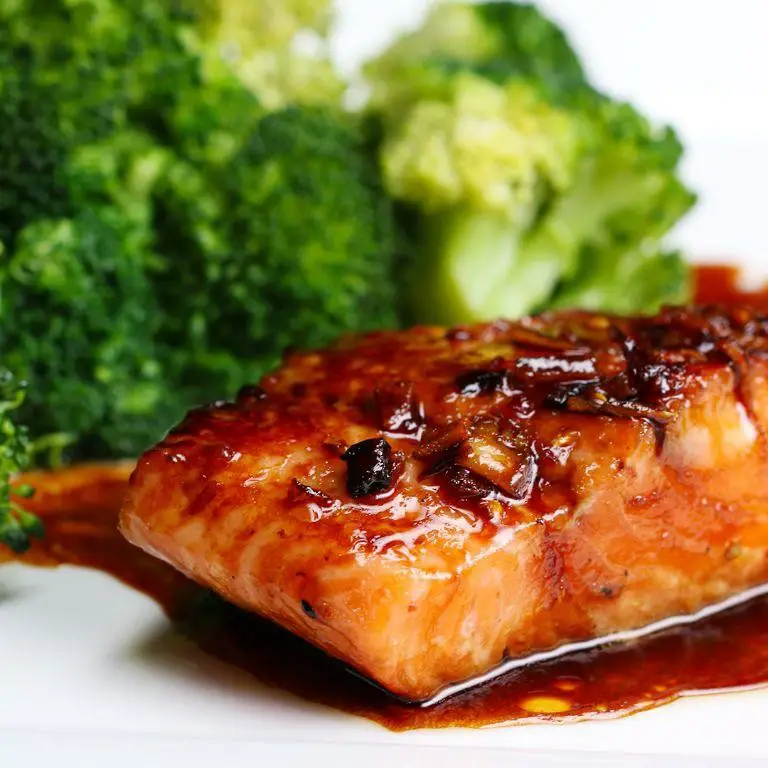
Soy Sauce Glazed Salmon
Gathering the right ingredients and following these steps will lead you to a perfectly glazed salmon that’s both flavorful and tender. Let’s dive into the process of creating this delightful dish.
Ingredients
- 1 lb salmon fillet (skin-on for extra flavor and crispiness)
- 1/4 cup soy sauce (I always opt for low-sodium to control the saltiness)
- 2 tbsp honey (local honey adds a lovely depth)
- 1 tbsp minced garlic (freshly minced makes all the difference)
- 1 tsp grated ginger (keep some extra for garnish if you like)
- 1 tbsp olive oil (extra virgin is my go-to for its fruity notes)
- 1/2 tsp sesame oil (a little goes a long way in enhancing the aroma)
Instructions
- Preheat your oven to 375°F (190°C) to ensure it’s ready for the salmon.
- In a small bowl, whisk together the soy sauce, honey, minced garlic, and grated ginger until well combined. This will be your glaze.
- Heat olive oil in an oven-proof skillet over medium-high heat. Once hot, place the salmon fillet skin-side down. Sear for 2-3 minutes until the skin is crispy.
- Flip the salmon carefully, then pour the glaze over the fillet, ensuring it’s evenly coated.
- Transfer the skillet to the preheated oven and bake for 10-12 minutes, or until the salmon flakes easily with a fork.
- Drizzle with sesame oil right before serving to add an extra layer of flavor.
Lusciously glazed and perfectly cooked, this salmon boasts a beautiful balance of sweet and savory. Serve it over a bed of steamed rice or alongside roasted vegetables for a complete meal that’s sure to impress.
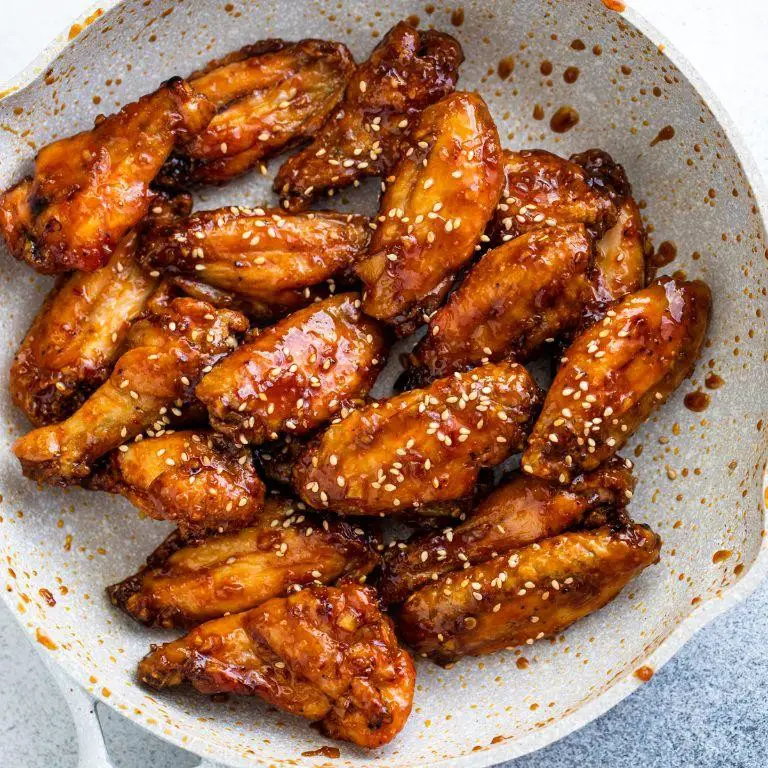
Garlic Soy Sauce Chicken Wings
You’re about to embark on a culinary journey that will transform your kitchen into a fragrant haven with these Garlic Soy Sauce Chicken Wings. Perfect for beginners, this recipe is a straightforward path to deliciousness.
Ingredients
- 2 lbs chicken wings (I find that wings with the skin on yield the crispiest results)
- 1/4 cup soy sauce (opt for low-sodium to control the saltiness)
- 3 tbsp honey (local honey adds a lovely depth of flavor)
- 4 garlic cloves, minced (freshly minced garlic is a game-changer here)
- 1 tbsp olive oil (extra virgin is my go-to for its fruity notes)
- 1/2 tsp black pepper (freshly ground makes all the difference)
Instructions
- Preheat your oven to 400°F (200°C) to ensure it’s hot enough for crispy wings.
- In a large bowl, combine the soy sauce, honey, minced garlic, olive oil, and black pepper. Whisk until the honey is fully dissolved.
- Add the chicken wings to the bowl and toss them thoroughly to ensure each wing is evenly coated with the marinade.
- Let the wings marinate for at least 30 minutes at room temperature. This step is crucial for infusing the wings with flavor.
- Arrange the wings on a baking sheet lined with parchment paper, ensuring they’re not touching. This allows for even cooking and crispiness.
- Bake in the preheated oven for 40-45 minutes, flipping the wings halfway through. The wings are done when they’re golden brown and the skin is crispy.
- Let the wings rest for 5 minutes before serving. This allows the juices to redistribute, ensuring moist and flavorful wings.
Delightfully sticky and packed with umami, these wings are a testament to the magic of simple ingredients. Serve them atop a bed of steamed rice to soak up every last drop of that garlic soy glaze.
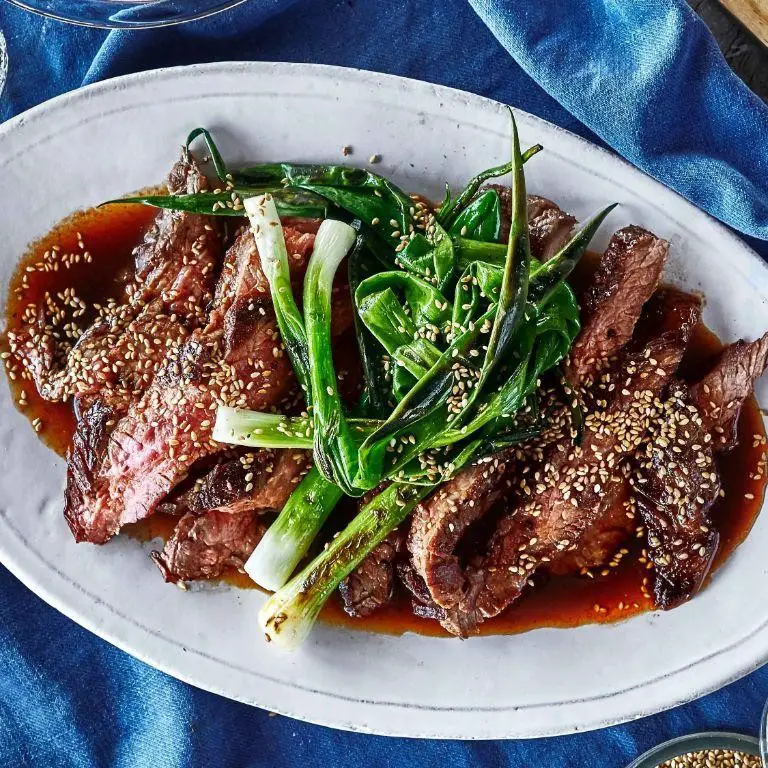
Soy Sauce Marinated Beef
This Soy Sauce Marinated Beef is a game-changer for weeknight dinners, combining simplicity with deep, savory flavors. Trust me, once you try this method, you’ll never look back.
Ingredients
- 1.5 lbs beef flank steak (slicing against the grain ensures tenderness)
- 1/2 cup soy sauce (I swear by Kikkoman for its perfect balance of saltiness and umami)
- 1/4 cup brown sugar (packed, for that caramelized crust we all crave)
- 3 cloves garlic (minced, because fresh is always better)
- 1 tbsp ginger (grated, a little goes a long way in brightening the dish)
- 2 tbsp sesame oil (toasted, for an nutty aroma that’s irresistible)
- 1/2 tsp black pepper (freshly ground, to add a subtle kick)
Instructions
- In a large bowl, whisk together soy sauce, brown sugar, minced garlic, grated ginger, sesame oil, and black pepper until the sugar dissolves completely.
- Add the sliced beef to the marinade, ensuring each piece is well-coated. Cover and refrigerate for at least 2 hours, though overnight marination yields deeper flavors.
- Heat a large skillet over medium-high heat. No need to add oil; the sesame oil in the marinade is sufficient.
- Remove the beef from the marinade, letting excess drip off. Reserve the marinade for later use.
- Cook the beef in batches to avoid overcrowding, about 2-3 minutes per side, until beautifully caramelized and cooked to your liking.
- Tip: For an extra glossy finish, simmer the reserved marinade in a small saucepan for 5 minutes and drizzle over the cooked beef.
- Tip: Let the beef rest for a few minutes before serving to allow the juices to redistribute.
- Tip: Serve over a bed of steamed rice with a side of blanched greens for a balanced meal.
Behold the tender, flavorful slices of beef, each bite bursting with the perfect harmony of sweet and savory. Try wrapping them in lettuce leaves for a refreshing crunch that contrasts beautifully with the rich marinade.
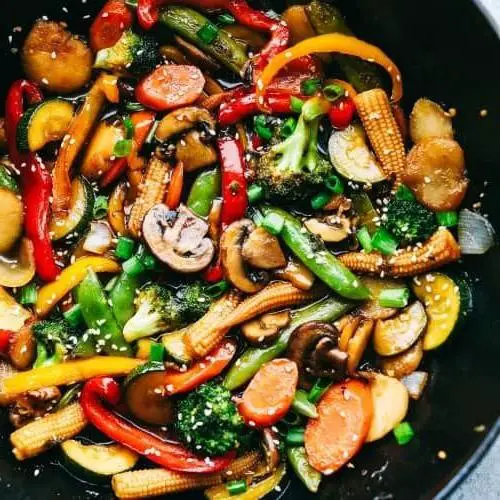
Vegetable Stir Fry with Soy Sauce
Ready to whip up a quick, nutritious meal that’s bursting with flavor? This Vegetable Stir Fry with Soy Sauce is a foolproof dish that combines crisp veggies with a savory sauce, perfect for a weeknight dinner.
Ingredients
- 2 tbsp extra virgin olive oil (my go-to for its fruity note)
- 1 cup broccoli florets (fresh and crisp works best)
- 1 bell pepper, sliced (I love the color and sweetness of red ones)
- 1 carrot, julienned (for a bit of crunch and color)
- 2 cloves garlic, minced (because everything’s better with garlic)
- 1 tbsp soy sauce (low sodium is my preference to control saltiness)
- 1 tsp sesame oil (for that authentic Asian flair)
Instructions
- Heat the olive oil in a large skillet over medium-high heat until shimmering, about 1 minute.
- Add the broccoli florets and stir fry for 2 minutes until they start to brighten in color.
- Toss in the bell pepper and carrot, continuing to stir fry for another 3 minutes. Tip: Keep the veggies moving to prevent burning.
- Add the minced garlic and stir fry for 30 seconds until fragrant. Tip: Garlic burns quickly, so watch it closely.
- Drizzle the soy sauce and sesame oil over the veggies, tossing to coat evenly. Cook for 1 more minute. Tip: A quick toss ensures every piece is flavorful.
- Remove from heat and serve immediately.
What you’ll love about this dish is the vibrant colors and the perfect balance of crunch and tenderness. Try serving it over a bed of steamed rice or noodles for a more filling meal.
Soy Sauce Braised Pork Belly
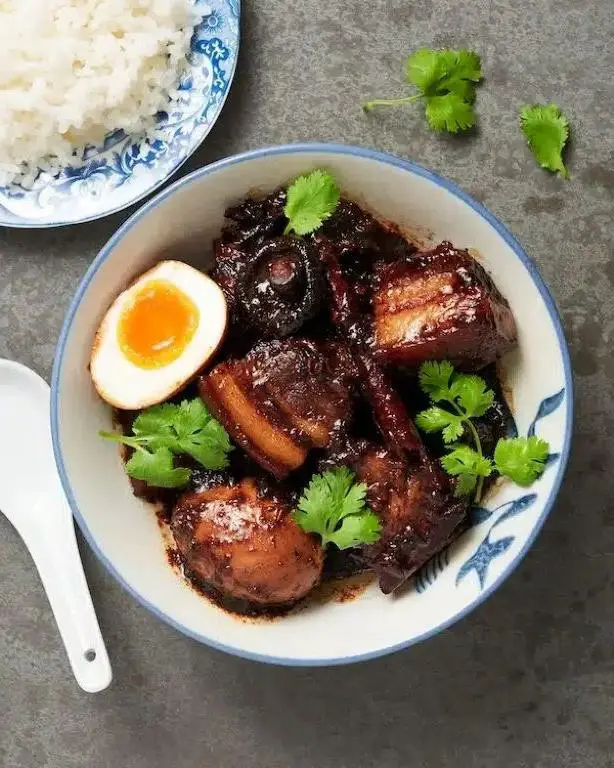
Very few dishes can rival the comforting embrace of Soy Sauce Braised Pork Belly, a dish that marries the richness of pork belly with the deep, umami flavors of soy sauce. This recipe is perfect for those looking to dive into the art of braising, offering a step-by-step guide to achieve tender, flavorful meat every time.
Ingredients
- 2 lbs pork belly, cut into 1-inch pieces (I find that slightly thicker pieces hold up better during the long braise)
- 1/2 cup soy sauce (I swear by Kikkoman for its balanced flavor)
- 1/4 cup brown sugar (packed, for that perfect caramelized glaze)
- 3 cloves garlic, minced (freshly minced garlic makes all the difference)
- 1 inch ginger, sliced (peeling is optional, but I always do for a smoother texture)
- 2 cups water (filtered water ensures no off flavors)
- 2 green onions, chopped (for garnish, adds a fresh contrast)
Instructions
- In a large pot, combine the pork belly pieces and enough water to cover them. Bring to a boil over high heat, then simmer for 5 minutes to remove impurities. Drain and rinse the pork under cold water.
- Return the pork to the pot. Add soy sauce, brown sugar, garlic, ginger, and 2 cups of water. The liquid should just cover the pork; adjust water if necessary.
- Bring the mixture to a boil, then reduce heat to low. Cover and simmer for 1.5 hours, stirring occasionally to ensure even cooking.
- After 1.5 hours, remove the lid and increase the heat to medium. Cook for another 30 minutes, or until the sauce has thickened and the pork is glazed, stirring frequently to prevent burning.
- Garnish with chopped green onions before serving.
Tip 1: Skimming the fat during the initial boil results in a cleaner flavor. Tip 2: For an extra layer of flavor, toast the garlic and ginger before adding them to the pot. Tip 3: Letting the dish rest for 10 minutes after cooking allows the flavors to meld beautifully.
Tender and succulent, the pork belly should practically melt in your mouth, with the soy sauce glaze offering a perfect balance of sweet and savory. Serve it over a bed of steamed rice or alongside crisp, blanched vegetables for a complete meal.
Soy Sauce and Honey Glazed Carrots
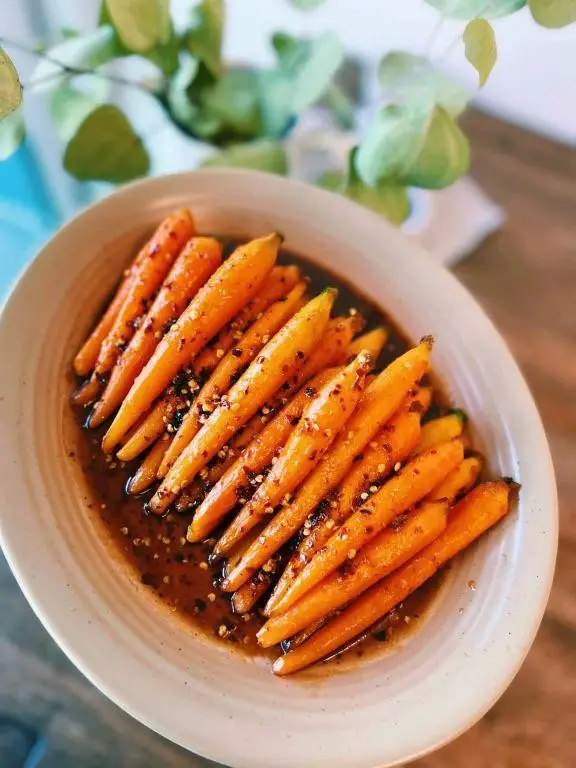
Our journey into the world of glazed carrots begins with a simple yet transformative combination of soy sauce and honey, creating a dish that’s both savory and sweet. Perfect for beginners, this recipe will guide you through each step to achieve perfectly glazed carrots every time.
Ingredients
- 1 lb carrots, peeled and sliced into 1/2-inch rounds (I find uniform sizes ensure even cooking)
- 2 tbsp unsalted butter (for that rich, velvety glaze)
- 2 tbsp honey (local honey adds a lovely floral note)
- 1 tbsp soy sauce (I opt for low-sodium to control the saltiness)
- 1/4 cup water (just enough to help steam the carrots to tenderness)
Instructions
- In a large skillet over medium heat, melt the butter until it’s just beginning to foam, about 1 minute.
- Add the carrot rounds to the skillet, stirring to coat them evenly with the butter. Cook for 5 minutes, stirring occasionally, until they start to soften.
- Pour in the water, cover the skillet, and reduce the heat to low. Let the carrots steam for 7 minutes, or until they’re tender but still crisp. Tip: Check the water level halfway through to prevent burning.
- Uncover the skillet and increase the heat to medium-high. Add the honey and soy sauce, stirring constantly to coat the carrots. Cook for another 3 minutes until the glaze thickens and clings to the carrots. Tip: Watch closely to avoid over-reducing the glaze.
- Remove from heat and let stand for 2 minutes before serving. This allows the glaze to set slightly. Tip: A sprinkle of sesame seeds adds a nice crunch and visual appeal.
Mouthwatering and vibrant, these glazed carrots boast a glossy finish with a perfect balance of sweetness and umami. Serve them alongside roasted chicken or as a standout side at your next dinner party for a touch of elegance.
Soy Sauce Pickled Cucumbers
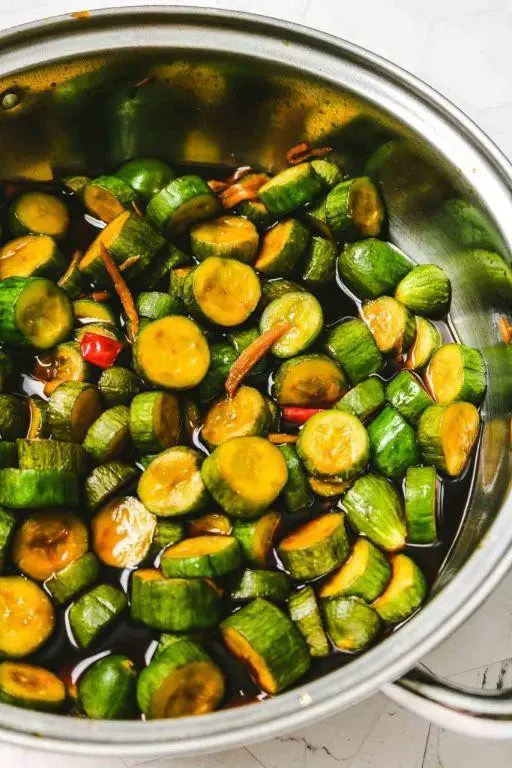
Kickstart your culinary adventure with this simple yet flavorful Soy Sauce Pickled Cucumbers recipe, perfect for adding a tangy crunch to any meal. Let me guide you through each step to ensure your pickles turn out perfectly crisp and infused with the rich umami of soy sauce.
Ingredients
- 2 medium cucumbers, thinly sliced (I like to leave the skin on for extra crunch and color)
- 1/2 cup soy sauce (opt for low-sodium if you’re watching your salt intake)
- 1/4 cup rice vinegar (this adds a mild sweetness that balances the soy sauce)
- 1 tbsp sugar (just a touch to round out the flavors)
- 2 cloves garlic, minced (because garlic makes everything better)
- 1 tsp red pepper flakes (adjust according to your heat preference)
Instructions
- In a medium bowl, combine the soy sauce, rice vinegar, sugar, minced garlic, and red pepper flakes. Whisk until the sugar is completely dissolved.
- Add the thinly sliced cucumbers to the bowl, ensuring each slice is submerged in the marinade. Tip: Use a plate or a small lid to weigh down the cucumbers if they float to the top.
- Cover the bowl with plastic wrap and refrigerate for at least 2 hours, though overnight is best for maximum flavor. Tip: Stir the cucumbers halfway through to ensure even pickling.
- Before serving, give the cucumbers a quick stir and drain any excess marinade if desired. Tip: Save the marinade to use as a dressing for salads or noodles!
These Soy Sauce Pickled Cucumbers boast a delightful crunch with a perfect balance of salty, sweet, and spicy flavors. Try serving them alongside grilled meats or as a vibrant topping for your favorite burger for an extra punch of flavor.
Soy Sauce Infused Mushroom Risotto
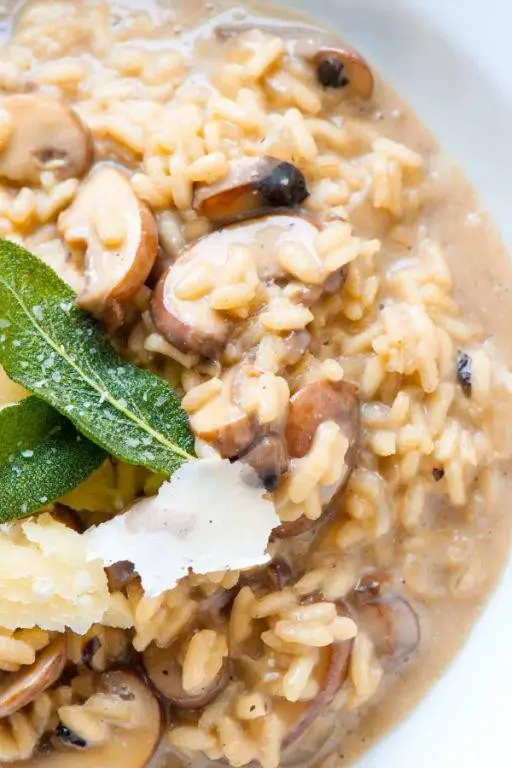
Now, let’s dive into creating a comforting bowl of Soy Sauce Infused Mushroom Risotto, a dish that marries the earthy flavors of mushrooms with the umami depth of soy sauce, perfect for a cozy night in.
Ingredients
- 1 1/2 cups Arborio rice – the star of the show, its high starch content is key for that creamy texture.
- 4 cups chicken or vegetable broth – I like to warm it up before adding to the rice for even cooking.
- 2 tbsp extra virgin olive oil – my go-to for its fruity notes that complement the mushrooms.
- 1/2 cup dry white wine – a splash adds acidity to balance the richness.
- 1 lb mixed mushrooms, sliced – cremini and shiitake are my favorites for their meaty texture.
- 1 small onion, finely diced – the foundation of flavor in any risotto.
- 2 cloves garlic, minced – because everything’s better with garlic.
- 3 tbsp soy sauce – the secret ingredient that adds a savory depth.
- 1/2 cup grated Parmesan cheese – for that salty, nutty finish.
- 2 tbsp unsalted butter – because butter makes everything better.
- Salt and freshly ground black pepper – to season as you go.
Instructions
- Heat the broth in a saucepan over medium heat until simmering, then reduce the heat to low to keep warm.
- In a large, heavy-bottomed pot, heat the olive oil over medium heat. Add the onions and a pinch of salt, cooking until translucent, about 5 minutes.
- Add the garlic and mushrooms, cooking until the mushrooms are golden and their liquid has evaporated, about 8 minutes. Tip: Don’t overcrowd the pan to ensure the mushrooms brown nicely.
- Stir in the Arborio rice, toasting it for 2 minutes until the edges become slightly translucent.
- Pour in the white wine, stirring constantly until it’s fully absorbed by the rice.
- Begin adding the warm broth, one ladle at a time, stirring frequently and allowing each addition to be absorbed before adding the next. This process should take about 18-20 minutes. Tip: Keep the broth at a simmer to maintain the rice’s cooking temperature.
- Once the rice is al dente and the mixture is creamy, stir in the soy sauce, Parmesan, and butter. Season with salt and pepper to taste. Tip: The risotto should flow slowly when spooned; if it’s too thick, add a bit more broth.
- Remove from heat and let it sit for 2 minutes before serving.
Lusciously creamy with a punch of umami from the soy sauce, this risotto is a testament to the magic of simple ingredients. Serve it with a sprinkle of extra Parmesan and a drizzle of truffle oil for an extra touch of luxury.
Soy Sauce and Ginger Dressing for Salads
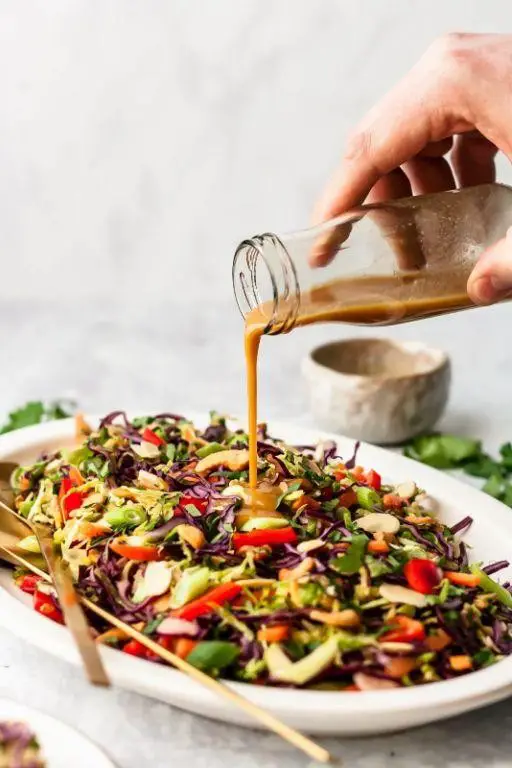
Our journey into making a Soy Sauce and Ginger Dressing begins with understanding its balance of flavors—umami from the soy sauce and a spicy kick from the ginger. This dressing is perfect for those who love a bit of zest in their salads.
Ingredients
- 1/4 cup soy sauce (I always opt for low-sodium to control the saltiness)
- 2 tbsp rice vinegar (adds a nice tanginess)
- 1 tbsp honey (for a subtle sweetness)
- 1 tbsp freshly grated ginger (the fresher, the better for that vibrant flavor)
- 1/2 cup extra virgin olive oil (my go-to for its smooth finish)
- 1 clove garlic, minced (because garlic makes everything better)
Instructions
- In a small bowl, whisk together the soy sauce, rice vinegar, honey, and grated ginger until the honey is fully dissolved.
- Slowly drizzle in the extra virgin olive oil while continuously whisking to emulsify the dressing. Tip: Room temperature ingredients blend more easily.
- Add the minced garlic to the mixture and whisk again to combine. Tip: Let the dressing sit for 10 minutes before serving to allow the flavors to meld.
- Taste the dressing and adjust the ingredients if necessary. Tip: If you prefer a thicker consistency, a teaspoon of Dijon mustard can help emulsify it further.
Here’s the final touch: This dressing coats greens beautifully, offering a glossy sheen and a punch of flavor. Try it over a crisp Asian slaw or as a marinade for grilled vegetables to elevate your dish.
Soy Sauce Caramelized Onions
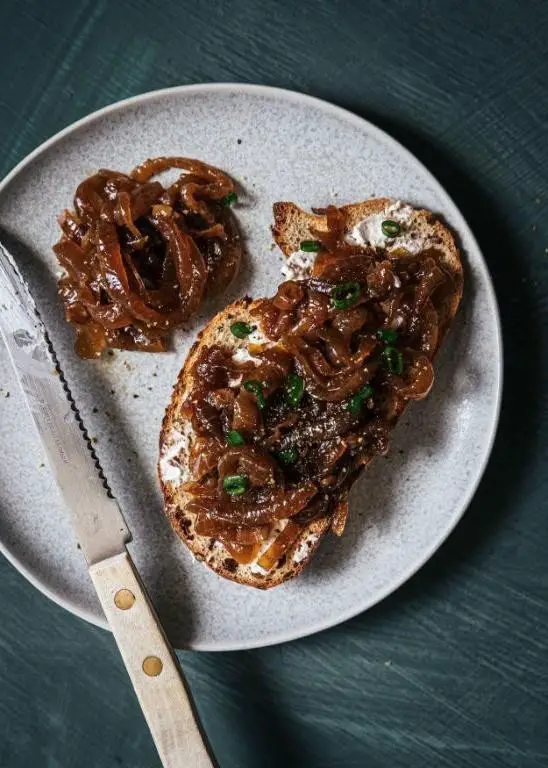
Discover how to transform simple onions into a rich, umami-packed condiment with this soy sauce caramelized onions recipe. Perfect for elevating burgers, bowls, or even as a sophisticated toast topping, this method ensures deep flavor with minimal effort.
Ingredients
- 2 large yellow onions, thinly sliced (I find they caramelize best when cut with the grain)
- 2 tablespoons unsalted butter (for that rich, rounded flavor)
- 1 tablespoon extra virgin olive oil (my go-to for a slight fruity note)
- 1/4 cup soy sauce (opt for low-sodium to control the saltiness)
- 1 tablespoon brown sugar (adds a subtle sweetness that balances the soy)
Instructions
- Heat a large skillet over medium-low heat and add the butter and olive oil, allowing the butter to melt completely.
- Add the thinly sliced onions to the skillet, stirring to coat them evenly with the fat. This ensures even caramelization.
- Cook the onions slowly, stirring every 5 minutes, for about 30 minutes. They should turn a deep golden brown; patience here is key to developing flavor.
- Once the onions are caramelized, stir in the soy sauce and brown sugar. Cook for an additional 5 minutes, allowing the liquids to reduce and coat the onions.
- Remove from heat and let cool slightly before serving. The onions will continue to thicken as they cool.
Unbelievably versatile, these soy sauce caramelized onions boast a sticky, jam-like texture with a perfect balance of sweet, salty, and umami. Try them layered in a grilled cheese for an unexpected twist or as a bold topping for your morning avocado toast.
Soy Sauce and Lime Grilled Shrimp

Creating a dish that’s both simple and bursting with flavor is easier than you think, especially when it involves the tangy and savory combination of soy sauce and lime. Today, we’re diving into a grilled shrimp recipe that’s perfect for a quick weeknight dinner or a weekend barbecue.
Ingredients
- 1 lb large shrimp, peeled and deveined (I like to leave the tails on for presentation)
- 1/4 cup soy sauce (low sodium works great if you’re watching your salt intake)
- 2 tbsp fresh lime juice (about 1 large lime, and yes, fresh makes a difference)
- 2 tbsp honey (for that perfect balance of sweetness)
- 2 cloves garlic, minced (because garlic is life)
- 1 tbsp extra virgin olive oil (my go-to for its fruity notes)
- 1/2 tsp red pepper flakes (adjust based on your heat preference)
Instructions
- In a medium bowl, whisk together the soy sauce, lime juice, honey, minced garlic, olive oil, and red pepper flakes until well combined.
- Add the shrimp to the bowl, ensuring each piece is well coated with the marinade. Let it sit for 15 minutes at room temperature for the flavors to meld.
- Preheat your grill to medium-high heat (about 375°F to 400°F) to ensure those beautiful grill marks without overcooking.
- Thread the shrimp onto skewers, leaving a little space between each to promote even cooking.
- Grill the shrimp for 2-3 minutes per side, or until they turn pink and opaque. Avoid overcooking to keep them juicy.
- Remove from the grill and let them rest for a minute before serving to allow the juices to redistribute.
Absolutely delightful, these shrimp boast a perfect harmony of sweet, salty, and spicy with a hint of citrus. Serve them over a bed of cilantro lime rice or alongside a crisp salad for a meal that’s as vibrant as it is delicious.
Soy Sauce Roasted Brussels Sprouts
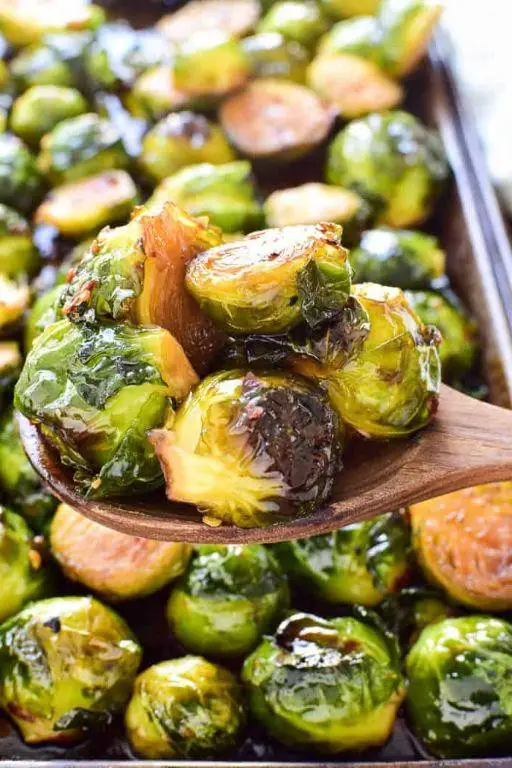
Often overlooked, Brussels sprouts transform into a caramelized, savory delight when roasted with soy sauce. This simple method elevates their natural sweetness, making them a irresistible side dish that even skeptics will love.
Ingredients
- 1 lb Brussels sprouts, halved (look for small to medium sprouts for even cooking)
- 2 tbsp soy sauce (I swear by the depth of flavor in Kikkoman)
- 1 tbsp extra virgin olive oil (my go-to for roasting)
- 1 tsp garlic powder (for that quick flavor boost)
- 1/2 tsp black pepper (freshly ground makes all the difference)
Instructions
- Preheat your oven to 400°F (200°C) to ensure it’s hot enough for roasting.
- In a large bowl, toss the halved Brussels sprouts with olive oil until evenly coated. Tip: Dry sprouts well before tossing to help them crisp up.
- Add soy sauce, garlic powder, and black pepper to the bowl. Mix thoroughly to ensure each sprout is well seasoned.
- Spread the sprouts in a single layer on a baking sheet. Tip: Use parchment paper for easy cleanup and to prevent sticking.
- Roast in the preheated oven for 20-25 minutes, stirring halfway through, until they’re deeply browned and crispy on the edges. Tip: Don’t overcrowd the pan to allow proper air circulation.
Mouthwateringly crispy on the outside and tender inside, these Soy Sauce Roasted Brussels Sprouts boast a umami-rich flavor. Serve them atop a bowl of steamed rice for a simple yet satisfying meal, or alongside your favorite protein for a balanced dinner.
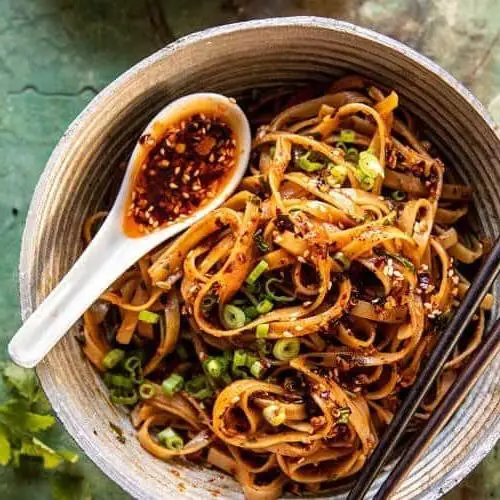
Soy Sauce and Sesame Noodles

Zesty and flavorful, these Soy Sauce and Sesame Noodles are a quick fix for your weeknight dinner dilemmas. Let’s dive into making this simple yet satisfying dish that’s sure to become a staple in your recipe repertoire.
Ingredients
- 8 oz dried spaghetti – I find that spaghetti holds the sauce beautifully, but feel free to use any noodle you love.
- 3 tbsp soy sauce – A good quality soy sauce makes all the difference here.
- 2 tbsp sesame oil – This is my secret ingredient for that irresistible nutty flavor.
- 1 tbsp honey – Just a touch to balance the saltiness of the soy sauce.
- 2 cloves garlic, minced – Freshly minced garlic adds a punch of flavor.
- 1 tbsp sesame seeds – For that perfect crunch and visual appeal.
- 2 green onions, thinly sliced – They add a fresh, sharp contrast to the rich sauce.
Instructions
- Bring a large pot of salted water to a boil over high heat. Tip: Salting the water is crucial for flavoring the noodles from the inside out.
- Add the spaghetti to the boiling water and cook according to package instructions until al dente, about 8-10 minutes. Tip: Stir occasionally to prevent sticking.
- While the noodles cook, whisk together the soy sauce, sesame oil, honey, and minced garlic in a small bowl until well combined.
- Drain the spaghetti, reserving 1/4 cup of the pasta water. Tip: The starchy pasta water helps the sauce cling to the noodles.
- Return the spaghetti to the pot and pour the sauce over it, tossing to coat evenly. Add the reserved pasta water a little at a time if the sauce seems too thick.
- Garnish with sesame seeds and sliced green onions before serving.
Silky noodles coated in a glossy, umami-rich sauce with a hint of sweetness and a nutty undertone from the sesame oil. Serve it with a side of steamed vegetables or top with a fried egg for an extra protein boost.
Soy Sauce Marinated Tofu
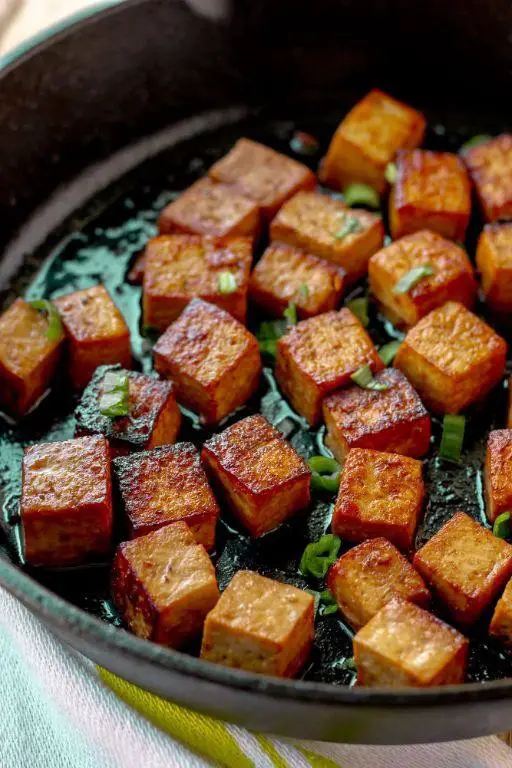
Mastering the art of marinating tofu begins with this simple yet flavorful Soy Sauce Marinated Tofu recipe. Perfect for beginners, this dish combines the umami richness of soy sauce with the delicate texture of tofu, creating a versatile protein that can elevate any meal.
Ingredients
- 1 block (14 oz) firm tofu – I find firm tofu holds its shape better during marination.
- 1/4 cup soy sauce – Opt for low-sodium if you’re watching your salt intake.
- 2 tbsp maple syrup – A personal favorite for its subtle sweetness that balances the soy sauce.
- 1 tbsp sesame oil – Extra virgin sesame oil adds a nutty depth to the marinade.
- 2 cloves garlic, minced – Freshly minced garlic is key for the best flavor.
- 1 tsp grated ginger – A little goes a long way in adding a warm, spicy note.
Instructions
- Press the tofu for 30 minutes to remove excess water. Place it between two plates with a heavy can on top.
- In a bowl, whisk together soy sauce, maple syrup, sesame oil, garlic, and ginger until well combined.
- Cut the pressed tofu into 1-inch cubes and gently toss them in the marinade, ensuring each piece is coated.
- Cover the bowl and refrigerate for at least 2 hours, or overnight for deeper flavor. Tip: Turning the tofu halfway through ensures even marination.
- Preheat your oven to 375°F and line a baking sheet with parchment paper.
- Arrange the marinated tofu cubes on the baking sheet, spacing them apart. Bake for 25 minutes, flipping halfway through, until edges are crispy. Tip: For extra crispiness, broil for the last 2 minutes.
- Let the tofu cool for 5 minutes before serving. Tip: This rest period allows the tofu to firm up further.
Finished with a golden crust and a tender interior, this Soy Sauce Marinated Tofu boasts a perfect balance of savory and sweet. Serve it over a bed of steamed rice with a sprinkle of green onions for a simple yet satisfying meal, or add it to your favorite stir-fry for an extra protein punch.
Soy Sauce and Brown Sugar Glazed Ham
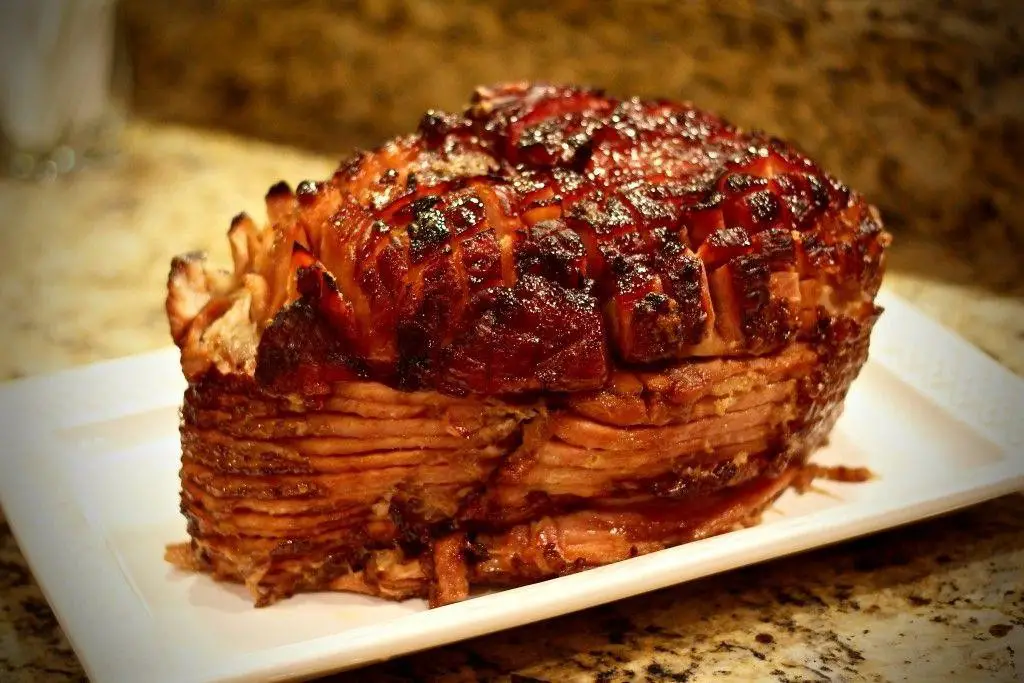
Alright, let’s dive into making a succulent Soy Sauce and Brown Sugar Glazed Ham that’s sure to be the star of any meal. This recipe combines the deep, umami flavors of soy sauce with the sweet, caramel notes of brown sugar for a glaze that’s irresistibly glossy and flavorful.
Ingredients
- 1 fully cooked ham (about 8-10 lbs) – I find a bone-in ham adds more flavor.
- 1 cup brown sugar – packed, for that perfect sweetness.
- 1/2 cup soy sauce – low sodium works great if you’re watching salt intake.
- 2 tbsp Dijon mustard – adds a nice tangy depth.
- 1 tsp garlic powder – for a subtle kick.
- 1/2 tsp ground cloves – just a hint to complement the ham.
Instructions
- Preheat your oven to 325°F (163°C). This ensures even cooking.
- Place the ham in a large roasting pan, flat side down. Scoring the surface in a diamond pattern helps the glaze penetrate.
- In a medium bowl, whisk together brown sugar, soy sauce, Dijon mustard, garlic powder, and ground cloves until smooth. Tip: Warm the mixture slightly if the sugar isn’t dissolving easily.
- Brush half of the glaze over the ham, making sure to get into the scores. Reserve the rest for later.
- Bake the ham, uncovered, for about 1.5 hours, or until the internal temperature reaches 140°F (60°C). Tip: Basting every 30 minutes with pan juices keeps it moist.
- During the last 15 minutes of baking, brush the remaining glaze over the ham and increase the oven temperature to 375°F (190°C) to caramelize the glaze.
- Let the ham rest for 10 minutes before slicing. This allows the juices to redistribute.
With its sticky, sweet exterior and juicy, flavorful meat, this ham is a showstopper. Serve it sliced thin with a side of roasted vegetables or use the leftovers in sandwiches for a delicious next-day treat.
Soy Sauce Dipping Sauce for Dumplings
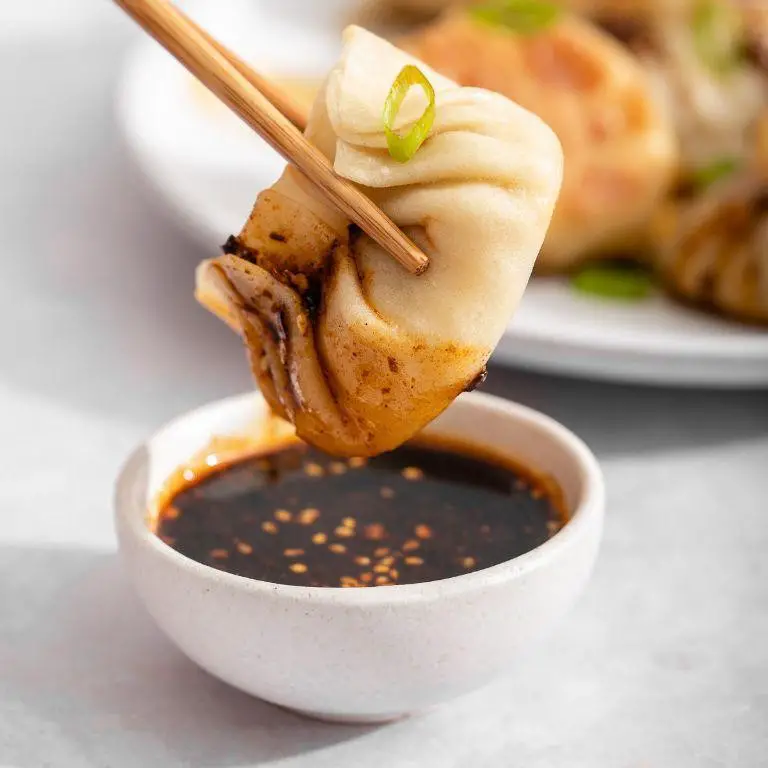
Ready to elevate your dumpling game with a simple yet transformative soy sauce dipping sauce? This methodical guide will walk you through creating a balanced, flavorful companion to your favorite dumplings, perfect for beginners and seasoned cooks alike.
Ingredients
- 1/2 cup soy sauce (I always opt for low-sodium to control the saltiness better.)
- 2 tbsp rice vinegar (The mild sweetness of rice vinegar balances the soy sauce perfectly.)
- 1 tbsp sesame oil (A drizzle of toasted sesame oil adds a nutty depth that’s irresistible.)
- 1 tsp sugar (Just a hint of sugar rounds out the flavors.)
- 2 cloves garlic, minced (Fresh garlic is key here for that punchy aroma.)
- 1 green onion, finely chopped (For a fresh, crisp finish.)
- 1/2 tsp red pepper flakes (Adjust to your heat preference, but it’s a must for a slight kick.)
Instructions
- In a small bowl, combine the soy sauce and rice vinegar. Whisk them together until fully blended.
- Add the sesame oil and sugar to the mixture. Stir well until the sugar dissolves completely, about 1 minute.
- Mix in the minced garlic, chopped green onion, and red pepper flakes. Let the sauce sit for at least 10 minutes to allow the flavors to meld. Tip: The longer it sits, the more pronounced the flavors become.
- Give the sauce a final stir before serving. Tip: If you prefer a smoother sauce, you can strain out the garlic and onions, but I love the texture they add.
- Serve alongside your favorite dumplings. Tip: For an extra layer of flavor, try adding a few drops of chili oil on top before serving.
This soy sauce dipping sauce boasts a harmonious blend of savory, sweet, and spicy notes, with a texture that’s both rich and light. Try drizzling it over steamed vegetables or using it as a marinade for an unexpected twist.
Soy Sauce and Chili Oil Pasta
Yield a bowl of comforting Soy Sauce and Chili Oil Pasta that’s as easy to make as it is delicious. This dish combines the umami richness of soy sauce with the fiery kick of chili oil, creating a perfect balance of flavors that’ll have you coming back for more.
Ingredients
- 8 oz spaghetti (I like to use whole wheat for a nuttier flavor)
- 2 tbsp soy sauce (low sodium works great if you’re watching your salt intake)
- 1 tbsp chili oil (adjust based on your heat preference)
- 2 cloves garlic, minced (freshly minced garlic makes all the difference)
- 1 tbsp extra virgin olive oil (my go-to for its fruity notes)
- 1/4 tsp red pepper flakes (for an extra layer of heat)
- 1/4 cup pasta water (reserved from cooking the spaghetti)
- 2 tbsp grated Parmesan cheese (optional, but highly recommended for a cheesy finish)
Instructions
- Bring a large pot of salted water to a boil over high heat. Add the spaghetti and cook according to package instructions until al dente, about 8-10 minutes.
- While the pasta cooks, heat the extra virgin olive oil in a large skillet over medium heat. Add the minced garlic and red pepper flakes, sautéing for about 1 minute until fragrant.
- Reserve 1/4 cup of the pasta water, then drain the spaghetti.
- Add the drained spaghetti to the skillet with the garlic and red pepper flakes. Pour in the soy sauce and chili oil, tossing to combine evenly.
- Slowly add the reserved pasta water, a little at a time, until the sauce reaches your desired consistency.
- Remove from heat and sprinkle with grated Parmesan cheese if using.
Now, the moment of truth: the pasta should be slick with sauce, each strand coated in that glorious soy and chili oil mixture. The heat from the chili oil builds with each bite, while the soy sauce adds depth and savoriness. Serve it with a side of steamed veggies for a complete meal, or enjoy it as is for a simple yet satisfying dish.
Soy Sauce Flavored Popcorn

Very few snacks can match the universal appeal of popcorn, but when you add a savory twist like soy sauce, it transforms into an irresistible treat. Let’s dive into making this simple yet flavorful snack that’s perfect for movie nights or as a unique party offering.
Ingredients
- 1/2 cup popcorn kernels (I find that organic kernels pop more uniformly)
- 2 tbsp unsalted butter, melted (for that rich, creamy base)
- 1 tbsp soy sauce (low sodium works best to control the saltiness)
- 1/2 tsp garlic powder (adds a nice depth of flavor)
- 1/4 tsp smoked paprika (for a subtle smokiness)
Instructions
- Preheat a large pot over medium heat for about 2 minutes. A heavy-bottomed pot ensures even heat distribution.
- Add the popcorn kernels to the pot and cover with a lid. Shake the pot gently every 30 seconds to prevent burning.
- Once the popping slows to about 2 seconds between pops, remove the pot from the heat. This usually takes around 3-4 minutes.
- Transfer the popped popcorn to a large bowl, making sure to leave any unpopped kernels behind.
- Drizzle the melted butter evenly over the popcorn, tossing gently to coat. Tip: Use a spoon to drizzle for more control.
- Sprinkle the soy sauce, garlic powder, and smoked paprika over the popcorn. Toss again to ensure even seasoning. Tip: Add the soy sauce slowly to avoid soggy popcorn.
- Serve immediately or let it sit for a minute if you prefer a slightly crispier texture. Tip: For an extra kick, a light sprinkle of chili flakes works wonders.
You’ll love the umami-packed flavor and the satisfying crunch of this soy sauce flavored popcorn. It’s a fantastic twist on the classic that’s sure to impress, whether you’re serving it at a gathering or enjoying it solo with your favorite film.
Conclusion
Bringing together a world of flavor, our roundup of 18 soy sauce recipes offers something for every taste and occasion. From weeknight dinners to special gatherings, these dishes promise to delight. We’d love to hear which recipes you try and love—drop a comment below! Don’t forget to share your culinary adventures with friends by pinning this article on Pinterest. Happy cooking!