Valentine’s Day is the perfect occasion to show a little extra love, and what better way to do that than with homemade chocolate truffles?

These Valentine’s Day Chocolate Truffles are incredibly easy to make, requiring just 5 simple ingredients.
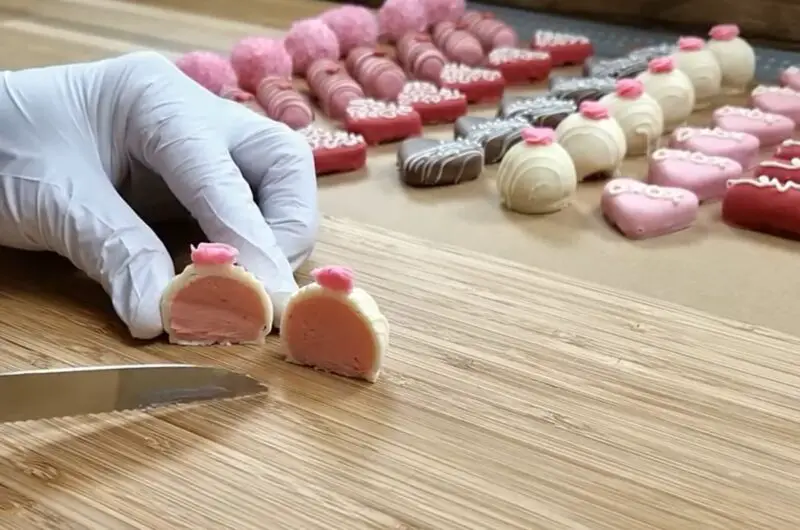
With their smooth, creamy centers and simple yet elegant decorations, they make a thoughtful and delicious gift for anyone you care about. Plus, they’re a lot of fun to make in your own kitchen!
Why You’ll Love These Chocolate Truffles

This recipe is a straightforward, no-fuss method to create 50 delightful truffles. If that’s too many, feel free to halve the recipe. With their rich, milk chocolate flavor and the option to customize with a dash of lemon or lime peel, these truffles are perfect for any sweet tooth.
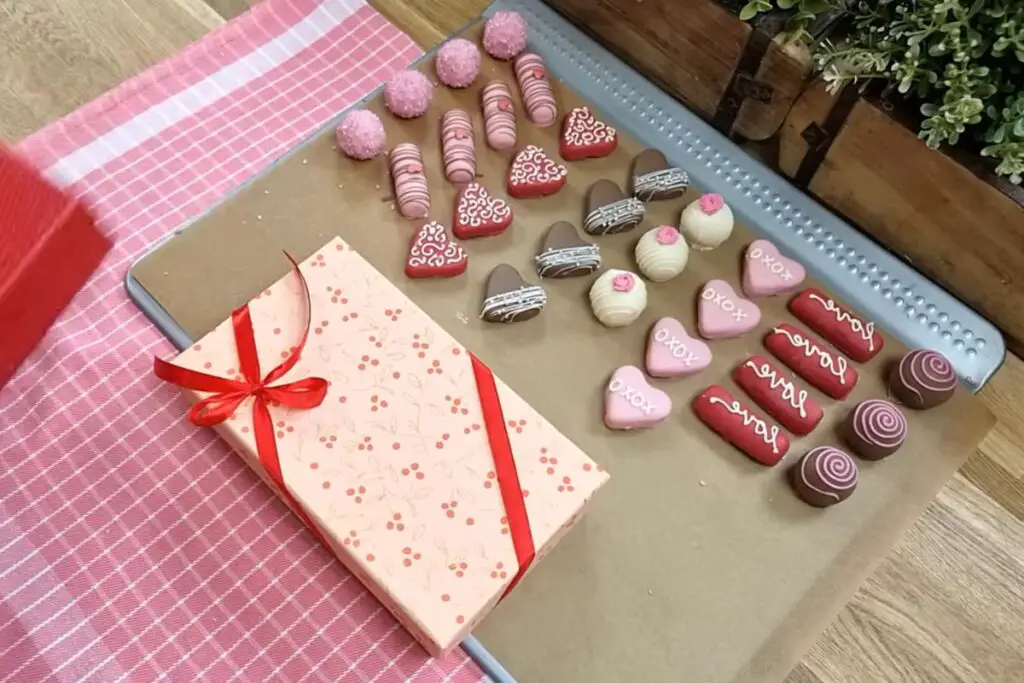
The truffles are decorated with just a few items: chocolate, silver pearls, small buttercream flowers, and pink-colored granulated sugar. The pearl sugar adds a special touch, and I even show you how to make it pink in the video. It’s a simple yet stunning decoration that really makes these truffles shine. You can also get creative by adding different colors or shapes to match the occasion.
Plus, these truffles can be stored in the fridge for up to two weeks—so you can make them in advance and keep them on hand for when you want to gift or enjoy them.
Ingredients for Valentine’s Day Chocolate Truffles
- 8 oz Milk Chocolate Chips (I recommend Ghirardelli or another high-quality milk chocolate)
- 1 can (14 oz) Sweetened Condensed Milk
- 1 Tbsp Vanilla Extract
- 2 Tbsp Butter (softened)
- 1 ½ cups Granulated Sugar (for rolling)
For decoration:
- Melted Chocolate (for dipping)
- Silver Pearls (optional, but they add a touch of elegance)
- Small Buttercream Flowers (for a beautiful, homemade touch)
- Colored Granulated Sugar (dye your sugar pink or any color of your choice for a festive look)
- Optional: Grated lemon or lime peel (for a refreshing flavor boost)
Instructions for Making Valentine’s Day Chocolate Truffles
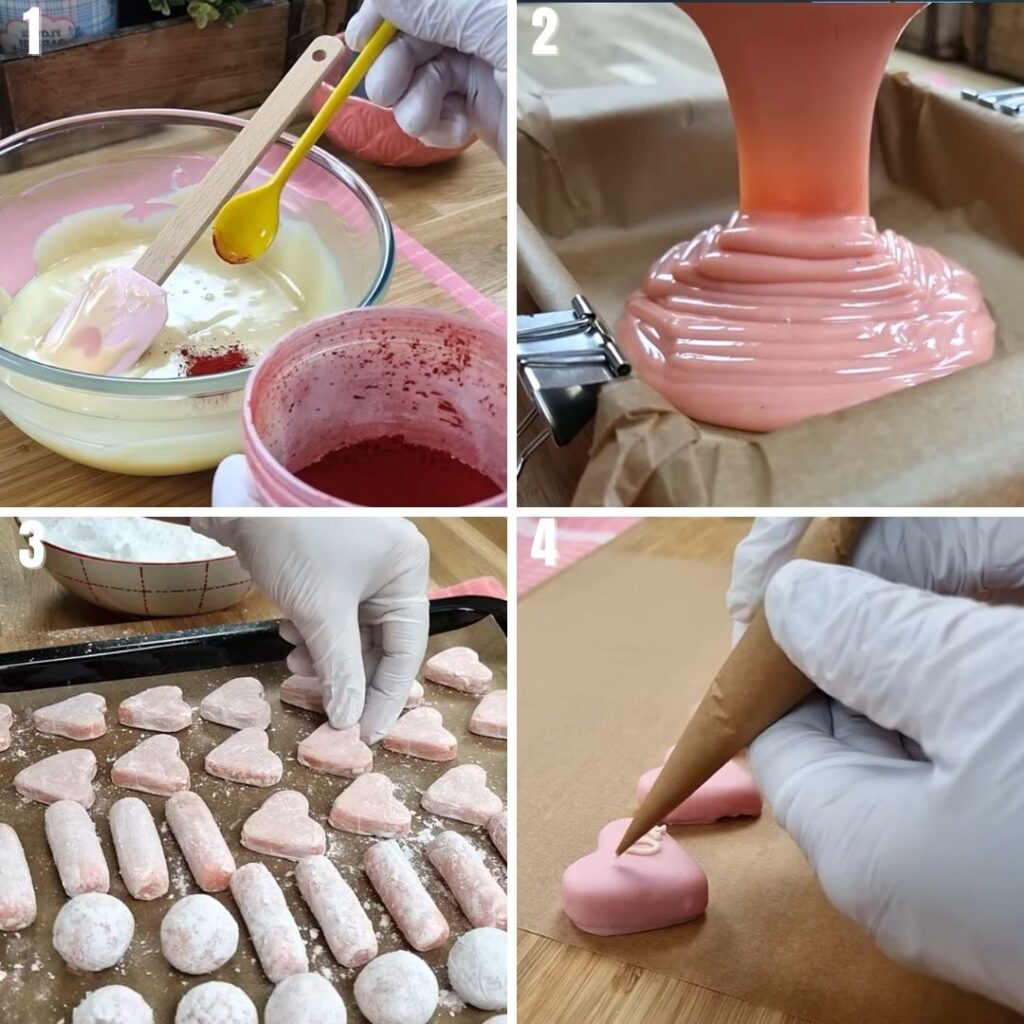
Step 1: Prepare the Truffle Dough
Start by melting the milk chocolate chips. You can do this in a double boiler or a heatproof pan set over a saucepan of gently simmering water. Stir occasionally to make sure it melts smoothly.
Once the chocolate is melted, add the sweetened condensed milk, vanilla extract, and softened butter. Stir everything together until fully combined, creating a rich, creamy mixture. If you’d like a little extra flavor in your truffles, add some freshly grated lemon or lime peel. This will give them a refreshing citrus twist that pairs perfectly with the milk chocolate.
Once mixed, let the truffle dough cool to room temperature so that it’s easier to handle.
Step 2: Roll the Truffles
Now, it’s time to form your truffles. Using a small cookie scoop (about a tablespoon of dough per truffle), roll the mixture into balls with your hands. If the dough feels too soft to roll, place it in the fridge for about 20-30 minutes to firm up.
Once rolled, place the truffles on a parchment-lined baking sheet.
Step 3: Chill the Truffles
Place the baking sheet of truffles in the freezer for 20-30 minutes. This will help the truffles hold their shape and make it easier to dip them into the melted chocolate coating.
Step 4: Coat the Truffles
While the truffles are chilling, melt some chocolate (either more milk chocolate or dark chocolate if you prefer) for dipping. Once the truffles are firm, dip each one into the melted chocolate, making sure to coat it completely. Place the dipped truffles back onto the parchment-lined baking sheet.
Step 5: Decorate the Truffles
While the chocolate coating is still soft, it’s time to decorate! You can dip them in colored granulated sugar (I recommend dyeing the sugar pink to match the Valentine’s Day theme), or top them with small buttercream flowers. If you want an extra special touch, sprinkle the truffles with silver pearls for a touch of elegance.
Step 6: Let the Coating Set
Allow the truffles to sit at room temperature or refrigerate them for 20-30 minutes until the coating hardens and sets. Once set, your truffles are ready to be enjoyed or gifted.
Storing the Truffles

These Valentine’s Day Chocolate Truffles can be stored in the fridge for up to two weeks. They make a great make-ahead gift or treat to have on hand for any occasion. Just make sure to store them in an airtight container to keep them fresh.
Conclusion
These Valentine’s Day Homemade Chocolate Truffles are a simple, fun, and thoughtful way to show love to anyone special in your life. With just five ingredients and some beautiful, easy decorations, you can create a delicious gift that’s sure to impress. Whether you’re sharing them with friends, family, or that special someone, these truffles are sure to bring a smile to everyone’s face.
Enjoy making them in your kitchen, and remember—there’s nothing like homemade chocolate truffles to show you care. ❤️
Valentine’s Day Homemade Chocolate Truffles: Simple and Sweet
4
servings20
minutes10
minutesIngredients
8 oz Milk Chocolate Chips
1 can (14 oz) Sweetened Condensed Milk
1 Tbsp Vanilla Extract
2 Tbsp Butter (softened)
1 ½ cups Granulated Sugar (for rolling)
Melted Chocolate (for dipping)
Silver Pearls (optional)
Buttercream Flowers
Colored Granulated Sugar (dyed pink)
Optional: Grated lemon/lime peel
Directions
- Melt chocolate: In a double boiler, melt milk chocolate, then stir in sweetened condensed milk, vanilla, and butter. Cool to room temperature.
- Roll truffles: Scoop and roll into balls, refrigerating for 20-30 mins if too soft.
- Chill: Place on parchment-lined sheet, freeze for 20-30 mins.
- Coat: Dip truffles in melted chocolate, return to the sheet.
- Decorate: Add sugar, buttercream, or pearls while chocolate is soft.
- Set: Let truffles set at room temp or in the fridge for 20-30 mins.
Notes
- Keep in an airtight container in the fridge for up to 2 weeks.