You’re in for a treat with these 20 Delicious Weight Watchers Lunches Recipes Healthy that promise to keep your meals exciting and your waistline in check. Perfect for busy home cooks across North America, each recipe is a blend of simplicity, flavor, and nutrition. Dive into this roundup and discover how easy it is to enjoy wholesome, satisfying lunches that align with your health goals. Let’s get cooking!
Grilled Chicken and Avocado Salad
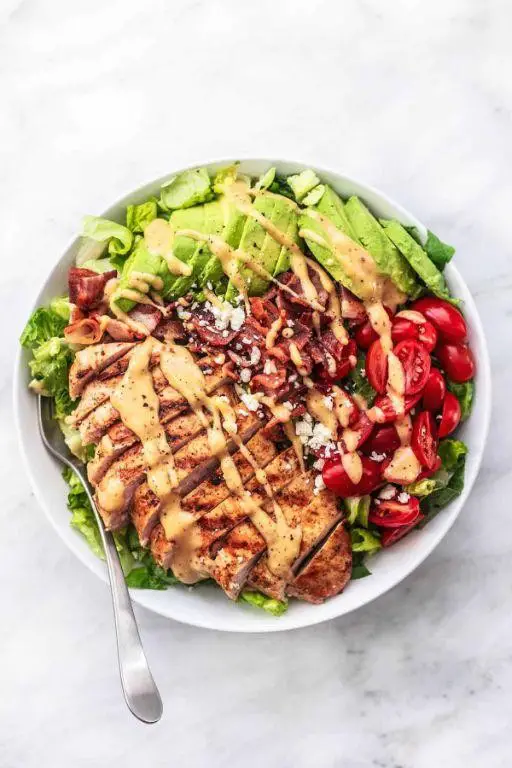
Mastering the art of a perfect summer salad begins with this Grilled Chicken and Avocado Salad, a dish that marries the smoky char of perfectly grilled chicken with the creamy, buttery texture of ripe avocados, all brought together with a zesty lime dressing that dances on the palate.
Ingredients
- 2 boneless, skinless chicken breasts (I find that organic, free-range chicken offers the best flavor and texture)
- 1 large avocado, diced (look for one that’s just ripe—yields slightly to pressure)
- 1 cup cherry tomatoes, halved (I love the burst of sweetness they add)
- 1/4 cup extra virgin olive oil (my go-to for its fruity notes)
- 2 tbsp fresh lime juice (about 1 large lime, and yes, fresh makes all the difference)
- 1/2 tsp salt (I prefer sea salt for its clean taste)
- 1/4 tsp freshly ground black pepper (freshly ground offers a more vibrant flavor)
- 2 cups mixed greens (I opt for a blend of arugula and spinach for a peppery kick)
Instructions
- Preheat your grill to medium-high heat, aiming for about 375°F to ensure a good sear without burning.
- Season the chicken breasts evenly with salt and pepper on both sides. Tip: Letting the chicken sit at room temperature for 10 minutes before grilling ensures even cooking.
- Grill the chicken for 6-7 minutes per side, or until the internal temperature reaches 165°F. Tip: Resist the urge to flip the chicken more than once to get those perfect grill marks.
- While the chicken rests, whisk together the olive oil, lime juice, salt, and pepper in a small bowl to create the dressing. Tip: A little honey can be added to the dressing if you prefer a touch of sweetness.
- Slice the grilled chicken against the grain into thin strips. This ensures each bite is tender.
- In a large bowl, combine the mixed greens, cherry tomatoes, and diced avocado. Drizzle with the dressing and toss gently to coat.
- Top the salad with the sliced grilled chicken and serve immediately.
Delight in the contrast of textures—the crisp greens against the creamy avocado and juicy chicken—and the harmony of flavors that make this salad a standout. For an extra touch, serve with a side of warm, crusty bread to soak up any remaining dressing.
Quinoa and Black Bean Stuffed Peppers

Savory and satisfying, these quinoa and black bean stuffed peppers are a vibrant dish that brings both nutrition and flavor to the table. Perfect for a hearty dinner, they’re as pleasing to the eye as they are to the palate.
Ingredients
- 4 large bell peppers, any color (I love the contrast of red and yellow for a pop of color)
- 1 cup quinoa, rinsed (this removes any bitterness)
- 1 can (15 oz) black beans, drained and rinsed (for that perfect texture)
- 1 cup corn kernels (fresh or frozen, but I always go for fresh when in season)
- 1 small onion, finely diced (white or yellow, depending on your preference)
- 2 cloves garlic, minced (because everything’s better with garlic)
- 1 tsp ground cumin (it’s all about that warm, earthy flavor)
- 1 tsp chili powder (adjust according to your heat preference)
- 1 tbsp extra virgin olive oil (my go-to for its fruity notes)
- 1 cup shredded cheese (I’m partial to Monterey Jack for its meltiness)
- Salt to taste (though I find a pinch is usually enough)
Instructions
- Preheat your oven to 375°F (190°C) to ensure it’s perfectly heated for baking.
- Cut the tops off the bell peppers and remove the seeds and membranes, creating a hollow cavity for stuffing.
- In a medium saucepan, bring 2 cups of water to a boil. Add the quinoa, reduce heat to low, cover, and simmer for 15 minutes, or until the water is absorbed. Tip: Let it sit covered for 5 minutes off the heat for fluffier quinoa.
- While the quinoa cooks, heat olive oil in a large skillet over medium heat. Add the onion and garlic, sautéing until translucent, about 5 minutes.
- Stir in the black beans, corn, cumin, and chili powder, cooking for another 3 minutes to blend the flavors.
- Combine the cooked quinoa with the skillet mixture, mixing well. Season with salt to taste.
- Stuff each bell pepper with the quinoa mixture, packing it lightly. Top each with shredded cheese.
- Place the stuffed peppers in a baking dish and bake for 25-30 minutes, or until the peppers are tender and the cheese is bubbly and slightly golden. Tip: For an extra crispy top, broil for the last 2 minutes.
- Let the peppers rest for 5 minutes before serving to allow the flavors to meld beautifully.
Lusciously tender peppers give way to a hearty, spiced filling that’s both comforting and wholesome. Serve these with a dollop of sour cream or a sprinkle of fresh cilantro for an extra layer of flavor.
Turkey and Hummus Wrap
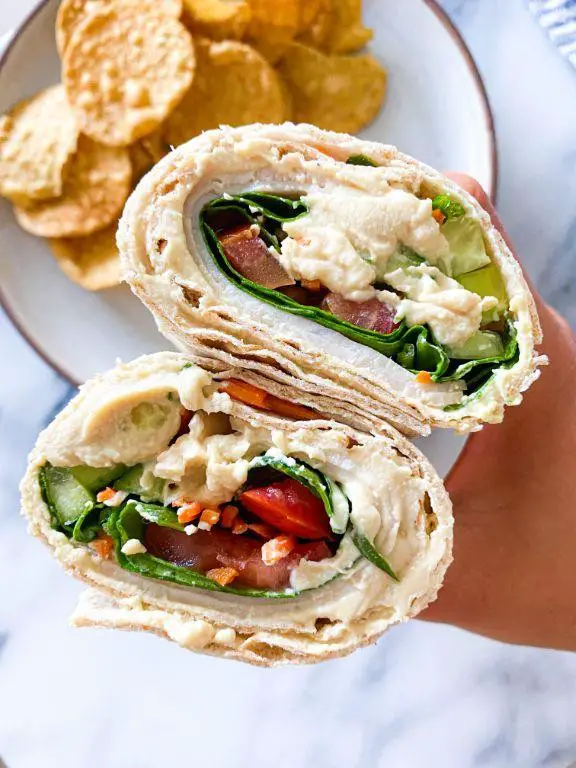
Yearning for a lunch that’s both nourishing and effortlessly chic? The Turkey and Hummus Wrap is your answer, blending creamy textures with the hearty satisfaction of lean protein, all wrapped in a soft, pliable tortilla for a meal that’s as convenient as it is delicious.
Ingredients
- 1 large whole wheat tortilla (I find the nutty flavor complements the hummus beautifully)
- 1/2 cup hummus (extra garlicky is my preference for a punch of flavor)
- 4 slices of roasted turkey breast (opt for low-sodium to control the saltiness)
- 1/4 cup shredded carrots (for a crisp, sweet contrast)
- 1/4 cup baby spinach leaves (their tender texture is perfect here)
- 1 tbsp extra virgin olive oil (my go-to for its fruity notes)
- 1/2 tsp smoked paprika (it adds a subtle depth that’s irresistible)
Instructions
- Lay the whole wheat tortilla flat on a clean surface. Spread the hummus evenly over the tortilla, leaving a 1-inch border around the edges for easy rolling.
- Layer the turkey slices over the hummus, ensuring they cover most of the tortilla for even distribution in every bite.
- Scatter the shredded carrots and baby spinach leaves over the turkey. Drizzle with extra virgin olive oil and sprinkle smoked paprika on top for that smoky nuance.
- Starting at one end, tightly roll the tortilla, tucking in the ingredients as you go to prevent spillage. For a secure wrap, fold in the sides after the first full turn.
- Heat a non-stick skillet over medium heat (about 350°F). Place the wrap seam-side down and cook for 2-3 minutes, or until golden and slightly crispy. Flip and repeat on the other side.
- Transfer the wrap to a cutting board. Let it rest for a minute before slicing diagonally for an elegant presentation.
Savory with a hint of smokiness, this wrap offers a delightful crunch from the carrots against the creamy hummus. Serve it with a side of pickled vegetables for an extra tangy contrast, or pack it whole for a satisfying on-the-go meal.
Zucchini Noodles with Pesto and Cherry Tomatoes
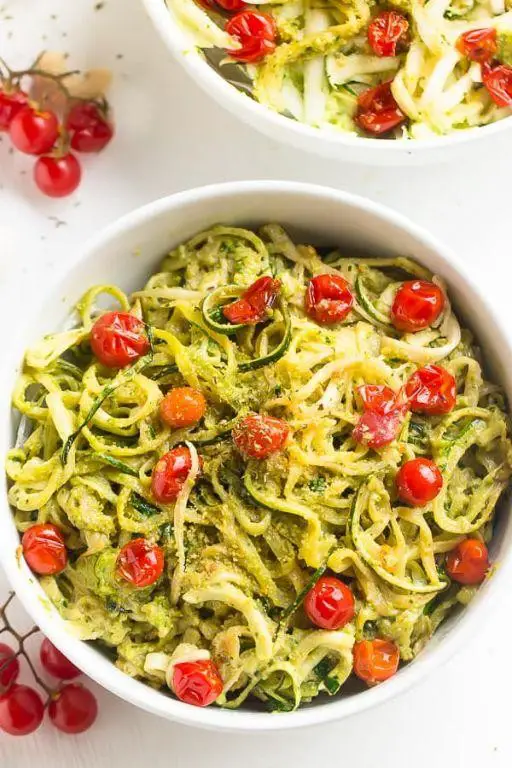
Fresh from the garden or your local farmers’ market, zucchini transforms into delicate noodles that pair beautifully with vibrant pesto and sweet cherry tomatoes, creating a dish that’s as visually appealing as it is delicious.
Ingredients
- 4 medium zucchinis (I find that organic zucchinis have the best flavor and texture for noodles)
- 1 cup fresh basil leaves (packed, for that unmistakably fresh pesto taste)
- 1/2 cup extra virgin olive oil (my go-to for its fruity notes)
- 1/3 cup pine nuts (lightly toasted to bring out their nutty essence)
- 2 garlic cloves (because pesto isn’t pesto without a garlicky punch)
- 1/2 cup grated Parmesan cheese (plus extra for serving, because you can never have too much)
- 1 pint cherry tomatoes (halved, for a burst of sweetness in every bite)
- Salt to taste (I prefer sea salt for its clean, crisp flavor)
Instructions
- Using a spiralizer, turn the zucchinis into noodles. Tip: If you don’t have a spiralizer, a julienne peeler works in a pinch.
- In a food processor, combine the basil, olive oil, pine nuts, garlic, and Parmesan cheese. Pulse until smooth. Tip: For a chunkier pesto, pulse fewer times.
- In a large bowl, toss the zucchini noodles with the pesto until evenly coated. Tip: Let the noodles sit for 5 minutes to soften slightly, enhancing their noodle-like texture.
- Gently fold in the halved cherry tomatoes.
- Season with salt to taste, and serve with an extra sprinkle of Parmesan cheese.
Zesty and light, this dish offers a delightful contrast between the creamy pesto and the crisp zucchini noodles, while the cherry tomatoes add a juicy pop. Serve it al fresco for a summer dinner that celebrates the season’s bounty.
Egg Salad Lettuce Wraps
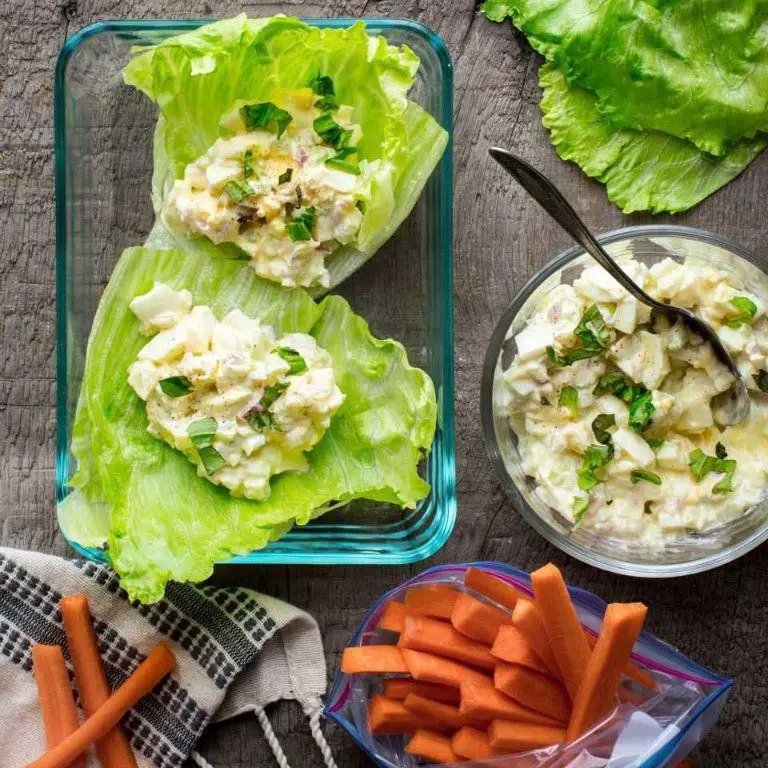
Savory and refreshing, these Egg Salad Lettuce Wraps are a delightful twist on the classic, offering a lighter, crunchier alternative that’s perfect for summer lunches or elegant picnics. The creamy egg salad, enlivened with a hint of mustard and fresh herbs, pairs beautifully with the crisp lettuce leaves, creating a dish that’s as pleasing to the palate as it is to the eye.
Ingredients
- 6 large eggs (I find room temperature eggs peel more easily)
- 1/4 cup mayonnaise (for richness, I always opt for full-fat)
- 1 tbsp Dijon mustard (adds a lovely tang)
- 1/4 cup finely chopped celery (for a bit of crunch)
- 2 tbsp finely chopped fresh dill (or chives, if you prefer)
- Salt and freshly ground black pepper (to season perfectly)
- 8 large butter lettuce leaves (washed and patted dry)
Instructions
- Place the eggs in a single layer in a saucepan and cover with water by 1 inch. Bring to a boil over high heat.
- Once boiling, cover the pan and remove from heat. Let the eggs sit for 12 minutes for perfectly hard-boiled yolks.
- Drain the hot water and run cold water over the eggs until they’re cool to the touch. Peel under running water for smoother shells.
- Chop the peeled eggs into small pieces and transfer to a mixing bowl.
- Add the mayonnaise, Dijon mustard, chopped celery, and fresh dill to the bowl. Gently fold everything together until well combined.
- Season the mixture with salt and freshly ground black pepper, adjusting to your liking.
- Lay out the butter lettuce leaves on a serving platter. Spoon the egg salad evenly among the leaves, dividing it into 8 portions.
- Serve immediately, or chill in the refrigerator for up to an hour if you prefer a cooler filling.
Generously filled with the creamy egg salad, these wraps offer a satisfying contrast between the soft filling and the crisp lettuce. For an extra touch of elegance, garnish with additional dill or a sprinkle of paprika before serving.
Slow Cooker Lentil Soup

Slow Cooker Lentil Soup is the epitome of comfort food, blending hearty lentils with aromatic vegetables and spices for a dish that’s both nourishing and deeply satisfying. Savor the simplicity of this recipe, where minimal effort yields maximum flavor, perfect for any day of the week.
Ingredients
- 1 cup dried green lentils, rinsed and picked over (I find the green variety holds its shape better)
- 1 large onion, finely diced (yellow onions are my go-to for their sweetness)
- 2 carrots, peeled and diced into 1/4-inch pieces
- 2 celery stalks, diced (don’t skip the celery—it adds a wonderful depth)
- 3 garlic cloves, minced (fresh is best here for that punch of flavor)
- 6 cups vegetable broth (homemade or low-sodium store-bought works)
- 1 tbsp extra virgin olive oil (my favorite for its fruity notes)
- 1 tsp ground cumin (toasted and ground at home if you’re feeling ambitious)
- 1/2 tsp smoked paprika (this adds a subtle smokiness that’s irresistible)
- Salt and freshly ground black pepper (to season layers as you go)
Instructions
- Heat the extra virgin olive oil in a skillet over medium heat. Add the onion, carrots, and celery, sautéing until the onions are translucent, about 5 minutes.
- Stir in the minced garlic, ground cumin, and smoked paprika, cooking for another minute until fragrant. This step blooms the spices, unlocking their full flavor potential.
- Transfer the sautéed vegetables to your slow cooker. Add the rinsed lentils and vegetable broth, stirring to combine.
- Cover and cook on LOW for 6-8 hours or HIGH for 3-4 hours. The lentils should be tender but not mushy. Tip: Avoid lifting the lid too often to maintain consistent temperature.
- Season with salt and freshly ground black pepper to taste. Tip: Taste and adjust seasoning before serving to ensure a balanced flavor.
- Let the soup sit for 10 minutes before serving to allow the flavors to meld further. Tip: A splash of lemon juice or a drizzle of olive oil before serving can elevate the dish.
Gently ladle the soup into bowls, noting how the lentils have absorbed the rich broth while maintaining their texture. The smokiness from the paprika and the earthiness of the cumin create a harmonious blend, making this soup a standout. Serve with crusty bread or a side of greens for a complete meal.
Spicy Tuna and Cucumber Rolls
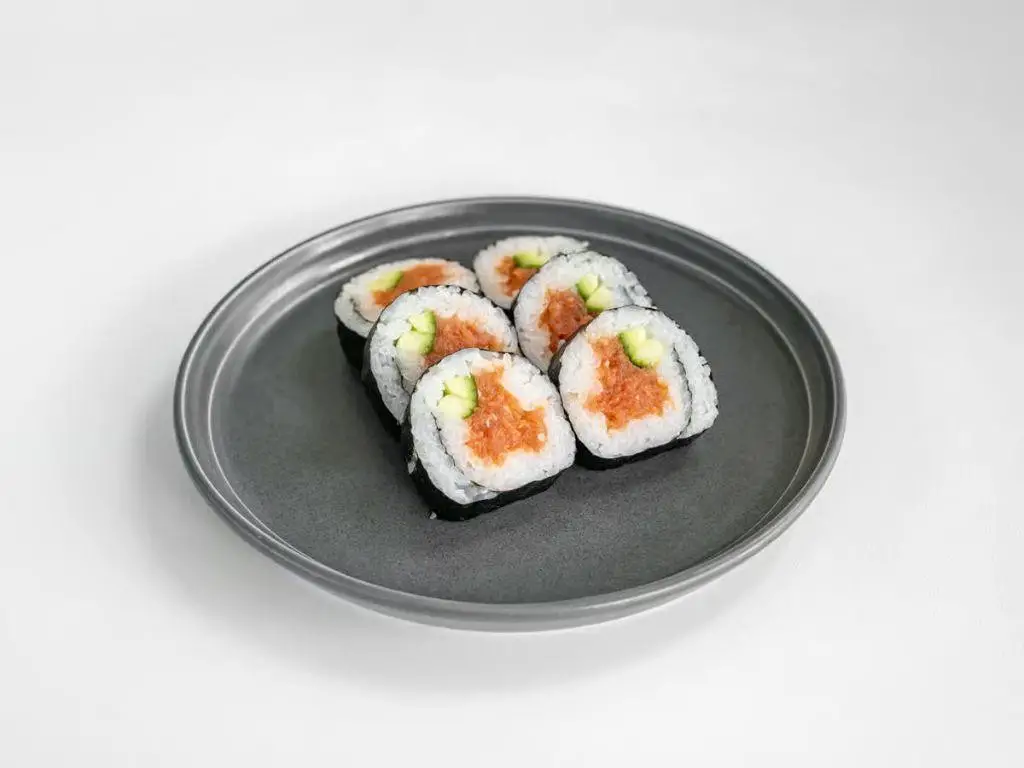
Savory and refreshing, these Spicy Tuna and Cucumber Rolls are a delightful twist on traditional sushi, offering a perfect balance of heat and crunch that’s ideal for a light lunch or an elegant appetizer.
Ingredients
- 1 cup sushi-grade tuna, finely diced (look for a deep red color and firm texture)
- 1/2 English cucumber, julienned (I find the seeds less bitter, making it perfect for rolls)
- 2 tbsp mayonnaise (I swear by Kewpie for its creaminess)
- 1 tbsp sriracha (adjust according to your heat preference)
- 1 tsp soy sauce (low-sodium is my go-to for better control over saltiness)
- 4 sheets nori (seaweed), cut in half
- 1 cup sushi rice, cooked and seasoned (room temperature works best for handling)
- 1 tbsp sesame seeds, toasted (for that nutty crunch)
Instructions
- In a medium bowl, combine the diced tuna, mayonnaise, sriracha, and soy sauce. Mix gently until evenly coated. Tip: Let the mixture sit for 10 minutes to allow the flavors to meld.
- Lay a half sheet of nori on a clean surface. Spread 1/4 cup of sushi rice evenly over the nori, leaving a 1-inch border at the top. Tip: Wet your fingers slightly to prevent the rice from sticking.
- Sprinkle sesame seeds over the rice, then flip the nori sheet so the rice is facing down.
- Place a quarter of the tuna mixture and a few strips of cucumber along the edge closest to you. Tip: Don’t overfill to ensure a tight roll.
- Roll the nori tightly away from you, pressing gently to seal the edge. Repeat with the remaining ingredients.
- Using a sharp knife, slice each roll into 6 pieces. Wipe the knife with a damp cloth between cuts for clean slices.
Here, the creamy spiciness of the tuna contrasts beautifully with the crisp cucumber, all wrapped in the subtle umami of nori. Serve these rolls on a slate board for an artistic presentation that highlights their vibrant colors.
Vegetable Stir Fry with Brown Rice

Just as the summer sun begins to wane, a vibrant Vegetable Stir Fry with Brown Rice emerges as the perfect harmony of nutrition and flavor, offering a colorful palette of crisp vegetables and hearty grains that dance together in a light, savory sauce.
Ingredients
- 1 cup brown rice (I love the nutty flavor it adds, but feel free to substitute with quinoa for a protein boost)
- 2 tbsp extra virgin olive oil (my go-to for its fruity notes and health benefits)
- 1 bell pepper, thinly sliced (a mix of colors makes the dish pop)
- 1 cup broccoli florets (fresh and crisp, they add the perfect crunch)
- 1 carrot, julienned (for a sweet, earthy undertone)
- 2 cloves garlic, minced (because everything’s better with garlic)
- 1 tbsp soy sauce (low sodium is my preference, but adjust to your liking)
- 1 tsp sesame oil (a little goes a long way in adding depth)
- 1/2 tsp ginger, grated (for that warm, spicy kick)
- 1/4 cup water (to help steam the veggies to perfection)
Instructions
- Rinse the brown rice under cold water until the water runs clear, then cook according to package instructions. Tip: Letting it sit for 5 minutes off the heat after cooking fluffs it up beautifully.
- Heat the extra virgin olive oil in a large skillet over medium-high heat until shimmering, about 1 minute.
- Add the bell pepper, broccoli, and carrot to the skillet. Stir-fry for 5 minutes, until the vegetables are bright and slightly tender. Tip: Keep the veggies moving to ensure even cooking.
- Push the vegetables to one side of the skillet. Add the minced garlic and grated ginger to the cleared space, sautéing for 30 seconds until fragrant.
- Combine the vegetables with the garlic and ginger, then pour in the soy sauce, sesame oil, and water. Stir-fry for another 2 minutes, allowing the flavors to meld. Tip: The water creates steam, helping the vegetables cook without losing their crunch.
- Serve the stir-fried vegetables over the cooked brown rice, garnishing with sesame seeds if desired.
Yielded by the gentle toss of the wok, this dish presents a delightful contrast of textures—from the tender chew of the brown rice to the crisp snap of the vegetables. The subtle heat from the ginger and the umami richness of the soy sauce make each bite a discovery. For an extra touch of elegance, serve it in a hollowed-out bell pepper or alongside a chilled glass of Riesling.
Greek Yogurt Chicken Salad
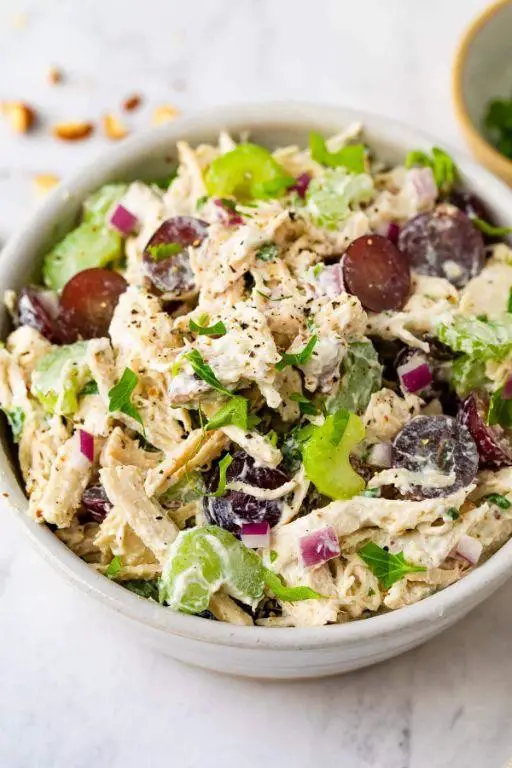
Gracefully blending the creamy tang of Greek yogurt with the succulent tenderness of chicken, this salad is a refreshing twist on a classic, perfect for those seeking a lighter yet satisfying meal.
Ingredients
- 2 cups cooked chicken, shredded (I find rotisserie chicken adds a delightful depth of flavor)
- 1/2 cup Greek yogurt (opt for full-fat for a richer texture)
- 1/4 cup mayonnaise (a dollop of Duke’s is my secret weapon)
- 1 tbsp lemon juice (freshly squeezed, for that bright zing)
- 1/2 cup celery, finely diced (for a satisfying crunch)
- 1/4 cup red onion, minced (soaked in cold water for 10 minutes to mellow the bite)
- 1 tbsp fresh dill, chopped (dried works in a pinch, but fresh is transformative)
- Salt and pepper to taste (I like a generous pinch of flaky sea salt here)
Instructions
- In a large mixing bowl, combine the shredded chicken, Greek yogurt, and mayonnaise, stirring gently until the chicken is evenly coated.
- Add the lemon juice, celery, red onion, and fresh dill to the bowl, mixing thoroughly to ensure every bite is flavorful.
- Season the mixture with salt and pepper, tasting as you go to achieve the perfect balance. Tip: Letting the salad chill in the refrigerator for at least an hour before serving allows the flavors to meld beautifully.
- For serving, consider scooping the chicken salad onto a bed of crisp greens, stuffing it into a ripe avocado, or spreading it on toasted whole-grain bread for a hearty sandwich. Tip: Garnish with extra dill or a sprinkle of paprika for a pop of color and flavor.
- This Greek Yogurt Chicken Salad is wonderfully creamy with a bright, herby freshness and a satisfying crunch from the celery. It’s versatile enough to be the star of your lunchbox or the centerpiece of a picnic spread.
Cauliflower Rice Bowls with Grilled Shrimp
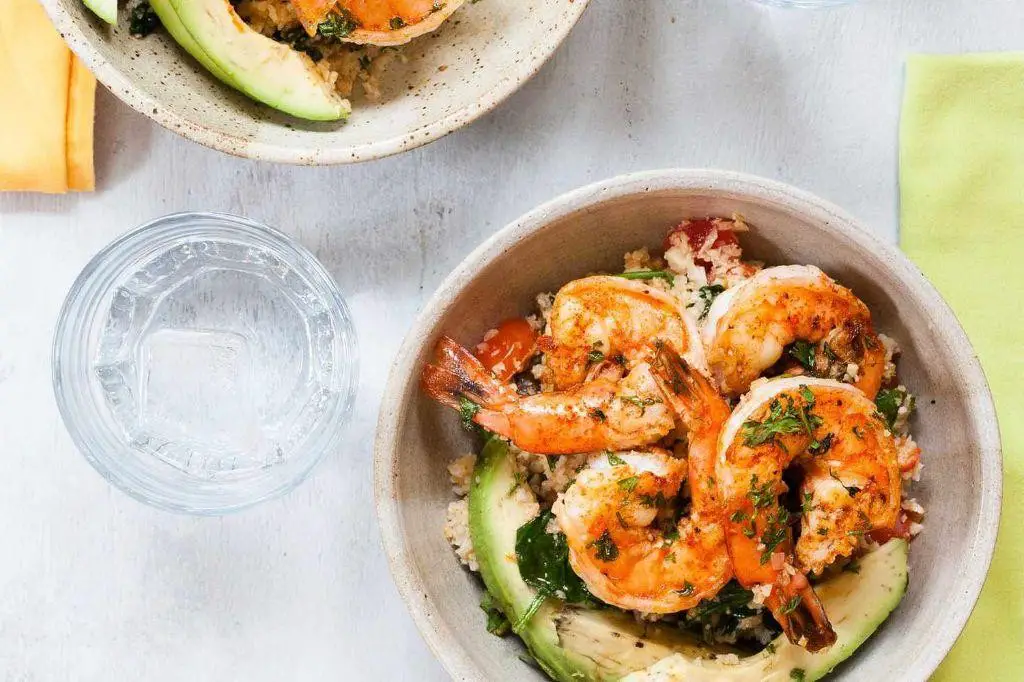
Savory and satisfying, these Cauliflower Rice Bowls with Grilled Shrimp are a testament to how simple ingredients can transform into a dish that’s both nutritious and indulgent. Perfect for a light yet fulfilling meal, this recipe combines the subtle sweetness of shrimp with the earthy tones of cauliflower rice, creating a harmony of flavors that’s sure to delight.
Ingredients
- 1 large head of cauliflower, riced (about 4 cups) – I find the texture is best when pulsed briefly in a food processor.
- 1 lb large shrimp, peeled and deveined – Opt for wild-caught; their flavor is unparalleled.
- 2 tbsp extra virgin olive oil – My go-to for its fruity notes.
- 1 tsp smoked paprika – Adds a depth that regular paprika just can’t match.
- 1/2 tsp garlic powder – For that essential umami backbone.
- Salt, to taste – I prefer sea salt for its clean, crisp flavor.
- Fresh cilantro, chopped (for garnish) – Adds a bright, fresh finish.
Instructions
- Preheat your grill to medium-high heat, about 375°F, ensuring it’s clean to prevent sticking.
- In a bowl, toss the shrimp with 1 tbsp olive oil, smoked paprika, garlic powder, and salt until evenly coated.
- Grill the shrimp for 2-3 minutes per side, until they’re pink and slightly charred. Tip: Don’t overcrowd the grill to ensure even cooking.
- Meanwhile, heat the remaining 1 tbsp olive oil in a large skillet over medium heat. Add the riced cauliflower, stirring occasionally, for 5-7 minutes until tender. Tip: For extra flavor, let some bits caramelize slightly.
- Divide the cauliflower rice among bowls, top with grilled shrimp, and garnish with fresh cilantro. Tip: A squeeze of lime adds a zesty contrast.
Light and flavorful, the tender shrimp paired with the slightly nutty cauliflower rice offers a delightful contrast in textures. Serve it with a side of avocado slices for a creamy addition that complements the dish beautifully.
Blackened Salmon with Steamed Broccoli
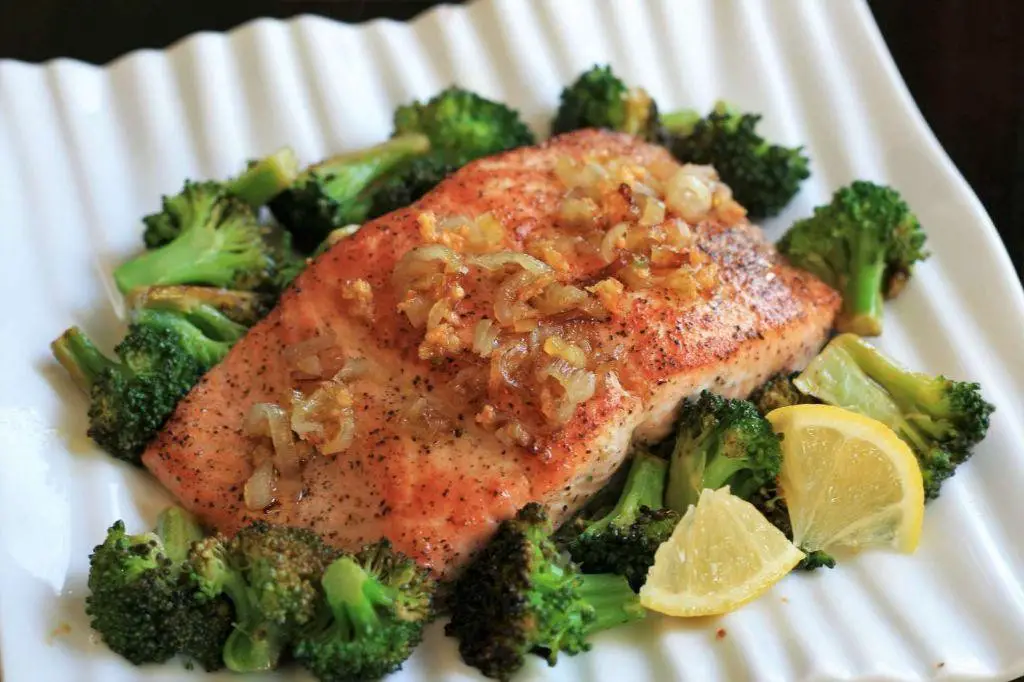
This Blackened Salmon with Steamed Broccoli is a dish that marries the bold, spicy flavors of perfectly seasoned salmon with the fresh, crisp texture of steamed broccoli, creating a meal that’s as nutritious as it is delicious.
Ingredients
- 2 salmon fillets (about 6 oz each, skin-on for extra crispiness)
- 1 tbsp blackened seasoning (homemade or store-bought, but I swear by my own blend)
- 1 tbsp extra virgin olive oil (the fruitier, the better for this dish)
- 2 cups broccoli florets (fresh and vibrant green, please)
- 1/2 tsp sea salt (I prefer the subtle crunch of Maldon)
- 1/4 tsp freshly ground black pepper (freshly ground makes all the difference)
Instructions
- Preheat your skillet over medium-high heat for about 2 minutes until it’s hot enough that a drop of water sizzles upon contact.
- While the skillet heats, pat the salmon fillets dry with paper towels to ensure a good sear, then generously coat both sides with the blackened seasoning.
- Add the olive oil to the skillet, swirling to coat the bottom evenly, then carefully place the salmon fillets skin-side down. Cook for 4 minutes without moving to get that perfect crust.
- Flip the salmon fillets and cook for another 3 minutes on the other side for medium-rare, or until your desired doneness is achieved.
- Meanwhile, steam the broccoli florets over boiling water for 5 minutes until bright green and tender-crisp, then season with sea salt and black pepper.
- Remove the salmon from the skillet and let it rest for 2 minutes before serving to allow the juices to redistribute.
Mouthwatering doesn’t even begin to describe the contrast between the spicy, crusty exterior of the salmon and its buttery interior, paired with the simplicity of steamed broccoli. For an extra touch of elegance, serve atop a drizzle of lemon-infused olive oil.
Turkey and Cheese Pinwheels

On a bustling afternoon, nothing satisfies like the simplicity and elegance of Turkey and Cheese Pinwheels, a delightful blend of savory turkey, creamy cheese, and soft tortillas rolled into perfect spirals of flavor.
Ingredients
- 4 large flour tortillas (I find the 10-inch size works best for easy rolling)
- 1/2 cup cream cheese, softened (Room temperature spreads easier, ensuring a smooth layer)
- 1/4 cup mayonnaise (A dollop adds richness and helps the ingredients cling together)
- 1 teaspoon garlic powder (For a hint of warmth and depth)
- 1/2 teaspoon onion powder (It’s my secret for a subtle, savory note)
- 8 slices deli turkey (Opt for thinly sliced for the perfect bite)
- 1 cup shredded cheddar cheese (Sharp cheddar brings a bold flavor contrast)
- 1 cup baby spinach leaves (Fresh and crisp, they add a pop of color and nutrition)
Instructions
- In a small bowl, combine the softened cream cheese, mayonnaise, garlic powder, and onion powder until smooth. This mixture is the glue that holds your pinwheels together, so take a moment to ensure it’s well blended.
- Lay out one tortilla on a clean, flat surface. Spread an even layer of the cream cheese mixture over the entire surface, leaving a small border around the edges to prevent spillage when rolling.
- Arrange 2 slices of turkey over the cream cheese layer, followed by a sprinkle of cheddar cheese and a handful of spinach leaves. The key here is even distribution for every bite to be as satisfying as the last.
- Starting at one end, tightly roll the tortilla into a log. Repeat with the remaining tortillas and ingredients. For easier slicing, chill the rolls in the refrigerator for 30 minutes—this step is a game-changer for neat pinwheels.
- Using a sharp knife, slice each roll into 1-inch pieces. A serrated knife works wonders here, gliding through without squashing your beautiful spirals.
Best enjoyed fresh, these Turkey and Cheese Pinwheels offer a delightful contrast of textures—from the creamy filling to the crisp spinach—and a harmonious blend of flavors that’s both sophisticated and comforting. Serve them on a platter with a side of spicy mustard for dipping, or pack them for a picnic to elevate your outdoor dining experience.
Avocado and Egg Toast

Gracefully simple yet undeniably luxurious, avocado and egg toast is the epitome of a perfect breakfast or brunch dish that marries creamy textures with rich flavors. This recipe elevates the humble toast to a culinary masterpiece with just a few quality ingredients.
Ingredients
- 2 slices of artisan sourdough bread (I find the tanginess complements the avocado beautifully)
- 1 ripe avocado (look for one that yields slightly to gentle pressure)
- 2 large eggs (I prefer room temperature eggs here for even cooking)
- 1 tablespoon extra virgin olive oil (my go-to for its fruity notes)
- Salt and freshly ground black pepper (to season)
- A pinch of red pepper flakes (for a subtle heat)
- A handful of microgreens (for a fresh, peppery finish)
Instructions
- Heat a non-stick skillet over medium heat and add the olive oil, ensuring the pan is evenly coated.
- Once the oil shimmers, crack the eggs into the skillet, being careful not to break the yolks. Cook for 3 minutes for runny yolks or 5 minutes for set yolks.
- While the eggs cook, toast the sourdough bread until golden and crisp, about 2 minutes per side in a toaster or under a broiler.
- Halve the avocado, remove the pit, and scoop the flesh into a bowl. Mash lightly with a fork, leaving some chunks for texture.
- Spread the mashed avocado evenly over the toasted sourdough slices. Season with salt, black pepper, and a pinch of red pepper flakes.
- Once the eggs are cooked to your liking, gently place one on top of each avocado toast.
- Garnish with microgreens for a burst of color and freshness.
Creamy avocado paired with the rich, runny yolk creates a symphony of textures and flavors that’s hard to resist. For an extra touch of elegance, serve with a drizzle of truffle oil or a sprinkle of smoked sea salt.
Chickpea and Spinach Stew
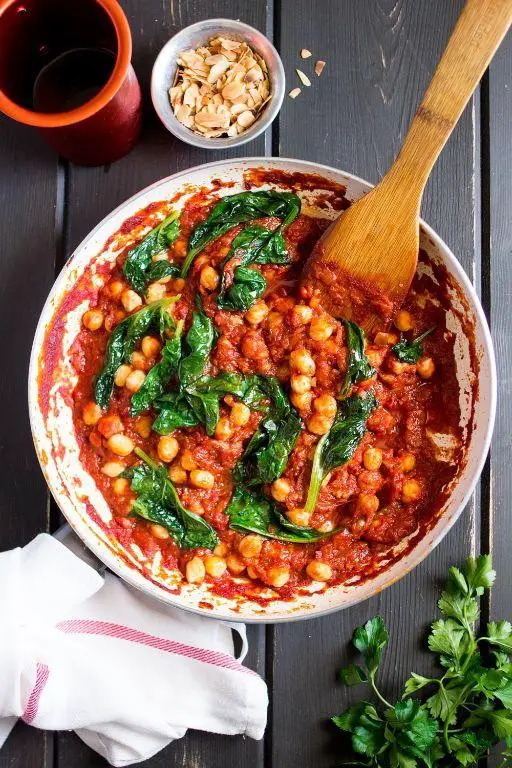
Few dishes embody the heartiness and healthful simplicity of Mediterranean cuisine quite like this Chickpea and Spinach Stew. Perfect for a cozy evening, it’s a vibrant, nutrient-packed meal that comes together with minimal fuss but delivers maximum flavor.
Ingredients
- 2 tablespoons extra virgin olive oil (my go-to for its fruity depth)
- 1 large yellow onion, diced (I find the sweetness balances the spices beautifully)
- 4 garlic cloves, minced (because more garlic is always better)
- 1 teaspoon ground cumin (toast it lightly for an aromatic boost)
- 1/2 teaspoon smoked paprika (for that subtle smokiness)
- 1/4 teaspoon red pepper flakes (adjust to your heat preference)
- 2 (15-ounce) cans chickpeas, drained and rinsed (I love the creamy texture they add)
- 1 (14.5-ounce) can diced tomatoes, with their juices (for a tangy base)
- 2 cups vegetable broth (homemade is ideal, but store-bought works in a pinch)
- 4 cups fresh spinach leaves (packed; they wilt down significantly)
- Salt, to taste (I start with 1/2 teaspoon and adjust from there)
- Freshly ground black pepper, to taste (a generous pinch does wonders)
- 1 tablespoon lemon juice (brightens the whole dish)
Instructions
- Heat the olive oil in a large pot over medium heat until shimmering, about 1 minute.
- Add the diced onion and cook, stirring occasionally, until translucent, about 5 minutes.
- Stir in the minced garlic, cumin, smoked paprika, and red pepper flakes, cooking until fragrant, about 30 seconds.
- Add the chickpeas and diced tomatoes with their juices, stirring to combine.
- Pour in the vegetable broth, bring to a simmer, and let cook uncovered for 15 minutes to meld the flavors.
- Gradually add the spinach, stirring until wilted, about 2 minutes.
- Season with salt and black pepper, then finish with lemon juice for a bright note.
Now, this stew boasts a luscious texture with the chickpeas offering a satisfying bite amidst the tender spinach. The flavors are deeply savory with a hint of smokiness and spice, making it a versatile dish that pairs wonderfully with crusty bread or over a bed of fluffy quinoa. Never underestimate the power of a simple, well-seasoned stew to bring comfort to your table.
Beef and Vegetable Kebabs
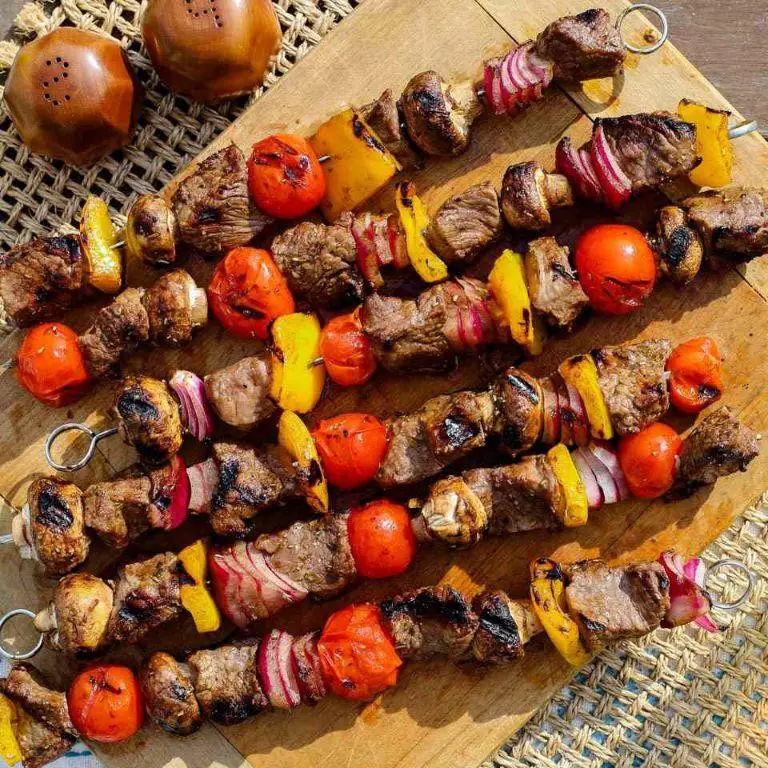
Nothing heralds the arrival of summer quite like the sizzle of kebabs on the grill, and our Beef and Vegetable Kebabs are a testament to the season’s bounty. Marrying tender chunks of beef with vibrant vegetables, this dish is a celebration of flavors and textures that are as pleasing to the palate as they are to the eye.
Ingredients
- 1.5 lbs beef sirloin, cut into 1-inch cubes (I find sirloin offers the perfect balance of tenderness and flavor)
- 1 red bell pepper, cut into 1-inch pieces (their sweetness contrasts beautifully with the savory beef)
- 1 yellow bell pepper, cut into 1-inch pieces
- 1 red onion, cut into 1-inch pieces (for a bit of sharpness that mellows when grilled)
- 8 oz button mushrooms, whole (they become wonderfully juicy)
- 1/4 cup extra virgin olive oil (my go-to for its fruity notes)
- 2 tbsp soy sauce (adds depth and umami)
- 1 tbsp Worcestershire sauce (a little secret for extra savoriness)
- 2 cloves garlic, minced (because garlic makes everything better)
- 1 tsp smoked paprika (for that hint of smokiness)
- Salt and freshly ground black pepper, to taste
Instructions
- In a large bowl, whisk together the olive oil, soy sauce, Worcestershire sauce, minced garlic, smoked paprika, salt, and pepper to create the marinade.
- Add the beef cubes to the marinade, ensuring each piece is well coated. Cover and refrigerate for at least 2 hours, though overnight marination yields deeper flavors.
- Preheat your grill to medium-high heat, about 400°F, ensuring the grates are clean and lightly oiled to prevent sticking.
- Thread the marinated beef and prepared vegetables onto skewers, alternating between the different components for a colorful presentation.
- Grill the kebabs for about 10-12 minutes, turning every 3 minutes for even cooking, until the beef is charred on the outside but still juicy inside and the vegetables are tender.
- Let the kebabs rest for 5 minutes before serving to allow the juices to redistribute.
Perfectly grilled, these kebabs boast a smoky exterior with a succulent interior, while the vegetables offer a delightful crunch and sweetness. Serve them atop a bed of fluffy couscous or with a side of tzatziki for a refreshing contrast.
Mexican Stuffed Sweet Potatoes

Zesty and vibrant, these Mexican Stuffed Sweet Potatoes are a delightful twist on a classic, blending the natural sweetness of the potatoes with the bold flavors of Mexican cuisine for a dish that’s as nutritious as it is delicious.
Ingredients
- 4 medium sweet potatoes (look for ones that are firm and evenly shaped for uniform cooking)
- 1 tbsp extra virgin olive oil (my go-to for its fruity notes)
- 1 cup black beans, rinsed and drained (I love the creaminess of canned beans here)
- 1 cup corn kernels (fresh or frozen, but always charred for that smoky depth)
- 1/2 cup diced red onion (for a crisp, sharp contrast)
- 1 avocado, diced (ripe but firm, to hold its shape)
- 1/2 cup shredded Monterey Jack cheese (melts beautifully for that gooey texture)
- 1/4 cup chopped cilantro (freshness is key, so add it last)
- 1 tsp ground cumin (toasted and ground at home if you can)
- 1/2 tsp smoked paprika (for that irresistible smokiness)
- Salt to taste (I prefer sea salt for its clean, mineral quality)
Instructions
- Preheat your oven to 400°F (200°C) to ensure it’s perfectly hot for roasting the sweet potatoes.
- Scrub the sweet potatoes clean, pat them dry, then rub each with olive oil and a pinch of salt to enhance their natural flavors.
- Place the sweet potatoes on a baking sheet and roast for 45-50 minutes, until they’re tender all the way through when pierced with a fork.
- While the potatoes roast, heat a skillet over medium heat and add the corn kernels. Let them char slightly for about 5 minutes, stirring occasionally, to bring out their sweetness and smokiness.
- In a mixing bowl, combine the charred corn, black beans, diced red onion, cumin, smoked paprika, and a pinch of salt. Mix well to ensure the spices are evenly distributed.
- Once the sweet potatoes are done, let them cool slightly, then slice each one open lengthwise and fluff the insides with a fork to create a bed for the filling.
- Divide the bean and corn mixture evenly among the sweet potatoes, then top with shredded Monterey Jack cheese.
- Return the stuffed sweet potatoes to the oven for about 5 minutes, just until the cheese is melted and bubbly.
- Remove from the oven and garnish with diced avocado and chopped cilantro for a fresh, vibrant finish.
Hearty and satisfying, these stuffed sweet potatoes offer a perfect balance of creamy, smoky, and fresh flavors. Serve them with a dollop of sour cream or a squeeze of lime for an extra zing that elevates the dish to new heights.
Pumpkin and Lentil Curry

Nothing warms the soul quite like a bowl of Pumpkin and Lentil Curry, a dish that marries the earthy sweetness of pumpkin with the hearty texture of lentils, all enveloped in a rich, aromatic sauce. Perfect for those crisp evenings when you crave something nourishing yet indulgent.
Ingredients
- 1 tablespoon extra virgin olive oil (my go-to for its fruity notes)
- 1 medium onion, finely diced (I find yellow onions offer the perfect balance of sweetness and sharpness)
- 2 cloves garlic, minced (freshly minced garlic elevates the dish immensely)
- 1 tablespoon ginger, grated (a little extra ginger never hurts for that warm kick)
- 1 teaspoon ground cumin (toast it lightly for a deeper flavor)
- 1 teaspoon ground coriander
- 1/2 teaspoon turmeric (for that golden hue and earthy tone)
- 1/4 teaspoon cayenne pepper (adjust according to your heat preference)
- 1 cup red lentils, rinsed (they cook faster and break down beautifully)
- 2 cups pumpkin, cubed (about 1/2-inch pieces for even cooking)
- 1 can (14 oz) coconut milk (full-fat for creaminess)
- 2 cups vegetable broth (homemade if you have it)
- Salt to taste (I start with 1/2 teaspoon and adjust)
- Fresh cilantro, chopped (for that fresh finish)
Instructions
- Heat the olive oil in a large pot over medium heat until shimmering.
- Add the onion and sauté until translucent, about 5 minutes, stirring occasionally to prevent burning.
- Stir in the garlic and ginger, cooking for another minute until fragrant.
- Add the cumin, coriander, turmeric, and cayenne pepper, toasting the spices for about 30 seconds to unlock their flavors.
- Pour in the rinsed lentils, pumpkin cubes, coconut milk, and vegetable broth, stirring to combine.
- Bring the mixture to a boil, then reduce the heat to low, covering the pot with a lid.
- Simmer for 20-25 minutes, or until the lentils and pumpkin are tender, stirring occasionally to prevent sticking.
- Season with salt to taste, starting with 1/2 teaspoon and adjusting as needed.
- Garnish with fresh cilantro before serving.
Best enjoyed when the pumpkin is fork-tender and the lentils have thickened the curry into a luscious, velvety sauce. Serve it over a bed of fluffy basmati rice or with warm naan bread to soak up every last bit of the flavorful sauce.
Roasted Beet and Goat Cheese Salad
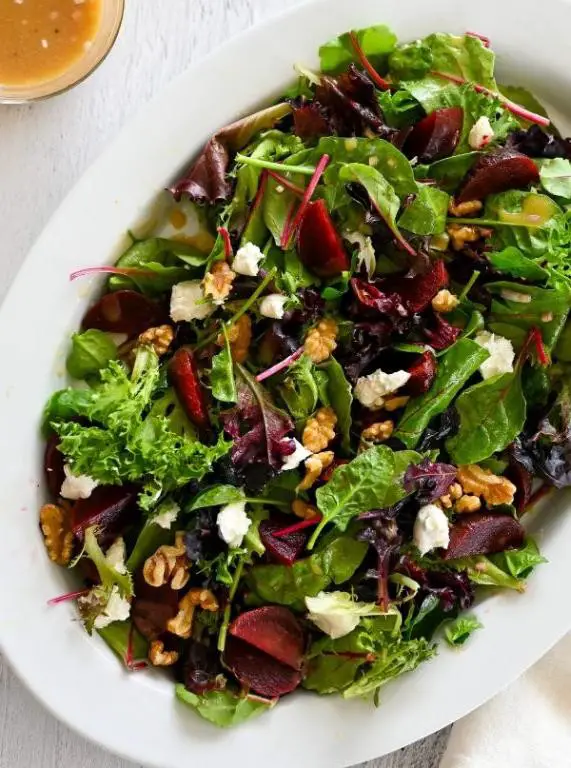
Zesty and vibrant, this Roasted Beet and Goat Cheese Salad is a celebration of flavors and textures that dance harmoniously on the palate. Perfect for a summer evening or a sophisticated lunch, it’s a dish that promises to delight with every bite.
Ingredients
- 3 medium beets, trimmed and scrubbed (I love the deep crimson hue they lend to the dish)
- 2 tbsp extra virgin olive oil (my go-to for its fruity notes)
- 1/2 tsp sea salt (for that perfect seasoning)
- 1/4 tsp freshly ground black pepper (freshly ground makes all the difference)
- 4 cups mixed greens (the fresher, the better)
- 1/2 cup crumbled goat cheese (room temperature for easier crumbling)
- 1/4 cup toasted walnuts (for a delightful crunch)
- 2 tbsp balsamic glaze (a good quality one elevates the salad)
Instructions
- Preheat your oven to 400°F (200°C) to ensure it’s perfectly heated for roasting the beets.
- Toss the beets with 1 tbsp of olive oil, sea salt, and black pepper until evenly coated. This ensures every bite is flavorful.
- Wrap each beet individually in aluminum foil and place on a baking sheet. Roasting them wrapped locks in moisture and enhances their natural sweetness.
- Roast for 45-50 minutes, or until the beets are tender when pierced with a fork. The exact time depends on the size of your beets.
- Once cooled, peel the beets and slice them into 1/2-inch thick wedges. Handling them while warm makes peeling a breeze.
- In a large bowl, toss the mixed greens with the remaining olive oil. This coats the greens lightly, preparing them for the other ingredients.
- Arrange the beet wedges over the greens, then sprinkle with crumbled goat cheese and toasted walnuts. The contrast of colors and textures is key here.
- Drizzle the balsamic glaze over the salad just before serving. It adds a sweet and tangy finish that ties everything together.
Overtly luxurious, this salad boasts a creamy, crunchy, and earthy profile that’s as visually stunning as it is delicious. Serve it on a large platter for a family-style meal or plate individually for an elegant dinner party presentation.
Shrimp and Avocado Ceviche
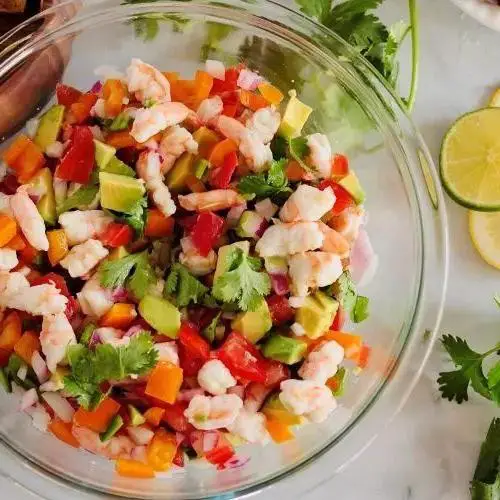
Gracefully blending the ocean’s bounty with the creaminess of ripe avocados, this Shrimp and Avocado Ceviche is a refreshing symphony of flavors perfect for a summer soirée or a quiet evening indulgence.
Ingredients
- 1 lb fresh shrimp, peeled and deveined (I always look for sustainably sourced shrimp for the best flavor and peace of mind)
- 2 ripe avocados, diced (the Hass variety is my favorite for its buttery texture)
- 1/2 cup fresh lime juice (about 4 limes, and yes, freshly squeezed makes all the difference)
- 1/4 cup red onion, finely diced (soaking it in cold water for 10 minutes tames the sharpness)
- 1 jalapeño, seeded and minced (adjust to your heat preference)
- 1/4 cup cilantro, chopped (stems included for extra flavor)
- 1 tsp sea salt (I prefer the subtle crunch of flaky sea salt here)
- 1 tbsp extra virgin olive oil (a drizzle adds a lovely richness)
Instructions
- Bring a medium pot of water to a rolling boil. Add the shrimp and cook for exactly 2 minutes until they turn pink and opaque. Tip: Overcooking shrimp makes them rubbery, so watch the clock.
- Immediately transfer the shrimp to an ice bath to stop the cooking process. Let them chill for 5 minutes, then drain and pat dry.
- In a large bowl, combine the cooked shrimp, diced avocados, lime juice, red onion, jalapeño, cilantro, and sea salt. Gently toss to mix. Tip: Use a rubber spatula to fold the ingredients together to keep the avocado pieces intact.
- Drizzle with extra virgin olive oil and give it one final gentle toss. Cover and refrigerate for 15 minutes to allow the flavors to meld. Tip: This resting time is crucial for the ceviche to develop its full flavor profile.
Unveil this ceviche to reveal a dish where the shrimp’s succulence meets the avocado’s creaminess, punctuated by the bright acidity of lime and the subtle heat of jalapeño. Serve it in martini glasses for an elegant presentation or with crispy plantain chips for a delightful crunch.
Chicken and Vegetable Soup

Warmth and comfort come together in this Chicken and Vegetable Soup, a dish that promises to soothe the soul with its rich flavors and hearty ingredients. Perfect for any season, this recipe is a testament to the beauty of simplicity and the depth of homemade goodness.
Ingredients
- 2 tbsp extra virgin olive oil (my go-to for its fruity notes)
- 1 large onion, diced (I find yellow onions add the perfect sweetness)
- 2 carrots, peeled and sliced into rounds (for a pop of color and crunch)
- 2 celery stalks, chopped (the backbone of any great soup)
- 3 garlic cloves, minced (because garlic is life)
- 6 cups chicken broth (homemade if you have it, for unmatched depth)
- 1 lb chicken breast, cubed (I prefer free-range for its tenderness)
- 1 tsp dried thyme (it’s all about that earthy aroma)
- 1 bay leaf (a little secret for layers of flavor)
- Salt and freshly ground black pepper (to elevate every bite)
- 2 cups baby spinach (for a fresh, vibrant finish)
Instructions
- Heat the olive oil in a large pot over medium heat until shimmering, about 1 minute.
- Add the onion, carrots, and celery, sautéing until the onions are translucent, about 5 minutes.
- Stir in the garlic and cook for 30 seconds, just until fragrant—be careful not to burn it.
- Pour in the chicken broth, then add the chicken, thyme, and bay leaf. Bring to a boil.
- Reduce heat to low, cover, and simmer for 20 minutes, or until the chicken is cooked through.
- Season with salt and pepper, then stir in the spinach until just wilted, about 1 minute.
- Remove the bay leaf before serving to avoid any bitter aftertaste.
Every spoonful of this soup offers a harmonious blend of tender chicken and crisp vegetables, enveloped in a broth that’s both light and deeply flavorful. Serve it with a slice of crusty bread for dipping, or top with a sprinkle of Parmesan for an extra layer of richness.
Conclusion
Mouthwatering and nutritious, these 20 Weight Watchers lunch recipes are your ticket to a healthier lifestyle without sacrificing flavor. We’ve gathered a variety of dishes to keep your midday meals exciting and satisfying. Don’t forget to try them out, share your favorites in the comments, and pin this article on Pinterest to inspire others on their wellness journey. Happy cooking!